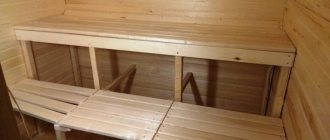
A hanger in a bathhouse is an integral part of the interior, which carries a functional load. But if it is desirable to install a metal hanger in the hallway, then it is better to install a wooden structure in the dressing room.
It will fit better into the design of a Russian bathhouse, and towels and linen will not get dirty with rust, which appears on metal products due to high humidity. Do-it-yourself wooden bath hanger - how to make and install a product without experience or special skills for this?
DIY wooden bath hanger
Why is there a hanger in the bathhouse?
A hanger is an indispensable attribute not only of a bathhouse, but also of other types of buildings. You can hang outerwear or underwear on its hooks. Of course, instead of a hanger in the bathhouse, you can install a wardrobe, because it is also intended for storing things, but such products, as a rule, are bulky and take up a lot of space. The advantage of a hanger is that it is compact , so if it is installed in a bathhouse, then a lot of usable space will be freed up, which can be used for other purposes.
Why do you need a bath hanger?
Low cost is another advantage of a hanger over a cabinet, because the manufacture of this piece of furniture requires few materials, while for a cabinet you need to purchase several times more boards or plywood. The hanger will also perform decorative functions, decorating the bathhouse. Even without special skills, you can make a unique hanger that will complement the interior of the bathhouse, making it more comfortable.
A hanger will cost less than a wardrobe
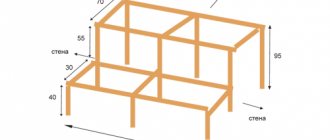
Example of a bath hanger with dimensions
Style
Let's start with style. This time we would like to limit theorizing on this topic as much as possible. Therefore, we will limit ourselves to introducing two poles - simplicity and ornateness, and between them let there be many intermediate options, including various attempts to imitate different eras or countries.
So, the more traditional your bathhouse is, the wider the possibilities - hangers of any degree of ornateness will suit you, and of the simplest ones, only those that combine exaggerated rigor of geometry with metal or glass elements are not suitable.
Original homemade hangers in the bathhouse shown in the previous photo
The more modern your bathhouse is, the better it is to opt for relatively simple interior elements. Of course, we are not talking about high-tech now, but simply about a comfortable bathhouse in which modern materials are used, everything is functional and there are not many references to tradition.
What do we mean by comparative simplicity? The presence of some decorative elements, but subordinate to functionality and not very attractive. Let us explain: the more original your hanger is, the more demanding it will become of its surroundings.
You need to understand the principles of stylistic unity - if you put Khokhloma on the table, then several other interior items should play with similar patterns, and the entire interior as a whole should be designed in the Russian ethno-style. A single out-of-the-ordinary object is more likely to irritate than please the eye
Let us explain: the more original your hanger is, the more demanding it will become of its surroundings. You need to understand the principles of stylistic unity - if you put Khokhloma on the table, then several other interior items should play with similar patterns, and the entire interior as a whole should be designed in the Russian ethno-style. A single out-of-the-ordinary object will irritate rather than please the eye.
Material selection
In order for the manufactured structure to be durable and of high quality, the choice of material from which it will be made must be approached with all responsibility. Let's consider the main criteria for choosing wood:
- for hangers in the dressing room, it is imperative to use wood so that the clothes and wet linen that are hung on them are not stained by rust that has arisen on the metal structure;
The hanger in the bath must be wooden
- choose wood that has low thermal conductivity . This is necessary to protect the skin from possible burns, because the temperature in the bathhouse is very high;
- It is advisable to use hardwood to make hangers . They are more suitable for use at high temperatures;
- all wooden elements must be processed so that there are no irregularities or burrs on the surface;
- for work you will only need high-quality boards that do not have even the slightest traces of rotting;
- If possible, use hardwood to make the hanger . They are more durable and can last much longer.
Give preference to hard wood
Note! Do not use softwood boards when making furniture for the steam room. The fact is that over time, conifers begin to secrete resin, traces of which will remain on clothes. This will greatly spoil the rest in the bathhouse, especially if there were expensive things on the hanger.
Diagram of a simple wooden hanger
Shelf for a bath hanger
General concept
As you know, there are no small things in a bathhouse, and to call a hanger a small thing is not at all true. Therefore, before equipping a bathhouse with this functional piece of furniture, you need to decide basically. Will it be purchased or will the bathhouse hanger be made with your own hands?
From the first year of institute, young designers are taught, albeit with varying degrees of success, one golden rule. A refined element must correspond to an equally refined overall concept of the entire room. That is, when purchasing or making with your own hands a hanger with sophisticated wood carvings, you should have other sophisticated carved elements in your bath interior that will organically complement each other and make up a single interior ensemble.
At the same time, the solution, which by the way is quite popular, will look quite ridiculous, when a wooden wall is drilled in a random order and real tree knots are inserted into the resulting holes. Yes, in a rustic, old ethnographic style, such a solution will look advantageous.
In principle, the choice is small. Either metal or wood. Metal products are strong, durable, and go well with basic bath styles and interior designs. Particularly advantageous are products that use hot or cold forging techniques: cutting, twisting, notching, and others.
The village bathhouse and the village smithy are two sacred places that complement each other very well. The copper products are very beautiful. Annealed red copper, supported by the noble patina of time, looks great in a product of any format. True, metal has several significant disadvantages:
- The raw materials are quite expensive. This is especially true for non-ferrous metals.
- It is not difficult to make metal hangers for a bathhouse yourself, however, it will require some metalworking skills and a certain set of tools. This is especially true for forged products. Not every, even well-equipped home workshop has a forge and anvil. You can get by with cold forging, but to work with cold metal, even of a small cross-section, you need a torsion device, which is also not an everyday occurrence in the everyday life of a craftsman. The best option is to purchase processed blanks and use them to assemble the finished product. In this case, you will need a welding inverter, an angle grinder, or, in common parlance, an angle grinder, and your hands. It is unlikely that it will be possible to do without an inverter, because simulating forge welding with bolted joints is nonsense.
- In the humid microclimate of the bathhouse, the metal is susceptible to corrosion, which will manifest itself in unpleasant brownish-red stains on the contact surfaces of things. The problem can be solved by applying a protective coating, but as they say in one port city: “It’s just a waste of time.”
As for the tree
Wooden products and raw materials are cheaper, lighter, and, in some ways, more practical. Self-production will require a minimum set of carpentry tools, and with some luck and imagination, you can do without them at all. What types of wood should you pay attention to:
- Oak is a beautiful noble tree with dense, durable and textured wood, which is unmistakably recognizable in the interior even by a non-specialist. It is resistant to difficult bath conditions and, like good French cognac, becomes better and more noble over time, acquiring non-trivial charm and depth. Among the disadvantages: it is more expensive than its competitors, it is difficult to process with tools made of carbon tool steel, it is prone to splitting along the fibers during indelicate and, frankly speaking, rough machining;
- Linden is a good compromise between price and consumer qualities. Classic wood in a bath interior. It is malleable in processing, has a pleasant aroma, smooth texture, global defects in solid wood are rare. At the same time, the texture and color of wood is much inferior to oak, leaving joinery made from it without the charm of zest;
- Ash is in many ways close to oak, in terms of key consumer qualities, including price;
- Alder is also a tree that deserves the closest attention. Moderately bright texture and extraordinary coloring emphasize its nobility in any, sometimes even the simplest design.
Types of hangers in the bathhouse
There are several types of wooden hangers, which are classified by design. We are talking about floor, wall and corner products. All of them are actively used when decorating a bath. Now let's look at each of these varieties separately.
Floor-standing
A popular type of hanger that you can easily make yourself. The designs of floor products can be different, for example, a hanger in the form of a pole with a small support and hooks on top . Hooks are placed on all sides so that clothes can be hung in a circle. Some craftsmen use a young tree as a base, the branches of which will form hooks for clothes. But before use, the cut tree must dry thoroughly.
Example of a floor hanger
Another option for making a floor hanger is a wooden frame supported by feet . Hooks are attached to the upper round element. You can use a door leaf as a frame for a hanger, to which hooks and a shelf are attached.
A DIY clothes hanger allows you not only to choose the most suitable model, but also to save money
Wall mounted
The most popular type of hangers, characterized by ease of manufacture. The simplest design consists of a small board and hooks attached to one of its sides. You can use ordinary wooden sticks, knockers or door handles as hooks. On the other side, loops are attached to the board, on which the hanger will be held.
DIY wall hanger
If you are not satisfied with a too simple design, then you can make a hanger in the “fence” style . To do this, you need to secure several boards with transverse slats, leaving small but equal gaps. If the top edge of the hanger is usually flat, then the bottom can be made curvy. Such designs are more complex to manufacture, so they are not found so often in steam rooms.
Wall hanger in the form of a “fence” for a bath
Corner
It is worth noting that both floor and wall structures can be angular. People usually resort to this type if there is free space only in the corner. The most difficult thing when making a corner hanger is cutting the boards at a certain angle and then connecting them. The upper part of the hanger can be covered with a sheet of plywood or a board, thereby making a separate shelf for hats.
Corner hanger made of wood
Place
Usually we need a clothes hanger in the bathhouse and a hanger for hats and towels. Where something like a kitchen unit is provided, small hangers can also be useful, but they are no different from what we use in the kitchen.
Hallway: for clothes
The clothes hanger should be the most thorough, because in winter it should hold a decent weight of outerwear for several people.
It is located in the hallway, dressing room or similar area of the rest room, if it is not separated by a partition.
In principle, when choosing, you can focus on the simplest models that we use in the hallway. Since you plan to make a hanger for the bathhouse with your own hands, it is worth deciding how many people it should be designed for, whether it will be enough to make it wall-mounted or whether it is better to make a floor structure.
At the same time, it is worth resolving the issue of a shelf for hats and the like - you don’t have to do it if you don’t want to. On the other hand, they are unlikely to linger on this shelf; after all, a bathhouse is not a home.
Steam room: for hats and towels
But in the steam room you need a very simple and light hanger that does not have to hold a lot of weight. A few felt hats, a few towels - that's all.
It can be quite small in size. You can make it with a shelf or without a shelf.
BY THE WAY! And nothing prevents you from using one of the corners of the steam room to place such a structure - this is both space saving and convenience.
What do you need for work?
Since the hanger is made of wood, pre-planed hardwood boards should be used as the main material. The number and thickness of the boards will depend on the type of hanger and the pattern according to which it will be made.
What tools may be required for the job?
The work will also require the following tools and materials:
- dowels (chops) for furniture assembly;
- set of self-tapping screws;
- special wood plugs;
- glue;
- stain and acrylic varnish;
- electric drill;
- set of drills;
- hacksaw or circular saw (if available);
- jigsaw;
- Phillips screwdriver or screwdriver;
- hammer;
- ruler;
- roulette;
- sandpaper with varying degrees of abrasiveness;
- square
Moisture-resistant wood glue
You will also need a pencil or marker to mark the wood where you want to cut or drill. When everything you need is at hand, you can start working.
Classification
Tables for a bath can be divided into separate groups depending on various factors: material, type of general design, shape of furniture.
By design
Depending on this criterion, 3 types of tables can be distinguished:
- Classic rectangular. The legs are located parallel to each other.
- V-shaped. The legs rest on a horizontal beam that lies on the floor. They connect at one point, from where they diverge to different corners of the tabletop.
- X-shaped. The legs cross each other. They are connected by inserting into cut-out recesses.
Classic tables with parallel legs can be divided by the number of supports - from 1 to 4.
By shape
Varieties:
- With a round tabletop. Several bath attendants can gather around them at the same time, depending on the size. Due to the lack of corners, useful space disappears; such a shape is more difficult to make yourself.
- With an oval tabletop. They are similar to round ones in terms of operation and the difficulties of self-assembly, but they take up even more usable space.
- Rectangular, square. Especially popular among bath attendants. They are easy to make yourself.
A separate group of tables are polygons. They have low popularity because they are only suitable for large rooms.
Bathroom wall hanger
Even if a ready-made diagram is used for the work, it can always be slightly adjusted by adding or removing hooks. This will allow you to adjust the product to the size of the bathhouse, or more precisely, to the width and height of the room where the hanger will be installed. Below is a step-by-step instruction with which you can make a wooden hanger without any experience working with wood.
Beautiful wall hanger for a bath
Table. Making a wooden hanger for the bathhouse.
| Steps, photo | Description of actions |
| Step one | Buy several small hammers from the store to make special hooks. In this case, 5 identical hammers are used. |
| Step two | Prepare the main material for the hanger – boards. Cut out the required pieces and sand them with sandpaper. If desired, you can varnish the boards. |
| Step three | Make small holes in the top of the board to eventually connect them together at right angles. The recommended distance between holes is 10 cm. |
| Step four | Screw a self-tapping screw into each hole. The work does not require long fasteners, so self-tapping screws 4 cm long will be sufficient. |
| Step five | Connect two boards at right angles. This is the basis for the future hanger. The junction of the boards must be sanded so that the surface is perfectly smooth. |
| Step six | Place squares around the edges of the wood structure to strengthen it. This can be done using a special plate bent at a right angle. Install it at the junction of the boards and secure with additional screws. |
| Step seven | Trim the previously prepared hammers, leaving a small part of the handle. All parts must be identical so that the appearance of the finished structure is not compromised. |
| Step eight | Drill a small hole in each handle using an electric drill. The depth of the hole made should be approximately 3-4 cm. |
| Step nine | Make the same holes in the board in those places where, as planned, there should be hooks for clothes. The diameters of the holes in the handle and the board must be the same. |
| Step ten | After making a hole in each hammer, prepare long screws. With their help, the products will be attached to the board. |
| Step eleven | Screw all the hammer hooks into place. Make sure they are all in the same position. Of course, instead of hammers, you can use something else, such as wooden hooks. |
| Step twelve | Once the structure is ready, attach it to the wall in the bathhouse. Now it can be used for its intended purpose. |
On a note! To increase the service life of the manufactured hanger, treat all wooden parts with a special moisture-resistant varnish. Only those varnishes that are water-based are suitable.
Water-based acrylic varnish for wood
How to make wooden chairs and stools with your own hands for a bath?
DIY fabric crafts - interesting master classes, photo ideas and tips
Components for the future stool: four boards (to be used for the seat), two bars that will strengthen the boards, four crossbars and four legs.
Sequencing
- First you need to install four boards on a flat surface so that they are one centimeter apart;
- Then you should secure the boards with bars;
- It is necessary to install the legs into the grooves of the bars;
- Next, insert and fix the crossbars;
- The finished stool must be sanded and coated with a protective compound.
What types of benches and benches (chairs) are there?
There are three types of benches in the bathhouse: folding, stationary (attached to the wall) and portable. Each of them is unique and has its own pros and cons.
- Folding benches and benches are very simple and therefore compact. Even an inexperienced person can easily create them. They don't require much time or effort;
- A feature of stationary benches and benches is that they are firmly attached to the wall. They cannot be moved. But such benches are much more comfortable to sit on, because they usually have a very good back;
- It is worth highlighting portable benches and benches for the bath, which are characterized by mobility, because they can be moved from one place to another without much effort.
Knot hanger
If you don’t want to use hammers to make a hanger, you can try to assemble a structure from a board and small knots that are used as hooks. The assembly process is simple, you just need to follow the sequence.
Hanger made from knots
- Collect several branches and leave them to dry. Once the wood is dry, carefully remove the bark.
- Remove all irregularities on future hooks by treating their surface with a rasp and sandpaper.
- Prepare a board no more than 4 cm thick. If desired, you can make a shape from the support board using an electric jigsaw. Sand the cut areas so that there are no irregularities or burrs.
Jigsaw
- Make marks on the hanger for later installation of fasteners, and then make holes in them. The same holes must be drilled in the knots.
- Carefully press the knots into the board of the future hanger and secure them with dowels. As an addition, you can use special wood glue. Do the work with each knot.
- Once the structure is assembled, coat all its elements with a water-repellent compound. This will extend the life of the hanger.
It’s easy to make such a hanger with your own hands.
A wooden hanger made of knots is a great opportunity to give your bathhouse a natural look and demonstrate your level of skill to guests and friends.
Preparatory stage
First you must prepare the branches. They need to be cleaned of dirt, if there is any on them. It is also advisable to remove excess branches. Ideally, they should all stick out in approximately the same direction. If the branches are too spreading, you simply won’t be able to secure the hanger to the wall. Leave one or two knots on each. This is quite enough.
After preparing the branches, one edge needs to be carefully aligned. To do this, use a saw. Try to make the cut so that when installing the branch vertically on a flat surface, there is no gap. You can sand the edge.
Smooth and fresh skin: dermaplaning, or why a woman needs to shave her face
If there is little snow, there will be no harvest: December 16 is Ivan the Silent Day
Women's jeans: before you buy them, you need to pay attention to one detail
Align all the branches, making them the same length. After this, process the top edge in the same way as the bottom.
Next, start preparing the boards for the frame. They also need to be cleaned of various contaminants and treated with sandpaper. This can be done when the hanger is ready. But it is much more convenient to process the boards until they are fastened into a single structure.
Wooden block hanger
Hangers are also made from maple or oak logs, always with knots. To create such a hanger, just find a photo of the finished product, and then use it as a visual aid. The procedure is simple, so if you correctly follow all the steps described below, you can make such a hanger without experience or special skills.
Cute wood hanger
- Choose a small log with branches that will resemble the hooks of a future hanger. The shape and dimensions of the sample can be arbitrary.
- Carefully cut the log into two parts so that knots remain on one half.
- Using a plane, process the surface of the workpiece, making it as smooth and even as possible. In other words, give the product a noble look.
- Make several of these hangers and coat each of them with varnish. The number of hangers that can be installed in the bathhouse is unlimited.
- Attach the hangers to the wall of the bathhouse with nails, although it is better to do this with self-tapping screws.
Use oak or maple logs
Each of the small hangers should be original and not similar to other products. Of course, you don’t need to take huge blanks to make them, because they will take up a lot of space in a cramped room.
Features of making decorative hooks
Ready-made hooks for bath hangers are commercially available, but if desired, you can make them yourself from available materials.
The simplest option is birch cuttings.
Hooks from cuttings are made as follows:
Additional recommendations
To avoid making mistakes when making a wooden hanger, you need to follow the recommendations of experienced specialists:
- all holes for dowels must be made in stages, that is, gradually;
Cedar bath hanger
- to mark centers as accurately as possible, use thin nails;
- be sure to treat the wooden structure with water-based varnish to extend its service life;
- Regardless of the type, the hanger can be made in almost any size. You just need to follow the assembly algorithm;
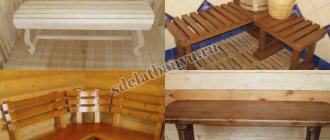
- You can complement the interior with a wooden bench installed under the hanger. This will make the room more cozy and comfortable.
Sign-hanger for a bath
Having studied all the above instructions in detail, you can forever discard the idea of coat hooks that are simply nailed to the wall in the bathhouse. They can be replaced with a unique hanger made by yourself.
Means of protection
Many people believe that it is only necessary to protect the wood of a bench if it is not in a steam room. In fact, it is in the steam room that the tree needs protection most of all, but previously we had to abandon this idea, because at high temperatures any chemical tends to become volatile and poison the air that those steaming breathe.
But progress is progress - the Finns have plenty of compounds that are suitable even for their hot sauna, not to mention the much “cooler” Russian bath. Such impregnations can protect wood from water, darkening, rot, etc. In this case, the surface will not feel greasy to the touch.
IMPORTANT! Varnishes should not be used in a steam room - this is a fact.
But in all other rooms, except for the steam room, you are completely free to use any composition that can protect the wood from the action of water, bacteria, fungi, insects and rodents. If desired, you can also coat it with fire retardants - compounds that make the wood non-flammable.
Why it is necessary to protect wood in a washing room - it’s clear, water flows there. But the rest of the bath rooms are not entirely dry either. Be that as it may, the humidity in the bathhouse is high everywhere. So saturate and varnish with whatever you see fit.
Tags
to make a hanger is a hanger in the wall hanger assembly of the hanger Hangers for Standard hangers are dimensional Floor hangers are available Corner hangers can Hangers are intended to make the hanger your own in the bathhouse. The manufacture of bath hangers The style of the bathhouse. For a bathhouse differ For a bathhouse and small-sized bathhouses. And bath accessories. accessories for bath accessories. boards for boards for boards under boards side boards and Boards are connected vertical boards.horizontal boards are made quality boards Modern designs differ standard designs.design option for structural elements are subject to installation of structures compact structures and wooden structure.manufactured structure was by design.
interior corner base sides or
Assembling the lining panel
Initially, you will need to cut six pieces of wood to form the backing panel. Any spruce, pine, or oak plank with a length of 1500 mm, width and thickness of 120 and 20 mm, respectively, is suitable for these purposes.
The main load on the panel occurs in the vertical direction, so too much strength is not required from the material. In fact, this is a decorative element of a hanger, therefore, if the design of the bathhouse requires it, then you can use wood with a beautiful grain pattern.
The second stage is to cut out the horizontal load-bearing cross members. Each of the three boards measuring 1120x100 mm will be attached to the wall of the bathhouse using self-tapping screws and dowels, so high-quality wood is used for the transverse planks, without knots or defects. There is no need to skimp on the strength of this part of a wooden bathhouse hanger; its breakage will not only upset you, but can also lead to damage or contamination of the bathhouse visitors’ belongings.
The cut vertical strips are laid on horizontal crossbars in increments of 80 mm and secured with self-tapping screws at at least three points. The result is a lattice-like structure. Before installing other parts of the hanger, the assembled panel is polished with a circle and varnished with alkyd toner.
Room interior
There is no more suitable place where you can simultaneously relax after a busy work week, imbue yourself with harmony, and cleanse your body than a sauna or bathhouse, which is closer in spirit to the Russian spirit.
For many, visiting it is a tradition that is supported by every generation, and is often instilled in families from early childhood, so it is not surprising that our compatriots want to have their own bathhouse in the backyard.
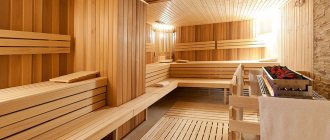
Great place to relax
The environment inside should give harmony and tranquility. This atmosphere is achieved by the combination of all parts of the interior. You should not think that the type of Russian baths is a standard steam room with a stove and the same type of shelves. A designer interior is always distinguished by original details and decor; only by implementing an individual project can you get a stylish room for couples and relaxation.
Stylish room in oriental style with your own hands
Quality, thoughtful finishing and accompanying accessories are three pillars of internal content that will never cause you any inconvenience. For information on how to equip the interior, I will tell you today. These ideas can be used both at home, for your own needs, and for business.