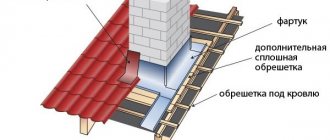
- How the cutting is built
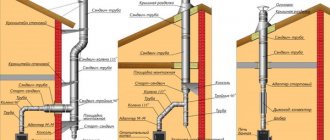
- How to install a sandwich pipe
- Passage of a brick chimney through a wooden ceiling
The use of solid fuel for heating in the private sector or country houses significantly increases the likelihood of a fire. The extremely hot fume exhaust system poses a hazard if it comes into contact with flammable materials as it passes through the ceiling and roof or wall. The most important element of the fire protection system is the use of a ceiling-pass assembly (CPU) of a chimney for a bathhouse, the installation of which must be done by hand in strict accordance with the instructions.
What is it used for?
PPU is designed for pipe passage through wall and ceiling ceilings; it is a round or square box with a hole. The main task is to ensure the protection of wooden floors from overheating, since during operation the temperature of the external contour of the chimney increases and heats objects in the immediate vicinity.
Such a device can be purchased in specialized stores or assembled with your own hands. When choosing a finished product, it is necessary to take into account the diameter of the chimney, as well as the location of the stove and ceilings.
For thermal insulation of the unit, basalt cotton wool rolls with a foil screen, which can be used at high temperatures, are perfect.
Types of fireplaces: which models can be installed in wooden houses
The installation of fireplaces in a wooden house is allowed, but with strict installation requirements. There are many different models on the market. The complexity of installation depends on the materials used to make the firebox, the type of fuel, and the structural features of the house.
Classic hearth in a log house
Classification by type of construction and installation location
Based on the shape of the body there are:
Corner fireplaces. Such fireboxes are installed in the corners of rooms.
Corner hearth
Straight wall. Direct designs include built-in and wall-mounted ones. Built-in fireplaces are mounted inside walls and are often used when installing heating fireplaces to heat two adjacent rooms. Wall-mounted – installed near the walls.
Built-in model
Isolated. Round, rectangular, square, with an open and closed firebox - free-standing fireplaces are placed in a free area, at a distance from the walls, often in the center of the living room.
Fireplace stylized as an antique stove in a wooden hut
Types of fireplace inserts by type of fuel consumed
In a house with wooden walls and ceilings, you need to be especially careful when choosing the type of fireplace. Some designs with an open hearth are prohibited for installation in wooden houses. There are many alternative fuel fireboxes on the market that can be installed in any room without a chimney.
According to the type of fuel, fireplaces that are suitable for wooden houses are classified:
Classic, solid fuel. Standard chimney structures, the fireboxes of which are designed for the use of firewood or coal. Such fireplaces are installed in wooden houses with the obligatory installation of a separate foundation, insulation of adjacent surfaces, and ceilings.
Classic fireplace
Electrical. The most reliable structures from a fire safety point of view. Instead of an open fire, the air is heated using electricity. And the imitation of live fire is created by the illumination of the interior decoration. Electric fireplaces are easy to install; it is not necessary to form a foundation for installation; a chimney is not provided. This is an ideal design for installation on the upper floors of wooden houses, in attics. The main thing is proper wiring in reliable insulation that will withstand the load.
Electric fireplace: easy installation and safety
Biofireplaces. A relatively new type of fireplace, which is optimal for installation in wooden houses, is decorative fireplaces powered by ethanol. Inside the firebox there is a fuel container and a ceramic burner. The advantage of a biofireplace is the complete absence of ash, soot and harmful substances. Such a fireplace is not enough to heat a room; its main function is decorative. There are several types of structures: wall-mounted, suspended, floor-mounted and table-top. A special feature is the release of steam during fuel combustion, which moisturizes the air. A chimney is optional.
Suspended model with bioethanol
Gas. A gas burner is installed inside the chamber. Instead of firewood, liquefied or natural gas is used. Installation requirements do not differ from the requirements for installing classic fireplaces. Installation of a chimney is mandatory.
Passage through a wooden floor
As a rule, the most common material when building a bathhouse is wood. Therefore, when passing a chimney through a ceiling, it is necessary to use a passage unit.
Below we will look at the main options for the passage duct, based on the material of the chimney itself.
Use of brick structures
If you have a brick chimney in your bathhouse, then the cutting of the chimney on the ceiling is made of brick by thickening it at the passage points. The height of this section of the masonry must be at least three rows of bricks.
Laying out a stove chimney is a complex process, since errors during construction can lead to poor draft and a fire. Therefore, it is better to entrust this matter to specialists.
Plasterboard box
The passage box can be made from heat-resistant plasterboard. To do this, you will need to prepare insulation from mineral wool or asbestos. This option is made in the same way as in the case of a metal box. The first step is to install plasterboard walls, and fill the space between them with insulation.
Expanded clay can be poured on top of the cotton wool or even instead of it, which gets clogged into all pores and provides additional insulation.
Metal box
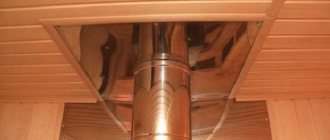
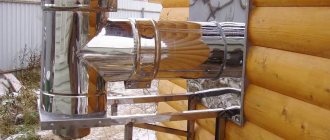
A more popular alternative to passing through wooden floors has become the use of a stainless steel ceiling-pass assembly. It is a box made of several steel plates; a hole is made in one of the walls based on the diameter of the outer contour of the sandwich. The void between the pipe and the box is filled with heat-insulating material.
Ceiling cutting for sandwich pipes is found in GOST and conventional. They differ in the size of the hole. According to GOST, it is necessary to cut a square measuring 1.0 by 1.0 m in the ceiling or wall, into which the polyurethane foam will be directly inserted. However, this size is not particularly popular, since then it is necessary that the distance between the logs in the bathhouse be 1.0 x 1.0 m, otherwise it is very difficult to insert such a unit.
A regular knot is a square measuring 48-50cm. To determine the size of the cut, you need to start from the diameter of the sandwich:
- if more than 200mm, then the correct size is 1.0x1.0m;
- if 200 mm – 48-50cm.
Important information: if the chimney is for a fireplace, then the size of the cut must be 1.0 x 1.0 m.
When installing the box, foil insulation is glued to all points of contact with wooden surfaces.
Possible mistakes
Faced with inexperienced craftsmen or without studying all the detailed information about installation, some owners encounter problems during operation. There is an explanation for these troubles; the most common mistakes are worth noting:
- During the work, a single-wall structure was used, rather than a sandwich pipe.
- The docking points are not sealed.
- To save money, the box was filled with sand, instead of expanded clay or any non-flammable component.
- Ceiling cutting does not imply the presence of a box.
In most cases, the pipe can be mistakenly wrapped and installed close to the ceiling, the joints coated with asbestos and claimed that it is reliable.
The ceiling-passage chimney assembly will not work as efficiently as possible in such a situation. It is impossible to avoid a fire without adhering to generally accepted installation rules.
Requirements and standards
The basic rule of fire safety during the installation of polyurethane foam units: the smoke channel passing near building structures made of flammable materials should not heat them above 50°C. You can read the conditions in more detail in SNiP 41-01-2003.
These standards cannot be met if you use direct pipe passage through the ceilings without the use of protective structures. Therefore, a pass-through ceiling assembly for the chimney is required, providing high-quality insulation.
Even if your pipe does not come into contact with wooden floors, the temperature of the external contour of the pipe is enough for charring and gradual smoldering to begin, so all sections of the passage are sealed with NG class insulation. When purchasing factory products, it is recommended to carefully study the instructions and comply with them when installing the protective unit.
How the cutting is built
The ceiling cutout for a sandwich pipe is a box for passing the chimney through the ceiling or other obstacle. To protect adjacent materials from fire, it is important to adhere to the following rules:
- it must be at least 50 cm wide;
- with a wide layer of plaster between the chimney and hazardous components, the area can be reduced to 35 cm.
- its height must be at least 7 cm greater than the thickness of the material.
Indentation size
It is the distance from the outer surface of the stove or smoke duct and a wall or partition made of flammable or low-combustible materials protected or unprotected from fire.
It ranges from 20 to 50 cm. Thicker walls heat surrounding objects to a lesser extent, so the amount of indentation can be reduced. The most appropriate materials from a fire safety point of view are:
- brick;
- stainless steel sheet with basalt cardboard;
- Flamm or mineralite slabs.
Please note that when protecting the wall with non-combustible materials, it is necessary to leave a gap of 7-10mm between the wall and the sheathing.
Safety regulations
When installing a chimney in a bathhouse through the ceiling, you must follow the recommendations of Sanitary Norms and Rules 41 – 01 – 2003. According to clause 6.6.22, it is necessary to ensure a distance of 130 mm in the case of a brick pipe passing through the ceiling for a chimney, which provides protection for wood. But given that in most cases metal pipes are used in baths, you need to focus on the following standards:
- It is necessary to maintain a distance of more than 380 mm to flammable objects protected by insulation;
- The minimum distance to flammable objects without insulation must be more than 500 mm.
In this case, these distances must be ensured before the pipeline comes into contact with the tree.
Ideally, these distances would not be covered with anything at all, but this option will contribute to increased heat loss, which is economically unprofitable. Therefore, this volume is covered with non-combustible materials.
The maximum length of the pipe passing through the ceiling in the bathhouse should not be more than 1000 mm. The chimney cannot be fixed to the roof in a rigid manner, because when the temperature changes, the pipe may change slightly in size, which can lead to deformation of the ceiling.
The bathhouse often uses pipes of a special design, called “sandwich”. They are two pipes of different diameters, one of which is located inside the other. The space between them is filled with a layer of insulation. Not many people know that the outer part of such a structure has almost the same temperature as the inside of the chimney.
Often, in order to quickly heat the bathhouse, owners allow the stove to overheat. If the temperatures of the external part of the pipe exceed the permissible values of 400 ºС, then this threatens the failure of the external part of the sandwich, which will lead to a fire hazard. Therefore, under no circumstances should the distance between the pipe and surrounding objects be reduced.
SNiP 2.04.05-91 (clause 3.83) gives the following recommendations.
The distance to combustible structures when using brick or concrete pipes must be at least 13 cm. For ceramic pipes not equipped with insulation, the corresponding distance will be more than 25 cm, for pipes with insulation - 13 cm.
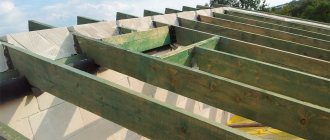
It is advisable to set these parameters at the bathhouse design stage, since the step when installing floor beams is usually not large. If it is 60 cm, then it will be possible to use only insulated pipes.
The diameter of the outlet part of the pipe is often 11.5 - 12 cm. If a sandwich uses 10 cm thick insulation, then we get a diameter of the outer part of 31.5 - 32 cm. We add the distance recommended for insulated structures of 13 cm on each side, we get a width of 57, 5 cm. That is, this design fits perfectly into the existing distance between the beams of 60 cm.
Now let's see what distance between the beams should be when using an uninsulated chimney. If the internal diameter is 11.5 mm, then we add to it the distance required by safety rules on all sides of 25 cm, we get 61.5 cm. The result obtained does not fit into the existing distance between the beams. Moreover, the diameter of the pipe can be even larger, and then the discrepancy between the size of the chimney and the pitch of the beams becomes even more noticeable.
Types of polyurethane foam
On the modern market you can find various chimney passages. The most common forms are:
- square,
- round.
It is easy to make such a device yourself if you have the skills to work with simple tools. The material can be stainless steel sheet, and basalt or expanded clay can be used as thermal insulation.
Our production
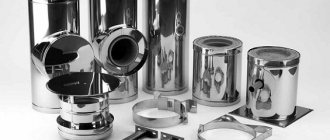
Single wall chimneys
Double wall chimneys
Mounting elements
If you decide to use a homemade pass-through unit, you should strictly adhere to the established rules to simplify further installation and ensure all standards. Below in the section we will tell you how to install it yourself.
What thermal insulator to use
After the device is fixed to the ceiling, they go up to the attic or second floor and fill the gap between the outer wall of the pipe and the beams with heat insulator.
Basalt wool can be used as thermal insulation. But be sure to check that the operating temperature range should be greater than 600°C.
You can use mineral wool or clay to insulate the pipe.
Some people think this option is not the best. Firstly, during production, resins are used as a binder, which release formaldehyde when heated. Secondly, condensation sometimes runs through the pipe. And mineral wool (and basalt wool too) lose their heat-shielding properties when wet. And when they dry, they are only partially restored. So this option is really not the best.
The penetration is also covered with expanded clay of medium and fine fractions. This is a natural material that is relatively light in weight. Even if it gets wet, it then dries and restores its properties. When wet, the thermal conductivity increases slightly, but it is already worse for expanded clay than for mineral wool.
In the past, sand was often used. The option is not bad in all respects, except for one detail: it gradually wakes up through the cracks. Refilling the sandbox is not difficult, but constant sand on the stove is annoying.
If we talk about natural heat insulators, then you can use clay. It is diluted to a paste-like state and the entire gap is covered. Sometimes expanded clay is used as a filler.
One of the heat insulators is expanded clay
Here is a review of the use of clay when passing a bath pipe:
“Clay rules in cutting! I dismantled the chimney in my bathhouse. Or rather, I took apart what was left: there was a lot of snow, and when it melted, it blew off the entire top. Once you change the top, you need to look at the bottom: the pipe has been standing for 7 years. So here it is. There is zero burning inside, and there is no burnout of the pipe either. Condition: as soon as installed. My penetration is lined around the perimeter with basalt wool, and then everything is covered with clay. This is definitely the best option."
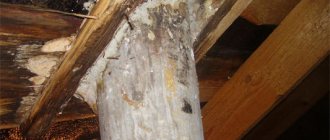
Not everyone recommends using insulation in the passage unit. There is an opinion that it is better to leave the gap unfilled: this way it will be possible to avoid overheating and burning out of this section of the pipe - it will cool better due to air blowing. This may be true, but the radiation from the heated pipe will dry out the nearby wood, and in this case the temperature of spontaneous combustion is significantly reduced - to +50°C.
As you can see, the pipe burned out
There are several ways to avoid overheating. The first, and most rational, is to use the heat that flies out into the pipe and heats it to extreme temperatures for your own needs. There are three options:
One way to avoid overheating is to place stones on the pipe
- Make a water jacket on the metal chimney and use hot water for showering or heating. The system is not so simple; it also requires a remote tank, as well as pipe connections, cold water supply, etc. But temperatures above the water jacket will not be nearly as high, and the pipe will not burn out.
- You can also heat water, but it’s easier: install a samovar-type tank. Hot water is also provided, the chimney does not overheat and is protected. But there are some nuances here: do not let it boil, drain the heated one in time, add the cold one. And doing this is not entirely convenient, since the tank is located quite high: above the stove on a pipe.
- Adapt a net for stones. The water will have to be heated in a different way, but the advantage here is this: after the procedure is completed, the stones dry the bath. Here, too, difficulties may arise: the weight of the stones is considerable, it is unlikely that you can do without support, unless you use the factory version (on the right in the figure). In a homemade version, a structure will be needed to redistribute the mass.
When using any of these methods, the pipe temperatures in the ceiling passage are significantly reduced. The likelihood of burning becomes very small. That's not all. There is a way - simply cool with air. To do this, another one of larger diameter is put on the heat-insulated pipe. A grate is made at the bottom and top through which air enters/exits. For a steam room this is not an option - it will draw out all the steam, but for a washing room it can be used. The method is especially good in the attic and when passing through the roof.
Preparation for installation work
Installation may vary depending on the chosen design, the diameter of the pipe and the material from which it is made.
Before you begin installation, you must complete the following work:
- Cut a square measuring 1.0 x 1.0 m or 0.5 x 0.5 m in the ceiling or wall (if the rafters run close to the planned pipe, you can make an additional box from wood, sheathe the inside with mineralite. Attach the box itself to the joists and then attach polyurethane foam to it ).
- Line the inside of the passage with mineralite slabs.
- Prepare a diameter hole in the ceiling. All flammable roof elements located in close proximity to the furnace equipment are insulated using non-combustible objects.
Often wooden surfaces are coated with special compounds that prevent ignition. However, no heat-resistant paint will protect wooden floors from fire; the service life of such paint is a maximum of 1 year.
How to calculate a chimney duct system?
When drawing up a project, they are guided by the requirements for such systems, since there are mandatory regulatory documents, and compliance with them is monitored by the technical supervision service.
- Dimensions. The total height of the chimney must be at least 5000 m, otherwise normal draft cannot be ensured. Horizontal sections exceeding 1000 mm are prohibited for the same reason. The diameter of all chimney elements is equal to this size of the heating device pipe. The total number of turns is no more than three.
- Mandatory additional protection, components. In unheated rooms and in those areas that are outside the walls of the building, chimney pipes must be properly insulated. Flammable roofing materials are a good reason to install a special “fuse” - a spark arrestor.
- The section of the chimney above the roof. If the roof is flat, the length of the top part should be at least 500 mm. For a gable structure, the same requirements, but with one condition: the distance from the ridge to the pipe is less than 1500 mm. Exceeding this figure means the need to mount the chimney flush with the ridge beam.
- Passage through building elements. The minimum gap between the pipe and the ceiling is 200 mm. When a chimney passes through a non-combustible roof, the distance between it and the pipe must be at least 130 mm. Joints of modules at the floor level and in the thickness of walls are prohibited. 700 mm - minimum distance of seams from walls, floor, ceiling.
If the chimney will pass through the premises of the building, then modules with thermal insulation are purchased for its installation. Any other option requires covering the structure with brickwork.
Since sandwich pipes are now becoming increasingly popular, chimneys are often installed outside buildings. In this case, the systems are mounted on the outside of the wall with brackets. The second method is to use a metal profile to construct a vertical supporting structure. It is difficult to argue with the feasibility of such solutions, because there is no need for passages through the ceiling and roof. The safety of the structure taken outside the house is another big plus.
Installation of PPU
How to install a sandwich pipe
Important information: only by using a sandwich can the temperature of the upper pipe circuit be reduced from 450° to 200°. The sandwich also helps avoid the formation of excessive condensation.
- A single-wall module, at least one meter deep, or a pipe heat exchanger is first installed on a sauna stove. Next, an adapter from a single-walled to a double-walled pipe is installed, then the use of a sandwich structure is recommended. This will reduce overheating of pipes coming from the furnace and increase their service life
- Joining pipes in interfloor and attic floors is strictly prohibited.
- The pipe can only be routed through the ceiling through polyurethane foam. After assembling the chimney, fill the free space between the side walls of the ceiling passage and the pipe with heat-resistant and non-flammable material. A material based on basalt rocks (MPB, BSTV) is recommended.
- Horizontal sections worsen traction, so we avoid them if possible. If this is impossible to do for some reason, then you should try not to make horizontal positions longer than 1 meter.
- Do not use more than three elbows in the system. Exceeding this amount reduces traction performance.
- It should be remembered that any material changes its dimensions when heated, so the pipe should not be rigidly fixed at the exit point.
After all the preparatory work, you can begin the installation of the ceiling-passage device. The chimney assembly goes from the heating unit upwards, after which it is discharged into the attic, and then through the roofing pie.
If the passage unit passes dangerously close to the joists and rafters, you need to make it yourself and install a box made of wooden blocks lined with mineralite plates on the inside. And the PPU is already installed there.
If you purchased a ready-made unit, you must follow the instructions. Factory-made polyurethane foam can be of various configurations: “empty” or with additional insulation. In the first case, it is necessary to cover the base of the unit (stainless steel sheet) with basalt cardboard from the inside, and install the polyurethane foam itself in a box protected by mineralite sheets. We leave the distance between the pipe and the sheet empty. But the assembly itself must be covered with kaolin wool to a depth of 5-7 cm from the attic side; no more is needed to avoid overheating of the pipe.
If you purchased polyurethane foam with mineralite from the Ferrum company, then this unit can be installed without an additional insulated box, as in the first option. In this case, it is also necessary to fill the void inside the unit by 5-7 cm with kaolin wool. This additional insulation increases the fire safety of the passage unit.
The assembly is fastened with self-tapping screws or with a standard fastener if you purchased a factory product. Fixation is carried out to the ceiling from above. The stainless steel platform (the base of the unit) is attached with self-tapping screws to the lining after finishing.
When installing, you need to make sure that the hole coincides with the pipe, since tilting the system is prohibited, the maximum permissible error is 1 mm.
Roof passage for round shape
At the next stage, you need to protect the attic space from moisture that gets into the gap formed between the roof. It is most convenient to use special purchased products for waterproofing this area, which are selected according to dimensions. These penetrations come in a variety of colors and are suitable for any roof. They are installed with bolts or special glue.
For better protection against leakage, you can additionally buy a sealant that carefully treats all joints. This will help ensure dryness in any climate.
Basic rules for arranging a structure
By following simple instructions, you can assemble a safe and properly functioning chimney. However, if you deviate from the instructions below, the design may not only become ineffective, but also dangerous in terms of fires.
- The total height of the structure should not be less than 5 meters from the heat source to the head of the pipe.
- It is not allowed to use pipes of smaller diameter than the outlet of the stove pipe.
- The height to which the pipe rises above the roof must exceed the height of the ridge by 50 centimeters. If the chimney is located on the slope of the roof, then the distance above which it should rise by half a meter is calculated based on the following diagram:
- If the device has a height of more than one and a half meters above the base, it must be strengthened with guy wires.
- Connections of structural elements should not coincide with passages through the roof or ceiling.
- The length of horizontal or inclined sections of the chimney should not exceed one meter. This is necessary to prevent clogging of the pipes with soot, as well as to ensure the best ratio of traction force and furnace efficiency.
- If the roofing material is flammable, then it is necessary to equip the pipe with a spark arrester made of mesh with cells no larger than 5 millimeters.
It is not difficult to take all these points into account, and the efficiency and safety of the constructed device will comply with all necessary standards and regulations.
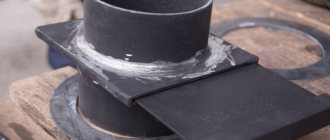
Do-it-yourself installation of polyurethane foam
The hole should be approximately 0.5 mm larger than the thickness of the channel diameter. This will ensure ease of insertion. Thermal insulation is packed along the outer and inner walls. The distance between them is 1-2 cm.
If you do not have a ready-made kit, you can perform high-quality stove heating in your home without it. To do this, the free space in the ceiling is sealed with fire-resistant thermal insulation, on top of which steel strips are installed. A plate made of heat-resistant metals is installed on it, in which a suitable hole is cut. This plate is secured with a bolted connection. It is most convenient to make it from metal.
When installing it, we comply with all requirements and maintain the established distances to fire hazardous objects. The resulting voids on the side of the second floor or attic should be filled with expanded clay or other non-flammable insulation.
Passage of a brick chimney through a wooden ceiling
Laying out a stove chimney is a complex process where many nuances must be observed. Therefore, it is better to entrust this matter to specialists. In addition, errors during construction can lead to poor draft and fire.
An important point: simple building bricks are not suitable for laying individual parts and the entire chimney. A prerequisite for long-lasting and trouble-free operation of a brick pipe is the use of a ceramic heat-resistant type of brick.
When building structures, it is necessary to lay them out in a special way in the places where the floors pass. The ideal option would be to cut the chimney on the ceiling. The height of this section of the masonry must be at least three rows of bricks. The thickness of the chimney walls when passing through the roof or wall (partition) should be greater than along the main height. The distance to flammable materials must be at least 25 cm.
Two passages of a brick chimney are possible. In the first option, the passage unit is mounted by increasing the thickness of the masonry, the so-called “fluff”. The second option for passing a brick pipe through the attic floor without laying out the “fluff” is carried out in almost the same way as for a metal pipe. In this case, the chimney along its entire height has the same cross-sectional size, without increasing the thickness of the walls.
The hole in the ceiling is secured with a stainless steel sheet or mineralite slab. A window is cut out in the center of the sheet through which the chimney will pass. The length and width of this opening should exceed the similar parameters of the pipe by literally 3–5 mm. When laying a chimney, approximately three or four rows up to the ceiling, a sheet with a prepared opening is placed on it, and then the laying is carried out further up to the height of the finished attic floor. Wooden floors are laid with mineral wool to reduce heat transfer from the pipe. But a more reliable way would be a stainless steel box into which a brick chimney will pass; the distance from the pipe to the walls is also laid with mineral or kaolin wool at 5-7 cm.
Sealing joints
This stage is considered the most difficult when removing through the roof. To do this, install a lower apron made of tin.
A “tie” made of metal is placed under it, the purpose of which is to drain liquid into the drain. Outside, you can install a decorative apron, the purpose of which is to create an aesthetic appearance.
When using a flexible coating, the task of waterproofing is greatly simplified. It is quite easy to bend such material onto a pipe that has been pre-coated with impregnation to create a better fit. It is also recommended to treat the joints of the wall and roof with sealant.
Video tip - assembly of a chimney pipe passing through a wooden ceiling
From the following video you can learn how to properly lay the structure without spending extra effort.
Self-construction of chimneys
The technology for installing a smoke duct has much in common with the installation of a conventional air duct. The difference lies in the presence of more stringent requirements for the operation of the chimney. Therefore, the process of arranging pipes for furnaces requires accurate calculations, selection of building materials, fasteners, refractory putties and other things.
Modular pipe
In the case where the chimney is planned to be laid in the wall of the house, this nuance should be taken into account at the stage of wall construction, otherwise the hole will need to be punched using a jackhammer. It is possible to install a stove duct in an already equipped ventilation duct, but as a result, the fire safety of the smoke exhaust structure will significantly deteriorate.
To implement a hidden pipe scheme, you need to use the services of an experienced architect, since during the operation of the furnace, temperature deformations are possible - the dimensions of the channel increase from the influence of hot gas, thereby exposing the walls to destructive processes.
Chimney sections inside load-bearing structures can be constructed from multilayer blocks. They are placed over the entire surface of the wall, using a temperature-resistant adhesive for fixation. This material is able to level out thermal deformations, thanks to damper gaskets, and thereby ensure the integrity of the building.
The main advantage of this design is that there is no need to insulate the pipe on the roof of the house - the channel will go outside above the roof level inside the gable.
Mounted steel chimney
Installing steel chimneys does not require special skills or a lot of time, so they are often preferred by homeowners, and such structures are relatively inexpensive.
It should be taken into account that:
- Any metal pipe must consist of at least two parts and must be disassembled accordingly. After a few years, the first section burns out from high temperatures, not the entire structure will need to be replaced, but only a section of it.
- Where the chimney will be brought out through the roof and wall, fire-resistant insulation is laid, otherwise the building may catch fire.
- The section of the pipe located in an unheated room must be properly insulated so that cold air masses do not cool the gas and thereby affect the performance of the heating unit. As a result, condensate will not collect on the surface of the pipe and it will not rust.
- It is imperative to waterproof metal pipes using non-combustible materials.
Install the metal shell structure in stages:
- The first elbow is placed on the screen pipe or on the outlet of the furnace air duct.
- The second ring is brought out through the attic into the room and fixed on a fire-resistant spacer.
- Connect both knees.
- The third segment is led out into the attic through a through opening in the roof. The place where the pipe exits to the street is covered with a spherical casing.
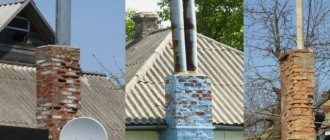
Root brick pipe
This type of brick stove chimney will last for many years. The main pipe is installed on a foundation, which is laid separately during the construction of the basement floor.
The installation technology of this chimney is more complex than that of a mounted metal structure. The fact is that the main pipe must withstand the longitudinal load from the weight of the entire unit, so it is laid out from baked bricks.
Features of the structure:
- To build a chimney channel, leave a hole the size of a brick or half a brick. To lay one layer, 4-6 bricks will be enough.
- The layers are laid out so that the bottom joining seam of the row is under the whole brick.
- Before the chimney pipe is brought out through the roof, a special module is made in the place where it passes through the ceiling to shift the axis of the section piercing the roof relative to the axis of the part of the chimney located in the room.
The design of this type is complex, and it is installed when there are no other options.
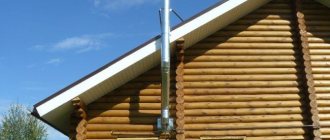
External chimney
A pipe mounted from metal or asbestos-cement modules is installed along the facade of the building, moving in the direction from bottom to top.
External structures have the following features:
- in the place where the pipe enters the building, a hole is made, through which a horizontal segment of the chimney is then brought out;
- the junction of the horizontal and vertical sections is designed in the form of a tee, one part of which is closed with a plug. This element is used when cleaning the chimney;
- the pipe is attached to the facade using detachable metal clamps. The lower part of the chimney is strengthened with a superstructure specially erected on a separate foundation.
Features of ceiling cutting for a bath
To install wiring from the bathhouse, it is necessary to ensure not only the required level of safety, but also to carefully protect the steam room from heat escape.
Here the cutting is carried out in three stages:
- Preparing the site.
- Installation of a protective box.
- Careful insulation of all joints.
ugra.ru
Summary:
Ceiling pass-through without insulation Diameter: 115 mm
Review:
Chimney diameter 115 mm;. CEILING PASSAGE UNIT WITHOUT INSULATION UNDER SANDWICH PIPE F 200, 0.
ceiling passage unit with insulation, 115 mm - buy with delivery throughout the Russian Federation. Description, characteristics, photos | Beneficial loyalty program - discounts and bonuses on the Maxidom card.
Ceiling passage unit 600*600 (500*500) (430-0.5/OTs-0.5) f 115 45.78 rub. ̶S̶T̶A̶R̶A̶Ya̶ ̶TS̶E̶N̶A̶: 50.358 rub. In this case, with an internal diameter of 115 mm, the safe distance from the outer edge of the pipe to flammable materials is 250 mm. The distance between the beams in this case should be 250 mm * 2 + 115 mm = 615 mm.
HOMEMADE SANDWICH PIPE. For a BATH WITH YOUR OWN HANDS
Comments 12
I agree with you, thanks for the explanation. As always, everything ingenious is simple.
Absolutely nothing.
I agree, it's a funny thing
Now one question: who will get me out from under the table!?
Thank you, thank you
Certainly. This happened to me too. Let's discuss this issue. Here or in PM.
Of course, I apologize, this doesn’t suit me at all. Thanks for the help.
I consider, that you are mistaken. Let's discuss this. Write to me in PM.
What can I say here?
I agree. I agree with everything said above. We can communicate on this theme.
Interesting. just the name is kind of frivolous.
Add a comment Cancel reply
- &
- (black)
- 100
- 1000
- 2.0
- 200
- 300
- 500
- ABS
- ASUS
- Audio
- Benro
- Blue
- Bluetooth
- Bosch
- Box
- Brother
- Bulros
- Canon
- Case
- Cisco
- Classic
- Digital
- DVD player
- Electric
- Electrolux
- Epson
- Falcon Eyes
- Galaxy
- Garmin
- HAMA
- HUAWEI
- IPhone
- Kit
- LED
- Levenhuk
- Light
- Master
- Mini
- Nikon
- Office
- Panasonic
- Philips
- Pioneer
- PLA
- Plus
- Power
- Premium
- Pro
- Pro sKit
- REXANT
- Samsung
- Series
- Silver
- Smart
- Sony
- Style
- SUPRA
- TV tuner
- Ultra
- VoIP phone
- White
- Wi-Fi router
- Xiaomi
- A4,
- Automotive
- Adapter
- Battery
- Accessories
- Acoustic system
- Antenna
- Art.
- Audio cable
- White
- Wireless
- Binoculars
- Block
- Bracelet
- Keychain
- Paper
- Hob
- Webcam
- Fan
- Camcorder
- Vinyl
- Wine
- External
- Water
- Undermount kitchen sink
- Flash
- Built-in
- Gamepad
- Grill
- Door
- Double
- Holder
- Children's
- At home
- Home
- Board
- HDD
- Lock
- Charger
- Charger
- Green
- Gaming
- Integrated amplifier
- Interactive
- Infrared heater
- Cable
- USB cable
- Balanced audio cable
- Coaxial cable
- Microphone cable
- Camera
- Fireplace hood
- Karmana
- Map
- Cartridge
- Book
- Ring
- Switch
- Complex
- Set
- Computer
- Computer case Black
- Envelope
- Controller
- Skates
- Box
- Red
- Fastening
- wall bracket
- Laminator
- Lamp
- Ribbon
- License
- Magnifier
- Magnetic
- Marker
- Motherboard
- Car
- Typewriter
- Media player
- Metal
- Weather station
- Microwave
- Microscope
- Chip
- Microphone
- Mm)
- Mm,
- Mobile
- Model
- Module
- Monopod
- Music Center
- Mouse
- Kit
- Navigator
- Storage device
- Storage water heater
- Floor
- Wrist watch
- Nozzle
- Wall
- Board game
- Headphones
- Knife
- Laptops
- Lens
- Optical drive Black
- Office
- Air purifier
- Glasses
- Plastic bag
- Panel
- Adapter
- Printing
- Power
- Tablet
- Plastic
- Plastic
- Player
- Gift
- Backlit
- Stand
- Pillow
- Shelf
- Polarizing
- Portable
- Printer
- Projector
- CPU
- Remote controller
- Size
- Connector
- Frame
- Walkie Talkie
- Repeater
- Socket
- Pen
- Manual
- Backpack
- Napkin
- Alcohol mashine
- Lamp
- LED
- Selfie
- Grey
- Network
- Signal
- Blue
- Cooling system
- Scanner
- Folding
- Dictionary
- Cm)
- Cm,
- Smartphone
- Mixer
- Split system
- Glass
- Stand
- Washing machine
- Rack
- Table
- Studio
- Bag
- Tablet
- TV
- Telephone
- Thermometer
- Trimmer
- Pipe
- Cabinet
- Humidifier
- Universal
- Destroyer
- Gains
- Amplifier
- Device
- Iron
- Filter
- Flash drive
- Camera
- Cameras
- T-shirt
- Fridge
- Color
- Color:
- Colored
- Digital
- Kettle
- Watch
- Black
- Case
- Mop
- Sewing machine
- Closet
- Gateway
- PC.
- Tripod
- Manfrotto tripod
- Brush
- Forceps
- Screen
- Electric
- Electric shaver
The procedure for installing the passage unit through the ceiling
The process of attaching the protective box itself is usually not difficult. To do this, we perform a simple sequence of actions:
- the ends are covered with thermal insulation material;
- in the passage box for the chimney, all parts in contact with the ceiling elements, as well as its bottom, are insulated;
- the pipe is carefully inserted, but it should not fit tightly to the walls;
- we secure the assembly using self-tapping screws or other fasteners;
- insulation is carried out in the attic, and the voids are filled with loose mass;
- If desired, you can decorate the structure.
What problems does roof penetration solve?
To determine the purpose of such roofing additions, it is worth turning to the function of the roof itself. It must protect the house from precipitation and other external influences, while maintaining optimal heat, noise and waterproofing performance. The presence of holes and cracks in the roof is not allowed, therefore communications passing through the roof must be carefully sealed at points of contact with the finishing material and the load-bearing structure. In turn, roof penetration initially creates a minimum of free space, which is not used for engineering purposes. At the same time, it promotes the effective removal of smoke and air, protecting the roof materials from thermal effects. Ventilation systems, by the way, often lead to the formation of condensation in places where air flows are discharged. Special units for such channels prevent the processes of drip formation, removing moisture outside.
Selection of material for thermal insulation
There are several types of thermal insulation materials for any occasion. Let's look at the most popular of them.
- Technical basalt wool is used most often. Obtained by melting certain rocks. In addition to low thermal conductivity, it also retains moisture and can withstand high temperatures from 700° to 900°.
- Kaolin wool is produced by melting silicon oxide materials at a temperature of 1750°. It has a low thermal conductivity coefficient and does not melt or crumble at high temperatures. Maximum temperature of use is 1100-1250°. It has a long service life and can withstand many starts and cool-downs without losing its qualities.
- Construction basalt wool is obtained by melting mica. The operating temperature of such thermal insulation is 400-450°.
If you find it difficult to choose, it is recommended to order mineral wool. Since such a product is time-tested, universal in use and widely available on sale.
In this article we looked at how to make a passage unit for a chimney through the roof and other slabs. Any person skilled in handling hand tools can do this. To do this, take the time to familiarize yourself with all the rules and strictly follow all the points specified in the instructions.
If you are not confident in your abilities or want to save time, then it is better for you to seek help from a professional who has extensive experience in this field.
Fire protection
So, what insulating material is best to use for thermal protection when constructing a chimney passage through the ceiling with your own hands?
- Mineral wool. Retains its properties up to 300 ºC. Rigid mineral wool PZh - 175 can withstand higher temperatures (up to 1000 ºC). The disadvantage is the release of formaldehyde, which can be harmful to health. Also not resistant to water;
- Expanded clay. Tolerates wetness well. The disadvantage is the need to construct additional containers to accommodate it;
- Basalt cardboard. Environmentally friendly. A sheet 5 mm thick can withstand temperatures up to 900 ºС;
- Asbestos. It copes well with fire protection, but at the same time emits harmful substances. Therefore, if it is used for a chimney, it is necessary to isolate the room from it using metal sheets;
- Minerite. Able to withstand heating up to 600 ºС, without being destroyed by water and being an absolutely environmentally friendly material.
Basalt cardboard in action.
Excellent fire protection. Some experts still use sand or clay for thermal insulation, but this method is gradually becoming a thing of the past.
You can reduce the likelihood of a fire using several other methods.
- Construction of a water jacket on the chimney. This will require a remote tank. It will also be necessary to supply cold water. But the hot water generated can be used in the shower or for heating. But the temperatures above the water jacket will drop significantly, which will reduce the likelihood of the pipe burning out;
- You can place a water tank above the stove, which will also protect the chimney from excessive heating. But with this method, you will have to constantly ensure that the water in the tank does not boil and pour cold water in time;
- Place stones on the pipe. You will need support to redistribute their mass.
Using all these methods, it is possible to reduce the temperature in the installed passage, which will significantly increase fire safety.
To increase fire safety in the bathhouse, you can use materials such as glass-magnesium sheets and fire-resistant plasterboard sheets. They are used to cover the ceilings themselves and the openings in them through which the chimney passes. Only Premium class sheets marked “NG” are suitable for fire protection. If such marking is absent, then such products cannot be used for fire protection.
Service life of the external chimney
The service life of the structure depends on the material of its manufacture and correct installation. When used correctly, ceramic pipes will perform their function for up to 40 years. A brick chimney can be used for more than 50 years. Stainless steel will have to be replaced after 15-20 years, but it all depends on the thickness of the metal. Galvanization has the shortest service life: up to 10 years.
The durability of the structure is affected by the heating temperature of the exhaust gases. A high-quality sandwich system will last up to 20 years. Structures last longer if heating equipment runs on gas or pellets.
Video description
This video clearly shows an example of violation of the rules for installing a sandwich chimney:
- The position of the pipe is not observed. It is installed strictly vertically. When insulating main walls with foam plastic or mineral wool, long dowels are used to secure the chimney.
- There is no ebb on the side roof slope. In this case, precipitation can get on the insulation and impair its functions.
- Insufficient overall vertical height. This error leads to poor traction.
Problems arise when using low-quality insulating material. Cheap insulation shrinks over time, so there is a possibility of local overheating of some parts of the chimney.
Make it yourself or buy it?
You can make a ceiling assembly at home, and it can be no worse than a ready-made store-bought version. But this will require time, skill and a special tool:
- metal scissors;
- Bulgarian;
- riveter;
- manual bender, etc.
approximate price
For those who do not have time and prefer to spend their weekends with family or friends, I have collected current and inexpensive offers of ceiling units on the market.
Is it possible to make a chimney in a small bathhouse without making holes in the roof?
Hello! I want to make a small steam room, 4-5 squares. I don't want to put holes in the roof. Is it possible to bring the chimney directly into the wall and then up? Oleg
Expert answer
Hello, Oleg!
The chimney you are interested in is called an external (or attached) chimney and is widely used by European and American builders. In Russia, they prefer internal chimneys - they allow you to increase the heat transfer of the stove and correspond to domestic architectural traditions.
To lead the pipe through the wall, special elbows are used, or, in other words, bends with bends at different angles, which allows installation to be carried out in the most convenient way. From the outside, a tee is installed on a horizontal or inclined section, to one branch of which the vertical part is connected, and the second is closed with a plug and subsequently used to clean the channel from soot and carbon deposits. To secure the chimney in a vertical position, special clamp holders are used.
To properly install an attached chimney, we recommend listening to the recommendations of experienced stove makers:
- to avoid a drop in draft and also reduce soot formation, the length of the horizontal section should not exceed 1 m;
- the upper cut of the pipe must be protected with a cap, which will protect the gas duct from precipitation;
- the outer part of the chimney must be insulated - this will prevent the formation of condensation and normalize draft in winter;
- the use of round pipes is preferable to rectangular ones, due to the fact that the former create less resistance to the movement of heated gases;
- the cross-sectional area of the chimney must correspond to the power of the heating unit;
- Where the pipe passes through the wall, it is necessary to install a fireproof cutting. Joints inside cuts are not allowed.
We, in turn, recommend that the horizontal section be arranged under the ceiling. Thus, the hottest part of the chimney will be located inside the room, giving off additional heat. In addition, a water heat exchanger is often installed in this area, with the help of which hot water is obtained.
As you can see, a properly designed external chimney allows you to get the same benefits as an internal one, and at the same time does not require, as you say, “to make holes in the roof”, although it has a slight complication in terms of configuration.
stroy-banya.com>
Other articles
Expert advice
Before purchasing the necessary materials for arranging an external chimney, the power of the equipment is determined. It affects the diameter of the pipes. You can also use these expert tips:
- if the heating equipment is equipped with forced draft, then it is not necessary to increase the vertical section of the structure; it is enough to remove the horizontal pipe;
- a horizontal section that is too long helps slow down the smoke flow (the value should not exceed 1-1.5 m);
Rules for installing chimney pipes Source krovgid.com
Inspection holes are installed not only on the outer part of the structure, but also on the internal horizontal element.
Briefly about the main thing...
Chimneys can be single- or double-walled. Based on the material of manufacture, metal, brick structures and structures made of sandwich pipes are distinguished. The last option is optimal for private houses. When installing a chimney, the rules for its placement in the room are observed. Its functionality, as well as the presence of draft in the heating equipment, depends on the correct determination of the diameter and height of the structure.
The installation technology through a wooden and brick wall is the same, but there are some nuances: wood is more susceptible to ignition and requires maximum protection. During installation, you must comply with fire regulations, and also take into account possible errors.