Installation of a furnace requires determining the installation location of the product and, accordingly, calculating all parameters. The dimensions and diameter of the pipe depend on the power of the product.
An important component in the construction of a bathhouse is strict adherence to the rules and standards; you need to act in accordance with the drawn up project; the slightest changes will entail consequences. It is useful to determine the diameter of the pipe while drawing up the project.
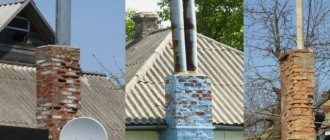
The ideal shape of a pipe is considered to be a cylinder. This is the optimal solution, because the draft in rectangular chimneys is not as good as in cylindrical ones.
The cylindrical shape prevents soot from accumulating and allows the combustion product to escape freely. Dimensions are determined taking into account the parameters of the passage opening and height.
Calculation of a chimney for a wood-burning stove: dimensions, diameter, height above the roof
Calculating a chimney for a wood-burning stove under construction is one of the most important conditions for the normal and high-quality functioning and operation of the system. Therefore, it is very important during construction to adhere to accepted norms and rules as much as possible. Next, we’ll talk about what average parameters need to be taken into account and how to determine them yourself.
Why is a chimney calculation required?
In order for your furnace to function properly, it is important that the fume exhaust system is set up properly. Two main parameters play a huge role in this, which we will get to know below. They will determine what draft there will be and how effectively smoke will be removed from the stove. How to correctly calculate a chimney pipe will depend not only on the functioning of the system, but also on the safety of people living in the room. Therefore, pay attention to any subtleties, study the theory, so that later you can easily find out and determine how to independently calculate the chimney.
Article on the topic: Which fence absorbs noise better
Rules for choosing pipe length
If the pipe comes out of the roof at a distance of 0.5 m to 1.5 m from the ridge of the roof, then according to the standards it should rise above it by 0.5.
This saves chimney material and provides the most efficient heating. During snowfall, the least amount of snow collects in this place, which eliminates leaks during melting. The standards stipulate that the resulting estimated length should not be less than 5 meters, if measured from the surface of the grate to the top edge of the pipe. When the chimney exits to the surface more than 3 meters from the ridge, you should draw a horizontal line from the highest point and lower it by an amount of 10º relative to the horizon. Above it the head of the pipe ends. If other buildings are built nearby, then the height of the chimney is higher than the neighboring roofs. For very high neighboring houses, the 45º rule is used, that is, a straight line is drawn at this degree from the neighboring roof to the one where the chimney is made, and the head is arranged slightly higher than the mental straight line.
What parameters need to be calculated?
To calculate, you need to determine the following parameters:
- Length. First of all, you need to determine the maximum height of the building, how many meters to the ridge of the roof in the very place where the future pipe is supposed to exit. Because one of the most important characteristics of the future system will depend on the length. Take into account the fact that channels that are too high will simply “eat up” the draft; as a result, it will reach the heat source at a lower speed, which means your stove will burn much worse. In addition, chimneys that are too low in relation to the roof are also “scary”; more about this below.
- Chimney diameter (section). As for this parameter, it is necessary to take into account not so much the dimensions themselves as the original shape of the pipe itself. Do not forget an important condition: if you want to get a high-quality chimney system that works according to all the rules, then the pipe must be cylindrical. That is, be sure to make the walls round so that soot and soot linger less in the channel. Thus, you push back the moment of cleaning the channels. As for the size (diameter), it must be selected based on the cross-section of the main outlet pipe of the furnace or boiler. It is not recommended to use pipes with a diameter larger or smaller than the pipe. High probability of depressurization.
How to install a pipe in a bathhouse: what types of devices are there?
Installation of a chimney in a steam room can be done using several methods, depending on the location of the stove. Types of smoke exhaust are distributed according to the following indicators:
- Used raw materials. There are two options here - a metal chimney pipe, or a structure made of fire-resistant brick. The second method is classic. It has been used by most builders for a long time. However, in recent years, many people have given preference to metal structures when building a chimney. The main reason for this is that such pipes are easy to install yourself and it will take much less time.
- Installation method. There are two methods - internal and external chimney. A logical question arises: how to remove the pipe from the bathhouse through the wall? To do this, a special hole is drilled and the entire system goes outside. This species is also called North American. This method of constructing smoke ventilation does not have the main disadvantage of the generally accepted installation method - installing a pipe through the ceiling. This means that you do not have to perform complex manipulations to output the tap. It is enough to drill a hole in the wall and lay the pipe to the street. Installing a chimney in a bathhouse through the ceiling requires more installation costs, so we recommend using a proven method.
If you are in doubt and don’t know which type of chimney to choose, keep in mind that the metal option is much cheaper and easier to install. Next, we will consider the advantages and disadvantages of each type of pipe.
How to calculate chimney parameters?
As described above, you need to know certain parameters. If the two main parameters are height and cross-section, then there is one more indicator that must be taken into account. These are the characteristics of the heating equipment itself.
There are several forms of calculation, divided into:
- Accurate.
- Approximate.
- Automatic.
By the first, we need to understand that it is necessary to take into account a lot of factors, including gas temperature indicators, separation speed, height and speed at which combustion of a particular fuel will occur. These values must be substituted into a special formula; a detailed calculation will be given at the end of the article.
As for the approximate calculation, the size of the combustion chamber is taken into account. For example, let’s take the classic size of a regular chamber in a furnace or boiler - these are dimensions within the range of 500 by 400 mm. The substitution system is used, that is, 1:10. Then for round channels, the diameter will be 180 - 190 mm.
Article on the topic: Which penofol is better for a bath
The third type of calculation is the use of special calculation calculators. As a rule, they provide more accurate data, but you need to know more initial parameters. Roughly speaking, this is the same first method of counting, but it is performed using a computer.
Determining the height of the chimney
We already know that the performance of the system depends on this parameter. Therefore, keep in mind that according to SNiPs, the average height should be 5 meters, but not more than 7 meters. With a shorter length, natural traction will not be formed in sufficient quantities. When calculating, follow the described rules:
- From the base to the highest point is more than 5 meters.
- Exit to a flat roof is marked by an elevation of the pipe head by 500 mm.
- When erected on a pitched roof, three meters to the ridge, the chimney, when drawing a visual line, should be located at a 10 degree angle. The shorter the distance to the ridge, the correspondingly greater the degree.
Determination of the cross section of the smoke channel
In order not to use complex geometric calculations, we recommend that you pay attention to the recommendations of experts. So, the diameter of the chimney must meet the following criteria:
- If the power does not exceed 3.5 kW, then a diameter of 0.14 cm is sufficient.
- Power up to 5 kW is equal to a diameter of 0.20 cm.
- Power up to 7 kW, equal to a pipe cross-section of 0.27 - 0.30 cm.
If you want to calculate the cross-section more accurately, you can use parameters such as fuel type, combustion rate, thrust speed, height, and speed of passage through the pipe.
How does the diameter of the chimney affect its height?
The diameter of the chimney pipe partly only affects the height. Roughly speaking, you will not be able to expand the cross-section in order, for example, to reduce the length of the channel - these values are not interrelated, as many believe. Therefore, you should not “be tricky” with the diameter, adjusting a certain height, which will be below 5 meters or above 7 meters. The level of traction will be the same throughout the entire length from 5 to 7 meters. But a diameter that is too large can reduce traction and create turbulence, although at first glance this seems absurd.
Article on the topic: How to properly insulate a frame house with ecowool
Calculation of the optimal traction indicator
In addition to calculating the diameter of the chimney, you also need to know the draft force. To do this, you will need to find Bernoulli's law and substitute the external and internal temperature data, as well as the pressure level. For the final calculation, the total pressure loss in both zones is taken into account. If the indicators are identical, then the traction is in the optimal range.
Example of furnace calculation
As promised, at the end we provide an example of independent calculation. So, you need to calculate the diameter of the chimney for a wood-burning stove using the following formula:
D = 4*Vr/3.14*2 = 0.166 m. The values are selected based on standard sizes and indicators according to the table. Where:
D – Section. Vr is the required volume of air for combustion. 4 is the standard thrust setting.
Types of ceiling penetrations
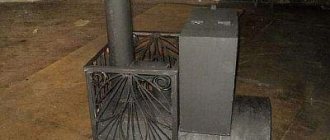
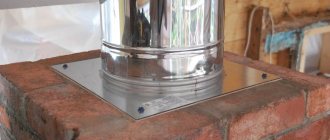
When crossing the ceiling, it is necessary to protect the “pie” materials from heat, and also somehow fix the pipe in a certain position. This task is accomplished by a ceiling cutout or, as it is also called, a “passage unit.”
The pass-through units are industrially manufactured. They are a box made of metal or mineralite, to which a stainless or galvanized steel plate is attached on one side. A hole is made in the middle of this assembly into which a sandwich is inserted. The plate on the side of the room closes the hole in the ceiling, decorating it. It also serves as a support for the heat insulator, which is used to fill the gap between the pipe and the floor beams for better thermal insulation.
This is a mineralite ceiling penetration. View from the attic
There is no disagreement regarding what material to use for the penetrations in the bathhouse: only stainless steel. The fact is that at temperatures that are typical for steam rooms, galvanization releases far from the most useful substances. Therefore, there is only one option: stainless steel.
Everything is installed simply. If the ceiling was made without taking into account the passage of the pipe, a square hole is cut in the right place (between the beams), which is 1-2 cm smaller than the size of the decorative panel. Beams and boards are covered with a layer of thermal insulation. If available, you can nail down strips of mineralite, basalt or asbestos cement cardboard (asbestos is harmful, so use it only as a last resort), just a strip of stone wool insulation. In some cases, padding of the insulation with metal strips is required (when it is needed, see below).
You can't do that - you had to cut a square hole. And the lining on the ceiling near the pipe is already charred...
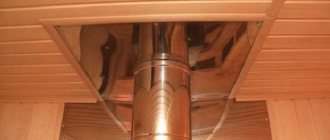
When installing a pipe on a stove, the device is placed on a straight section that will cross the ceiling. The passage unit simply rises to the desired level. A strip of thermal insulation is placed under its edges that touch the ceiling boards, then everything is fixed with self-tapping screws. In many units, manufacturers even make perforations for self-tapping screws, so even this is not a problem.
The configuration of these products varies. Sometimes a metal cylinder is made around the hole for the pipe. The edges of the decorative plate protrude significantly beyond this cylinder. When installing a pass-through unit of this type, the hole is still cut in a square shape. A circle is also possible, but from the pipe to its edge there must be a distance of at least 130 mm if the pipe is insulated, and 250 mm if it is without insulation
With this option, please note: the size of the plate should be sufficient to mask the hole. In addition, with this form of passage through the ceiling, it is imperative to protect the wood of the ceiling not only with heat insulators, but also to cover it with strips of metal
Pass-through units through the ceiling come in different configurations
There are passage units in which there is no cylinder around the pipe, but there are outer sides around the perimeter. They are made of metal, and can also be made of mineralite. If the sides are made of metal, the edges of the cutout in the ceiling must be lined with a heat insulator (for example, basalt cardboard or the same mineralite). If the sides are made of mineralite, then they themselves are a good heat insulator. So additional thermal insulation of the edges of the cutout is not necessary (but you can play it safe).
Methods for calculating the diameter of a chimney for a wood-burning stove
The efficiency and performance of the stove depends on the optimal cross-sectional size and height of the chimney. SNiP rules and several calculation options will help you choose the right size for a wood-burning stove in your home.
- Why do you need to know the diameter?
- What should be the diameter of the chimney for a stove?
- Calculation methods
- Exact method + formula
- Swedish calculation method
- What to do if the chimney cross-section is square?
- What should be the height of the chimney pipe for a stove?
- Why is this parameter needed?
- SNiP requirements
- Self-calculation method
- Table “Height of the chimney above the ridge”
- Conclusion
Basic rules and regulations
Before insulating a pipe in a bathhouse from the ceiling, you should study the following SNiP requirements:
- To ensure optimal draft force, a chimney pipe with a height of at least 5 m should be erected;
- A minimum distance of 250 mm must be maintained between the chimney pipe and the nearest combustible elements;
- If materials with insufficient fire protection are used for roofing, a spark arrester must be installed;
- A certain distance must be maintained between the upper stove ceiling and the ceiling: for metal pipes - more than 1.5 m, for brick chimneys - 0.5 m.
Why do you need to know the diameter?
Beginners do not understand the importance of the chimney cross-section for a stove and why it is so important to correctly calculate not only the internal size, but also the height of the pipe. When developing an individual project for an autonomous heating system for a residential or industrial premises, the level of traction and performance of the unit depends on the accuracy of the data.
Inexperienced builders can make a pipe with a large or insufficient cross-section. In any such option, the operation of the heating device is disrupted, and you are simply throwing money away. For optimal operation of the home heating system, it is important to carry out an accurate calculation and familiarize yourself with the recommendations of regulatory documents.
Head design rules
What functions are attributed to this device:
- protecting the chimney from rain, snow, leaves and foreign objects, reducing the impact of strong gusts of wind;
- thanks to protection from moisture and wind, increased draft in the smoke channel;
- roof decoration.
If the roof serves for the outlet of several pipes , then identical heads will serve as a decorative detail and combine all the outlets into one ensemble. There are various designs of caps; they are intended for ventilation ducts and chimneys, but their protective functions are necessary for the normal operation of the heating system.
What should be the diameter of the chimney for a stove?
The size of the chimney can be calculated in several ways. The simplest one is to determine the cross-section of the chimney depending on the size of the combustion compartment. Solid fuel consumption is determined by this characteristic, and based on these data, the volume of exhaust gases can be determined.
Article on the topic: How to seal cracks in the floor in a bathhouse
If you have an open firebox and the chimney is made of a round steel pipe, these values should be in a ratio of 10 to 1. For example, the dimensions of the combustion chamber are 50/40. Such a stove must be equipped with a chimney with a cross-section of 180 mm.
If we make a pipe from brick, its internal size should exceed the size of the ash pan or ash door by one and a half times. The minimum size of a square cavity for gas removal is 140/140 mm.
Material
Bath stove pipes are made from the following materials:
- baked brick (silicate brick is not suitable) - has good heat exchange with the environment, is fireproof, such a chimney requires strong support;
- ceramics - resistant to high temperatures, physical and chemical influences, ceramic blocks are made specifically for chimneys.
- ferrous metal - to protect it from corrosion it is coated with enamel, it can withstand temperatures up to 500°C, but is not suitable for intensively working baths;
- stainless steel - is durable and lightweight, a pipe made from it can be installed on a stove with a wall thickness of half a brick, the best brand is AISI 321 (with an admixture of molybdenum), the material must be purchased from a trusted manufacturer.
Asbestos cement is a too porous material; it easily absorbs condensation, which, when combined with soot, destroys the pipe and it can burst. To avoid this, it must be insulated and lined with brickwork. In the steam room, chimneys with a galvanized outer casing are not used, because This material releases harmful substances when heated.
Wooden parts of the roof and roofing made of flammable materials have a high fire hazard. The pipe is placed from them at a distance of 15 and 30 cm, respectively, and these structural elements are insulated with roofing steel and flexible sheet asbestos.
Calculation methods
Exact method + formula
Calculating a chimney for a stove is not a task for beginners. It is better to entrust such work to professionals. But if you decide to calculate this parameter yourself, you will need knowledge of basic data and several formulas:
- To determine the volume of exhaust gases, it is important to know the power of the heating unit. For calculations we use the formula:, where:
- B is the combustion rate coefficient of solid fuel. This value is determined based on the data in table No. 10 of GOST 2127;
- V – level of volume of fuel burned. This value is indicated on the tag of the industrial device;
- T – heating level of exhaust gases at the exit point from the chimney. For wood stoves – 1500.
- The total area of the chimney. It is calculated based on the ratio of gas volumes, this value is designated “Vr”, and the speed of their movement in the pipeline. For a household wood-burning stove, this number is 2 m/sec.
- The diameter of a round pipe is calculated using the formula – d² = (4 * Vr) / (π * W), where W is the speed of gas movement. It is better to perform all calculations on a calculator and carefully enter all values.
Calculating the optimal amount of thrust
This operation is performed to control the calculations of the optimal height and cross-section of the chimney. This calculation can be carried out using 2 formulas. We will present the basic, but complex formula in this chapter, and we will present the basic, simple formula when performing a trial data calculation:
- C is a constant coefficient equal to 0.034 for wood-burning stoves;
- The letter “a” is the value of atmospheric pressure. The value of natural pressure in the chimney is 4 Pa;
- The height of the chimney is indicated by the letter “h”.
- Т0 – average level of atmospheric temperatures;
- Ti is the amount of heating of the exhaust gases as they exit the pipe.
Article on the topic: How to build a garage from sand block
Example of calculating the cross-section of a chimney
We take as a basis:
- the potbelly stove runs on solid fuel;
- within 60 minutes, up to 10 kg of hardwood firewood burns in the stove;
- fuel moisture level – up to 25%.
Let's look at the basic formula again:
The calculation is carried out in several stages:
- We perform the action in brackets – 1+150/273. After calculations we get the number 1.55.
- We determine the cubic capacity of the exhaust gases - Vr = (10*10*1.55)/3600. After calculations, we obtain a volume equal to 0.043 m 3 /sec.
- The area of the chimney pipe is (4*0.043)/3.14*2. The calculation gives a value of 0.027 m2.
- We take the square root of the chimney area and calculate its diameter. It is equal to 165 mm.
Now we determine the amount of thrust using a simple formula:
- Using the formula for calculating power, we calculate this value - 10 * 3300 * 1.16. this value is equal to 32.28 kW.
- We calculate the level of heat loss for each meter of pipe. 0.34*0.196=1.73 0.
- The level of gas heating at the exit from the pipe. 150-(1.73*3)=144.8 0.
- Atmospheric gas pressure in the chimney. 3*(1.2932-0.8452)=1.34 m/sec.
Swedish calculation method
The size of a chimney for a stove can be done using this method, but the main purpose of the Swedish method is to calculate the chimneys of fireplaces with an open firebox.
In this calculation method, the size of the combustion compartment and the volume of air in it are not used. To determine the correctness of the calculation, use the following graph:
What is important here is the correspondence between the area of the combustion chamber (“F”) and the opening of the chimney (“f”). For example:
- firebox dimensions 770/350 mm. We calculate the area of the compartment - 7.7 * 3.5 = 26.95 cm 2;
- chimney size 260/130 mm, pipe area - 2.6*1.3=3.38 m2;
- We calculate the ratio. (338/2695)*100=12.5%.
- We look at the value 12.5 at the bottom of the table and see that the calculation of length and diameter was made correctly. For our stove it is necessary to build a chimney 5 m high.
Let's look at another example of calculation:
- the firebox is 800/500 mm, its area is 40 cm 2;
- chimney cross-section 200/200 mm, area 4 cm2;
- We calculate the ratio (400/4000)*100=10%.
- Using the table, we determine the length of the chimney. In our case, for a round sandwich pipe it should be 7 m.
What is traction and what does it depend on?
The removal of combustion gases is carried out using the draft created in the pipe. Due to the constant movement of air, gases hazardous to human health are drawn out.
The draft force is directly dependent on the height of the chimney and the temperature difference in the pipe channel and in the open air. In the chimney, when the stove burns, a temperature of 200 - 250 degrees is formed. Due to the cooling of gases due to contact with the metal surfaces of the connecting pipe, the temperature in the draft stabilizer becomes slightly lower, and therefore a constant stabilized draft appears.
It must be remembered that vapor condensation should not collect in the chimney against the background of high flue gas temperatures. Moisture entering the pipe leads to destruction of its surface. This happens especially often in winter, when there is a significant drop in temperature. As a result of these processes, cravings decrease. Air leakage that occurs in the draft stabilizer helps reduce humidity.
With high humidity in the environment, as well as as a result of precipitation getting inside the chimney channel, the draft also decreases. An umbrella installed on top will help protect the chimney from them.
The chimney on the roof must be covered with an umbrella
You can determine the traction force using an ordinary match, brought to an open firebox, with the vent open and half-open. A flame drawn inward indicates good draft. When the flame deviates towards the room, there is a reverse draft. In such conditions, lighting the stove is strictly prohibited, as smoke and carbon monoxide will escape into the room.
This situation often occurs when the chimney is dirty or damaged, so regular cleaning, inspection and repair are required.
When building a chimney, it is very important to correctly calculate all dimensions and select the right material. All these parameters directly depend on the fuel that will be used for heating.
A chimney made of brick is suitable for heating with solid fuel and gas. The height, its diameter and cross-section also need to be correctly calculated - this is the key to the normal and safe functioning of the heating system.
If the dimensions are chosen incorrectly, the efficiency of the heating device (appliance) will be reduced or the necessary draft will be absent, which can lead to undesirable or even tragic consequences for the residents of the house.
All these criteria are very important if smoke from not one, but two heating devices is installed into one chimney. In such a case, it is better to contact specialists to calculate the data, since you can make a mistake in one direction or the other.
According to the rules, one chimney can serve no more than two heating devices, provided that the size of the internal cross-section in total allows their simultaneous operation. The cutting channel should be about 70 - 80 cm high.
If the parameters are greater than the required ones, the efficiency of the entire heating system will decrease. If they are not large enough, the draft will be small and carbon monoxide may begin to enter the premises, which can lead to irreversible consequences.
Which chimney is better
The best shape for a chimney is considered to be a cylinder. That is why even in brick structures, metal or asbestos-cement pipes are often built in, having the diameters required by calculations.
the ideal chimney shape is a cylinder (pipe)
Hot combustion products tend to move upward in a spiral path, and the cylinder core is the optimal shape for this. Maximum thrust is generated precisely in such conditions.
Modern boilers operating on the “stop-start” principle cannot do without such a pipe. The main thing in them is to quickly warm up the system to the set temperature and switch it to standby mode, this is what saves the operation of the boilers.
In a pipe that has corners (rectangular or square), turbulence is created and draft activity is reduced. For fireplaces and wood-burning stoves - this form is acceptable and even gives certain “preferences” - it helps to slow down the heat output and increase the efficiency of the devices.
What to do if the chimney cross-section is square?
Cylindrical chimneys, especially after the advent of sandwich pipes, are the most common types of devices. But when building a brick kiln, you have to lay out a square or rectangular shape.
Article on the topic: How to make a heat exchanger for a bathhouse with your own hands
In such chimneys, turbulence is formed, which prevents the normal passage of exhaust gases and reduces draft. But for wood stoves or fireplaces, rectangular pipes remain the most popular shape. Such devices do not require an increased level of exhaust gas extraction.
The calculation of a chimney for a wood-burning stove with a square or rectangular cross-section is made taking into account the ratio of the dimensions of the pipe to the size of the blower hole on the stove. This proportion is 1/1.5, where 1 is the internal cross-section of the pipeline, and 1.5 is the dimensions of the blower or ash pan.
Construction of a gable roof for a bathhouse
Construction of the rafter system
The roof structure is based on a rafter system, which is a complex of wooden elements:
- Mauerlat - a base that creates support for the entire structure on the walls of the building;
- Rafter trusses are elements in the form of isosceles triangles, the legs of which are the rafter legs. It is the shape of the triangle, as the most stable figure, that allows the gable roof to withstand large external loads;
- Lathing is a sparse or continuous system that allows roofing material to be attached to the rafters.
All wooden elements of the rafter structure are made from dried wood with a moisture content of no more than 20% without knots and cracks. Before installation, the wood is treated with special means to prevent the formation of mold, mildew and pest damage to the wood.
There are two ways to build a truss structure:
- Hanging. Suitable for small buildings. The rafters in this system have only two points of support: the mauerlat and the ridge beam. This type allows you to avoid supports in the center, which allows you to make maximum use of the attic area.
- Layered. Used in large buildings. The rafters have additional support points in the center of the house in the form of load-bearing walls.
When calculating and choosing material for the rafter system, the total load on it is taken into account, which depends on the weight of the structure, snow load, etc. As a rule, rafters are made of wooden beams with a section of 50 * 100 mm.
Let's look at how to properly make a rafter system for a gable roof:
- The Mauerlat is laid on walls insulated with a layer of roofing felt and secured to them with anchor bolts, studs or twisting. In a bathhouse made of timber, the role of the Mauerlat is performed by the upper crowns, fastened with staples;
- The trusses are fastened at the top with a metal plate. First of all, the outer trusses are mounted, and then, according to the level specified by them, the rest are set at a gap of approximately 60 cm. The rafter legs can be attached to the mauerlat by notching or metal elements.
Roof lathing and insulation
An important point in the construction of a roof structure is its vapor and waterproofing. The protective material is spread over the rafters with an overlap of up to 10-15 cm at the joints of the material and fixed with nails or staples
It is important to create ventilation gaps between the waterproofing and the roof. For this purpose, a counter-lattice is created under the lathing system.
Next, the sheathing is filled, the pitch of which depends on the selected roofing material. For soft roofs, a continuous sheathing is made of moisture-resistant plywood; for other materials, the pitch of the system can be increased to 40-50 cm, depending on the slope of the slopes.
If you want to create a warm roof for the bathhouse, insulation is used, which is laid on the attic side between the rafters and covered with a layer of vapor barrier material.
Installation of roofing material and pipe outlet
One of the final types of work is the installation of roofing material on the bathhouse roof. Regardless of the chosen roof, the work order will be as follows:
- Laying the first row of roofing along the eaves, maintaining the level and firmly fastening the first row of material;
- Installation of the next rows of roofing from the eaves up to the ridge. Each next row is laid with an overlap of 10-15 cm with the previous one to avoid roof leaks;
- Lastly, the roof ridge is installed, the options for which vary depending on the chosen roofing material.
An important point when building a roof on a bathhouse is the question: how to make a chimney? It is most advisable to route the pipe in the bathhouse through the roof 30-50 cm from the ridge with an elevation of 50 to 100 cm above the roof. The passage of a pipe through a roofing pie, the materials of which easily and quickly catch fire, must be associated with mandatory insulation of the pipe. To do this, a special hole is made in the constructed roof, the walls of which do not allow the pipe to come into contact with the flammable elements of the roof.
The final work is the installation of a drainage system, covering the roof overhangs and cladding the roof gables.
What should be the height of the chimney pipe for a stove?
Calculation of this parameter allows you to avoid the occurrence of backdraft and other possible troubles. This issue is regulated by the rules of SNiP and other documents.
Why is this parameter needed?
In order to understand the importance of this factor, let's take a closer look at several physical laws and the consequences of incorrectly made chimneys. As heated gases pass through, the temperature drops, but warm air or gases always rise.
At the outlet of the pipe, the temperature drops even more. Exhaust gases located in a pipeline with a reliable layer of thermal insulation have a high temperature and a column of heated smoke, rising upward, increases the draft in the firebox.
Let's analyze the situation - we reduce the internal cross-section of the pipe and increase the height of the pipe above the roof ridge. If you think that the volume of heated gas increases, the cooling time of the smoke increases and the draft increases, this statement is only half true. The traction will be excellent, even with a large surplus. Firewood will burn quickly and the cost of purchasing fuel will increase.
An excessive increase in the height of the chimney can cause an increase in aerodynamic turbulence and a decrease in the draft level. This is fraught with the occurrence of reverse draft and smoke escaping into living spaces.
SNiP requirements
The length of exhaust gas exhaust pipelines is regulated by the requirements of SNiP 2.04.05. the rules require compliance with several basic installation rules:
- The minimum distance from the grate in the firebox to the protective canopy on the roof is 5000 mm. Height above the level of the flat roof covering 500 mm;
- the height of the pipe above the roof slope or ridge must correspond to the recommended one. We will talk about this in a separate chapter;
- if there are buildings on a flat roof, the pipe should be higher. In this case, with a large pipe height, it is secured with braces made of wire or cable;
- if the building is equipped with a ventilation system, their height should not exceed the exhaust gas outlet hood.
Article on the topic: How to make floors in a house from aerated concrete
Self-calculation method
How to independently calculate the height of the smoke channel, for this you will need to perform a calculation using the formula:
- “A” – climatic and weather conditions in a given region. For the north, this coefficient is 160. You can find the value in other areas on the Internet;
- “Mi” is the mass of gases passing through the chimney in a certain time. This value can be found in the documentation of your heating device;
- “F” is the time for ash and other waste to settle on the walls of the chimney. For wood stoves the coefficient is 25, for electric units - 1;
- “Spdki”, “Sfi” – level of concentration of substances in the exhaust gas;
- “V” – exhaust gas volume level;
- “T” is the temperature difference between the air coming from the atmosphere and the exhaust gases.
There is no point in giving a trial calculation - the coefficients and other values will not be suitable for your unit, and extracting square roots will require downloading an engineering calculator.
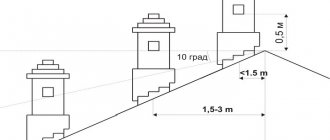
Table “Height of the chimney above the ridge”
The table of the height of the chimney above the roof structure will help you determine the size of the pipes without making complex calculations. First, we will analyze the selection of pipe length for flat roofs.
| Selection of pipe length for flat roofs. | Min. pipe height in mm |
| There are no parapets or other structures or devices on the roof. | 1200. |
| A protective curb or other structures are built on the roof and the distance to them is up to 300 mm. | 1300. |
| Excess over other ventilation ducts | 500. The minimum distance to the ventilation shaft is 5000. |
| For pitched types of roof structures. | Min. pipe height in mm |
| The chimney exits to the roof at a distance of 1500 mm from the ridge. | 500. |
| The pipe is located at a distance of 1500-3000 mm from the ridge. | The pipe is brought out to the level of the roof ridge. |
| The distance from the ridge to the passage of the exhaust pipeline is over 3000 mm. | We set aside 10 0 from the ridge cavity. The top of the pipe should be level with this line. |
Article on the topic: How to make a cap for a fence post
DIY chimney installation in a bathhouse: step-by-step guide
The first step to start installation is to draw up the correct diagram for your chimney. We advise you to contact a specialist. He organizes a detailed plan on how to make a chimney in the bathhouse and install an outlet through the ceiling and roof. The choice should first of all be based on the stove installed in the bathhouse. Each unit has its own requirements and the pipe should be selected based on these indicators.
Then you need to select the outlet material. If you plan to do the installation yourself, we recommend taking a closer look at metal options.
Now let's take a look at the step-by-step instructions for installing and passing the pipe into the bathhouse through the ceiling.
- Step 1. Insulate the passage in the ceiling for the chimney in the bathhouse. It is important to leave a gap of ten centimeters between the outlet and the surface. We recommend using glass wool for fencing.
- Step 2. Install the unloading unit. It is this part of the chimney that takes on all the loads and dampens lateral vibrations.
- Step 3. Install the starter sandwich. An important point is that this part must fit tightly to the main pipe, otherwise the room may become smoky.
- Step 4. Place clamps or fasteners on all pipe connections. This will maintain the tightness inside the system.
- Step 5. Close the chimney passage through the ceiling in the bathhouse. To prevent warm air from escaping, use mineral wool to seal the hole.
- Step 6. Passage of the ceiling and roof for the pipe in the bathhouse. After insulating the hole in the ceiling, you should drill a hole in the roof. The chimney outlet must be half a meter above the roof level.
- Step 7. How to fix the chimney pipe on the roof? Install the nozzle and secure it tightly. This will be enough for the element to hold firmly.
Chimney pipe diameter - calculation of the chimney cross-section
We welcome you, readers, to our blog of the online store Atmosphere of Warmth. We continue the series of useful articles on choosing a chimney. In previous articles we talked about the selection of steel grade, as well as the correct chimney height. In this same article, we decided to tell you how to choose the diameter of the chimney, what it affects and what it depends on.
What does the diameter of the chimney affect?
The diameter of the chimney or its cross-section directly affects the throughput of the pipe. If it is insufficient, smoke may appear in the heated room.
To begin with, let us clarify that maximum draft is possible in chimneys with a round cross-section, that is, stainless steel chimneys provide better smoke removal.
Again, a metal chimney has smooth walls, which means it will be more difficult for soot and soot to “catch” than, for example, on a brick surface.
So, once we have decided that the cross-section of the chimney should be round, we can begin to select the optimal diameter or cross-section of the chimney.
How to choose the diameter of the chimney pipe
The initial pipe that connects to the heating device must have a diameter equal to or almost equal to the cross-section of the stove, boiler or fireplace pipe.
There is no point in trying to fit a significantly larger diameter onto a smaller one. Yes, special adapters are produced, but is there any point in overpaying for them if you can install a suitable pipe?
A mono pipe is meant as the initial pipe, since it is irrational to connect the stove directly to the sandwich.
Usually mono pipes are installed within the premises, and sandwiches are installed outside.
So, if you purchased a heating device, then simply look at the passport, or measure the diameter of the pipe yourself. If the device is not available, then this point can be clarified directly in the store.
Or, you can obtain the cross-section of the chimney by calculation.
For gas-fired heating appliances, there must be at least 5 cm of cross-section for each kW of power. For solid fuel units - at least 8 cm, respectively.
Article on the topic: How to stop a dog from jumping over a fence
In practice this means the following:
For a building with an area of 300 square meters, a power of 30 kW will be required (1 kW per 10 m²). Then the minimum cross-section of the chimney for a gas boiler will be 140 mm (area 150 cm²), for a wood-burning stove - 180 mm (area 240 cm²).
We have more or less decided on the internal diameter of the chimney, but how to choose the cross-section for the sandwich pipe?
What determines the diameter of the outer chimney pipe?
The diameter of the outer pipe depends on the thickness of the thermal insulation installed in the pipe. The greater the thickness, the larger the cross-section of the chimney.
Below in the table we have described what thickness of insulation is recommended depending on the purpose of the chimney
Self-installation of a chimney for a bath
The installation method depends on what material is planned to be used for the production of the chimney. There are some rules that should be taken into account when making a chimney yourself:
- The device must not be connected to other pipes.
- The smoke exhaust structure should not have horizontal sections longer than 1 m.
- During the heating season, the sauna chimney must be cleaned at least 2 times.
- The structure must extend at least 0.5 m beyond the roof.
Installation of a steel sandwich chimney through the ceiling
The first thing to consider is the sandwich chimney. Manufacturers supply products together with a set of additional parts, which include:
- knee;
- tees;
- clamps;
- plugs;
- ceiling-passage units;
- heads;
- protective screens.
The diagram will allow you to understand the technology of installing a stainless steel chimney.
Step-by-step guide to assembling a steel chimney:
- First of all, using a plumb line, you need to mark the exit points of the pipe through the roof and ceiling structure. Next, you need to prepare a recess according to the size of the pipe. It is worth remembering that between the sandwich pipe and the wooden ceiling parts you need to leave a distance of approximately 10 cm around the perimeter of the recess.
The dimensions of the hole should be approximately 10 cm larger than the dimensions of the chimney pipe - Thermal insulation can be done using mineral wool. It will be necessary to close the place where the pipe passes through the ceiling. There is no need to worry about the cotton wool getting damp, as the elevated temperature dries it out quickly.
- You will need to take all dimensions and determine the location of installation of the unloading unit. It is recommended to do it in the attic. It will take on the load of the pipe that comes out of the ceiling. In addition, the unloading unit is able to eliminate lateral vibrations.
The unloading unit takes on the load of the pipe coming from the ceiling - If the distance between the floor base and the attic is large, then a unloading unit should be installed. If the distance is less than 1.5 m, then auxiliary supports are not required. The unloading unit can be constructed from steel angles and fasteners. The corners must be secured to the rafters. The fixation should be as reliable as possible.
- You will need to install an initial pipe on the outlet pipe of the stove. It must fit into a large pipe with an interference fit; during the purchase process you need to select the appropriate dimensions.
An initial sandwich pipe must be installed on the outlet pipe of the furnace - The narrow pipe should fit into the outlet pipe of the furnace, but it should not cover it. The pipe sections must be inserted into each other. The transition and bend areas should be additionally secured with clamps.
Places of passages and bends of pipes must be fixed with clamps - Where the pipe passes through the ceiling structure, a groove must be installed to cover the outlet recess. This will also make the chimney more stable. To the groove you need to weld a pipe of a larger diameter, which will be used as an adapter. This will increase the support area and eliminate deformation in the event of strong loads in the side part. The adapter will allow the chimney to move freely up and down. To eliminate heat loss due to loose parts, it is recommended to use mineral wool. It must be placed under the cutting piece and carefully pulled to the ceiling using nails or self-tapping screws.
To close the outlet hole in the ceiling, you need to install a groove - Holes must be prepared in the sheathing and roof covering. Next, you should seal the outlet of the smoke exhaust device. An adapter is required for this. The joints must be coated with sealant. It is recommended to place another sheet on the covering and secure it with self-tapping screws and rubber washers. The remaining cracks are treated with sealant. The pipe outlet should be 55 cm above the roof level.
The vertical position must be controlled by the building level - A fungus should be mounted at the top of the chimney.
Video: installation of a chimney from sandwich pipes through the ceiling
Installation of a ceramic chimney through the ceiling
The sequence of actions will be as follows:
- First of all, you need to prepare the place where the device will be placed. If there are any irregularities on it, they must be eliminated. Installation of chimneys is allowed on a separate base near the heating device or on its upper surface. A special adhesive mixture is used for masonry, since the solution will not be able to provide the necessary strength.
For masonry you need to use a special glue, since the solution will not be able to provide sufficient strength - You should prepare metal rods 1 m long and 5–10 mm in diameter. With their help, you will need to additionally secure the structure. This will preserve the integrity of the chimney. Next, you need to make recesses in the ceiling and roof. There is no need to make a reserve in terms of dimensions, since the device will be able to protect wooden parts from elevated temperatures.
- The next step is to install 2 halves of ceramics. The lock should be lubricated with an adhesive mixture.
The first block must be filled with adhesive mixture - Next you need to check the location of the halves. If necessary, they can be trimmed. Iron rods should be inserted into the side recesses. The gaps between the reinforcement and ceramics are filled with glue. There is no need to completely fill the cavity. The glue must be positioned so that it connects the rods and ceramics in 3-4 places.
- Thermal insulating material should be wound around the ceramic pipe and lightly tightened with iron wire or a clamp. There is no need to tighten it too much, since the heat insulator should not shrink. Pressed mineral wool is mainly used as a heat insulation material.
- The pipe will need to be installed in the recess of the ceramic, and then its location will be checked. To speed up the process, you can wrap all the pipes with insulation at once. The number of pipes corresponds to the height of the chimney.
You can check the location of the pipe using a building level - The next ceramic block is mounted with glue. Another pipe is inserted into the socket of the first one. Excess glue from the inner tube should be wiped off immediately, there should be no drips.
The lock of ceramic parts must be lubricated with glue and excess removed - The actions are carried out by analogy; during the process it is important to monitor the location of the chimney.
- To secure the chimney in the attic, you need to cut the slats according to the dimensions of the recess, install them around the perimeter of the chimney and firmly nail them to the attic.
- The roof where the chimney exits should be sealed. This is done using additional elements that are sold ready-made.
Where the chimney exits through the roof you will need to install a passage unit
Video: installation instructions for a ceramic chimney
Installing a chimney through the wall
- The first step is to determine the place where the duct will be located inside the building and the chimney pipe will be installed in the wall. To protect the inner base of the bath walls from overheating, a sheet iron screen should be installed. At the passage point, you need to prepare a hole whose dimensions exceed the diameter of the pipe.
To protect a wooden wall from overheating, you need to install a sheet metal screen - The chimney must be connected to the inlet pipe of the stove using an adapter. Next, you should put on a piece of pipe with a damper.
- The parts must be fastened with iron clamps. The joints are treated with a sealant that is not afraid of high temperatures. The chimney must be brought to the point of passing through the wall. If you need to turn the pipe and lay a horizontal section, you will need to use 45° and 90° bends.
- In the place where the structure passes through the obstacle, you need to place a fire-resistant box. It is made of iron or asbestos cement. In the free space formed between the walls of the box and the pipe, you need to place a thermal insulator that does not ignite.
- On the street side, you need to fix a part of the smoke removal system in the form of a tee, in the lower part of which there is a container for condensate.
When installing tees, you need to install brackets for support - The pipe is completed with vertical sections until the required height is reached. To fix it, you need to use iron brackets. The distance between elements is at least 1 m.
After the chimney exhaust device has been assembled, you will need to light the stove. If the smoke comes out of the firebox quickly, this means that the work was done correctly.
How to install a chimney from a bathhouse through the ground
To run a pipe through the ground, you need to insulate it. A regular layer of bitumen will not work, as the pipe will be at high temperatures. The sequence of actions will be as follows:
- You will need to prepare several lined pipes, the diameter of the first should be 5–10 cm less than the diameter of the second. One pipe must be placed inside another. It is recommended to entrust the assembly process to specialist tinsmiths.
- Pipes can be assembled from several parts. The joints are fastened with clamps. There must be 3 spacers between each clamp, otherwise the chimney structure may collapse when falling asleep.
- The joints should be treated with heat-resistant sealant.
- The outer pipe, which is located in the ground, will need to be coated with bitumen.
The instructions may seem simple, but it is recommended to entrust this work to experienced specialists.
Chimney diameter.
When installing a chimney pipe , it is very important to calculate the correct diameter of the chimney ; this issue should be given special attention when designing an autonomous heating system. Often the chimney pipe is selected based on approximate parameters. Many people believe that it would be better to make the cross-sectional diameter of the chimney larger, but this is not at all the case. In order for the heating system to function optimally, it is necessary to accurately calculate the diameter of the chimney.
Initial parameters for calculating the chimney pipe.
To calculate the chimney, you can use the chimney calculator.
The characteristics of the future chimney are directly influenced by certain parameters, of which the most important are:
1. Type of heating device. The organization of a gas exhaust system is in most cases necessary for solid fuel boilers and furnaces. The volume of the combustion chamber is taken into account, as well as the area of the opening of the chamber for air entering the firebox - the ash pan. Often calculations are made for homemade boilers that run on diesel fuel or gas.
2. The total length of the chimney and its configuration. The most optimal design is considered to be 5 meters long and with a straight line. Additional vortex zones that negatively affect traction are created by each turning angle.
3. Geometry of the chimney section. The ideal option is a cylindrical chimney design. But this shape is very difficult to achieve for brickwork. The rectangular (square) cross-section of the chimney is less efficient, but it will also require less labor.
Which side should we approach the question from?
We suggest trying to choose a ready-made sauna stove option that meets the greatest number of your requirements:
- power corresponding to the parameters of the room (volume, thermal insulation, required maximum temperature, speed of entry into operating mode, etc.);
- the estimated height of the chimney, calculated based on the parameters of the building in which the bathhouse is located;
- the type of fuel used;
- possible design features of the organization of smoke removal (through the wall or through the roof, the presence and need for inspections for cleaning, draining condensate, etc.).
And, if the first point is initial and defining, and operates in a fairly narrow corridor, then the rest are corrected to a greater extent by you. As a rule, the manufacturer attaches instructions to the sauna stove, which regulates the parameters of the chimney, including requirements for it in various installation options. Choose one that can effectively work with the chimney design you desire.
Approximate and accurate calculation of the chimney diameter.
Accurate calculations are based on a complex mathematical platform. To calculate the diameter of the chimney , you need to know its main characteristics, as well as the characteristics of the fuel and heating device. For example, you can take the calculation of a standard pipe with a round cross-section without rotating units, connected to a stove and burning wood. The following calculation input parameters are taken:
- gas temperature at the entrance to the pipe t– 150°С;
- the average speed of gas passage along the entire length is 2 m/s;
- burning rate of wood (fuel) with one stack B = 10 kg/hour.
Article on the topic: How to make a fence from pallets
Following these data, you can proceed directly to the calculations. First you need to find out the volume of exhaust gases, it is determined by the formula:
Where V is the volume of air required to maintain the combustion process at a speed of 10 kg/hour. It is equal to 10 m³/kg.
Substituting this value we get the result:
Then we substitute this value into the formula that calculates the diameter of the chimney :
To make such a calculation, you need to know exactly all the parameters in the future gas exhaust system. This scheme is very rarely used in practice, especially in the case of organizing a household autonomous heating system. determine the diameter of the chimney in other ways.
For example, based on the dimensions of the combustion chamber. Since the amount of fuel burned depends on its size, the volume of incoming gases also depends on it. If there is an open firebox and a chimney with a round cross-section, then the ratio is taken to be 1:10. That is, when the size of the combustion chamber is 50*40 cm, then the optimal chimney diameter will be 18 cm.
When constructing a brick chimney structure, the ratio is 1:1.5. The diameter of the chimney system in this case should be larger than the size of the blower. The square cross-section will be no less than 140*140 mm (this is due to the turbulence created in the brick pipe).
How to properly install a pipe in a bathhouse: the advantages of brick devices
Compared to its metal counterpart, this method has been used for much longer. Previously, there were no metals in production that could withstand extremely high temperatures. Making a brick chimney is a very painstaking task and requires professional training, experience and perfectly calibrated calculations. We strongly do not recommend building such a device yourself if you are not a pro. Unlike metal pipes, the brick laying method has the following advantages:
- Thermal and thermal insulation. An old and proven method will allow you to maintain heat inside the bath for a long time. Vapor circulation also improves.
- Durability. A bend made of fire-resistant brick lasts much longer than its iron counterpart. A structure built according to the correct drawings from high-quality material will please the owner for many years, and the system will not have to be replaced.
- High fire resistance. A bathhouse is a place with an increased risk of fires, so safety and fire resistance become one of the main indicators when choosing materials. A brick structure will prevent flames from spreading, thereby protecting both the property and the owner.
Swedish method for calculating chimney diameter.
In the examples described above, the height of the gas exhaust system is not taken into account. For it, the ratio of the area of the combustion chamber to the cross-section of the pipe is used, taking into account its height. The pipe value is determined according to the graph:
Where f is the chimney area, and F is the firebox area.
However, this method is more applicable to fireplace systems, since the volume of air for the firebox is not taken into account.
You can choose different methods for calculating the diameter of the chimney , but when installing complex heating systems, an optimally accurate diagram is important, especially for low-temperature long-burning heating devices.
Some more tips
In addition to height, the draft force is influenced by the shape of the internal section of the chimney. An oval passage is considered optimal, since as you gain altitude, the smoke begins to twist into a spiral and nothing prevents it from accelerating. Square and rectangular sections themselves become an obstacle due to the internal corners, so the surface must be smoothed as carefully as possible. Some masons select and lay bricks with the smooth side inward, while removing the mortar buildup.
Another important point is the size of the chimney diameter. Oval passages are made according to the size of one tenth of the area of this firebox parameter. Square pipes require an area size of one fifteenth of the firebox area. The general rule for all smoke ducts is that their diameter should not be less than the width of the upper exit from the ash pit.
In addition to the height of the pipe relative to the ridge, you should take into account its height from the location of the ventilation ducts . Ventilation located nearby requires raising the height of the chimney by 20–25 cm from its horizon. If there is insufficient draft in the pipe, then the method of increasing the pipe height is used. But at the same time, you should remember the rule of relevance, that is, you should not make the height too large or insufficient.