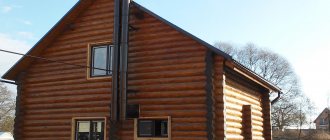
“Don’t rush to throw away old things, they may still come in handy.” In the scoop, everything was done conscientiously, thoroughly, with a scientific approach, so that the products would serve for many years and be as useful as possible for humans. Nowadays, in the era of disposable things, the quality of Soviet goods is especially noticeable. Many have long taken note of this, and quite successfully use them for their household solutions... we will talk about a cast iron bathtub.
Street option
Cutting the bathtub
It is best to saw the bathtub outdoors, after turning it upside down. Cast iron is a brittle metal, so the procedure requires care. The cutting is done with a grinder. Buy several cutting discs at once. We make markings, and then lightly cut the enamel along the line so that when a full cut is made, chips do not form. We saw through the cast iron at a slight angle and make sure that the tool does not heat up. We take breaks. To prevent the halves of the sawn tub from pinching the disk at the final stage of cutting, place supports made of wood or brick along the edges of the cut.
Bathroom cutting is done with a grinder
Potbelly stoves - proven and simple designs
Potbelly stoves were a hit of the 20s of the last century. At that time, these stoves competed with brick stoves and were installed everywhere, even in apartments. Later, with the advent of centralized heating, they lost their relevance, but are used in garages, dachas, and for heating utility or outbuildings.
Sheet metal
Potbelly stoves from a cylinder, barrel or pipe
The most suitable material for making a potbelly stove for a garage is propane cylinders or a pipe with a thick wall. Barrels are also suitable, but you need to look for ones that are not very large in volume and have a thick wall. In any option, the minimum wall thickness is 2-3 mm, the optimal is 5 mm. Such a stove will serve for many years.
By design they are vertical and horizontal. It is more convenient to burn horizontally with firewood - longer logs will fit. It’s easier to make one extended upward, but the firebox is small in size, so you’ll have to cut the wood finely.
A potbelly stove for a garage can be made from a cylinder or pipe with a thick wall
Vertical
First, how to make a vertical stove for a garage from a cylinder or pipe. Divide the selected segment into two unequal parts. Below is a smaller one for collecting ash, above is the main one for storing firewood. The following is the order of work:
- Cut out the doors. Small at the bottom, solid at the top. We use the cut pieces as doors, so we don’t throw them away.
- We weld the grates in the chosen place. Usually this is steel reinforcement cut into pieces of the required length with a thickness of 12-16 mm. The reinforcement installation step is about 2 cm.
- Weld the bottom if there is none.
- We cut out a hole in the lid for the chimney, weld a strip of metal about 7-10 cm high. It is better to make the outer diameter of the resulting pipe fit standard chimneys. Then there will be no problems with the installation of the chimney.
- We weld the lid with the welded pipe into place.
- Using welding, we attach the locks and hinges to the cut-out door pieces and install it all in place. As a rule, potbelly stoves are not airtight, so there is no need to make seals. But if desired, you can weld a strip of metal 1.5-2 cm wide around the perimeter of the doors. Its protruding part will cover a small gap around the perimeter.
Overall, that's it. All that remains is to assemble the chimney and you can test a new stove for the garage.
Horizontal
If the housing is located horizontally, the ash box is usually welded from below. It can be welded to the required dimensions from sheet steel or a piece of channel of a suitable size can be used. Holes are made in the part of the body that will be directed downwards. It’s better to cut something like grate bars.
How to make a potbelly stove for a garage from a gas cylinder
Then in the upper part of the body we make a pipe for the chimney. To do this, you can weld a cut piece from a pipe of a suitable diameter. After the piece of pipe is installed and the seam is checked, the metal inside the ring is cut out.
Next you can make the legs. The best fit is pieces of a corner, to which small pieces of metal are attached from below so that they stand stable.
The next step is installing the doors. You can cut a piece of metal onto the ash pan, attach hinges and a lock. There are no special problems here. The gaps around the edges do not interfere - combustion air will flow through them.
There will be no difficulties if you are making a door from metal - welding the hinges is not a problem. Only here, in order to be able to at least slightly regulate the combustion, the door needs to be made a little larger - so that the perimeter of the opening is closed.
How to install stove casting on a metal stove
It is problematic to install furnace casting. Suddenly someone wants to have not a steel door, but a cast iron one. Then you need to weld a frame from a steel corner, attach the casting to it with bolts, and weld this entire structure to the body.
From two barrels
Anyone who has used a potbelly stove knows that very hard radiation comes from its body. Often the walls become heated to a red glow. Then it is impossible to be near her. The problem is solved with an interesting design: two barrels of different diameters, inserted one into the other. The gaps between the walls are filled with pebbles, clay mixed with sand (calcined over a fire, then filled in only after it has cooled). The inner barrel acts as a firebox, and the outer one is just the body.
This stove will take longer to heat up. It will not immediately begin to give off heat, but it will be more comfortable in the garage and after the fuel burns out, it will warm the room for another couple of hours - releasing the heat accumulated in the bookmark.
https://youtube.com/watch?v=PEWZxL2ebXE
Other uses
An old bathtub can serve well the owner of a country house or cottage, you just need to show a little imagination. Often, an old plumbing device is used in the following ways:
- Swimming pool for children. The usual inflatable pool is not the most practical thing; it can easily be replaced with a bathtub, not forgetting to install drainage at the drainage point; subsequently, such a pool can easily be transformed into an artificial reservoir.
- Design element. If you combine a flower bed and a table, then such an item can be safely placed on the terrace and admire the lush blooms in any weather.
Table for a creative person Source pinterest.ca
For those who like to cook. The streamlined shape is ideal for creating a barbecue or stove; You can also get a mini-cellar or hiding place.
When a bath doesn't spoil the view Source pinterest.com
Compost container. The bathtub is equipped with a reliable, tight-fitting lid to prevent unpleasant odors from spreading.
An alternative to a compost bin Source gjcleverley.com
Calculation of basic parameters (with drawings and dimensions)
High efficiency of a potbelly stove can only be achieved if all the main design parameters are correctly calculated.
Pipe
In this case, the diameter of this element is very important. The throughput of the chimney should be less than the productivity of the furnace firebox, which is the main distinguishing feature of a potbelly stove. This will allow warm air not to immediately leave the stove, but to linger in it and heat the surrounding air.
It is very important to make an accurate calculation for it. The diameter should be 2.7 times the volume of the firebox. In this case, the diameter is determined in millimeters, and the volume of the firebox in liters
For example, the volume of the combustion chamber is 40 liters, which means the chimney diameter should be about 106 mm
In this case, the diameter is determined in millimeters, and the volume of the firebox in liters. For example, the volume of the combustion chamber is 40 liters, which means that the chimney diameter should be about 106 mm.
If the potbelly stove provides for the installation of grates, then the height of the firebox is calculated without taking into account the volume of this part, that is, from the top of the grate.
Screen
It is very important to force the hot gases not to cool, but to burn out completely. In addition, the fuel must burn through partial pyrolysis, which requires extremely high temperatures. A metal screen located on three sides of the stove will help to achieve a similar effect.
It should be placed at a distance of 50–70 mm from the stove walls, due to which most of the heat will return to the stove. This air movement will give the necessary high temperature and protect against fire.
A metal screen located on three sides of the stove will help to achieve a similar effect. It should be placed at a distance of 50–70 mm from the stove walls, due to which most of the heat will return to the stove. This air movement will give the necessary high temperature and protect against fire.
The screen of a potbelly stove made of red brick is capable of accumulating heat
Litter
It definitely has to be there. There are two reasons for this:
- some of the heat is radiated downwards;
- the floor on which the stove stands gets hot, which means there is a risk of fire.
The litter solves these two problems at once. As such, you can use a metal sheet with a projection of 350 mm (ideally 600 mm) beyond the contour of the furnace itself. There are also more modern materials that do an excellent job of this task, for example, a sheet of asbestos or kaolin cardboard, at least 6 mm thick.
You can use an asbestos sheet for bedding under a potbelly stove.
Chimney
Despite all the calculations, gases sometimes escape into the chimney not completely burned out. Therefore, it must be done in a special way. The chimney consists of:
- the vertical part (1–1.2 m), which is recommended to be wrapped in thermal insulation material;
- hog (slightly inclined part or completely horizontal), 2.5–4.5 m long, which should be 1.2 m from the ceiling, which is not protected with heat-resistant materials (1.5 m from the wooden surface), from the floor - by 2.2 m.
The chimney must be vented to the street
Stages of constructing a cooking structure
Brick foundation
- A part of the bathtub (with a limiting hole) is installed level. A metal corrugated sheet of metal (8-12 cm thick) is placed on the upper surface, and the second part of the split bath is covered with the bowl down. The contact points of these elements are pre-treated with fire-resistant silicone for fireplaces. The resulting structure, for ease of further assembly, is fixed with clamps.
- In 6 places, symmetrically, through holes for bolt fastening are drilled at the joints. The bolts are tightened. The main frame is ready.
- The lower part of the furnace must be equipped with a removal of burnt gases to ensure draft.
There are 2 options:
- installation of the pipe on the side of the structure. To do this, a hole is formed for the pipe, where it is secured by welding;
- the pipe passes directly through the structure. To do this, before assembly, you need to take care of arranging the holes in the corrugated sheet and the upper bowl.
To ensure traction, the pipe needs to be 2-3 meters long. The pressure difference allows you to avoid backdraft in gusty winds. The top of the chimney should be equipped with a protective cap against rain.
Almost done
- On the front side, the stove must be equipped with dampers: a firebox and an oven door. This is done using brickwork and (or) metal sheets.
- The lower part of the stove is lined with brick, lined or plastered. The cooking oven is ready.
For heating
This type of bathroom stove is even simpler. For its construction, only one part of the bath is needed.
It is installed on the first row of bricks on a previously prepared foundation, covered with red brick, the voids are filled with sand and (or) broken glass.
The bowl is covered with a thick corrugated metal sheet (10-12 mm) and secured with bolted fasteners. The seams are treated with fire-resistant silicone or other similar sealant. To avoid deformation of the sheet from fire, it is reinforced with welded metal corners.
The combustion chamber is closed with a door, the compartment is equipped with an ash pan (welded from a profile pipe).
The chimney must be equipped with a control damper.
For waste disposal
There is no special scheme for burning natural waste from the bathroom. Both cooking and heating structures are suitable for this purpose. The main condition for accelerated combustion of waste will be to ensure increased draft in the furnace structure. To do this, you can temporarily increase the chimney - the greater the pressure difference, the faster the combustion will occur.
Cheap and cheerful
Stage No. 4: finishing
Here I had two tasks:
- Insulate the stove structure even more;
- Decorate the building, making it an excellent addition to the country interior.
And I started:
- I mixed a solution of clay and sand in a ratio of one to two;
The composition of clay and sand tolerates high temperatures well
You can also add some lime to the mix. This will reduce the risk of cracks appearing during the hardening of the finishing layer.
- I covered the cooking compartment with a steel mesh , the mesh size of which is 20 mm, and fixed its edges to the brickwork using self-tapping screws and plastic dowels. Now the clay plaster applied on top will not slide down the smooth cast-iron surface, and when it dries, it will have sufficient strength;
- By this time, the mixed mixture had reached the desired consistency, and using a spatula I applied the first finishing layer , which I did not smooth;
The first layer is ready and drying
- After the clay had set, I completed the final finishing , then moistened the spatula and carefully leveled the created coating. In total, my cladding was approximately 70 mm thick;
- After hardening I whitewashed the fur coat , adding to the similarity of the appearance of the structure with ancient stoves.
Oven after whitewashing
Also, in the future, I also want to cover the brickwork with ceramic tiles, but in order to save money, I don’t want to specifically purchase expensive materials for this. Therefore, I’m waiting for the time to renovate the bathroom at the dacha to use the ceramics removed from its walls.
Furnace No. 1
This version of the stove is capable of heating a bathhouse of 7 square meters. m to 80 degrees in just a couple of hours. To build a stove you will need scrap metal: a cast iron bath, a gas cylinder and a metal drum from a conveyor belt with a diameter of 40 cm. The drum can be replaced with a gas cylinder or pipe - this will be the combustion chamber. The sequence of work is as follows:
- A concrete foundation is being poured for the future furnace.
- The end of the bathtub is cut off.
- We make a combustion chamber: holes are drilled at the bottom of the drum. A box is welded to cover the holes and serve as an ash pit.
- We put the door on the firebox. You can use this spare part from an old stove.
- A gas cylinder is welded vertically at the opposite end of the drum.
- Now the resulting structure is placed in the bath.
Brickwork around the bathtub - A chimney pipe is welded to the cylinder.
- Lay the foundation with bricks to the height of the bathtub. Clay mortar is used for binding.
- After the masonry has dried, it is decorated with ceramic tiles. Tile adhesive is selected that is heat-resistant.
- Stones with a fraction of 7 to 15 cm are poured into the bathtub. Granite or pink quartzite. The stones quickly gain temperature and give off heat for a long time. Quartzite releases chemical compounds into the air that normalize blood pressure and metabolism. This bathtub can hold approximately 350 kg of stones. Bathhouse technologists claim that this number of stones is enough for a bathhouse of 10 square meters. m.
Advice. If you weld a flat metal platform to the cylinder, you will get a stove for heating the kettle.
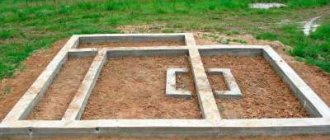
Why do you need a foundation?
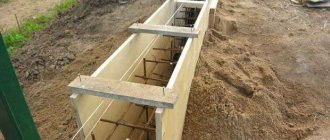
Having cut the main part of the future stove into two identical fragments, you can begin building the foundation. It is the main stabilizing element of the structure. Without a solid cement foundation, regular shrinkage will occur (do not forget about the weight of the metal) into the soil, which can render the brickwork unusable.
The technology for constructing a concrete base may be different. A small stand can be built without additional supports; to build a tall one, you will have to put together a blind area. The main purpose of the blind area is to give the concrete base an even shape.
Diagram of a concrete foundation with a blind area
Cast iron stoves: let's evaluate the advantages
I would like to warn you right away that this process is very labor-intensive, requiring great patience and caution, since during its execution you can break the instrument and tear the disc, as a result of which there is a high probability of serious injuries to people nearby
Schematic instructions for sawing a cast iron bathtub
- To begin with, I laid the bathtub on the ground upside down for ease of further operations;
- Strictly in the middle I drew a straight line with a marker, marking the place of the cut;
The cutting line should be strictly in the middle
- Next, strictly following the applied markings, using a grinder, I carefully made a cut into the enamel layer, the depth of which, as a rule, ranges from 1.5 to 2.5 mm. If you immediately start sawing the cast iron itself, then chips will form on the enamel covering it;
Scheme of cutting the enamel layer
- Now I moved on to sawing the font itself and did it slowly, regularly giving the tool rest. Believe me, the price of haste here can be very high; the saved 20-30 minutes will not replace your burnt angle grinder.
This type of metal is rightfully considered one of the best stove materials. Its main advantages include:
- Environmental safety. When heated, it does not emit harmful substances.
- Resistant to temperature changes. An outdoor stove made of brick may begin to crumble after just a few years.
- High thermal conductivity. A fireplace made of cast iron will warm up a room much faster than one built from other materials.
- Strength. Cast iron is the leader among metals in terms of strength. Even steel stoves are less reliable.
- Ease of use.
- Fire safety.
The disadvantages of cast iron that are worth paying attention to are brittleness and susceptibility to corrosion. In the first case, unnecessary mechanical influences should be avoided; in the second, the surface should be treated with special solutions.
Cast iron parts are valued in the manufacture of heating devices for two reasons:
- the metal heats up quickly and retains heat for a long time;
- Despite sudden temperature changes, cast iron does not wear out and lasts for decades.
An old cast iron bathtub is the main element of a garden stove
The concave shape of the product is also suitable for constructing a fryer. It resembles a dome, which can serve as both the base of the oven and the combustion chamber compartment. So, if you want to build an original barbecue oven with your own hands from an old bathtub, arm yourself with the tools and get to work.
We immediately warn you that the cutting process is a labor-intensive task that requires effort, endurance and certain knowledge. Anyone who has previously worked with an angle grinder knows the technology of cutting thick metal sheets, but here is a special case: the base material is covered with a thick (about 2 mm) layer of enamel. Therefore, you need to cut carefully, slowly, in sections of 5-10 cm, pausing to allow the disc to cool.
Half sawn bathtub
Why is a homemade cast iron stove (in our case, a stove made from a cast iron bathtub) so profitable? Cast iron is one of the best materials for this purpose, but factory-made cast iron stoves are quite expensive. This material has gained popularity due to its strength, although it is fragile. In addition, it is resistant to critically high temperatures and unpretentious in operation.
Modern cast iron stoves are especially popular
Comparing cast iron and brick stoves, we will say that the thermal conductivity of the first is much better. And since the bathhouse does not maintain a high temperature all the time, the material should not be sensitive to temperature changes.
In winter, a bathhouse at a summer cottage is usually not heated, which is why the brick sometimes begins to crumble, but cast iron has no such problems. As for fire safety, only a new brick stove is absolutely not dangerous. With an old product, sparks may break through cracks.
In order to enhance the aesthetics, it is best to line a home-made cast iron bathtub stove with brick. If some blocks are damaged, they can be easily replaced.
By making a stove from a cast iron bath, you will become the owner of a convenient and reliable device that functions perfectly in any conditions. From such a bathtub you can also make a very original fireplace for your dacha. It is especially suitable for those who are currently laying the brickwork for a country house, since the fireplace is, as it were, “recessed” into the brick wall, and this makes it possible to use the space with maximum benefit.
Preparatory work: choosing an installation site and laying the foundation
Cut parts from steel sheets must be checked for the absence of burrs and sharp metal protrusions, as they will interfere during welding
You should also pay attention to the size of the cut elements
When choosing a place to install the stove, you should take into account that it is better to install these units in the corner of the room away from walk-through doors and windows. If such a stove is intended for a bath or steam room, then it can be installed behind a small partition. This will additionally protect against accidental contact with hot oven surfaces.
Option for a bath
It is best to build the foundation for the furnace together with the building under construction. However, if the heating structure is planned to be installed indoors, it is necessary to dismantle the floor to the very foundation. In this case, logs can be cut only after the foundation has been erected to their level.
Over time, the building shrinks, and otherwise the base of the furnace will crack and the unit will warp.
To lay the foundation for a brick-lined stove, you must perform the following steps:
Make markings for the future dimensions of the oven. It is more convenient to take notes on the wall. Disassemble the floor covering. You need to get to the ground itself. At this stage, do not saw the wooden joists.
In accordance with the markings on the wall, dig a pit 50 cm deep and 75 cm wide. If there is a large amount of sand in the ground, the walls of the pit may crumble. To avoid this, you need to cover them with roofing felt or polyethylene. Carefully compact and level the bottom of the pit. Pour medium-fraction gravel inside to create a layer 250 mm thick. Lay waterproofing on top of it - roofing felt. Then fill in a layer of sand equal to 150 mm. It needs to be compacted. Please note that wet sand compacts better.
Make formwork for liquid concrete from boards or OSB boards. If it is made of boards, then concrete can pour out through the cracks or earth can be poured inside. To prevent this, the inner surface of the formwork can be covered with polyethylene.
Now it is necessary to make a metal frame that will strengthen the concrete base. For this you need reinforcing bars with a thickness of 8 to 10 mm. From them it is required to make a three-dimensional structure consisting of two gratings connected at a distance of 200 mm parallel to each other. The width of the cells should be no more than 150x150 mm. The intersections of reinforcing bars can be strengthened by welding, wire or plastic clamps.
Install the finished metal frame inside the formwork. It should be noted that this structure must be placed at a height of 50 mm above the waterproofing. To do this, you can drive wooden stakes or pieces of reinforcement perpendicular to the base. Attach a metal frame to them. You can use halves of bricks for this, which will create the desired height for placement. Pour the concrete mixture. The M 300 or M 400 brand is suitable for this.
Care should be taken to ensure that all elements of the reinforcement frame are hidden under a layer of concrete. During the process of pouring the foundation, air bubbles are formed, which must be removed by bayoneting or using a deep vibrator. Cover the poured mixture with polyethylene
This is necessary for the foundation to harden evenly. If this is not done, moisture will evaporate from the top layer of concrete. This can cause the hardened base to crack and lose its strength. After 8–10 days, the foundation will harden. Clean the frozen base from dust and debris. Cover with waterproofing material. Ruberoid or thick polyethylene is suitable for this. On top, make a continuous layer of fire-resistant red brick. When the level of the masonry reaches the joists, they must be sawed down so that the wooden ends lie on the concrete base.
Making a stove from an old bathtub with your own hands: step-by-step instructions
So, let's look at how you can make your own stove from a cast iron bathtub.
For a country house, you can make a stove from an old cast-iron bathtub, which in its strength and service life will not be inferior to models from the factory
First we build the foundation.
- Using a cord and stakes, we mark the foundation.
- We dig a trench, the depth of which should not be less than 50 cm. We put layers of sand and gravel on the bottom, and then compact them thoroughly.
- On top of the sand and gravel cushion we place a waterproofing layer, usually polyethylene.
- To raise the base of the foundation, we build formwork in the center. Typically, general formwork is built, and pouring is done to a height of at least 30 cm.
- The free volume is reinforced and filled with a solution of cement and sand (1 part cement to 3 parts sand). The volume can also be filled with brickwork.
- After pouring the foundation, it must harden.
Now it's time to design the stove itself.
To this end, we perform the following actions:
Cutting a cast iron bathtub crosswise
This must be done carefully, since cast iron is very fragile. If the movements are sloppy or abrupt, you can damage the bath so that it becomes unsuitable for subsequent work. We take half of the cut bathtub, and then install it on top, and in such a way that we get a structure that looks like a capsule with a cut. Further work will require a sheet of metal with a thickness of more than 5 mm
For the design you will need two halves of the bath and a metal sheet, which is necessary to separate the lower part from the upper (the area for fuel from the place where food is prepared).
A hole for the chimney must be provided in the sheet of metal, located near the back wall. The chimney starts from the lower chamber and then goes through the entire stove.
The chimney is attached to the metal sheet using welding.
We install the stove blank on the bricks
To prevent the structure from falling, it is very important to level it. Before you start welding, it is recommended to warm up the cast iron a little (for example, the material will become much more pliable if you heat firewood in the chamber). In the lower chamber, we cover the front part with a metal sheet, first making a large diameter hole in it (through this hole firewood will be thrown into the chamber). We make chamber doors for the firebox and for cooking.
Well, a simple and quite functional stove is ready. All that remains is to decorate the structure, making it a decoration of the yard. The stove can be painted, for example, in a folk style. No one will even think that a cast iron bathtub was used to make the product.
Sauna stove from an old bathtub
A cast iron bathtub can form the basis of a good kitchen stove. However, it is quite possible to make an excellent sauna stove from it, and with your own hands.
Cast iron is an environmentally friendly material, so no harmful substances are released when heated
Building a bathhouse and equipping a stove in it will require certain skills, so before construction it makes sense to consult a professional.
There are certain requirements for sauna stoves:
- All such furnaces must have enough power (thermal), and they must also have a large range of adjustment.
- To change the heat and moisture regime, the device is equipped with a heat accumulator and a steam generator.
- Furnaces should have the ability to adjust the convention.
So, from a well-worn cast iron bathtub you can make a simple two-tier sauna stove that meets all the requirements listed above. The lower tier of the stove is one half of the bathtub, which faces the wall with its cut and the convex part at the top. The entire structure on the outside must be lined with brick. The required steam generation is ensured thanks to the stones that cover part of the “bath-oven”. Heat accumulation occurs in the upper chamber.
Sources
- https://sandizain.ru/na-dache/pech-iz-chugunnoj-vanny.html
- https://ogon.guru/stroitelstvo-svoimi-rukami/pech/vidi-pechey/dlya-dachi/iz-vanni.html
- https://pechnoy.guru/pechi/proekty/pech-iz-chugunnoj-vanny.html
- https://serviceyard.net/sovetyi/pechka-iz-vannyi-svoimi-rukami.html
- https://BesedkiBest.ru/pechi/pech-iz-chugunnoy-vanny.html
- https://SdelaiKamin.ru/metallicheskie-pechi/pech-iz-vanny
- https://stroy-banya.com/delaem_pech/pech-iz-staroy-vanny-svoimi-rukami.html
Alternative modifications
In fact, these are not even modifications, but, on the contrary, somewhat stripped-down options, which, nevertheless, can also be very useful in the household. Moreover, both of them can be realized from one vessel:
- For example, how to make a bath with a cast iron grill stove? After all, fried meat cooked over an open fire is simply amazing. For this it will be enough:
- Take the half of the bathtub that does not have a drain hole and attach another pair of legs to the cut edge for structural stability;
- Place a suitable sized grill on top. It is not at all necessary to fix it “tightly”; on the contrary, the removable version is more convenient to use and maintain;
- That’s it, through the open façade you add firewood or remove coals, put pork, lamb or chicken on top, and heat-intensive cast iron helps create the temperature necessary for frying;
- You can also make an effective stove for a bathhouse from a cast iron container:
- Lay the bathtub upside down so that its main part is in the steam room on a pre-prepared concrete base, and the cut goes into the next room;
- Inside, install a grate with the help of corners, and cover the facade with a metal sheet equipped with doors for the firebox and ash pan;
- Install a chimney pipe with exit outside the bathhouse area. You can first weld a small horizontal pipe into the facade, and then use an elbow to bring the chimney vertically to the roof;
- In the steam room, build a brick wall around a cast iron container at a distance of 10 cm and as high as the tank itself;
The process of installing a stove-stove from an old cast-iron font
- Fill the gap between the bricks and the bathtub with stones, which, when heated, will provide the necessary heat.
Instructions for making a stove from a cast iron bath
First of all, you need to cut the bath crosswise with your own hands.
Be extremely careful, as cast iron is quite fragile - sudden, careless movements can make it unsuitable for further work.
An angle grinder (or, as it is also called, an angle grinder) is quite suitable for cutting.
Stock up on several cutting discs and time, you can’t rush here - this is the most important part of the work.
For the next stage of DIY work, you will need a metal sheet, but one that is too thin will not work for our purposes.
Ideally, the metal thickness should be more than 5 mm.
The stove will use both halves of the vat, and the sheet is needed to separate the top from the bottom (i.e., the cooking compartment from the fuel area).
Thus, you should get two chambers - one for cooking, and the second for firewood.
To secure the sheet and the bath halves, it is best to use fasteners: clamp the edge of the sheet between the edges of both halves and put it on.
To prevent smoke from forming in the upper chamber, use oven sealant. We attach the chimney to a metal sheet by welding.
Next, we install the workpiece on the bricks with our own hands.
Here it is important to level its position as much as possible so that the stove cannot collapse
Before cooking, cast iron should be heated a little, for example, by heating firewood in the lower chamber - this will make the material easier to weld.
We cover the front part of the lower chamber with a metal sheet; first we need to make a large hole through which firewood will be placed.
An easy-to-make and at the same time functional stove for your summer cottage is ready. The only thing left to do is to decorate the structure so that it becomes a real decoration of the yard.
If you or someone you know has artistic abilities, then paint the stove, for example, with folk motifs.
It would not even occur to any neighbor or guest that such a device could be made from an old, unnecessary bathtub.
Preparing a cast iron bathtub body for remodeling
The first stage of building a heater, regardless of its design and size, always begins with removing layers of old paint, limescale, rust, and all the debris that has accumulated on its surface over decades of use.
Some craftsmen recommend burning the body on wood in the open air. The stove is placed on bricks and a small fire is lit. It will take a long time to heat the cast iron bowl, at least 2-3 hours, until the remaining contaminants burn out. In this way, it is possible to get rid of ingrained odors and at the same time “reveal” the surface from layers of lime and rust.
Advantages of using cast iron
Cast iron parts are valued in the manufacture of heating devices for two reasons:
- the metal heats up quickly and retains heat for a long time;
- Despite sudden temperature changes, cast iron does not wear out and lasts for decades.
Even the enamel used to cover plumbing equipment retains its qualities and does not immediately burn out. The fact is that the technology of applying a layer of enamel in the last century involved heating the finished product to 800ºC. The quartz sand included in the solution melted under the influence of high temperature and contributed to the baking of the enamel. It received high strength indicators and at the same time was “welded” to cast iron. The only thing you should be wary of is sudden heavy blows, under the influence of which cracks appear.
An old cast iron bathtub is the main element of a garden stove
The concave shape of the product is also suitable for constructing a fryer. It resembles a dome, which can serve as both the base of the oven and the combustion chamber compartment. So, if you want to build an original barbecue oven with your own hands from an old bathtub, arm yourself with the tools and get to work.
Materials and tools for work
To make such a stove, you need to prepare the necessary tools and materials. Since sawing a cast-iron bathtub, especially a Soviet-made one, when they really didn’t spare the metal, is not so easy, and “disposable” Chinese appliances may not be able to cope with such a task. For this work you need a reliable German or Russian tool.
Tools:
A small angle grinder - “grinder”.
The grinder must be reliable - a low-quality tool may not even cope with such a task
- Circles for cutting metal, 1 mm thick and 125 mm in diameter, you will need 3÷4 of them, depending on the thickness of the cast iron.
- Grinding wheels - for processing cut sides of metal, files.
- Electric drill with a metal drill Ø m (depending on the selected bolts). It is necessary for drilling holes in the sides of the bathtub to connect its two parts with bolts.
- Trowel and spatula for masonry and finishing work.
- Construction gun for sealant.
- Plumb and building level.
- Hammer.
Materials:
- The cast iron bath itself.
- Sheet metal, at least 5 mm thick.
- Two-burner cast iron hob. Instead, a regular metal sheet can be laid.
- Brick for building walls that will cover the lower part of the bathtub, which will be the combustion chamber, on three or even four sides.
- Grate placed in the firebox.
- Clay and sand for masonry mortar.
- Ready-made heat-resistant adhesive mixture for finishing exterior walls with ceramic tiles.
- Heat-resistant sealant (material: heat-resistant silicone).
- Bolts with nuts and washers for fastening the structure.
- Metal mesh “chain-link” for reinforcing the clay mortar, laid on the top of the bath, which will act as a cooking chamber.
- Ceramic tiles (possibly broken) for finishing.
- A metal corner, which may be required for the manufacture of brackets - for installing a grate separating the firebox and the blower.
- Chimney pipe with a diameter of about 110 ÷ 120 mm.
To ensure personal safety, work should be carried out in safety glasses, a respirator and construction gloves.
Preparation of materials and tools
To create such a miracle stove from a bathtub, you need to prepare:
- angle grinder (grinder);
- 2–3 circles on metal with a thickness of at least 1 mm and a diameter of 12.5 cm;
- electric drill;
- metal drills with a diameter of 9, 11 mm;
- grinding wheels;
- files;
- hammer;
- level;
- construction gun (for applying sealant);
- plumb line;
- putty knife;
- Master OK.
Materials you will need:
- iron or steel sheet 5 mm;
- fireproof red brick;
- grate;
- sealant;
- Rabitz;
- clay;
- sand;
- metal corner;
- bolts with nuts, washers;
- chimney pipe with a diameter of 12 cm.
Photo: the material has been prepared, all that remains is to select the purpose of the furnace and begin work.
All construction work is recommended to be carried out outdoors, having first put on protective clothing, goggles, gloves and a respirator.
Furnace No. 1
This version of the stove is capable of heating a bathhouse of 7 square meters. m to 80 degrees in just a couple of hours. To build a stove you will need scrap metal: a cast iron bath, a gas cylinder and a metal drum from a conveyor belt with a diameter of 40 cm. The drum can be replaced with a gas cylinder or pipe - this will be the combustion chamber. The sequence of work is as follows:
- A concrete foundation is being poured for the future furnace.
- The end of the bathtub is cut off.
- We make a combustion chamber: holes are drilled at the bottom of the drum. A box is welded to cover the holes and serve as an ash pit.
- We put the door on the firebox. You can use this spare part from an old stove.
- A gas cylinder is welded vertically at the opposite end of the drum.
- Now the resulting structure is placed in the bath.
Brickwork around the bathtub - A chimney pipe is welded to the cylinder.
- Lay the foundation with bricks to the height of the bathtub. Clay mortar is used for binding.
- After the masonry has dried, it is decorated with ceramic tiles. Tile adhesive is selected that is heat-resistant.
- Stones with a fraction of 7 to 15 cm are poured into the bathtub. Granite or pink quartzite. The stones quickly gain temperature and give off heat for a long time. Quartzite releases chemical compounds into the air that normalize blood pressure and metabolism. This bathtub can hold approximately 350 kg of stones. Bathhouse technologists claim that this number of stones is enough for a bathhouse of 10 square meters. m.
Advice. If you weld a flat metal platform to the cylinder, you will get a stove for heating the kettle.
Types of structures
They differ in structure and operating principles. Let's look at each type in more detail.
Open
The stones are laid on top of the stove structure and are not covered with anything. Due to this, the steam room warms up faster, reaching temperatures of up to 100 degrees. But the humidity in the room is low, so the heat turns out dry.
The product consists of three parts:
- fireboxes;
- compartments for stones;
- containers with water.
There should be few stones, otherwise the top layer will not warm up well and the steam room will not be warm enough.
To increase the level of humidity and the release of water vapor, the hot stones are simply watered. One or two ladles will be enough - this will give up to 15% humidity.
To increase the level of fire safety and reduce the risk of burns, it is recommended to lay fire-resistant bricks around the walls of the furnace or make a partition made of wood.
To heat a sauna, it is important that as much of the stove area as possible is in contact with the air space. This contributes to faster heating of the air in the steam room
Closed (lined with brick or stone)
If wood fuel is chosen for heating, you will have to prepare large reserves in advance. Such a stove takes a long time to reach the desired temperature, but, having reached the desired level, gives good heat transfer and retains heat for a long time.
Closed structures are great for large baths, where there is not only a steam room, a wash room, a dressing room, but also a relaxation room.
One of the advantages is closed stones. Therefore, there is no risk of getting burned.
In factory economical models, the stove has a double casing with a gap for air exchange between the walls.
Combined
For most manufacturers, the design consists of a high box with gratings and double valves (performs the function of a firebox). A chimney pipe emerges from the neck of the box. Stones are placed in the neck here.
There are devices available for sale with combined fuel types:
- gas-wood;
- electric wood-burning.
They do not need to be constantly monitored. Simply adjust to the desired temperature.
By design they are divided into 3 types:
- Monoblock. With heat exchanger, combustion chamber. Gas burner of a fixed type, covered with a steel sheet.
- Paired. They have two separate combustion chambers for wood and gas.
- Reconfigurable. Universal device. Can be modified for each fuel.
The first two types do not need to be reconfigured, since you can switch from one type of fuel to another.
Gas is used as main gas or liquefied in cylinders.
The electric-wood-burning design allows you to successfully heat the bathhouse using electricity or wood (optional). Moreover, firewood is considered the main raw material. When they burn out and the temperature drops, the electric heater automatically starts working. There are two heating elements on the sides of the product. Such stoves operate on a 220 W network, with a three-phase voltage of 380 V.
The owners can choose which fuel to heat the bathhouse with. But such designs are many times more expensive than simple wood-burning stoves.
Step-by-step creation of a stove from a bathtub
Without construction experience, it is worth consulting with a specialist about all the intricacies of masonry and installation of parts, and it is better to carry out the work under the supervision of a foreman. This way the product will be of high quality and fire safety standards will be met.
As for the construction of the foundation, its type depends on the total weight of the furnace:
- For a structure over 700 kg, a monolithic or strip base with a depth of 50 cm should be installed. Formwork is constructed around the perimeter of the pit and covered with a layer of crushed stone or broken brick. It gets compacted. Filled with concrete.
- For small ovens, a brick foundation is sufficient. It is recommended to purchase cement grade no lower than M300. The bricks are placed edgewise and fastened together with mortar.
Now let's look at detailed instructions for making each of the stoves for different purposes.
For the bath
To create the necessary conditions in the steam room, the design must meet the following requirements:
- have high thermal power;
- regulate convection currents;
- produce sufficient steam.
The procedure for constructing a sauna stove:
An interesting idea to make a sauna stove from both halves of the bathtub. The second part will be needed as an extension for heating water, or you can use it to build a Russian heater.
For cooking
You can’t do without a barbecue or grill at your summer cottage. And the opportunity to bake delicious bread and fry meat in the fresh air forces owners to install small outdoor ovens on the premises.
Here is a description of how to build a barbecue step by step from a bathtub.
The sequence of work is as follows:
Some craftsmen leave the barbecue in this condition, but to keep your stove looking beautiful, you should still do the exterior finishing.
There are several options:
- Whitewashing the clay part.
- Laying whole ceramic tiles or pieces.
- Surface finishing with natural stone, pre-cut into pieces 10 mm thick.
The materials are attached to the oven with heat-resistant adhesives.
For heating
At the dacha it is easy to build a fireplace from half a bathtub. He can be:
- Built into the wall. Suitable if the house has brick walls. Significantly saves free space.
- Leaned (half-open). The firebox is located at a considerable distance from the wall. This fireplace does not require a separate foundation; it is mounted directly into the floor. It has good traction and a built-in ash pan.
The advantage of using a cast iron bath for the combustion part is that the fireplace is shaped like an arch and eliminates complex brickwork. The hole for the chimney pipe is made at the top of the bathtub. The outer part is decorated with a fireplace portal.
When building a semi-open fireplace, the following recommendations should be taken into account:
- Cement mortar up to 15 mm thick is poured under the base.
- A metal mesh is laid on top.
- A layer of waterproofing is applied.
- Insulation such as asbestos cardboard is laid.
- A pedestal for the firebox is being built. Brick or aerated concrete will do. The binder mixture is cement mortar or heat-resistant glue.
- The structure is plastered. You can decorate it with stone or ceramic tiles.
- A gap is left between the lining and the firebox for the convection heating system.
- The chimney pipe is mounted in the hole made and discharged through the ceilings and roof. Often done in the shape of a sleeve.
- The inside of the firebox and chimney are lined with heat-insulating, non-combustible material.
- The lower part of the fireplace is being finished.
- The product is closed on the side and top with a frame made of aluminum corners connected with self-tapping screws.
- The frame is covered with plasterboard.
- Holes are made in the cladding for air ventilation.
For waste disposal
An unusual solution to build a waste incinerator from an old bathtub.
The principle of its construction is similar to a street barbecue.
Layout of the stove on a brick base
An alternative is to remodel an old heater by removing all parts except the grate and body. Part of the cast iron is welded to the base from the inside to strengthen the structure.
You can load waste into this fire bin directly from the top. When burning, the stove should be covered with another part of the bath so that the smoke does not disperse throughout the entire area.
So you shouldn’t rush to get rid of things that are out of order or out of shape. In skillful hands, even an old bathtub will get a second life and become a functional stove that will last for many years.
Water supply
Manufacturing
Making homemade equipment begins with drawing up a drawing of a metal sauna stove. It is necessary to indicate the components and main dimensions. The manufacturing process consists of several main stages.
Tools and materials
After drawing up the drawing, you can go to the hardware store for materials and tools:
- grinder with metal discs;
- welding machine with electrodes;
- a set of measuring instruments;
- sheets of metal;
- metal corners;
- doors for the combustion chamber, blower;
- fittings for making a grate;
- chimney pipes.
Additionally, you will need a metal water tank, which must have a drain valve, a water supply hole with a plug.
Preparation
Before you begin assembling homemade furnace equipment, you need to cut the metal sheets into component parts according to size. After this, it is advisable to temper the steel. To do this, you need to perform several steps:
- Heat metal parts.
- Allow the metal to cool on its own.
When steel tempering is completed, you need to check the dimensions of the parts. They shouldn't change much.
Making a firebox
The firebox can be made from a large diameter metal pipe or made from individual sheets of metal. Both manufacturing methods need to be considered.
Assembling a firebox from separate sheets of metal:
- Cut metal sheets to create the body.
- Separately weld the two parts of the box.
- Secure reinforcement between the parts.
- Weld the box parts together. Make two rectangular holes in the front part - one above the grate, the other below it.
- Make holes in the holes.
- Drill a round hole in the top of the box for the chimney.
Assembling a firebox from a large diameter pipe:
- Place the handset in a vertical position. Cut it into two parts.
- Attach the reinforcement to the surface of the lower part to form a grate.
- Weld the two pieces of pipe together.
- Cut two holes above and below the grate. Secure to the door holes.
- Make a hole for the chimney in the upper part of the homemade firebox.
When the combustion chamber is ready, you can begin assembling the heater.
Pipe stove frame
How to make a heater?
There are two methods for making a heater. First assembly method:
- If homemade stove equipment is made from a large-diameter pipe, you can place the heater inside it, above the combustion chamber. To do this, you need to cut an additional door above the firebox.
- Weld the fittings so that stones that will be heated can be poured over the combustion chamber.
- A tank can be mounted on top of the entire structure. The stones are placed inside the oven, the door is closed, and the wood is set on fire.
Second assembly method:
- If a water tank is not needed, you can place the heater on top of the stove, around the chimney.
- Attach the smoke exhaust pipe to the hole made. Weld the walls for the heater along the contour of the metal box on top.
After this, you can pour special stones inside the homemade heater.
Assembling a tank for heating water
When assembling a homemade stove with a water tank, the container is placed above the overall structure of the stove. On top of the heater you need to weld a metal plate 10 mm thick. Make a hole in it for the chimney. After this, weld the water tank from separate metal sheets. Make a hole on the side for the drain valve.
Installation of the structure
After assembling a homemade stove, you need to properly install it in the bathhouse. To do this, you need to take into account some rules:
- Choose a location so that the stove is away from the walls.
- For the foundation you need to make a masonry of refractory bricks.
- Adjacent surfaces should be covered with a layer of non-combustible material, a sheet of reflective steel.
- To improve heat transfer, you can line the stove with a layer of red brick. In this case, you need to leave a distance between the metal and brick surfaces.
- To protect bathhouse visitors from burns, you can assemble a wooden fence. The wood must be pre-impregnated with fire-resistant impregnations.
When installing a chimney, you need to take into account that the pipe will get very hot. Therefore, it is necessary to make additional insulation where the pipeline passes through the ceiling and roof.
Cast iron stoves: let's evaluate the advantages
Why is a homemade cast iron stove (in our case, a stove made from a cast iron bathtub) so profitable? Cast iron is one of the best materials for this purpose, but factory-made cast iron stoves are quite expensive. This material has gained popularity due to its strength, although it is fragile. In addition, it is resistant to critically high temperatures and unpretentious in operation.
Modern cast iron stoves are especially popular
Comparing cast iron and brick stoves, we will say that the thermal conductivity of the first is much better. And since the bathhouse does not maintain a high temperature all the time, the material should not be sensitive to temperature changes.
In winter, a bathhouse at a summer cottage is usually not heated, which is why the brick sometimes begins to crumble, but cast iron has no such problems. As for fire safety, only a new brick stove is absolutely not dangerous. With an old product, sparks may break through cracks.
In order to enhance the aesthetics, it is best to line a home-made cast iron bathtub stove with brick. If some blocks are damaged, they can be easily replaced.
Steel competes seriously with cast iron. In terms of heating speed and strength, steel stoves are not inferior to cast iron ones, but the service life of the former is significantly shorter. Perhaps the main weak point of steel furnaces is their susceptibility to corrosion. With cast iron this problem is not as pronounced.
By making a stove from a cast iron bath, you will become the owner of a convenient and reliable device that functions perfectly in any conditions. From such a bathtub you can also make a very original fireplace for your dacha. It is especially suitable for those who are currently laying the brickwork for a country house, since the fireplace is, as it were, “recessed” into the brick wall, and this makes it possible to use the space with maximum benefit.
Video: Universal miracle stove made from a cast iron bath
Having assessed all the advantages of cast iron (for example, compared to steel) and the relative ease of making a bathhouse from a cast iron bathtub, we note that making a bathhouse yourself from this material is very profitable. So, if you want to make a stove with your own hands from an old bathtub, purchase the missing material, pick up the tools and get started!
The time when an old bathtub was only suitable for collecting water for irrigation has passed. The opening of construction hypermarkets throughout the country ensured the availability of tools and finishing materials.
It turned out that a bathtub is not just an object that should remain forever as it is, but an irreplaceable material for the manufacture of stoves, barbecues, fireplaces and other inventive solutions. Let's look at the most interesting options.
The idea that used cast iron bowls are ideal for making stoves and braziers quickly spread among craftsmen. The reasons are due to the combined properties of the material:
- quick heating of cast iron and long-term heat retention, unlike steel;
- durable enamel coating, sintered during application, at a temperature of 800°C;
- high wear resistance of the alloy even with temperature changes.
It is these properties that cast iron cookware, beloved by many cooks, is known for. Meat, pies, vegetables in pots cooked in such a Russian oven will always be evenly steamed, baked and will remain hot for a long time. And using its somewhat modernized design for a bathhouse will help save several tens of thousands of rubles.
Instructions
Below are step-by-step manufacturing instructions:
STEP 1.
First you need to saw your cast iron hot tub in half using a grinder. To do this, mark the bathtub using a construction marker or pencil. It is desirable that the cut occurs on the non-enamelled side. It is also necessary to organize a support, for example, made of brick, under the halves of the bowl. This will protect you from biting the disc.
Cutting cast iron is a rather long and labor-intensive task, so work must be stopped periodically and the tool allowed to cool. The blade should be moved slowly and smoothly along the cutting line.
Advantages of using cast iron
Cast iron is a wonderful material in itself. It is very durable, although a little fragile, has excellent thermal conductivity and the ability to retain heat. That is why it was so readily used in the production of bathtubs, batteries and other heating products. Therefore, it is not surprising that our citizens, distinguished by their resourcefulness, began to make various stove devices from bathtubs - fortunately, the form is suitable for this.
There is also such cast iron
Advantages of cast iron for stove products:
- safe for human life and health - this material, when heated, does not emit chemical compounds dangerous to the human body;
- resistant to high temperature changes - this allows products made from this material to be durable, especially in aggressive environmental conditions;
- increased heat transfer allows you to heat the room faster;
- increased strength, which exceeds the quantitative characteristics of other metal furnace products;
- the use of this material ensures fire safety.
Disadvantages associated with resistance to sudden mechanical stress and some susceptibility to corrosion can be easily mitigated with proper use. Therefore, in general, it can be argued that cast iron is one of the best materials for the manufacture of stoves, both as a whole and for use as individual elements: ash pans, dampers, hobs, etc.