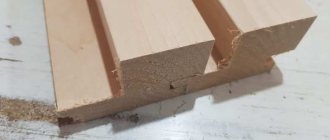
Half-tree oblique connection
There are various ways to lay timber in a log house.
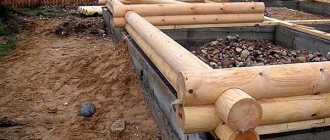
Unlike a log house, when the box is assembled separately and then installed on the foundation. A house from it is built directly on a concrete foundation. The main thing is to fold the first crown correctly, this determines how straight the walls will be. The technology is based on the corner connection.
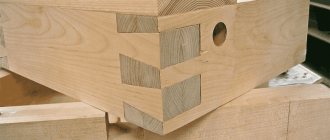
Regardless of what type of further connection is chosen, the first and last crowns are laid “half a tree”. In this case, the upper part of one beam is removed, and the lower part of the second.
Photo of a half-tree corner connection
A hole for the dowel is first made in the timber. A dowel is a wooden pin used to connect beams; it is installed inside during assembly, increasing the strength of the building. It connects several pieces at once in the corners. Then a seal is placed on it, and the subsequent crown is installed.
The timber is processed in such a way that a tenon is machined on one side and a groove on the other. How to lay timber when building a house using this joining method?
A tenon of appropriate size is selected for the groove. The parts must fit tightly together without gaps. This is the warmest "no residue" corner joint method.
"Bandaged"
The first crown is always laid “half a tree”, the subsequent ones in any chosen way. To connect the structures, grooves are cut into them, into which dowels are inserted.
These are wooden or metal bars that cut into the workpieces being joined to half their thickness. This type requires great precision when performing.
"On the dowels"
The methods of connecting beams during the construction of a log house are significantly different from the joints of logs. Since ancient Rus', wooden construction has been done from logs; since then, centuries-old experience in connecting corners and joints has been accumulated. But this is the 21st century and ancient techniques are gradually acquiring their modified analogues, so first of all I want to introduce you to the technique of laying beams, and we will disassemble the log later.
Nowadays, two connection methods are practiced in wooden construction:
- With the remainder (“to the oblo”, “to the bowl”)
- Without a trace (“in the paw”, “in the tooth”).
The corner connection of a log, as well as with a beam, is made in two types, as “into the paw” or “into the bowl”, that is, without a remainder or with a remainder.
This is the best connection when a horizontal crossbar crosses a vertical stud of a frame structure, such as when separating cabinet sections or in window and door frames.
Usually the face of the post is not sawn through, although the connection has equal strength characteristics in either direction. Mark the width of the post on the crossbar (1). Using a marking knife and a square, draw marking lines on the face of the crossbar and halfway up the edges (2). Turn the piece over and do the same to mark the back side of the post.
Set the thicknesser to half the thickness of the wood and draw lines on the side edges between the already marked marking lines, working from the front side of each element (3). Mark the waste portion of the material.
Using a short work bench fence, cut the wood along the shoulder line to the depth of the thicknesser marking line. Make sure that the saw works along the inner – waste – part of the material between the marking lines, since a loose connection is not strong enough and has an unsightly appearance. Make one or two additional cuts, evenly distributed along the waste part, to facilitate further work with the chisel (4).
Place the workpiece in a vice. Use an appropriately sized chisel and mallet to remove any excess wood. Use the chisel towards the middle, pointing it slightly upward (5). Turn the workpiece over to cut the material on the other side. Having selected the main part of the waste, cut off the remainder in the middle. To remove fibers remaining at the base of the shoulders after sawing, hold the chisel vertically. Check the flatness of the bottom of the sample using the side edge of a chisel.
Half-timber corner joints (also called corner joints) are easy to make, but their strength depends on the gluing and may require reinforcement with screws or dowels. The beveled half-timber joint is a fancier version, but is not as strong due to the reduced gluing area.
Cutting a half-timber joint in elements of window and door frames with decorative edge processing is not fundamentally different from making a transverse (cross) half-timber joint. However, there are additional difficulties associated with processing the shaped part.
After marking the position of the connection on each side, cut off the relief. At the same time, saw to the edge of the top edge of the relief. The width of this cutout should be equal to the width of the top edge of the relief (1). Since it is difficult to mark on a curved surface, use a miter box to guide the sawing correctly (2). Make a wooden block with a 45° bevel to trim the relief. Clamp the block and the piece together and use a chisel to cut off the corners (ribs) of the relief (3).
Now make a half-tree join in the remainder of each element. The depth of the cutout in them must coincide with the lower level of the relief (4).
A miter half-timber joint is cut in the same way as a regular cross joint, but the cuts are made at an angle. The main difference is the marking of the shoulders.
Connection marking
Marking a 45° angle does not cause any difficulty when using a jig. To mark the other corner, use a small marker placed on a protractor or an accurate drawing. Apply one line for the bias shoulder markings on the front side of the bottom piece. Place the top element on the line and mark its width (1).
Place the top piece right side up and mark the width of the bottom piece on both side edges of the top piece (2). Mark the cutout on the underside using a marker or a marker.
This relatively strong frame connection is used when one of its elements must, when intersecting with another, end flush on the outer edge of the second.
After marking the cutout on the cross member using the half-timber cross joint method, cut the end of the vertical member at a right angle and mark the width of the cross member on the underside of the vertical. Continue the line to the edges and use a thicknesser to draw lines along the edges and at the end (1).
A half-timber dovetail notch is similar to a half-timber T-joint, but is more durable, as it has greater tensile strength along the axis of the vertical element. It can also be called cutting half a tree into a half-frying pan, a transverse lock into a simple frying pan, and other names derived from these names.
First, a vertical element is cut out to form the “tail”. Mark and cut the overlapped section as directed for a simple half-timber T-joint. Mark the dovetail corner using a template or stencil (1) or use a ruler. Cut out the waste with a saw or chisel, depending on the size of the joint (2).
The half-timber joint is a stable design for T-shaped, corner or cross-shaped joints. According to existing rules, a half-tree connection is made across the entire width of both parts. However, a blind half-tree connection is also possible. In this case, the area of the joint areas covered with glue will be even larger.
Half-tree corner connection.
Half-tree T-joint.
Half-tree cross joint.
Blind T-shaped connection in half a tree: invisible from the outside.
In modern wooden construction, two types of corner joints are used:
- With the rest. The remainder is the end of a log or beam that protrudes outward from the corner of the frame. The advantage of this type of corner connection is better protection of the seams from blowing;
- Without a trace. The crowns of the log house do not protrude beyond the corners of the house.
Corner joints of logs are performed in almost the same way as joining beams. In this case, the landing nest in the lower log is most often made not flat, but semicircular, resembling a cup. Therefore, this method of joining is called cutting “into the bowl”.
Connecting logs “into a bowl” with the remainder
The rectangular shape of the timber does not require a complex cup-shaped joint.
Joining the beams at the corners of the house is done in two ways:
- Single-sided (wood floor)
- Double-sided (in red)
The one-sided joint of the timber is easy to perform, since it is enough to make only one vertical groove.
This type of connection is called half-tree because the depth of the cut or notch is ½ of the height of the beam or log.
One-sided joint of profiled timber “half a tree”
Listing the main methods of joining timber in the corners of a house, it is necessary to say a few words about the double-sided cutting method. It is more complicated than one-sided joining of crowns, since vertical cuts have to be made not only on the top, but also on the bottom side of the beams.
After this, the wood between the cuts is cut out, leaving smooth horizontal landing areas. By laying the beams on top of each other, we get a strong joint with two flat seams.
Connecting the timber “in the okhryap” with the remainder
Reliable joining of logs can also be done using the “in-the-hole” method. However, most often specialists use a “bowl” joint, which is optimally suited for the round shape of the log.
Cutting a corner from logs “in okhryap”
The double-sided “bowl” connection and the semicircular “bowl” require highly qualified carpenters. Here you need to work accurately and carefully. Any mistake with the depth of cut or cutting out a groove can lead to a violation of the geometry and a decrease in the strength of the joint.
To protect the corner from blowing, wooden house-building professionals use timber joints “fat-tailed”. In essence, this is a modified double-sided “bucket” connection, in which a longitudinal protrusion is cut out on the seating surface. It not only covers the joint from blowing, but also increases the strength of the contact area.
Connecting the tail angle with the remainder
What is a warm corner
This is a sealed joint that shrinks evenly. The corner connection of the timber into a warm corner, or tongue and groove, allows you to improve the performance characteristics of the building and ensure the disappearance of “cold bridges” and drafts.
Beam corner connection technology:
- Marking, for accuracy it is better to use a template.
- A groove is made in the lateral plane of one of the crowns, and a tenon is made in the other, completely symmetrical.
- Assembling the walls according to the principle of the first tenon beam on the right, the second on the left.
- Fastening is done with round dowels.
The grooves are made in production conditions using special equipment. You can cut them yourself with a chainsaw, manual machine or jigsaw. In order for the final structure to be durable, it is important to initially use high-quality material with a humidity of no more than 20%. Sealants can be used for additional insulation.
Marking
For marking you need a square, thicknesser, knife or marking dowel. Use a pencil to mark only on material with a rough, untreated surface. On a fine-fibered or smooth surface, the marking line is drawn with a knife or dowel: a shallow groove will also serve to guide the saw evenly.
The prepared bars or planks are laid side by side parallel to each other and marked at the same time. This ensures complete coincidence of the marking lines, which guarantees a flawless, distortion-free connection of all parts. It is important to get everything right the first time, as it will be quite difficult to make corrections in the future.
This is how the groove is marked.
Use a thicknesser to mark half the thickness of the plank on the narrow sides.
To mark, never use ballpoint pens, felt-tip pens, ink or ink, as they leave virtually indelible marks on the wood.
When treated with a chisel, soft wood can easily split in the place where the growth rings pass. To avoid this, you need to make several additional cuts. In this case, if the tree splits, it will be between two adjacent cuts, and not across the entire width of the groove.
Benefits of technology
The method of such a connection as a warm corner, in fact, has a significant impact on various aspects of construction and operation, namely:
- with high-quality assembly, the junction of the corners of the walls is so strong that you can do without inter-crown insulation;
- a building erected using this technology is not threatened by force loads and impacts in the form of soil movement or earthquakes, since it is strengthened several times;
- this method eliminates such unpleasant moments as corrosion, fungus, mold, and the penetration of insects into the interior;
- significantly reduced costs for fasteners, since these fittings are irrelevant for fastenings with residue;
- Pre-prepared beams with grooves and tenons cut into them allow for quick assembly.
Marking
First, a clear marking line on the parts indicates the contours of the grooves. In order not to confuse anything when processing parts and to prevent mistakes, the areas to be removed should be marked with shading. There is a particularly great danger of making mistakes when processing parts that are to become lintels and crossbars.
The areas to be removed should be marked with hatching so that the contours of the grooves are not blocked: the main markings should be clearly visible during subsequent operations.
Light shading on the parts marks those areas that should be removed. In this case, you must not block the marking line.
To cut parts along the markings, use hacksaws or bow saws with thin, frequent teeth to make the cut as smooth as possible.
The cut line should pass through the area of the part that will go to waste. First, make a small notch with a saw. Then they saw along the front edge along the marking line to the lower limit. Thus, the marking line will always be in front of your eyes, which means you can accurately guide the saw and immediately make adjustments if the cut begins to move away from the marking line.
When the cut of one corner is ready, turn the part over and do the same on the other side. Only after this the saw is positioned horizontally and the cut is completed in this way.
When processing even wide parts in this way, the cut is very precise. Excess wood can later be removed with a chisel and file or sandpaper.
During the first movements, guide the saw blade with your thumb until you make a notch.
Saw along the front edge of the piece first, moving the saw at an angle exactly along the marking line.
Then do the same on the other side until the entire horizontal marking line is captured.
At the final stage, guide the saw horizontally.
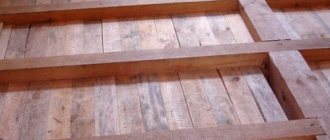
Removal of load-bearing walls beyond the pile foundation
Sometimes private developers try to find solutions that allow them to save on the purchase of building materials and the work of screwing in additional piles. At the same time, they forget about the strength of the building structure, which can be broken very recklessly.
Here is an example of a gross violation of construction technology; the photo shows the removal of the outer wall beyond the boundaries of the pile row.
What can you recommend to people who prioritize questionable savings? The most important thing is to avoid self-indulgence, and then everything will work out for you. If building regulations provide for the installation of piles under each corner or wall of the future room, then so be it. There is no need to make any overhangs or indentations that are not supported in the form of a pile firmly screwed into the ground. This will not lead to a reduction in the cost of construction, but it will provide additional problems for the developer.
Guffych FORUMHOUSE user
If you make an overhang or indentation, then this structure will hang on the logs. In this case, you will have to make a double strapping from the inside and connect it somehow with the external overhang (so that the structure does not completely fall apart). It won’t be cheaper (due to savings on piles), since you will have to spend money on strengthening the lower floor, but this will add problems.
If you plan to add additional architectural elements to the house (a veranda or, for example, a porch), their corners should also be supported by metal piles.
Land user FORUMHOUSE user
In general, according to the technology of constructing a pile-screw foundation, piles must be placed under all cuts, corners and load-bearing walls. This is the most important rule.
Gluing
Before applying glue to the joints of both parts, you should once again check their connection in a “dry state”. If a gap is found in the connection, then some of the parts will have to be replaced: such an error cannot be corrected later. It’s a different matter when you have to apply too much force to connect the parts in a T-shape or cross-shape, or when, with a corner connection, the parts do not fit very tightly to each other.
Then you need to remove the excess with a chisel or clean the surface with sandpaper. At the same time, you should not wield the chisel with excessive zeal. Also make sure that the surfaces do not turn out round. Remember: with any half-tree connection option, the parts must fit tightly to each other.
Clamp carefully
All areas of the joints must be evenly covered with a thin layer of glue. Wait for a while, then connect the parts and check again whether they form a right angle. If everything is in order, clamp the parts with a clamp. Just don’t tighten the screw too tightly, otherwise the glue will “creep” out. The glue must be wiped off immediately, otherwise it will harden on the surface of the part.
https://www.youtube.com/watch?v=y3qdCpEtndI
Before pressing the pieces tightly together, make sure they form a right angle.
Subsidiary variations of cutting timber into a bowl
Cutting profiled timber into a bowl, as shown in the photo, has always attracted attention due to its simplicity and relatively low labor costs. Although, if you do not make auxiliary locking elements, it will hardly retain heat. If you decide to build a summer bathhouse, then this is not a problem. If it is necessary to ensure the safety of heat for a warmer structure, then the cutting of timber walls should also be supplemented with a cut. In this case, the cutting method becomes somewhat more complicated, although heating technology will improve its parameters.
The most popular variations of chopping into a bowl are:
- chopping in the cold or, in other words, in the cold;
- bowl with ledge;
- chopping in the okhryap;
- clap with a cut;
- tail cutting.