Tree species used for making stands, bath chairs, backrests
When choosing material for sauna equipment, it is better to choose hardwood.
They do not release resin when heated and have a dense and smooth structure that requires almost no processing. When making equipment for a bathhouse, coniferous species are often used on parts that people do not come into contact with during washing. Spruce and pine boards are used for finishing walls and ceilings; you can use it for supporting parts of beds (legs, beams, etc.). If you make shelves in a bathhouse with your own hands from coniferous wood, the evaporating resins will saturate the air with aroma and beneficial phytoncides.
It is preferable to use hardwood for seats and backs. They are more pleasant, have low thermal conductivity, do not form sharp chips and do not stain the skin with resin. Auxiliary equipment is also made from easy-to-process wood.
Waiting room heating
If the dressing room is not heated, the room will be cold in winter. Electric heaters are a way out, but they consume a lot of electricity. It is more profitable to design the correct location of the stove in the bathhouse. The heater is placed so that one of its walls is part of the partition that opens into the rest room. Another option is to move the firebox to the locker room and leave the stove itself inside the steam room.
Heating can be done with metal ventilation pipes coming out of the steam room and passing through the relaxation room. However, the effect of such a system is worse than the option with a stove.
Making a headrest
These products usually lie on the lower tier or in the dressing room. They are taken with you to the bathhouse and placed under the head like a pillow, and they should not be hot at that moment. Headrests are made from different materials and differ in shape.
Selection of headrest material and design
For headrests, it is better to choose linden - a cheap, easy to process and high-quality material. Even a beginner will be able to make with his own hands a model that is light in weight, convenient in shape and easy to make. The most difficult step will be cutting out curved surfaces with a jigsaw.
The curved parts of the headrest need to be cut with a jigsaw
The dimensions should be such that the product fits generously on the shelf, is small and convenient for placing under your head, for example, 340x353 mm.
The optimal headrest size is 340x353 mm
Table: materials for headrest
- We draw the side supports on the scraps of the board and cut them out with a jigsaw according to the diagram.
The side supports of the headrest are cut out with an electric jigsaw
- We fix them in a clamp and process them with grinding wheels until they are completely smooth.
- Cover with impregnation for shelves and walls and dry.
- Then we cut the planks and process their edges. We also cover them with impregnation for shelves and walls and dry them.
The planks also need to be coated with impregnation for shelves and walls and dried
- We prepare the pins. We count and check for smoothness.
- Using a wood drill, we make blind holes with a diameter of 6 mm on the underside of the planks.
Non-through holes are drilled on the slats at a distance of 4.5 cm from the edge
- We try on the planks to the support. We drill the same holes on the top side of the supports according to the diagram, but not right through.
Holes in the support are drilled according to the diagram
- We insert the pins there and tap them with a hammer. They should go in with force and sit tightly.
The pins should fit firmly into the holes and be tight.
- We connect the planks with the support on the pins. We start from the center bar to set the correct distance. We tap them on top with a felt hammer so as not to damage the appearance of the wood, or with a regular hammer through a rag.
- The headrest is ready. The connections will not be visible from either the top or bottom.
If you make a headrest on pins, then the joints of the parts will be completely hidden
How to insulate a dressing room from the inside
The issue of insulating the dressing room is no less important than the thermal insulation of the entire bathhouse. If tiles were used to finish the floor, there is no need to create an underground space in the locker room. The concrete screed is poured on top of the sand cushion laid on the ground. Install thermal insulation from foam plastic boards inside. Additionally, electric heating mats can be laid under the tile finish.
Wooden floors are susceptible to moisture. For drying, organize a ventilated underground space. Holes are cut out in the strip foundation - vents. Inside the steam room and washing room for pouring floors, the board is laid with a gap. This option is not suitable for a rest room, since the floor in the dressing room is required to be insulated, and the boards are laid without gaps. First, the logs are laid. They are filled with bars from below and a subfloor is laid. After laying the waterproofing, the cells between the joists are filled with expanded clay or any other insulation. The thermal insulation is covered with waterproofing on top and a board is laid. The floor is warm and ventilated from below, which prevents rapid rotting of the boards from the underground space.
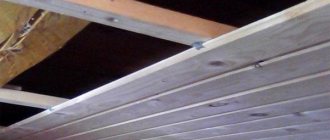
Thermal insulation of the ceiling is no less important than the floor. Most of the heat leaves the bathhouse through the roof. However, at the same time a large amount of steam rushes upward. When exposed to cold air, condensation forms. Reduce heat loss by laying insulation on the ceiling. The material is laid between the beams. A vapor barrier sheet is stretched from the bottom side of the bathhouse. The thermal insulation is covered with waterproofing on top. From below, the insulation with vapor barrier is held on a counter-lattice, to which facing material, for example, lining, is fixed. There should be a ventilation space between the ceiling trim and the thermal insulation cake.
The walls of the bathhouse are insulated in the same way as the ceiling. The sheathing is attached to the outside of the façade. Insulation is laid between the vapor and waterproofing. The finishing material is fixed to the counter-lattice. The walls inside the bathhouse are protected with waterproofing.
More information about the insulation and ventilation of the bathhouse is shown in the video:
Adviсe
If you need to make shelves not in three, but in two tiers, then you need to take into account that the height of the lower level from the floor should be approximately 50 cm, and from the top - 90 cm.
It is necessary to leave a technological gap between the decorative finishing of the floors and the benches. Its size is usually 4 mm on each side, and the expansion coefficient of the wood as it swells must be taken into account.
To make frame bases, experts recommend purchasing 50x70 cm timber. In addition, to prevent the wood from drying out, the thickness of the board should be approximately 4 times less than the width. When making a frame, it should be further strengthened. To do this, you can connect all the supporting parts using boards both below and above. It is recommended to wear special rubber pads on the legs of bath furniture - with such parts the shelves will not scratch the floor or slip on damp boards.
If the steam room in the bathhouse cannot boast of a large footage, then it is permissible to build a lower shelf in the shape of a triangle. Such structures should be placed indoors in such a way that one leg fits loosely against the wall, and the other against the adjacent shelf.
Most often, the lower part of the shelf structure is not secured in any way. Thanks to this solution, the floor under the structure can be washed, and it dries more efficiently. If the bottom of the bench is too bulky and heavy, then special runners can be built under it, moving along rubber guides.
The use of self-tapping screws during the construction of the shelf allows you to firmly and reliably fix the resulting structure. In addition, it will be possible to easily disassemble the bath furniture in order to dry or replace any part
It is not recommended to use coniferous wood for making shelves, despite their environmental friendliness and pleasant aroma. Such materials, when exposed to high temperatures, release a resin that will stick to the skin.
The width of the shelf should not be less than 0.4 m. If you build a narrower structure, then it will be impossible to sit or lie on it - there will not be enough space. When making a shelf, you should use special fasteners made of hard wood.
It is permissible to use stainless steel parts only when constructing a frame base, which will later be covered with boards. This is explained by the fact that metal fasteners can become very hot in the steam room and you can accidentally burn yourself on them if they are on the surface.
Dimensions
The shelves can be quite wide or very narrow. It all depends on how they are used. Sitting on a wide shelf, it is difficult to lean against the wall - the large width does not allow you to lean back comfortably. At the same time, lying on a narrow bench is difficult, if not impossible - you need a wider shelf.
Over the course of many decades of operation, the optimal dimensions were determined experimentally:
- for seats (benches), the width should be in the range of 45-60 cm, and the height - 35-50 cm;
- for beds, the width should start from 60 cm (most often beds with a width of 70-90 cm are used), and the height should be 80-110 cm.
Expert opinion
Lovkachev Boris Petrovich
Bath master who knows everything about steaming
The requirements for the size of the shelves are not strict; any owner is free to make them according to his own understanding. However, it is necessary to take into account the conditions and purpose of the shelves - for the seat, the most convenient sizes are those close to standard chairs.
The height of the beds was also not taken from the ceiling - it is inconvenient to hover with a broom a person lying at too high or low a height. In the first case, the arms are in an awkward position, which quickly causes the shoulder girdle to tire. In the second, unwanted stress occurs on the lower back. Therefore, it is recommended to adhere to generally accepted shelf sizes - this will allow you to achieve maximum comfort.
Care instructions
Having made your own bath shelves, it’s a good idea to learn how to properly care for them. Despite extremely high temperatures and significantly increased humidity, the bathhouse is subject to the aggressive effects of various microorganisms and ordinary dirt.
Useful tips
To protect wooden surfaces from the negative influence of the environment, first of all, it is necessary to regularly perform sanitary and hygienic cleaning and various preventive measures.
You should also consider the following recommendations:
- At the end of the bath procedures, it is recommended to first wash the shelves with ordinary laundry soap and then wipe them dry with a towel or regular rag.
- If possible, ventilate the room as often as possible. To do this, open all windows, doors and ventilation valves wide, having previously closed all containers with water with tight lids. The room must be ventilated for at least 3-4 hours.
- Several times a year, wooden furniture in the steam room must be treated with special water-repellent compounds. Before processing, it is recommended to clean all contaminated surfaces with a scraper or sandpaper.
Regular and timely care of bath furniture significantly extends its service life and also helps prevent the appearance of various fungal infections.
Bath shelf drawings
prepare a drawing
To do this, you need to draw a plan of the room in which the structure being created will be located. The drawing must show the exact dimensions of all elements.
Thanks to the presence of the diagram, you can calculate the most suitable place to place the shelves.
There are several schemes according to which a design can be created:
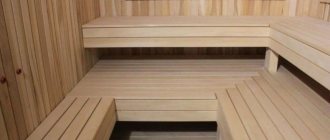
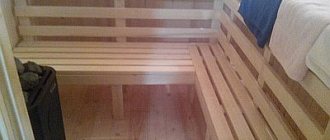
- Corner shelves in the steam room can be created even in a small bathhouse. Most often they have 2 or 3 tiers.
- Longitudinal shelves located near one wall.
- Parallel. Such structures can be either symmetrical or asymmetrical. They are usually located on opposite walls.
When creating a drawing, you can consider several options and then choose the one that suits you best. Thanks to the layout of all elements, you can easily determine the number of steps and their height.
Arrangement of shelves in the steam room for comfortable movement
Single-tier benches are placed spaced between opposite walls or installed in a corner structure. Typically, such benches are made portable so that they can be taken out into the air.
When assembling multi-tiered racks, take into account the distance to the stove so as not to get burned. Sometimes when jumping, a person may lean forward with his body. In spacious steam rooms, they use the option of placing one bench opposite another, and the distance should not be less than 80 cm.
Stepped structures increase the functionality of the steam room so that the visitor has the opportunity to choose the degree of heating. At high heights, the maximum possible width of the shelves is made.
DIY bathhouse shelves: step-by-step guide
If you are planning to make shelves for a bath yourself, you should choose a suitable tree (usually one species is used for sun loungers and wall decoration): linden, aspen or alder. It is worth noting that of these three species, alder has the most attractive appearance, aspen is most suitable in terms of performance indicators, and linden is the most budget-friendly solution.
The following are taken into account:
- the expected number of visitors, their weight and dimensions;
- size and shape of the steam room;
- type of seats (stationary, reclining, retractable);
- planned temperature regime (and humidity level);
- the preferred option for staying in the steam room is sitting, lying down, with active treatment with a broom, supply of steam;
- methods of preparing materials.
Below is a shelf in a bathhouse (drawing) with a side view and isometric view.
The indicated dimensions and heights of the shelves in the bathhouse are standard; they can be slightly changed in accordance with personal preferences.
The installation stages (how to make shelves in a bathhouse) are shown in step-by-step photos and a short video.
After choosing a design, you need to decide where to attach the shelf - on the wall (as in the step-by-step guide) or the floor. At the same time, we should not forget about the need for frequent cleaning.
Do-it-yourself bathhouse curtains are made using wooden fasteners or fastened with metal parts so that they are hidden under the tree. Otherwise, the metal may severely burn your skin. Typically, self-tapping screws with plugs (wooden or plastic), corners “from the inside out,” oak or pegs made from the same wood are used for fastening.
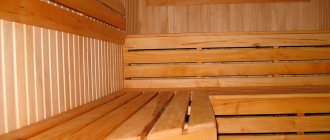
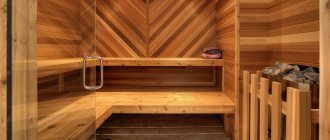
Steam room interior
Although the main quality of a steam room is its effectiveness and convenience, appearance also matters. That's why:
All elements are finished taking into account not only safety and comfort, but also aesthetics. High-quality surface coatings, including oil-wax, can reveal the texture of wood and emphasize the laconicism of thoughtful forms; the use of one or more harmonizing types of wood for decoration increases the attractiveness of the interior
When choosing materials, it is important to consider the correspondence of the color scheme of furniture, walls (ceiling, floor) and stove; Correctly selected lighting (hidden or semi-hidden lamps of a suitable style) and a rational choice of accessories will help make the procedures more enjoyable.
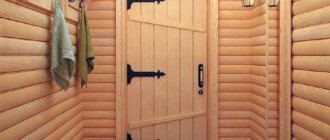
Furniture
What kind of furniture is needed in a bathhouse? You certainly won’t be able to do without a bench and a hanger; this is the bare minimum. But this does not mean that nothing else is needed in the waiting room. A small chest of drawers or whatnot , where you can put clean clothes, towels, tablecloths and other necessary things, would be quite Of course, if possible, then in the dressing room you can place not only a chair and benches for relaxation, but also a refrigerator or even a TV.
If you want to place a sofa in the dressing room, then choose upholstery made of leather or leatherette; due to high humidity, textiles will quickly become unusable. If you don’t like sitting down on your skin after a steam room, then buy a blanket made of natural fabric . All textiles in the dressing room should be easy to wash and dry quickly. For long service life of furniture and decorative elements in the dressing room, you need to ensure that vapor barrier and insulation are done according to all the rules.
Choose the design you like or come up with your own. Each dressing room looks different and bears the imprint of the owner’s character. You can see interesting ideas in the selection of photos.