Restoring old wooden windows is beneficial not only from the point of view of saving the family budget, but also for protecting the environment.
It extends the life of wooden products, preserves the architectural heritage of cities and helps protect landfills from overload.
Reclaimed wood can last much longer than modern fiberglass windows, up to almost 35 years or more. It is recommended that complete restoration of wooden windows be carried out every 20 years. Let's take a closer look at what can be done with old wooden windows.
What it is?
Restoration of an old wooden window is a set of mandatory technological procedures performed on the wooden part of the structure in order to completely restore and improve all its functional characteristics.
According to current standards, restoration of wooden window blocks is carried out during a major renovation of a building, with a frequency of at least 20 years . These periods can be reduced or increased depending on the operating conditions of each window.
In damper and colder climates, restoration is carried out more often, as well as in cases of unsatisfactory maintenance of wooden products or the presence of mechanical damage.
The main stages of reconstruction are:
restoration of wooden parts of the block;- replacing rotten sections of the frame;
- putty and surface primer;
- drying and final sanding;
- glass replacement and sealing;
- valve seals;
- impregnation of wooden frames with antiseptics;
- replacement of accessories;
- window painting.
Homeowners should not sit idle and wait until the window frame completely rots and falls apart. After the heating season, wooden structures must be inspected, and any detected defects must be immediately corrected.
Impregnation of a wooden window with drying oil
Drying oil is a substance based on vegetable oils (flax or hemp), which is part of oil paints. Impregnation of a wooden window with drying oil is used as a septic tank. It is necessary to prevent the development of fungus and the formation of rot inside the wood structure. This antibacterial treatment will protect the wood and extend its service life. Drying oil is applied in several layers:
- The first layer is impregnation, so it is necessary to generously moisten the entire surface with drying oil.
- After it dries, apply subsequent layers, but no more than 4.
Some experts recommend using hot drying oil for this purpose. It is worth mentioning that drying oil is highly flammable, so it needs to be heated in a water bath. But it’s better to avoid heating the drying oil and apply it cold. There won't be much difference in the effect.
When is restoration needed?
All wooden window blocks have their own service life, which depends on the type of wood from which they are made. Coniferous and deciduous species can last 35 years or more, and oak and beech - more than 50. In practice, there are quite a few examples where windows installed in historical buildings delight visitors with their appearance for more than 200 years.
The decision to restore the frames should be made by the owner of the building, depending on the plans for its use and location within the city. If they are located on objects related to architectural heritage, restoration is a priority form of restoring their functional characteristics.
However, there are conditions under which such block updating cannot be carried out :
- the structure of the frame is loose; when pressed, large dents are created;
- there is a loosening effect in technological openings;
- dark spots were found under the layer of paint, indicating the process of rotting;
- frame deformation;
- through splits of wooden products.
Glazing
We clean the glass from traces of putty and other contaminants. We carry out all work wearing strong gloves to avoid cuts. When dismantling and washing, it is likely that it will not be possible to keep all the glass intact. It is better not to throw away large fragments right away; they can be useful for cutting out glass in window vents.
Glass cutting.
We will install the glass using glazing beads and galvanized carpentry nails 20mm long. Using a miter box and a fine-toothed hacksaw, we cut pre-antiseptic, primed and painted glazing beads in two layers.
Cutting glazing beads in a miter box.
Apply acrylic sealant to the transom around the perimeter of the glass. We apply the glass, carefully pressing it along the perimeter, making sure that the pressure on the sealant is uniform along the entire perimeter. This will ensure a tight seal. Then we nail the glazing beads. If they crack at the same time, you will have to do preliminary drilling with a 1.5mm drill bit. The pitch of the nails is 10-15cm. We fill the cracks in the corners of the beads with sealant. After drying, cut off the excess that appears with a wet knife.
We install glass.
The nail heads, if desired, can be tinted with a cotton swab.
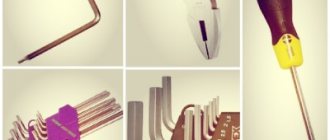
Tools, building materials and fixtures
Before starting the restoration of old wooden frames, a full examination of the condition of the wood is carried out; based on its results, a list of activities is prepared, according to which a list of necessary materials and tools should be selected.
When choosing a tool, you need to take into account that the final stage of reconstruction of a window unit should be heat protection measures.
The main list of tools and materials for the restoration of a wooden window block:
zenzubel - a special plane for creating and processing hollows and folds;- chisels of different widths from 5 to 30 mm;
- carpenter's knife;
- carpenter's square;
- core drill 10 mm for wood;
- building level and plumb line;
- wood putty;
- drying oil;
- paint or varnish;
- liquid Nails;
- drying oil;
- zinc white;
- solvent;
- brushes;
- different nails;
- sandpaper.
Experts do not recommend using polymer putties for wooden frames, as they increase heat loss from the frames.
How to update old window blocks with your own hands?
They plan to carry out restoration work in warm, dry weather; the maximum ambient humidity should not exceed 65%. In case of precipitation, the frames are carefully covered with rain film.
Before repairs, a thorough inspection is carried out and a list of necessary operations is established. Typically, the main operations are :
- dismantling;
- disassembly;
- removal of glass and fittings;
- restoration of wood parts;
- putty;
- grinding;
- painting;
- replacement of accessories;
- installation of a leaf window;
- installation of frames in the technological opening.
Restoration of window blocks begins only after thorough drying of the wooden frame.
Removing from hinges
Before starting to dismantle the window, first cover the floors and furniture with protective film.
Next, they begin the first stage of restoration—removing the sash. This process is different for old and new modifications of window blocks - for old-style frames, just open the sash and remove it from its hinges.
For a tilt-and-turn mechanism, open the sash and set the handle in the folding position, lift the sash so that the pin comes out of the hinge below. Next, they take a special steel scissor bar that holds the sash at an angle and simply unfasten it.
Modern wooden frames with double-glazed windows are removed in the same way, regardless of the tilting mechanism. To do this, open the sash, remove the protective cover from the top hinge and then remove the pin by pulling it down. After which the sash is removed from the lower hinge by moving it upward.
Restoration of the frame and its surface
After the frame is removed from its hinges, remove all glazing beads and glass. For further work on restoring the frame, you need to completely remove the old paint from it. There are two common methods for this :
- using a hot hair dryer, the most effective option;
- using chemical surface treatment.
When working with a hairdryer, hot air with T = + 250 C is directed onto the paint layer, the paint melts and chars, after which it is easily removed with a regular knife.
Kerosene is used as a chemical solvent , the frame is disassembled into individual parts, wrapped in rags and placed in a tank with kerosene, leaving in this position for 2-3 days in a fireproof and dry place.
Take out the wooden parts one by one and remove the softened paint from their surface with a knife. If the product is left in the air for a long time, the kerosene will dry out and the paint will dry out again.
Remains of paint on the surface are removed with sandpaper or a sander.
Removing rotten parts
If the rotted area of the frame is small and not deep, it is restored with epoxy wood putty .
To do this, the damaged area is freed from layers of paint and rot is removed. Next, putty is applied, carefully filling chips and cracks, forming a smooth surface.
It should protrude slightly above the main surface, since it will subsequently be sanded. The treated frame is left to dry, then the surface is sanded with a grinder until it is even with the base.
This option for reconstructing the frame is not durable, so in case of large amounts of damage, the part is completely replaced with a new one.
Putty, primer and sanding
Next, putty the remaining small defects of cracks and chips on the frame. Mark them with a marker and apply a primer to the marked areas, and apply latex or oil putty on top with a rubber spatula. All excess deposits are removed immediately . The work is carried out in two layers, giving each layer plenty of time.
Drying and sanding
Leave the frame to dry for at least a day. Then the entire surface is sanded again. Cleaning it with a dry brush each time to check the quality of the sanding.
Working with glass
Restoration of glass involves carefully inspecting it beforehand. Those sheets with cracks and chips are rejected, and new sheets must be cut out instead. On old glasses without defects, remove paint and dirt, wash thoroughly and prepare for installation.
Glazing sealing
Clean glass must be installed in the frame using sealant. It comes in different colors and is chosen according to the color of the window.
Procedure for installing glass on sealant:
- squeeze out a little sealant under the inner corners of the frame;
- insert a sheet of glass and fix it with small nails;
- remove excess sealant with a rag soaked in vinegar;
- The sealant on the nails is not removed; it will protect them from rust.
Installation of glazing beads
Next, the glass must be covered with wooden glazing beads; they are pre-cut to size and painted to match the color of the frame. Allow it to dry, then cut the corners at 45 degrees. Install on sealant or secure with small nails .
Treatment with impregnations and antiseptics
Before painting, the wooden frame is impregnated with antiseptics. The most famous and inexpensive antiseptic is drying oil. It is applied in 2-3 layers after the previous layer has completely dried. The drying oil is applied while heated. You need to work carefully wearing gloves to avoid getting burns.
This type of wood protection is enough for 3-4 years of use, almost until the next window painting.
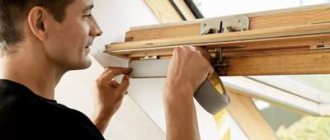
Installation of seal
In order for wooden double-glazed windows to be warm, it is imperative to perform thermal protection, the main function of which in the block is performed by the seal in the frame sashes.
First, the attachment areas of the sashes and glass are treated with silicone sealant . After this, the seal is placed in a special groove.
If there is no such groove in the frame, then it can be made around the perimeter of the sash by using a milling cutter to select a 5 mm recess with an angle of 45 degrees. Next, it is thoroughly cleaned of chips and a PVC seal is inserted into the resulting groove, while avoiding unnecessary tension on the product.
Replacing broken fittings
Before installing the fittings, they are carefully inspected, worn out and damaged ones are rejected, and the rest is thoroughly cleaned of dust and paint.
Rejected fittings must be replaced , it is better if it is a modification of the same type; if the required brand is not available in the retail chain, then they are chosen by size.
The work of replacing the fittings will only take a couple of minutes, and the tools you will need are a Phillips screwdriver. The most difficult work lies in replacing the handle. To do this, you need to rotate the protective cover at the base 90 degrees. The screws securing the handle to the window will then open.
When replacing the handle, when installing an opening limiter, install a limiter plate for the regulator.
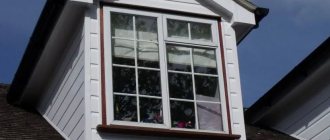
Coloring
The reconstruction of wooden window blocks is completed by painting, for which special dyes for exterior work are used that can withstand precipitation and temperature changes: oil and alkyd compositions.
Apply paint in 2-3 layers , each subsequent one is applied after the previous one has completely dried. The thickness of the paint varies for each layer, from a thinner state for the first layer, this will create a more even layer.
It is best to paint the frame without glass; in this case, you will not need to remove paint stains on the windows afterwards. If the glass is already installed, they are protected at the junction with the frame with masking tape.
Installation in the opening
Before installing a restored window, the opening must be well prepared, cleaned of protruding pieces, dust and dirt. Next, all cracks are sealed with cement mortar, and the surface treatment is completed with primer.
The finished wooden block must be brought into the opening, installed on support blocks and aligned horizontally and vertically, followed by fixation with spacer blocks.
Installation can be done in two ways:
- With unpacking of the block . In the first case, through holes are drilled in the frame and anchor bolts are driven into the wall through them. This is the most preferred method, especially for multi-storey buildings and in operating conditions with high wind loads.
- Without unpacking the block . In the second option, the frame is secured with special anchor plates. In this case, it is worth choosing reinforced, wide modifications of the plates.
Removing paint from a wooden window
Removing old paint is one of the important stages of restoring a wooden window. Old double glazed glass may have been painted frequently without removing the previous layers, which could result in a decent layer of paint forming. Even if there is only one or two layers on the frame, you will still have to remove it. To do this, you can use thermal and chemical methods.
- Thermal method. Its essence is to remove paint from wood using an industrial hair dryer. An ordinary hair dryer will not be suitable for this purpose due to the lack of heating temperature. To peel off the paint you need 250°. Using a regular hair dryer will only char the wood, causing it to lose its properties. An industrial hair dryer is used to heat small areas of paint. As soon as it starts to melt, it is cleaned off with a knife. A spatula will not work for this purpose as it will cut into the wood. T
- Chemical method. You can remove paint using special means (solutions, liquids, removers). You can use wood solvents Hummerite, Kompozit, Sadolin, Tikkurila. They are applied according to the instructions and remove paint without damaging the wood.
There is also a folk method based on kerosene and a bag. Its meaning is to soak rags in kerosene and wrap a fragment of the frame. The tree should be stored in the bag for 1-2 days. After this, you need to remove the paint with a palette knife, which during this time will soften and turn into a soft mass. But you need to remove one part of the frame from the bag at a time, since while one is being cleaned, the others will dry out. A labor-intensive process, but this method does not damage the tree.
Avoid using harsh chemicals not intended for this purpose as they may damage the appearance and properties of the wood.
Problems and errors
The process of restoring wooden windows is quite complex, labor-intensive, and consists of many stages, each of which is very important for future operation and therefore must be carried out scrupulously by craftsmen.
mistakes made when restoring wooden window blocks are :
when placing windows in the opening, the fastening method was chosen incorrectly, the opening was not prepared, the horizontal and vertical installation of the block was not adjusted, the installation depth of the frame was incorrectly selected;- the wooden frame has not been treated with antiseptics;
- the seal is not installed and sealants are not applied;
- an old fitting is installed, as a result of which there is no tight fit of the valves and their jamming when opening/closing;
- weak fasteners are installed and in small quantities.
Assessing the suitability of transoms and frames, removing and repairing problem areas
Removing the paint down to the wood will reveal all hidden defects. There is no need to be afraid of them. Local cracking and small rotten areas can be repaired. The worst thing is if the wood has become completely (throughout its entire thickness) loose. Loose fragments must be replaced. It often happens that the bottom corners become the most problematic places - moisture accumulates in them. In very old windows in such places, entire pieces are sometimes completely “eaten away.” Repairing these particular areas of wooden windows is the most difficult.
The lower part of the transom is badly rotted.
Severely dried out and cracked fragments.
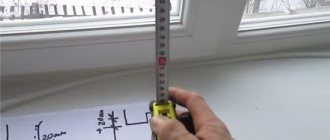
You should carefully inspect the bottom of the window frame. Especially at the edges (in the corners) and in the center. Usually you have to either cut out the rotten areas or dismantle the entire lower part. If there are no problems, you are lucky.
The lower edge of the dismantled section of the window frame.
For high-quality restoration of transoms, it is advisable to disassemble them into separate parts. In the future they will have to be sanded; in the corners this is almost impossible to do if the transom is assembled. Disassembly is carried out by removing the metal corners attached to screws and drilling out the dowels with an 8mm drill.
A dowel is a wooden round rod glued to the corners of the joints.
After drilling out the dowels, the transom can be easily disassembled.
If the corners of the transoms are in order, there are no rotten areas, you don’t have to disassemble them.
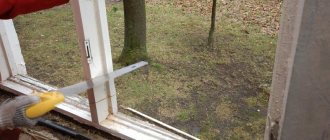
We remove rotten areas with chisels and a hammer (mallet).
Removing the rotten area.
After removal, a section of the correct geometric shape should be obtained.
We prepare the area for gluing the liner.
We fill it by making an insert of the required size and shape. It is highly desirable that the liner be made of identical wood and have an overlap - a size with a margin in the direction in which it can be sanded (at least in the direction from the front plane of the transom). If there is a “donor” transom (or parts thereof), you should use it as a raw material.
Preparing the insert for gluing.
We install the liner with glue. We clamp with clamps.
We hold the tab under the pressure of the clamps until the glue dries.
After drying, drill through the liner and the transom with an 8mm drill, install the beech dowels with the same glue. The number of dowels must correspond to the size of the liner.
Long dowels are sold in construction hypermarkets in the form of round timber 8mm in diameter with longitudinal notches. The length is usually up to 900mm, they can simply be cut to the desired length.
After repairing problem areas of wooden windows, we sand these areas, removing the overlap. In this case, the liner will lie strictly flush (at the same level) with the surface of the transom.
Sand the tabs.
Sanding is best done with a grinder with adjustable rotation speed at about 3000 rpm using a flap wheel with grit P40 or P60. Coarse grain size is caused by paint residues and impregnation with drying oil, which is why the circle with finer grains becomes clogged very quickly.
Pros and cons of the decision to restore the box
Like all construction operations, window restoration has its advantages and disadvantages. The main advantage of this type of restoration of window blocks is their low cost compared to replacing them with new blocks.
If the base material of the frame is well preserved, after reconstruction it can still be used for at least 35-40 years, and metal-plastic windows for no more than 25 years.
In addition, experts attribute to the advantages of reconstructing wooden windows:
- preservation of the architectural style of the building;
- environmental safety of products;
- increasing the service life of blocks by 35 years or more;
- respectability of appearance.
Disadvantages include the complexity of the work, the need to adapt modern fittings to the old structure and the impossibility of using the option for frames with high rotten damage.
Geometry straightening
The appearance of drafts when the window is closed, increased audibility of street noise, as well as squeaks and significant physical effort required to open or close the window are typical signs of broken window geometry. Check the geometry of the valves, adjust them if necessary and secure the result by installing metal corners.
Please note that window geometry does not always have to obey the “right angle” rule. If, for example, the window frame itself is somewhat skewed, then it makes no sense to check the geometry of the window using a square. It is better to pay attention to how the window closes and opens.
The geometry is adjusted by adjusting the tension of the screws located in the window hinges. If, when closing, the window sash catches the frame, adjustment of the upper hinge is required. The lower hinge is responsible for moving the sash to the right/left.
Installation of corners
The corners can be screwed in with a regular screwdriver, but it’s faster and easier to do this with a screwdriver
Metal corners are attached to the joints of frame parts and have both decorative and fixing purposes. The correct location for the corners is on the inside of the window. Quantity: four pieces per frame. To install, first prepare the grooves of the required size using a chisel. We insert the corners into the grooves. We check the accuracy of the installation: we check the length of the frame diagonals.
Price for work
The cost of restoration work can differ several times, or even dozens of times. This is due to restoration projects, the most expensive work is with wooden blocks located on historical sites.
For private and apartment buildings, the final cost of restoration will always be less than the purchase and installation of a new window block and depends on the area of the block, the source material, technical condition and number of floors.
Average cost of restoration of wooden window blocks in houses built 1960-1980.
- double-leaf with separate binding, 9,000 rubles;
- three-leaf with separate binding, 14,000 rub.
- double-leaf with double binding, 8200 RUR;
- three-leaf with paired binding, 10,500 rubles;
- balcony block, 12,000 rubles;
- restoration of slopes and window sills, 1500 rub.