18.06.2021
Draining
Editorial staff of the “New Place” website
Share
From this article you will learn
:
- Types of water drainage systems in a private house
- Sewage diagram for draining water in a private house
- Step-by-step instructions for installing a water drain in a private house with your own hands
- Secrets of preserving water drainage in a private house in winter
There can be no talk of any comfort for human living if the issue of wastewater drainage is not resolved. Draining water in a private house is a problem for many owners of small country cottages or dachas, which is very important to be able to solve and do it correctly.
In our article we will look at the principles by which sewerage should be installed, how to install it yourself, and also talk about proper preservation of the house for the winter. To do everything right, read on.
The use of septic tanks from barrels
It is advisable to build a septic tank at the dacha with your own hands from barrels in the following cases:
- as a temporary structure during the construction phase of a house before the sewer system is installed,
- with a minimum amount of waste, typical for periodic visits to a suburban area without permanent residence.
Such requirements are due to the small volume of tanks. The capacity of large barrels is usually 250 liters
Therefore, the volume of a septic tank from three tanks will be 750 liters. At the same time, according to the terms of sanitary standards, the septic tank must accommodate three daily “portions”.
It is advisable to build a septic tank from plastic barrels with your own hands as a separate treatment facility, for example, for a shower or bath
.
The advantages of such designs are:
- low cost (used containers are often used),
- simplicity of design and installation,
- less excavation work due to the small volume of tanks.
Types of devices for a country house
- Filtration septic tank with a compartment for settling the thick fraction. This is an advanced technology, the main operating principle of which is to separate sewage that enters the collector and divide it into fractions. As a result of passing through several filtration chambers, the liquid is purified to a state that is safe from the point of view of sanitary standards.
- Local treatment plant. In fact, these are mini-purification plants based on the use of bacteria to purify water.
- Using the container as a cesspool.
Country drainage can be separate and common
The first case is when wastewater from different plumbing fixtures enters different containers for sedimentation and filtration. In addition, separate delivery of water from street storm water collectors and the internal network is considered a separate form.
The general sewage collection and drainage system consists of laying a single pipeline both for indoor appliances and for collecting water outside.
Septic tank installation
Do-it-yourself sewerage from barrels requires certain preparatory work to be completed before installation. We will consider the option of making a septic tank from three barrels, but the same remains for a septic tank from two tanks.
Technological holes are made in each barrel.
In each of their barrels, in addition, holes are made at the upper end (or lids, which are often provided with tanks for ease of cleaning) for ventilation pipes.
In each tank, the inlet is located 10 cm above the outlet.
The pit for the septic tank is dug out of the barrels in such a way that when installed, there is a gap of 25 cm on each side of any tank. The bottom of the pit is covered with crushed stone or a sand cushion is arranged.
To fill the foundation, step formwork is installed
When placing barrels with a sequential decrease in level (each is 10 cm lower than the previous one), the volume of the tanks will be fully used, which is very important with the small capacity of septic tanks of this type. If the removal of purified liquid is provided through the bottom filter of the third barrel, the last tank is installed directly on crushed stone, without a foundation.
After pouring the foundation at the stage of solidification of the solution, rings or hooks are installed in it, to which clamps will cling to fix the containers
Just in case, it is better to “anchor” not only plastic, but also iron tanks.
If wastewater removal will be carried out through a filtration field, then trenches for laying corrugated pipes can be dug at this stage.
Once the foundation has gained strength, you can begin installing and securing tanks, installing pipes and sealing joints at their entry points. Experts recommend not using silicone for these purposes, preferring other types of sealants, for example, epoxy.
The trenches of the filtration field are covered with geotextile, and after laying the perforated pipes, the material is wrapped with the edges overlapping each other.
A fully assembled septic tank made from barrels is filled with soil. It is better to fill plastic containers with water at this time to avoid deformation.
During the backfilling process, the soil is periodically carefully compacted.
Installation of an object made of concrete rings
Since concrete rings are the most common option for constructing a cesspool, it makes sense to consider it in detail.
Here is the general scheme for performing installation work:
- Perform markup.
- Dig a pit.
- Install the rings.
- Bring a sewer pipe to the property.
- Make a hole for the pipe and insert it into the container.
- Seal all connections.
- Apply a layer of waterproofing material.
- Place a sand and gravel filter at the bottom of the structure.
- Backfill the pit.
- Install the top cover with cover.
- Cover the ceiling with soil or decorate it.
You can also dig a pit for a small hole by hand. You will need a bayonet shovel to dig, a bucket on a rope to remove the soil, a shovel to pour it into the bucket, and a partner on top to pull the bucket out. The concrete ring is placed on the ground and dug inside.
If a large pit is needed for a cesspool without a bottom, it makes sense to rent an excavator so that the work goes faster
As a result, the ring gradually lowers, preventing the walls of the pit from collapsing. For a large cesspool, it is still better to spend money on renting an excavator. The speed of work will increase significantly. Here you can also first place the ring on the ground and then begin work. You will need an excavator with the appropriate bucket size and an experienced operator.
The trench for the sewer pipe should have a slight slope, 2 - 3 cm per linear meter. If soil freezing in winter is typical for this area, then the pipe above this mark should be insulated.
A hole for the pipe is punched in a suitable place after it is laid. If you make such a hole in advance, you may simply not guess the height of the pipe entry.
Concrete rings at the bottom of the cesspool pit should be installed very carefully using a crane so as not to damage them
The joints of the concrete rings, as well as the pipe entry point, are treated with a solution. Then a layer of waterproofing material should be applied. Inexpensive coating insulation will do.
This step is not considered necessary if all joints are securely sealed. However, the waterproofing layer will protect the structure from damage, and this will significantly increase its service life.
The joints between the concrete rings of the cesspool are fastened with mortar, then all joints are carefully covered with a layer of waterproofing material
The bottom filter is formed from river sand and gravel. You can also use crushed stone of suitable fractions. First, sand is poured in a layer of about 30–35 cm, then two layers of gravel or crushed stone of approximately the same thickness.
Small particles should be at the bottom, and large ones at the top. Now you need to install the top floor. Usually, for this purpose, a ready-made concrete slab of suitable size and configuration is taken.
There should be a hole in the ceiling large enough so that you can not only lower the suction hose, but also send a person to inspect the condition of the container after cleaning it. This hole is covered with a lid so that foreign odors do not disturb others.
A concrete floor with a hole for the lid is the best option for installing a cesspool made of concrete rings. Such structures are also used in the construction of sewers from other materials.
Some owners prefer to make a double lid. It reliably protects against odors and freezing of drains in winter. A layer of soil is usually applied on top of the ceiling so as not to spoil the landscape.
The lid, of course, must be left free; it must be 20–30 cm above ground level. Now you just need to monitor the level of waste in the container and remove it in a timely manner.
The double lid over the cesspool container without a bottom has increased heat-insulating properties and reliably cuts off unpleasant odors
If everything is calculated correctly, then cleaning will only be necessary a couple of times a year. After the cesspool is cleared, do not allow a person in overalls to be lowered down. His task is to inspect the walls of the structure and check their integrity.
Periodically wash the bottom filter or replace it completely. All work inside the cesspool must be done only in the presence of a partner, who is at the top for insurance.
Do-it-yourself system installation in a private house
After the cesspool is placed on the site, you can begin to dig a trench to the required depth. In the central part of Russia it is 2-2.5 meters, in the northern regions it is a meter more, and in the southern regions it is 1-1.5 meters. They begin to dig a trench from the wastewater intake point to the top, towards the house.
Now a fine sand and gravel mixture, a “cushion,” is poured onto the bottom of the pit along its entire length. It’s better to immediately “shoot” the slope at least a little and level the sand.
The next step will be laying the pipeline itself. First, the end is inserted into the well so that the socket faces towards the house. It is advisable to immediately secure the pipe in the hole with mortar or foam. Then they are connected in series with the blank end into a socket. To simplify the process, the rubber bands are lubricated with motor oil or special lubricant.
Each pipe is measured to ensure it meets the required slope. This can be done with a building level, but it is better to take a level.
After assembling the outer line, the line is aligned along its entire length so that the entire straight section is visible through the hole.
Now the thread is sprinkled with sand and the edges are carefully tucked. Then a so-called protective layer of the same sand is poured.
Depending on the length of the outer section of the system, a fan riser is pulled to the surface every 8-10 meters. To do this, a connecting tee is inserted with the socket up, and a pipe of the same diameter is inserted into it. The fan riser needs to be mounted at the level of the soil backfill so that it sticks out slightly from the ground.
Once the route is laid, it’s time to install the system in the house. Often they dig a hole right under the foundation of the dacha and make a hole in the floor of the room where there will be a bathroom or kitchen. This is the most practical way to plant a pipe.
There is no need to insert any sleeves between the ceiling, foundation or floor. After installation, the hole must be sealed well and tightly to avoid the joints opening during operation.
If it is not possible to dig a ditch of the required depth, the drain must be insulated. Insulation of external sewerage is carried out using the following materials:
- Mineral wool.
- Fiberglass fabric.
- Expanded polystyrene shell.
- Large sawdust and roofing felt.
The method of thermal insulation for all materials is almost the same. There is no need to completely cover the line; you just need to put the insulation on top, and you can add a protective layer. However, this does not apply to the polystyrene foam shell, since it consists of two half-cylinders, which are placed entirely on the pipe and only then joined together in trenches.
Purpose of storm drain
A storm drain is installed to drain rain and melt water. It belongs to the point type. It is used as an independent structure and in combination with a drainage system.
Installing a storm drain is not difficult, but it is important to design the future system well.
Selection and calculation of materials for storm drains
When the project is ready, it is necessary to purchase building materials. You will need:
- sand;
- crushed stone;
- cement;
- sealant;
- storm drains;
- water collection tanks (storm water inlets);
- pipes;
- gutters;
- sand traps;
- gratings;
- observation wells for monitoring water levels;
- adapters for turns;
- plugs;
- brackets.
Drainage trays are made from asbestos cement, cast iron, stainless steel, and plastic. For self-installation, it is better to choose plastic. It is lightweight, pliable, and does not require complex equipment for installation.
The profile of the trays comes in the form of U, U and slotted. U-shaped is the most convenient for a private home. It is quite capacious and has no corners where dirt accumulates.
The calculation of materials for a stormwater system depends on the amount of precipitation, the design of the house, the area and characteristics of the land plot.
The diameter of the drains is chosen:
85 mm – for 10 l/s
100 mm – 20 l/s
150 mm – 50 l/s
200 mm – 80 l/s
The length of the gutters depends on the height of the house.
Drainage trays and gratings are calculated based on the linear footage of the storm drain using design calculations or tape measurements.
The volume of bulk materials can be approximately calculated using the formula:
V=abc
where a, b are the width and length of the trench, respectively,
c – layer height.
For sand, it is worth taking an amendment for compaction of about 20%. For crushed stone - about 5-10%.
Wells are selected based on the amount of precipitation. They are calculated using the formula:
M = (20A)Sk,
where M is the mass of precipitation;
20 – time, in minutes;
A – precipitation intensity over a period of 20 minutes;
S is the area from which water is collected;
k is the moisture absorption coefficient of the material.
The amount of sediment mass must also be known in order to correctly select the depth of drainage trays and their number on the site.
Do-it-yourself storm drain installation
Installation of storm drains is carried out after preparing the site (collecting garbage, eliminating all unnecessary things).
- Dig trenches up to 30-50 cm deep. The trenches must be clearly aligned with the projection of the location of the drains.
- Pits are dug under the drains. They are equipped with water intakes with a capacity of 5000-10,000 ml with special containers for collecting waste.
- Plastic rotary and inspection wells are installed.
- The trenches are filled with sand. Drainage trays are laid on the sand and grates are installed.
- Every 10 meters of a straight line, at all turns and at the exit from the tray system, sand traps are placed.
- The collected water is either discharged into a ditch/storm sewer outside the site, or collected in a container and watered with it in the garden. Draining rain and melt water into sewers for disposal of household wastewater is prohibited by SNiP.
If water is discharged outside the site, permission is required from the Department of Natural Surveillance, the Central State Hydrometeorological Service, the UPN, the Fisheries Department, and the Basin and Water Management Department. It is necessary to provide the stormwater drainage design to these services. Construction should begin only after its approval.
Instructions on how to drain the water
1. We will need a piece of hose 2-3 meters long; the most affordable one will be a corrugated plastic hose. The hose must have no damage to the walls and no plugs from foreign objects or ice.
2. You need to tie a weight to one end of the hose with your own hands so that the hose, when immersed in the barrel, is closer to the bottom of the barrel.
3. We cut out a hole in the ice of the barrel with an axe. The end of the hose with the weight should fit into the hole.
4. Lower the hose into the hole. There's a secret here. We lower almost the entire hose under water and observe the appearance of water at the level of the hole in the hose. then with a sharp movement we pull the hose and immediately lower it below the water level - water will begin to flow through the resulting siphon. If your thumb size allows, you can plug the end of the hose and work more slowly. The main thing is not to get your hands wet at -15°C.
5. Lower the hose below the bottom of the barrel and wait for the water to drain. Then you can either close the barrel from above or tip it over. A small amount of remaining water will not harm the barrel.
6. If you need to drain several barrels, then immediately transfer the hose to the next barrel to avoid the formation of ice plugs. It was the quickly formed ice that made it difficult to fill the hose with water in the video.
This method of draining water is a full-fledged life hack and is also suitable for barrels of smaller volume, because when a metal barrel with water is tipped over, the latter can become deformed, and the plastic barrel can crack. There is also a useful effect. If your area is turbulent, then a barrel with ice along the walls and an ice plug becomes a very difficult object to move until a strong thaw sets in.
Contents
Many people solve the issue of drainage for showers in the country using “old-fashioned methods”. Some people drain water under garden plantings, others drain the drain into the sewer, and some do not care about this problem at all, believing that it is enough to install a grate under the shower frame, and then all the waste water will seep into the ground. How to drain a country shower competently and effectively?
Preservation of the well for the winter
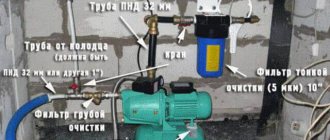
Preservation of a well that will not be used in winter begins before the onset of frost. It is convenient to carry out operations if the check valve is installed in an accessible place immediately after the pump. Some models of submersible pumps are equipped with a built-in valve.
Conservation of the summer version of the well is carried out in the following sequence:
- Turn off the power supply.
- Open the water tap.
- Expect a drop in pressure in the system. When it reaches 0.5 atm, the automatic valve opens. It is mounted below the soil freezing level on the supply hose.
- Unscrew and remove the control unit.
If the well is equipped with an adapter, the hydraulic tank with automation is located in the house. The pipes are located below the freezing point.
To mothball the well, the pump is disconnected from the electricity and the water tap in the house is opened. When the pressure in the system drops, the valve is activated. Water from the pipeline leading into the house is drained into a well.
If the well is equipped with a caisson, the pumped storage tank and automation are located mainly in it.
Preservation is carried out in several stages:
- Electricity is cut off from the pump. Open the shut-off valve on the pipeline to the house.
- They are lowered into the caisson. Open all the taps, except the one on the riser to connect the watering of the area.
- They wait for the water to drain into the well. Open the watering tap and drain the remaining liquid.
It is not necessary to lift the pump from the well. The temperature in it is above zero, the water does not freeze. Equipment is removed and stored when thieves are feared.
The simplest drainage system for a summer residence.
Simple drainage sewer system for a summer residence
It is not enough to supply water to the house; after use it needs to be disposed of somewhere. It’s hard to carry it out with buckets, and it’s somehow pointless: the water comes into the house on its own, and then you have to carry it out on your own two feet. You need at least basic sewerage for your home or cottage. The option of simply removing the pipe from the house and draining the water onto the ground or a small hole will not suit everyone. It doesn't look very good, and an unpleasant smell from this puddle or hole is almost guaranteed. What to do? So, we will need: an old metal or plastic barrel, a certain amount of sewer pipes (at least 6 meters, preferably 110mm PVC), a tee, an outlet, about 0.5 cubic meters of medium-fraction crushed stone, a shovel and several hours of our precious time. We choose a place for our drainage well. Preferably, no closer than 5 meters from the house, no closer than 20-25 meters from the well or borehole and below them along the groundwater flow. We dig a hole with a diameter larger than the diameter of the barrel by at least 0.5 m (the diameter of a standard barrel is 0.6 m, height 0.9 m, volume 0.2 cubic meters) and a depth of about 1.5 m (deeper is better). We make holes in the walls of the barrel, if it is metal, then with a grinder, if it is plastic, then with a wood saw with a fine tooth. We make a hole for the incoming sewer pipe in the wall, near the bottom of the barrel. We fill the bottom of the hole with at least 20 cm of crushed stone and place the barrel upside down, oriented the hole for the pipe towards the house. Now you need to dig a trench under the sewer pipe, bringing it to the place you need. The pipe must be laid with a slope of at least 3 mm per meter towards the barrel. It can be brought into the house either under the foundation or through a hole in it. There is no need to insulate the pipe; the water flowing through it will warm it up perfectly. Not far from the barrel, we place a tee with a small piece of pipe extending above the surface of the ground to circulate air inside the barrel and allow air to exit the sewer when it is filled from the house (so that the air from the barrel does not go into your house). We insert the pipe into the barrel through the hole made for this. We fill the gap between the barrel and the wall of the pit with crushed stone to the full height of the barrel. It is advisable to put some kind of non-rotting material at the bottom of the barrel (a piece of old slate is perfect). We fill both the trench and the hole with soil, compacting it thoroughly. We make a hole in the floor or wall of the house, finally introducing the sewer into the house. Further at your discretion. On a piece of pipe sticking out of the ground not far from a buried barrel, you can put a plastic mushroom, which is difficult, but can be found in stores. And now the nuances. This is an exclusively drainage sewer system for the home; it cannot cope with fecal waste, it cannot be cleaned or maintained in any way, and it is not intended for this. This sewer can be used for drains from the kitchen or bathhouse. Drainage wells from a septic tank have the same device. The microclimate for bacteria that process wastewater depends on the depth of the pit. Ideally, the depth of the pit should be: depth of soil freezing + height of the barrel + height of the crushed stone cushion (for the Leningrad region: 1.2 m + 0.9 m + 0.2 m = 2.3 m). But digging so deep is difficult and not necessary. The effluent also warms the barrel.
Simple drainage sewer system for a dacha with drainage
If the soil at the site where the sewage system is installed is clayey, and the water leaves the barrel slowly, then the sewage system for your home can be slightly improved. To do this, you need to lay another sewer pipe, or better yet, a drainage pipe. This pipe may discharge water into a drainage ditch at the border of the site, or it may lead nowhere, ending in a dead end. The purpose of this pipe is to drain excess water from the barrel, thus increasing the area of water absorption into the soil (irrigation area). The pipe is laid in a trench on a crushed stone bed and is also covered with crushed stone and then with soil. The depth of the trench is greater than that of the supply pipe, and the slope is directed away from the barrel. Naturally, the sewer pipe will have to be damaged by a number of holes in the lower part to improve water flow, making it like a drainage pipe. This is not required if the pipe is placed in a drainage ditch.
You may be interested in similar materials::
- What to do if the sewer is frozen. To be honest, I am a little surprised that someone’s sewer can freeze. Sewage pipes, in principle, cannot freeze there.
«>
Sump volume
Homeowners need to decide in advance (before choosing the type of cesspool) how to make a drainage pit of sufficient volume. Its required capacity is calculated by the formula:
V=Nday•Hperson•Vday/person
Wherein:
- V – design volume of the cesspool, m3;
- Ndn – number of days of operation of the pit for accumulation (before pumping out);
- Khchel – number of permanent household members;
- Vday/person – daily water consumption for one household, l.
For example, for a private household with permanent residence of 5 people, cleaning the cesspool once a month and water consumption of 150 l/person, the volume of the cesspool will be: V=30•5•150=22.5 m3.
We increase the resulting volume by at least 10% (filling the pit to the top is prohibited by regulations) and obtain the cesspool volume: V=22.5+22.5•0.1=24.75 m3. Let’s round the value to 25 m3 – more is better than less.
The correct value of daily water consumption depends on the needs of household members for bathing and washing, i.e. from their daily habits. According to statistics, city dwellers use more water than villagers.
You can, of course, prepare a bulk septic tank, calculating its cleaning once every two months. But a sewage tank truck does not accept more than 11 cubic meters
It is not worth digging a cesspool deeper than 3 m. Its bottom should not be in direct contact with the groundwater horizon; according to standards, it must be at least 1 m above their level. Let’s assume that in the spring-autumn rainy season the perched water is at a depth of 3.5 m. This means that the depth of the drainage pit can be no more than 2.5 m.
Since laying the walls of a rectangular cube is easier than that of a round tank, a rectangular cesspool will be considered. But a round septic tank is more reliable in operation, since the soil pressure on its walls is significantly lower.
Volume is calculated by multiplying the sides of a cube. We determine the long side (width) according to the future location of the cesspool, taking into account the convenient access of a sewage disposal truck. Let the width be 5 m. Then the length will be 25:2:5=2.5 m.
There is no need to get too carried away with the capacity of the drain pit. The capacity of the sludge tank, as a rule, does not exceed 10 m3. This means that such special transport is not capable of emptying an overflowing sewer bunker of a larger volume (as in the example above) and removing waste in one go.
It is more rational to arrange a cesspool with a volume of up to 10 m3 and empty it every two weeks. After all, a large sewer bunker will take away useful space on a suburban area, which can be used for something no less important.
Image gallery
Photo from
Drainage pit made of concrete rings with waterproofing
Factory-produced concrete storage tank
Drain pit with brick walls
Plastic containers for constructing drainage pits
How to arrange water drainage at your dacha
In the place where the future shower is planned to be built, you need to dig a small depression and line it with plastic film or roofing felt.
Draining water at the dacha for a summer shower
It is better to concrete the recess under the shower, forming a kind of waterproof pan, so that the ground under the summer shower does not silt. Water, removing labor sweat and dust from the skin and hair, also washes away fat. These wastes, gradually settling on the soil surface, lead to siltation. Eventually, the soil will no longer allow the water used in the shower to pass through, and an unpleasant puddle will begin to appear on the floor of the shower stall.
Water flows from the pan into the gutter, so the pan should be placed on a slope. In addition, the drainage gutter must also have a slope. To drain water to a certain distance from the summer shower, you need to dig a trench under the drainage pipe. To unhinderedly drain water in a dacha, it is necessary to lay the pipe so that it has a certain slope towards the drainage pit.
Draining water in the country house for the kitchen
To drain water at the dacha, you need to connect a corrugation to the kitchen sink and create a water valve by bending the corrugation in an N shape so that water always remains in it. Then connect the corrugation to a plastic pipe with a diameter of 50 mm and bring it outside the house.
By the way, the kitchen sink should be equipped with a grate to prevent large food waste from falling into the drain pipe. An intermediate siphon must be installed on the line between the kitchen and the drainage tank. so that all foreign particles that are heavier than water settle at the bottom and do not fall into the container.
The siphon should be equipped with an inspection window so that you can unscrew the lid and drain the water with solid particles into a bucket. This will reduce the entry of organic matter and sand into the drainage container. In this case, the volume of the barrel will be enough for a longer time, the barrel will last longer, and otherwise the rotting processes will lead to its silting.
Then you need to take a metal barrel; if it is closed at both ends, then on one side you need to cut out the bottom using a chisel and hammer. Place the barrel with the open end down in the hole on a pre-filled bed of gravel and small crushed stone. The prepared pit must be larger than the height of the barrel. At the other end of the barrel, you have to make one hole for the pipe, connect the barrel and the pipe taken out of the kitchen with a tee with flanges. All joints: pipes with the barrel, as well as with the outlet pipe from the sink, must be sealed.
For better resorption of water drainage at the dacha, you can additionally dig drainage trenches on the sides of the barrel as wide as it is, approximately 1.5–2 m long. The trenches must be filled with crushed stone and large boulders. Cover the top of the trench and barrel with a layer of earth 30 to 100 cm thick, flush with the surface of the site, and cover it with turf. On top you can plant flowers, grass and a couple of birch trees - they love water. This design will last approximately 7–10 years.
Internal layout
Details about the main stages:
- First you need to decide where and what devices will be installed. Depending on their number and purpose, the diameter of the sewer pipe is selected.
- Internal highway markings. The direction of the thread is marked along the wall or floor from the lowest point to the highest. Measurements of pieces for assembly are taken.
- Before starting to assemble, brackets are installed into which the pipes will then be inserted.
- Directly assembling the pipeline by connecting them to each other with a single end into a socket. Before inserting them, the rubber bands are generously lubricated with engine oil. During assembly, it is advisable to use a 45-degree bend rather than a 90-degree bend, since the angle of rotation of the former is much softer. Straight and oblique tees are used to connect devices. It should be remembered that the sewer pipe is not static: it sometimes narrows, sometimes it expands. Therefore, a compensator must be installed in the vertical section. Also, every 5 meters at problem areas and turns it is necessary to lay cleaning inspections. These are special fittings with a screw-on lid through which blockages can be cleared.
- A prerequisite for reliable operation of the drain is to check it after installation. You can check the joints by flushing the entire system. Having assembled all the elbows and tees, insert a hose into the latter and supply water under slight pressure. If everything is done correctly, the joints will remain dry, and all the water will go to the outer part of the line (drain).
Important: the slope of the internal sewerage system is slightly greater than that of the external one. For a pipe with a diameter of 50 mm it is 3 cm per meter, and for 100 mm it is 1.5-2 cm.
How to make proper sewerage when the groundwater level is high
If, when digging a trench, water has already appeared in the upper parts, you will still have to dig to the required depth.
If the sewage system is assembled correctly, groundwater will not affect further work. To prevent water from interfering when laying pipes, the trench needs to be dug a little wider and a recess of 20–30 centimeters must be dug along its very bottom along the edge along the entire length. Liquid will accumulate in this groove, and the ditch will remain dry.
Since the cesspool, VOC, septic tank and drainage system are sealed, high groundwater levels should not affect the treatment process. However, if a VOC or septic tank is installed at the dacha, then a waste pipe or dry well is required, through which water can penetrate back into the septic tank. To avoid this, a check valve is installed on the discharge pipe.
Another solution to this problem is to place the discharge pipe from the septic tank on top into the nearest ravine, since the water comes out almost clean, and this will not harm the environment.
Connecting a pipeline is a labor-intensive process; you will need:
- fittings, tees and couplings;
- grinder to cut off some sections;
- building level;
- hammer drill and screwdriver;
- special brackets - to secure pipes.
To independently install a drainage system to a sink, bathtub or shower stall, you will need a pipe with a diameter of 50 mm; for a toilet the size will be 100 mm. If there is a bathroom on both the first and second floors, then a hundred square meters are extended upstairs, regardless of what appliances will be there.
Local sewerage system with wastewater treatment
For a cottage equipped with modern plumbing equipment - a bathtub, toilet and bidet - a bunker-type sewer storage tank will not be enough.
A wastewater treatment complex will allow minimizing calls to specialists with treatment equipment, completely covering the need for sewerage, and avoiding local problems with soil contamination with sewage.
The principle of clarification (purification) of household wastewater through a system of drainage pipes is based on the natural order of filtration of fecal waste, which “works” in nature. Through the riser in the house, wastewater flows into a pipeline connecting the cottage and the septic tank. Sufficient volume of the sewer well is 2.5 m3.
When planning the landscape of a suburban area, we must not forget about the need to clean the septic tank. The car may not pass, and its hoses are not long enough
In such a storage tank, household wastewater is clarified with the precipitation of suspended matter. You will need to hire a sludge sucker with a team to clean the sludge deposited in the septic tank twice a year.
Self-cleaning with neutralization of sediments in a specially designed compost bin is also acceptable (see below). Clarified sewage water is sent to the drainage network, from where it goes into the ground.
The drainage pit is located at a distance of 5-20 m from the house. The main requirement for the location and positioning of the drainage network is a sufficient distance from the building so that the wastewater entering the ground does not wash away the foundation or flood the cellar.
From the sewer settling tank, the clarified waste stream moves first into a distribution well, then from it into a system of perforated drainage pipes made of polymer or asbestos cement.
Drainage pipes are laid at a depth of at least half a meter, actually at the level of development of the soil-vegetative layer. If the soil developed on sandy soil, then the length of the drains is calculated taking into account 10 m per person.
In soil with a sandy loam base, the length of the perforated pipe should reach 14 - 17 m, with a loamy base about 20 m.
For filtration in natural conditions, in the ground, of sewage, a two-chamber or three-chamber bunker is not necessary. A single-chamber drive will do if it is built correctly (+)
Sewage pipes from the well to the accumulation or discharge point should be placed with a slope of 0.02, i.e. There should be 2 cm of inclination per linear meter. It is desirable that the main part of the pipeline is laid below the frost depth noted in the region.
Areas located above the specified mark are thermally insulated with detachable cylindrical insulation made of polystyrene foam, polyurethane foam, polyethylene or slag backfill.
Laying a channel of 100-150 mm pipe that drains sewage water into a storage pit is carried out at least 50 mm above the distribution well with pipe routing through which clarified wastewater is directed to sealed drainage pipes.
The pipeline enters and exits into the pit through tees of 100 mm diameter. Their upper ends must be left open, with cleaning pipes placed above them, having an equal cross-section with the trays supplying and discharging waste.
There is a gap of 50 mm between the open end of the tee and each cleaning pipe. Sewage pipes made of polyvinyl chloride or polyethylene are used, the diameter of which is 100-150 mm.
One distribution well in a ground wastewater treatment complex is not enough. You will need at least two of these
A pipe is attached to the lower end of each tee. It must be brought 400 mm below the calculated water level in the drain hopper.
All components of the drainage pit, together with the ground filtration system, require ventilation. This function is assigned to the sewer riser inside the house, the upper end of which is located above the roof level, the cesspool itself and each sewer pipe.
The pipeline from the distribution well to the drains laid in sandy soil is carried out with a slope of 3 mm, in sandy loam 2 mm, in loamy 1 mm
In trenches dug under the filter system, pipes are laid with the perforation down. The joints of drainage sewer pipes are insulated with roofing felt, tape, simply polyethylene or a similar material.
Rules for choosing the volume and location of septic tanks
The daily water consumption rate is 200 liters per person, and the septic tank must be able to accommodate wastewater. Collected within 72 hours or 3 days. Thus, subject to permanent residence, a three-chamber septic tank made of 250-liter barrels is suitable only for one person. Therefore, septic tanks of this type are used only for temporary residence or for treating wastewater from one point (for example, from a bathhouse). In most cases, they try to somehow increase the capacity of septic tanks, which is why among treatment facilities made from barrels there are practically no two-chamber options (they have too small a volume).
It is important to comply with sanitary requirements regarding permissible distances from the septic tank to certain objects. For example, the distance from the source of drinking water should be at least 50 meters
Garden plants and fruit trees must be located at least 3 meters from the treatment plant. The distance to the road is at least 5 meters.
Conditions of a homemade pump for overflowing water...
To get started, I suggest you watch a video about this homemade product:
Probably many people have ever had the problem of pouring water from one vessel to another... Of course, you can simply lift and turn one vessel over another, but... this method is not always good, since the vessel can be large, that is, you will have a lot of weight containers and you simply cannot physically lift the container...
The second way is to pour, for example, in mugs... But this method is also not always good, since, for example, the shape of the vessel may not allow you to scoop up water in mugs or some other circumstances... And then the old proven method of pouring liquid comes to mind - take a flexible hose, lower one end of the hose into a container of water, and take the other end of the hose into the oral cavity and sharply blow air into yourself... Pressure will be created and then water will pour out of one container into another by inertia until you pull out the hose... Simple physics , but... this method is not very hygienic, and if the circumstances are bad, you can even choke on water... Therefore, this method is quite dangerous...
So, let's begin…
In order to make a pump we will need: - a bottle cap; - a drill and an 8 mm drill bit; - scissors or a knife; - a threaded bottle “neck”; - a flexible hose; - a small piece of pipe...
To begin, remove the gasket from under the lid and cut off its edges as shown in the photo, leaving a small “tail”...
Now we carefully place the cut gasket inside the lid and tighten it as shown in the photo... Our cut gasket will serve us as a valve...
We cut off the “neck” from another bottle and do something like a turbo water intake...
Now we put on a flexible hose from the other end of the pipe...
That's all!!! Our water overflow pump is ready...
Now we lower the side of the pipe where the valve is located into a container with water, and with sharp up and down movements we build up pressure... Water flows through the valve into the pipe and then into the hose, and from there it pours out...
Selection of materials for the drainage system
Quality, appearance, price - three parameters that guide the selection of materials for drainage. Climatic conditions are also important: in regions with sunny, hot summers, metal is preferable; for areas with high humidity levels, plastic is better.
An article devoted to the analysis and evaluation of both varieties will help you compare plastic and metal products for organizing drainage.
There are several options on the market:
- Cink Steel . Inexpensive and easy to install solution. But steel is susceptible to corrosion, so the durability of the structure is questionable.
- Polymers . They look attractive, you can choose a color to match the roof, and they last a long time. But they are moderately fragile and require careful installation.
- Copper and aluminum . These materials look solid and emphasize the material capabilities of the owner. Their service life is unlimited. The only thing that stops you from buying copper or aluminum parts is the high cost.
Regardless of the material, each system consists of pipes, prefabricated funnels, corners and gutters. The design of the drainage system consists of assembling them according to a pre-made diagram and fastening. The parts are connected using adapters with sealing gaskets.
Adhesive systems are commercially available, but they are more difficult to assemble than snap-on designs. For additional reliability, the latter can be “insured” from the inside with roofing sealant
It is important that all the necessary components of the spillway are found in one retail outlet and from one manufacturer. Missing something can slow down the installation process.
When selecting drainage parts, do not experiment with attempts to adapt handicraft elements to existing circumstances. It is better to immediately focus on products from trusted manufacturers.
Elements with a rectangular cross-section will be available for sale. They are usually 10-15% cheaper than round ones, but are more difficult to install and require an appropriate façade design. They are appropriate to use to get around ledges or awkward corners
When choosing a material, the reliability of the rafter system is also important; it must withstand the weight of the spillway. When in doubt, stick to lightweight polymer construction.
Where to drain water from a summer shower in the country
Equally important when designing a summer shower is the drain for water drainage. The easiest way is to connect the drain to a special drainage ditch, if it is located on the site. A tray made of galvanized metal sheet should be installed at the base of the summer shower. The tray will prevent soil erosion under the shower.
There are several options for where to drain water from the shower at the dacha:
you can connect the drain to the central sewer, drain the water into a drainage hole, there are other ways.
Before making a drain for a shower in the country, if the pan will be located directly on the ground, you need to dig a small depression in the place where the building will be located. The pit should be filled with crushed stone, stones or completely concreted. Before concreting, this depression must be covered with roofing material so that the ground does not get wet. The pallet should be installed on, for which you can use large stones or other available materials.
Then you need to connect the pan to the drain using a pipe laid in the trench. Sometimes you can do a DIY shower drain in a country house together with a collection of soapy water located outside the shower stall. Its volume must be at least 200 liters. Not far from the summer shower, you should dig a regular hole. Its walls must be strengthened, otherwise they can collapse very quickly during operation. It is better to make the bottom and walls of the collection concrete, then water will not be absorbed into the soil and erode it.
You can arrange a septic tank for a summer shower, but it should not be located directly under the shower stall itself, since due to large volumes of water it will begin to fill with soapy water and will begin to work worse. All this can lead to the destruction of the soil, and then the foundation of the summer shower stall. To preserve the soil and the structure itself, a drain for a summer shower must be built a few meters from the shower stall, and placed next to the drainage. The drain from the summer shower should be on a slope so that it goes towards the drainage tank or trench.
It is not recommended to use clay to create a waterproof drainage layer, as over time it can erode and fill the drainage ditch. The drain must be constructed in such a way that it is ventilated. In this case, there will be no problems with unpleasant odors.
Is it legal to drain into a drainage ditch?
Flow stations or VOCs from leading manufacturers clean wastewater efficiently, so there will be no problems with the law when discharging into a ditch. Especially when using ultraviolet disinfection and a microfilter at the exit from the aeration station.
Expert opinion
Albert Lyushin
Engineer-technologist with more than 15 years of experience.
Order installation of a septic tank
There are some nuances with septic tanks made of concrete rings:
- firstly, through the seams of concrete rings, even if they are sealed, sooner or later its contents leak out and clog the soil;
- secondly, this design does not clean the wastewater in any way.
According to the law, this will be equivalent to waste dumping. In this case, administrative punishment is provided.
You can view the standards for the installation of autonomous sewage systems in the regulatory document SP 30.13330.2016 (Current edition of SNiP 2.04.01-85).
Where to complain if neighbors drain wastewater into a ditch, storm drain or onto the terrain
Neighbors should know that the federal law on sanitary and epidemiological welfare provides for administrative liability for such discharge of wastewater without prior disinfection. You can write a complaint to SNT Rospotrebnadzor, and then go to court with their written response. In practice, such cases occur extremely rarely.
Where to drain purified water if there is no ditch
Wastewater treated with a septic tank must be supplied for post-treatment in filtration fields or in a drainage well. But not everyone has the space to install them on their summer cottage. In this case, all that remains is to use the drive.
Is it possible to drain water into your garden for irrigation?
It is undesirable to water vegetable gardens even with clarified wastewater from a biological station. After energy-independent anaerobic septic tanks, water is not suitable not only for irrigation, but also for discharge onto the ground.
Get a response within 3-12 hours from a specialist
Norms for the distance of treatment facilities on the site
According to SNiP, treatment facilities and pits must be located at a considerable distance from the house, water well and other engineering facilities.
- From a residential building - at least 5 m to a septic tank, VOC, cesspool to avoid unpleasant odors entering the room. And also prevent in advance the possible disastrous consequences of the influence of a humid environment on the foundation of the house.
- It is 30-50 m to a water well. Of course, it is very difficult to follow this rule, since the size of the plots is very limited. It is still necessary to remove the septic tank from the water supply system as much as possible, to the extent technically possible.
- To the borders of the neighboring plot - at least 2 m.
- From the collector to plants and trees - the location is 2-4 m if the tree roots are large.
Double chamber design
A two-chamber cesspool makes it possible to purify waste water much better; its design is closer to septic tanks; its structure is shown in the figure.
Simplified drawing of a two-chamber cesspool
Designations in the figure:
- a – pipe supplying wastewater to the first tank;
- b – ventilation;
- c – filter pad made of crushed stone;
- d – overflow hole through which clarified water enters the second tank.
A two-chamber cesspool functions as follows:
Through pipe “a”, water from the kitchen, toilet or bathhouse enters the first tank, solid organic sediments settle to its bottom, where they are gradually processed by bacteria, after which only sludge remains. You can speed up this process by adding a special antiseptic;
Antiseptic "Doctor Robik"
As the first tank is filled, the liquid reaches the overflow hole “d”, through which it enters the second chamber; since it has no bottom, then after passing through the crushed stone filter “c”, the water is absorbed by the soil.
Accordingly, by increasing the number of chambers to three, it is possible to achieve even greater cleaning, as a result of which such a problem as an unpleasant odor will be completely eliminated.
Materials and tools
- To dig a trench, you will need a small excavator. If there is no possibility of heavy equipment coming in, you will have to take up shovels.
- The pipes need to be cut with something, some people use a grinder with adjustable speed, or you can use a hacksaw with fine teeth.
- Jackhammer, perforator - make holes in the well and foundation of the house.
- Sand or fine ASG for fixing the pipeline in the trench.
- Insulation, thermal insulation in places where laying sewerage through an external network to a depth below the soil freezing layer is impossible.
The main segment of the drainage system is the pipe, here are its main options:
- Red PVC is available in various sizes.
- Black polyethylene ones also come in diameters from 50 to 159 mm.
- Ribbed - pragma. The length is 4 and 6 m, the diameter is from 100 mm to 500 mm.
- Gray polypropylene (plastic).
Some tips from the professionals
In order for the sewer system in a private house to work for its intended period, you must first install it correctly. This is 80 percent of success. But even after startup, it is necessary to properly monitor the system.
- Initially, correctly organize and calculate the volume of waste.
- Pump out the cesspool in a timely manner. And not only the liquid fraction, but also the sediment at the bottom of the wells.
- Make sure that no foreign objects get into the pipe that could cause a blockage. For example, small parts of children's toys, rags, etc.
- Conduct a timely external inspection of septic tanks and pits to check their tightness.
Year-round accommodation and summer
If no one lives at the dacha in winter, then it is enough to assemble a summer sewage system. In this case, there is no need to dig a deep trench and lay a larger diameter pipeline.
The outlet from the house also does not need to be installed at the very bottom of the foundation. The exit is made directly from the top point of the plumbing fixture. A simple scheme for collecting summer sewage in the photo:
As for the collector into which the water will be drained, it must still be sealed and securely installed. There is no need to install a septic tank; a regular drainage pit will do just fine. At the end of the summer season, it will simply have to be pumped out and preserved for the winter.
If you live year-round in a private house, you will have to complicate the task a little. To use water and a toilet in cold weather, it is necessary to ensure good insulation of external sewer pipes. In addition, there are still some difficulties during installation. This includes the depth to which the external sections of the water supply system are buried, its insulation, and many other factors.
Sealed waste pit
A sealed sewer system is a sealed container into which sewage water is pumped through pipes. As the container fills, sewage water must be pumped out with a special machine.
- the installation location does not depend on the type of soil on the site;
- does not depend on the passage of groundwater;
- environmentally friendly, sewage water does not enter the environment.
Disadvantages of a sealed design:
- a smell appears if the storage tank is made in the shape of a well;
- monthly costs (you need to periodically call a sewer truck for pumping);
- relatively high construction cost.