Hello, dear readers!
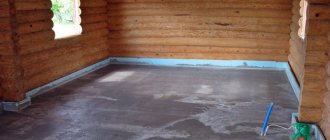
A concrete screed on the floor in a bathhouse is considered the best option. It is durable. No matter how you look after the wood, after 5-10 years the floors need to be re-laid. Do you understand the humidity...
Concrete does not rot, does not deform, does not require special care, and lasts for more than 40 years. Today we’ll talk about how to fill the floor in a bathhouse with a slope for drainage. It is not easy to do the work of arranging such a floor with your own hands, but it is possible if desired.
Pouring the floors in the bathhouse can be done both in the washing room and in the steam room. A concrete floor is essentially a concrete screed on top of which a waterproof, non-slip coating is laid. Typically, tiles are used for these purposes. When laid on the ground, the slope of the floor is ensured by creating a slope of the very base of the ground. For small areas - due to changes in the thickness of the underlying layer.
Features of floor design taking into account the soil
When the soil under the bathhouse building is loose or sandy, the flooring can be laid directly on the base, which in this case will be the ground. In this case, in the steam room there is no need to make a drain for a large volume of water. It is necessary to build drainage for the washing room.
Of course, you want to move around in a bathhouse on a warm floor surface, so you should provide maximum protection from the cold coming from the base. Then the air in the heated steam room will cool down for a long time, and maintaining the required temperature will become easier. This problem becomes especially relevant in the cold season, when the soil freezes and begins to take away a large amount of thermal energy.
Pouring the floor in a bathhouse on the ground consists of a number of mandatory measures:
- A drainage hole or well is installed to collect and drain wastewater.
- A cushion is created on the ground for the primary screed.
- Pour the initial layer of coating.
- Insulation and waterproofing are installed.
- Install the top concrete screed.
- Apply a tightening layer.
- Finishing of the floor surface is carried out.
Septic tank installation
Expert opinion: Afanasyev E.V.
Chief editor of the Stroyday.ru project. Engineer.
Read my detailed article about the installation and installation of a septic tank.
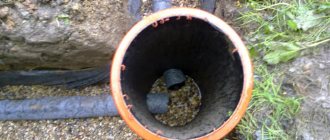
The water is discharged through the pipe either into the ground through a drainage area in the underground, or into a septic tank. It can be made from old tires or concrete rings. To prevent the pipe from freezing in winter, it must be insulated. A septic tank made of concrete rings is a simple budget design. The rings are installed on a soil cushion; the bottom is not concreted so that the water goes into the ground.
Construction of a septic tank made of concrete rings
The optimal option for a drainage device in a bathhouse is chosen based on the structural features, type of foundation and method of further drainage of water.
Drainage system
Moisture will collect in the steam room during procedures, albeit in small quantities. For this reason, a waste water receiver is installed on any type of soil. As a rule, it is an area covered with a special grid in the corner of the room or a shallow pit, the walls of which are made of concrete or coated with clay. The slope of the floor in the bathhouse is brought to this point.
Water can be drained from the receiver in several ways. Most often, a hole is made in the base, from which a pipe is led into a drainage pit or centralized sewer system. To prevent cold air or foreign odors from entering the room, a shutter is installed at the end of the pipe.
Often a closing hole is created at the top of the drainage ditch. It will provide additional ventilation to the room and remove moisture from it.
The lowest point of the floor structure is the bottom of the drainage pit. In some cases, it is not possible to remove the liquid outside the building - for example, when the bathhouse is located in the basement. Then, instead of a drainage ditch, a recess is installed with a container from which water is drawn after completing the bath procedures.
How to drain water?
Diagram of the floor arrangement in a bathhouse with a drain pit
The peculiarities of the processes occurring in the bathhouse require the installation of a well-thought-out drainage system in the floor. To do this, it is necessary to provide a drainage system and an appropriate slope of the floor surface. There are several schemes for water drainage devices:
- The first scheme is suitable for bases made of light sandy soils. They absorb moisture well. In this case, an absorption pit is installed. It is dug under the part of the bathhouse where the washing room will be located. From it, water will be collected in a pipe and discharged into the pit. Dimensions of the pit: sides and depth of 50-100 cm. Crushed stone, broken brick, sand are placed in the pit. For ventilation, through vents are left in the base.
- If the floor in the bathhouse will be poured on dense or clayey soils, then it is better to move the pit outside the structure. In such a situation, a small pit is installed under the washing room, where water will flow and flow through the pipeline system into a pit, septic tank or drain. To protect the room from unpleasant odors, you will need to install a water seal.
- However, the first and second schemes involve the installation of a lattice wooden floor on a slight elevation from the concrete base. If you want to make a floor directly on the ground and lay tiles as the front layer, then you need to install pipes directly into the screed. In this case, the drainage system should be thought out in advance. This drainage method is considered universal.
Cushion under the first layer of screed
Before pouring the floor in the bathhouse with your own hands, lay a special pillow to reduce heat loss. Before this, a pit 50-60 centimeters deep is dug in the ground.
A 30-40 cm layer of construction waste, consisting of fragments of bricks, stones, gravel and other things, is poured onto its bottom. The main thing is that the waste does not contain pieces of wood or other biological components that may begin to rot in the future. After backfilling is completed, the layer of debris is compacted.
The recess along the perimeter of the room is coated with clay and a 15-centimeter shock-absorbing layer of sand and small crushed stone is poured. This layer will absorb moisture that appears as a result of condensation caused by temperature changes. Then the resulting pillow is leveled, its surface is well compacted and the solution is poured.
Primary screed
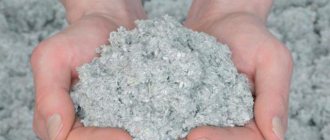
In order to provide additional thermal insulation, it is advisable to make the solution for the first layer of screed based on perlite. This material shown in the photo is an excellent insulator and therefore the floor covering will be warm and pleasant to the touch.
Since perlite is light and consists of small fractions, work with it should be carried out in a place well protected from drafts.
The solution is made with it in several stages:
- Pour 2 buckets of perlite into a concrete mixer and add 1 bucket of water.
- The mixture is thoroughly mixed, and its volume is significantly reduced.
- After the mass is made homogeneous, cement is added to it, which is poured gradually. The mixture continues to be stirred.
- When the mass becomes uniform in color and consistency, pour 1 bucket of perlite into it and pour in several liters of water.
- The mixture should ultimately be free-flowing.
- For perlite to react with cement and water, you need to wait some time - about 10-15 minutes with the concrete mixer turned off.
- Then they continue to knead until the mass is plastic.
If you don’t want to use a bathhouse during the cold season, you can do it simpler and use a mixture of 3 parts sand, 1 part M400 cement and 0.1 parts lime. These components are mixed by adding water until the color is uniform and the solution has the consistency of thick sour cream.
The finished mass is laid out on the subfloor and leveled. You don't have to use guide beacons at this stage. But at the same time, it is imperative to ensure that the floor in the bathhouse is poured correctly with a slope in the direction of the location of the drainage hole.
The primary screed needs to be given time to dry. The solution, which includes perlite, dries in about 5-7 days. This will take about 2 weeks for the concrete mixture. To prevent the screed from cracking, it should be moistened several times during the day, and in hot weather it should also be covered with plastic wrap. The surface should not be allowed to dry out.
Nuances of the right choice
Before starting construction of a bathhouse, it is important to carefully study all the features of the flooring arrangement and the criteria for its compliance. Before making a floor in a bathhouse, the owner will have to choose a method of water drainage and a material for constructing the floor structure
His decisions are determined by individual preferences and financial capabilities. In most country bath buildings, a concrete screed is poured or a floorboard is laid on prepared logs.
Features of wood flooring
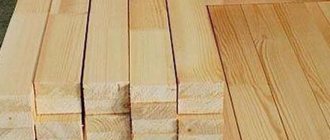
To ensure that the wooden floor in the bathhouse does not lose its aesthetics and technical properties for a long time, experts recommend choosing larch boards. Pine, birch, alder or fir are also suitable. Sometimes wood species can be combined: the final finishing is made from expensive material, and the rough finishing is made from cheaper materials.
Wooden floor in a bathhouseSource ad-cd.net
The raw materials for the finishing coating are prepared in advance and certainly dried. When this condition is not met, the wooden floor quickly deforms. Especially from solid wood. It takes longer to dry, but the possibility of avoiding deformation is not excluded. To prevent such problems, thin beams are laid. This material is designed for lighter loads, but this is compensated by transverse joists. Boards up to 2.5 cm thick are the least likely to deform, so they are considered the best solution for laying joists. But the best option is a board 4 cm thick.
Floors made of wood materials are laid in stages:
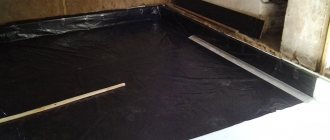
- The base is covered with several layers of roofing felt.
- Massive beams are laid at a certain distance along the perimeter of the foundation; they cover the entire space of the future floor.
- The bars (cranial) are attached.
- Logs are laid on the beams (they are cut in certain places to create a slope towards the drain). This is how rough structures are created before insulating the floor in the bathhouse.
- A moisture-proof membrane is fixed to the joists (leaving the ends up to 0.3 m free for attaching them to the wall waterproofing).
- A layer of insulation is laid between the subfloor boards. The optimal solution would be to combine protection from climate influences. For this, it is best to use mineralized wool.
- The finishing coating is arranged using tongue-and-groove boards.
Finishing of wooden floors in a bathhouseSource pol-inform.ru
The arrangement of high-quality floors depends on the material used and the reliability of its fastening. Structural elements have the following connection options:
- The beams are attached to the foundation with anchor bolts (from 14 cm).
- Fastening is carried out using a surface or through method. In the latter case, the anchor can be taken shorter. There are four such bolts per beam.
- The beams are attached to the support posts with self-tapping screws or screws using metal corners.
- The logs are fastened with beams, also using corners. If the logs are not solid, the connecting points are also secured with moisture holders.
- The board with tongues is inserted into different areas (the screws are “sunk” deep into the wood so that they do not interfere with fastening).
The main condition for installing wooden floors in bathhouses is the presence of ventilation holes in the foundation. They are needed so that the wood gets rid of accumulated moisture. Properly made non-leaking floors last up to 10 years.
Pouring a concrete floorSource ad-cd.net
Features of pouring concrete floors
In order to concrete the floors in the bathhouse, steam room and sink, you need to perform the following steps step by step:
- make a sand cushion on a soil base, set up plank formwork;
- prepare the base for the concrete mixture (mix cement with sand and gravel and add water until a liquid, homogeneous mass is obtained;
- pour concrete in an even layer of more than five centimeters;
- place a stiffening frame on the created base;
- reinforce the space in the formwork;
- fill the formwork with the rest of the concrete mass to the top (to give uniformity, the concrete can be compacted using a vibrator;
- The concrete must be thoroughly dried for several weeks.
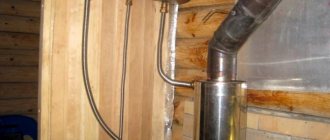
Insulation and waterproofing of the coating
The foundation around the perimeter of the bathhouse is coated with bitumen to prevent moisture from penetrating into the room. A waterproofing material such as roofing material is placed on the surface of the primary screed, the joints of which are treated with bitumen.
You can also use a thick polyethylene film for insulation. The joints are glued in several layers with wide construction tape or special tape.
The next layer is laid with thermal insulation material. Experts recommend using felt - it not only retains heat well, but also creates the required degree of adhesion for the next layer of screed. You can also use mineral wool as insulation.
Materials and tools for DIY floor construction
The floor in the bathhouse is necessary primarily to ensure the rapid removal of excess moisture into the ground or a special device - for example, a drain tank.
Most often, coniferous trees are chosen for making wooden floors - larch, fir or pine.
However, regardless of the chosen material, it is imperative to treat the boards using special impregnating compounds that will help prevent rotting and unpleasant odors. An additional solution, the implementation of which will reduce the likelihood of rotting boards and avoid premature repairs, is the installation of a high-quality ventilation system.
The technology for constructing a concrete floor with your own hands necessarily involves the construction of a foundation around the perimeter of the building. It will serve as the basis for later pouring the concrete floor. To complete this work, you will need the following tools:
- concrete mixer;
- building level;
- shovel;
- buckets and wheelbarrow.
When doing the work of laying a wooden floor with your own hands, you will need to place a subfloor on the wooden joists, and lay a layer of insulation on top. Next, treated finishing boards are laid on it.
To perform the above operations you cannot do without the following tool:
- hammer;
- plane;
- tape measure and pencil for measurements and design calculations.
Arrangement of the top layer of screed
In order for the flooring design to be of high quality, you need to know how to properly fill the floor in a bathhouse:
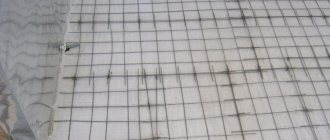
- The thickness of the top layer should be small - approximately 5-6 centimeters. The coating is made reinforced.
- Guide beacons are installed, maintaining a slight slope in the direction of the drainage zone.
- The screed is poured over a pre-laid steel or aluminum mesh.
- For filling, a cement-sand mixture is used.
- Wait for 10 days until the solution is partially dry, moistening the surface of the screed daily.
Applying a tightening layer
At this stage, it is necessary to make the surface perfectly flat and smooth, so apply a small layer of cement-based mortar and smooth it. Since the top layer of the screed has not completely hardened, adhesion will be good, which means that the coating will not be in danger of cracking.
After completing the arrangement of the tightening layer, the floor surface is allowed to dry completely, while continuing to wet the concrete and, if necessary, covering it with film.
Finishing
The result of the work done is a smooth coating. All that remains is to sand its surface with a grinding machine. After this it will be pleasant to move on the floor. You can also give it a beautiful appearance (read: “How and with what to treat the floor in a bathhouse - choosing the right impregnation”).
Modern finishing materials usually cover the floor with ceramic tiles. If you choose glass products, then the floor covering will be very durable, resistant to abrasion and temperature changes. The retail chain offers consumers special collections of tiles for bathhouses. Therefore, you can choose a finishing option to suit every taste.
Increasingly, instead of ceramics, a self-leveling floor in the bathhouse has begun to be used, which you can make yourself.
Often, owners of bath buildings use wooden boards to move across the floor, which are not only good for the feet, but also create a special atmosphere in the steam room due to certain types of wood.
Ventilated basement floor
In the case where the bathhouse is planned to be used throughout the year or the climate in the region is harsh, the floor in the building must be made with a ventilated space underneath. Such a floor covering will require additional cash costs, but as a result, the surface on which you will be moving will receive reliable thermal protection.
In this case, the technology will differ from work on creating a structure “on the ground”. The main difference is the absence of a drainage hole. Instead, there will be a point for collecting water, and a drain going beyond the foundation of the building. In addition, a pillow will not be required, since it will be replaced by a ventilated basement space.
Preparatory work for creating a primary screed consists of the following activities:
- ground leveling;
- installation of logs at a height of 20-25 centimeters;
- plank flooring;
- treating wooden elements with an antiseptic;
- laying film to provide waterproofing.
At the same time, the ground level both outside and inside the building must be the same. To ensure ventilation of the basement space, lugs are created in the foundation through which air will circulate and thereby remove moisture. As a result, the logs will last a long time.
The remaining stages of arranging the floor structure are similar to the processes described above.
Construction of a drainage pit
An example of a tire cesspool If the soil on the site is strong and, at the same time, has excellent filtering properties, then the construction of the pit involves digging a pit and constructing a drainage layer of crushed stone or gravel.
However, such ideal conditions are extremely rare. As a rule, well-draining soils tend to crumble, so when constructing a pit, it is necessary to provide for strengthening its walls.
Options for materials that can be used to lay out pit walls:
Example of a finished cesspool
You can also use available materials:
Installation stages
Advice! Masonry can be made not only from brick, but also from natural stone.
Advice! If there is no crushed stone, you can use construction waste - broken brick or concrete - to form a drainage layer.
When building a bathhouse, a system for discharging used water should be provided. An inexpensive and practical option for waste disposal is a drainage pit for a bathhouse. You can build this structure yourself, without involving a team of builders, since there is nothing complicated in its design.
Pouring technology for inexperienced builders
You should not be afraid of carrying out work on arranging a screed if you do not have experience and skills in how to pour floors in a bathhouse under the drain. In reality, this process cannot be called complicated.
Segments of aluminum profiles can serve as guide beacons. It is not mounted strictly horizontally, but with a slight slope towards the place where moisture is collected. A distance of about 100 centimeters is left between the beacons. To fix the landmarks, you can use small piles of cement mortar, which must dry.
Then they start pouring the screed. Work begins to be done from the farthest corner. The prepared solution is laid out on a rough base and distributed between the guides using a trowel. To make the process move faster, it is advisable to fill the floor with an assistant who will ensure a continuous supply of the mixture.
For the final leveling of the floor surface, a long rule is used. They guide it along the guides and smooth out the solution. If necessary, the mixture is added and spread with a trowel.
After a few days, the concrete layer will acquire the necessary strength, but the screed will be completely ready in no less than 2 weeks. The concrete surface should be moistened at least 2 times a day. The presence of light spots on the surface of the screed means that moisture is not enough and after wetting with water it needs to be covered with a film. To speed up the process, plasticizers must be added to the solution.
Stage one. Organization of water drainage
These works can be considered preparatory work, but without them you cannot start pouring the floor. We chose the most difficult option - the bathhouse was placed on a strip foundation.
Step 1. Draw up a sewer plan taking into account the placement of the steam room, locker room and other premises. At the same time, carefully consider the installation location of the water receiver, if one is planned to be installed. The receiver can be made from an ordinary metal or plastic barrel with a volume of approximately 100–200 liters; holes should be cut on the sides and bottom of the container using a grinder.
DIY septic tank from barrels
Step 2. Dig trenches according to the diagram. Observe the slope; the difference in height per linear meter should be approximately 1–2 cm. There is no need to use special instruments; the slope can be checked by eye or using an ordinary level.
Trench
Step 3. Level the bottom and lay plastic pipes. There is no need to add sand, the depth of the trenches is insignificant, and the sewerage system will not experience much pressure. If we take the drainage level in the steam room as zero, then the maximum depth of the trench at the exit from a 6 m wide bathhouse will be approximately 25–30 cm. There is no need to be afraid that the water will freeze in the winter. First of all, it's warm. Secondly, the slope ensures complete drainage, the pipes are always empty, and there is nothing to freeze.
Pipe slope control by level
How to use a bubble level to control the slope of pipes?
- Place the device on a flat surface, take a ruler and place it on a level at a distance of 50 cm from the beginning.
- Raise the device until the clearance between it and the plane is equal to a centimeter.
- Visually remember the position of the bubble on the scale or make a mark with a marker. In the future, when checking the slope of the pipes, use the mark you made.
Step 4: Assemble the drain inlet and attach it to the pipe. To facilitate the assembly process, you can use soap, soapy water or sunflower oil. Wet rubber seals with these liquids. It is strictly forbidden to use automobile oil for these purposes - the rubber in the seals is ordinary, automobile oil will ruin it and will have to be completely changed.
Assembled elements of internal sewerage
Seals should be moistened with oil or soapy water.
If necessary, make holes in the foundation strip
Sewage installation
The pipe is laid on a bed of crushed stone to create a slope
Step 5. Check the functionality and serviceability of the drain. To do this, fill a liter jar with water and place an empty container of the same volume at the outlet of the sewer pipe. Pour water into the receiver and see how much comes out of the sewer. If the volume is much less than the filled volume, this means that the pipe is laid with differences in height, water is retained in uneven areas.
Everything is normal - fill the trench, carefully compact it every 10 cm of soil height. For compaction, you can use any convenient means at hand.
Manual tamping
It is advisable to slightly moisten the soil before compacting. Keep in mind that subsidence under a layer of concrete can cause major problems. After installing the drain, further construction work can continue.
Warm floor system in the bathhouse
When you want to create the most comfortable conditions, you need to study information on how to fill a heated floor in a bathhouse (for more details: “What is the best heated floor in bathhouses - arrangement options”). To equip it, when laying the final screed, a heating system for the floor surface is installed inside it. The pipes through which the heated coolant moves are laid on top of the reinforcing mesh. This design can provide quick heating of bath rooms.