Foundations made using bored technology with a monolithic grillage have recently become increasingly popular. And this is fair, since the construction of such a foundation has undeniable advantages and wide application possibilities. This technology is a combination of installing buried concrete pillars, made using a special technology at key points, and pouring a connecting grillage of various technical devices.
This is what a bored foundation with a grillage looks like. Due to its reliability, efficiency and quick erection, a bored foundation with a grillage is used in both industrial and private construction, and can also be done with your own hands without the additional involvement of construction crews and equipment.
Pile foundation with monolithic grillage
The main components of this type of foundation are piles or piles with a grillage. Grillage - consists of beams or slabs that can connect piles above the ground.
This type of foundation is used in cases where construction takes place on soft soil:
- the final calculation of the width of a conventional strip foundation is more than 1.6 m
- the structure is erected in strict accordance with frame technology
- soils have a fairly high freezing depth.
Rice . Reinforced concrete piles with a monolithic grillage
Main dimensions and dimensions
To create a strong and durable foundation, it is necessary to make the correct calculations. The shape and dimensions of the grillage used are determined by the design features of the building being constructed, the loads on the foundation, and the number and location of piles.
Sectional view of a pile foundation
The grillage is created in the same way as the strip foundation structure. The height of the grillages for pile foundations directly depends on the level to which the structure should be raised from the ground, as well as on its weight. You can independently calculate a structure resting on the ground or slightly recessed. In the case of constructing a hanging belt, it is better to entrust the calculations to specialists, since they are very complex for a non-professional.
You can independently calculate the dimensions of the pile foundation grillage using the formula B = M / (L × R), where:
- B – minimum permissible height for belt support;
- M – weight of the structure without taking into account the supports used;
- L – belt length;
- R – soil strength at the surface of the earth.
Grillage reinforcement frame
Reinforcement frames for belts on a pile foundation are created in the same way as for construction on a strip foundation. The structure requires longitudinal (working), horizontal and vertical transverse reinforcement. The total cross-section of the longitudinal reinforcement must be at least 0.1% of the cross-section of the belt. To select the cross-section of each rod and their even number, an assortment of reinforcement is used.
Range of steel reinforcement
| Type of fittings | Belt length, m | Diameter, mm |
| Longitudinal (working) reinforcement | Until 3 | from 10 |
| Over 3 | from 12 | |
| Horizontal reinforcement (transverse) | from 6 | |
| Vertical reinforcement | Up to 0.8 | from 6 |
| Over 8 | from 8 |
Types of pile foundations by material of manufacture
- Wooden (perhaps the most rarely used piles in construction due to their inefficiency)
- Metal (screw - quickly installed and have a relatively low cost)
- Concrete
- Reinforced concrete piles (relatively low cost with the highest degree of quality and reliability)
In addition, piles have different types of sections :
- Square
- Rectangular
- Round
- Square, with a round cavity
A pile foundation can have a grillage, which is made in the form of a foundation beam. Its main purpose is to consistently connect adjacent piles to each other. Also, such a foundation can be made in the form of a slab. The first option is installed exclusively under load-bearing walls, and the second should cover the entire area under the building.
The pile foundation grillage can be prefabricated or monolithic. The monolithic type is produced by pouring concrete into pre-prepared formwork, and the prefabricated type uses ready-made reinforced concrete products. Read more about the pros and cons of a pile-grillage foundation.
Types and types of grillages
There are 3 main types:
- Made. Most often it consists of steel beams that are welded together. A significant disadvantage is the complex installation with low strength of the connection of the beams at the joints. It is used in cases of short-lived construction of a house, since the metal is subject to increased corrosion due to unprotected conditions.
- Prefabricated monolithic. They are used in the construction of heavy industrial buildings, since parts with connections can be cast in advance and assembled on site. It is not profitable to use when building your own home, because it only needs to be assembled with heavy equipment.
- Monolithic. Cast in the form of a strip or slab. The connection to the piles occurs by attaching to them, or by incorporating part of the pile into its thickness. Most often, when building low-rise houses and summer cottages, this type of grillage is used.
Types of grillage by height:
- High. It is located fifteen centimeters and higher above ground level. This facilitates the construction of buildings on heaving soils, hills, and in general, when the ground is uneven. There are several negative effects, such as the lack of a basement in the future home, as well as the cold floor resulting from the void. But still, this is practically the only option for building a house on a hilly area.
- Elevated. Placed at a height of zero to ten centimeters above ground level. There are no obvious shortcomings when compared with the first option.
- Recessed. It is planned below ground level on a sand cushion, which resembles a strip foundation, under which there are piles. Most often used for heavier buildings or structures. The obvious disadvantage is the high cost.
It is worth noting the fact that with proper design and compliance with all construction standards by workers, any grillage can withstand almost any load on the building.
Types of monolithic grillage
Grillages are distinguished according to the ratio of the height of the device to the level of the ground surface:
- Tall or hanging - placed above ground level (10-15 cm, but in individual cases these figures may be higher). This type can be used on all types of soil under a building that are light in weight. The only drawback is that there is a mandatory need to insulate the empty space that is formed between the ground and the grillage.
- A ground or intermediate grillage is constructed in such a way that its base should be located at ground level. If this type is used, there will be no void between the soil. The main feature of this grillage is that it can only be used on soft soils.
- The buried grillage differs from previous options in that its lower part is immersed in the ground, thereby its level is located below the surface of the earth. This type is a regular strip foundation, but at the base of which there are piles. This option is quite expensive and is used only during the construction of heavy objects.
Rice . Pile foundation with high and low grillage
Peculiarities
The technology provides for the presence of free-standing supports and a connecting element - a grillage. The depth of piles depends on the geological conditions of the site and the design features of the building. Drilling wells over a long distance allows you to increase the area of contact between the building support and the ground. Due to this, friction increases. Such foundations can withstand heavy loads.
Device diagram
The installation of bored piles has one serious drawback: all supports work separately. This option increases the likelihood of uneven precipitation, which is dangerous for almost all types of buildings. To prevent the destruction of the walls, a reinforced concrete strip grillage is provided. Its reinforcement allows it to withstand bending loads well and combine all supports into one foundation. The grillage manufacturing technology may vary depending on geological conditions.
Pile foundation with a monolithic grillage - do-it-yourself construction technology
- Number of wells
The number of required foundation formwork is obtained as a result of mathematical calculations. To do this, you should take the total weight of the structure being built, and you should not forget about the operational loads. The calculation of the characteristics of the internal rods is based on the pressure exerted by several elements: floor, partitions, roof structure, etc.
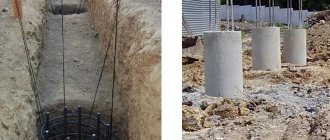
- Drill work
After receiving all the data, you can proceed to the process of drilling wells. If the plans did not include the use of modern technology, then you need to remember that a hand drill is capable of making a well, the diameter of which will not exceed 30 cm, and the depth will not exceed 5 m.
Rice . Drilling a well with a hand drill
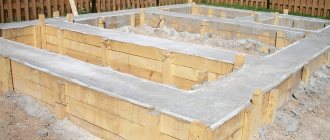
- Ruberoid pipes
After the wells are ready, roofing felt pipes need to be made. Their length should exceed the depth of the resulting wells by 20-30 cm. The upper part is made of several layers in order to tighten them together with wire. Thus, the resulting result is formwork and waterproofing.
Rice . Ruberoid pipes
- Foundation reinforcement and formwork
Rice . Scheme of reinforcement of a monolithic grillage
If a small amount of water was found at the bottom of the well, then you should not pump it out immediately.
The technology of constructing a pile foundation allows this fact to occur. But in cases where the liquid exceeds the depth threshold by a quarter, it should be pumped out before pouring concrete.
Rice . Formwork for piles
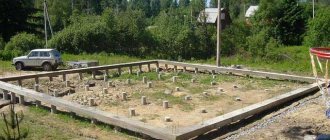
We erect a pile-grillage foundation
The foundation on bored piles, with a widening at the base - a “heel” and a grillage hanging above the ground, is popular among FORUMHOUSE participants. The availability of technology and the possibility of independently manufacturing this type of base are reflected.
However, as with any construction, when constructing such a foundation, certain features must be taken into account. In this regard, the practical experience and “tricks” of the users of our portal, which they use when building such a foundation, are interesting.
VzikFORUMHOUSE user
I have already built a house made of aerated concrete, a bathhouse, a gazebo, a garage and a brick fence on this type of foundation. I can say that with proper calculations and adherence to construction technology, no problems arise with this foundation.
Although our users have accumulated extensive experience in constructing a pile-grillage foundation with a widening at the base of the pile, it cannot be considered a universal solution suitable for any type of soil and structures.
The choice of foundation design should, first of all, be based on data from a geological survey of the site. Based on the results obtained, the bearing capacity of the soil, soil composition, groundwater level, the presence of subsidence foundations, etc. are determined. After this, taking into account the weight of the building and the collection of loads that the foundation (in this case, the “heels” of the piles) must redistribute to the ground, the most appropriate and cost-effective type of foundation is selected .
Based on practical experience, we can say that a pile-grillage foundation with an expansion at the base of the pile is most in demand on highly heaving soils, in areas with large differences in elevation. Under these conditions, the use of another type of foundation may not be economically viable due to the large volume of earthen and concrete work.
It should also be remembered that the calculation of a pile-grillage foundation is not as simple as it might seem at first glance. In case of gross violation of construction , without knowledge of the type of soil, groundwater level, etc. such a foundation can turn into a “time bomb” under the house. Moreover, to the final cost of a pile-grillage foundation, it is necessary to add measures for its insulation, installation of a blind area, drainage of surface and groundwater, and installation of an intake.
The fence is installed around the perimeter of the basement and closes the underground space under the house so that the wind does not blow around there.
This approach will allow you to understand whether it is profitable or not to arrange this type of foundation. A pile-grillage foundation is a “ribbon” (grillage) torn from the ground, to which piles are added. Hence (based on calculations) it may turn out that in some cases it is more economically profitable to build a classic shallow insulated strip foundation.
This article talks about how to make an insulated blind area.
The main features of a pile-grillage foundation, with a widening at the base of the pile, include:
- The pile is laid below the freezing depth (depending on the region).
- At the bottom of the pile, a widening is made - a “heel” with a certain ratio to the diameter of the pile and a calculated load-bearing capacity. Thus, the pile is reliably “anchored” in the ground.
- The grillage should not touch or lie on the ground.
The above measures help minimize the forces of frost heaving.
VzikUser FOUMHOUSE
I am installing gates. Due to my professional activity, I often see problems that arise with the support pillars of the entrance group. Due to the influence of frost heaving forces, poles “walk”, gate leaves warp, gates jam, etc. Of course, you can pour a monolithic concrete strip under the entire perimeter of the fence, but this is also not a panacea. I have seen many “broken” strip foundations, and in terms of money, this option turns out to be the most expensive.
Based on his knowledge and experience gained during the construction of the house, Vzik decided that the TISE foundation would also be suitable for the fence. As four years of experience in operating a heavy brick fence showed, the forum member was right. Despite the frosts and winters with little snow, during which the ground freezes deeply, the fence remained straight and still stands. There were no movements of the foundation, no distortions of the entrance group - swing gates and wickets - during operation. The more interesting is the design and method of erecting this foundation.
Vzik began construction of the fence back in 2012, doing it simultaneously with the construction of the garage.
On its site, the soil consists of the following layers:
- “fertility” - about 20-30 cm;
- sand 0.5 m.
Next comes dense clay; at a depth of 2.5 m there is no water.
The forum member advises not to drill a pile pit manually, but to rent a motorized drill with an auger with a diameter of 25 cm.
This will significantly reduce the time for preliminary preparation and save energy.
Vzik
While I was still drilling holes for the foundation of a house, I realized that doing it manually is a thankless task. Compare: on the first day, two people were able to make one hole “on clay” with a diameter of 25 cm, a depth of 1.8 m and a lower widening of 60 cm. In 10 days, only 30 piles were completely mastered, and 50 were needed! We decided to continue drilling with a motorized drill.
After renting a motorized drill, things started to get more fun. In just 2 hours, 20 preparatory holes with a depth of 1.5 m were drilled. After that, they were deepened to 1.8 m and widened at the bottom with a Tises drill.
Therefore, when it came to making holes for the foundation for the fence, the choice was obvious - to drill everything only with a motor drill. In one day, 50 holes were drilled to a depth of 1.5 meters, after which they were deepened with a hand drill to 2 meters and a lower expansion was made.
Advice: it is better to do the “heels” immediately before pouring the concrete, otherwise they may crumble ahead of time.
When manufacturing this type of foundation, we adhere to the following technology:
- Because the speed of preparation of extensions drilled manually is low; there is no need to order a mixer with factory-made concrete. The pile is filled with self-mixed concrete. You can do 5 piles a day. This saves money and makes you less tired.
- For a pile with a diameter of 25 cm, we knit the frame from 4 reinforcing bars with a diameter of 10-12 mm. A welded metal mesh with a cell of 15x15 cm is used as a connecting element. Such a square fits well into the drilled hole. Releases of 2 cm on each side set the direction for the reinforcement frame and provide a protective layer of concrete.
- The reinforcement frame can be knitted not with knitting wire, but with plastic ties. Although this method is somewhat more expensive than using wire, it saves time and greatly simplifies the process of knitting the frame. The strength of the screeds is sufficient for the reinforcement cage to withstand pouring concrete mixture and further vibration. After the concrete hardens, the screeds no longer bear any force load.
Vzik
At my construction site, I tied all the reinforcement frames (under a house, a fence, etc.) with ties; I didn’t use wire at all. Of course, if you tie with wire, it is a little more reliable, but practice has shown that a plastic tie can cope with the task.
By the way, when using ties instead of wire, we get another bonus that concerns the pouring of piles with widening at the bottom. The essence of the idea, which was applied by a user with the nickname Destructor, can be clearly seen in the following photos.
We bend the “legs” (at the bottom of the frame) of each of the four reinforcing bars at an angle of 90 degrees. The curved ends look inside the frame. We knit the frame using plastic ties. Next we proceed as follows:
- Pour some concrete into the heel.
- We lower the frame into the drilled hole.
- We turn the reinforcing bars “legs” bent at an angle with the ends outward.
- As a result, the ends of the “opened” reinforcing bars enter the “heel”, ensuring a reliable connection of the widening with the “body” of the pile after the concrete hardens.
DestructorUser FOUMHOUSE
When the “legs” are opened, the reinforcement slides well in the plastic screed. If you tie everything together with wire, it takes more time, and it will be difficult to turn the reinforcing rod.
In order for concrete to be poured into the hole “without a hitch”, we do it this way: we insert a special device into the drilled hole - an adjustable “neck” made from rolled tin and wooden blocks (you can come up with your own version of the device).
Advice: it is better to have several such devices in order to pour several piles at once. You shouldn’t take them off right away, because... the concrete has not yet hardened. Let the “neck” stand for about an hour, but you also don’t need to leave it for a long time, otherwise they will be caught by the concrete, and then you won’t be able to remove the “neck”. After removing the “neck”, you can put a plastic bag on the head of the pile. This is necessary so that the moisture does not evaporate and the normal process of concrete hardening occurs.
A sleeve rolled from roofing felt is inserted into the “neck” and the hole. Then we lower the reinforcement cage and pour the concrete, not forgetting to vibrate it properly, using a vibrator, and not the “bayonet” method. We make the concrete mixture as “hard” as possible, i.e. with the minimum amount of water required to mix it.
FghUser FOUMHOUSE
With a large amount of water, the grade of concrete decreases significantly and it becomes fragile.
Concrete should not be liquid, i.e. spread, as beginners often do, thinking that it’s easier to lay it this way. To improve the workability of the “hard” mixture, we do not hesitate to use plasticizers.
Using a vibrator with a long mace, you can easily vibrate and thoroughly compact even hard concrete.
One more point that needs to be paid attention to. To make piles, it is often recommended to use sewer or asbestos pipes of the required diameter as formwork. According to users of our portal, the most budget-friendly and easiest way to fill a pile is to use a roofing felt “shirt” for this. Moreover, it can be used even if it is necessary to fill high piles that will protrude above the ground by 0.5-1 meter or more.
OldvistUser FOUMHOUSE
I poured the piles into roofing felt formwork. The height above the ground was 50 cm. The diameter of the piles was 20 cm. Ruberoid was wrapped with tape only in two places where the pile protruded above the ground. To make a cylinder from a piece of roofing felt, I wound it around a sewer pipe of suitable diameter. Then he lowered them into the well and took out the pipe. I filled the pile with self-mixed concrete. Everything vibrated properly, nothing broke or came apart.
If you need to fill a pile more than 1 meter above the ground, you can proceed as follows: make two roofing felt “shirts”. First, pour concrete into the first one so that it does not reach the top edge of 10 cm. We insert the second “shirt” inside the first one, adjusting the required level, lowering or raising the roofing material cylinder. Then we pour the concrete further.
BraniganZ User FOUMHOUSE
I poured a pile 1.1 meters high from the ground like this, nothing fell.
An interesting method for making a roofing felt “shirt”, proposed by a forum member with the nickname face_ltd.
face_ltdUser FOUMHOUSE
After studying the forum, I, for financial reasons, refused ready-made formwork in the form of asbestos or sewer pipes. I made formwork from roofing felt more than 2 meters high.
We make a “shirt” like this: we cut off a piece of roofing felt to the size we need and wrap it on one side, around a frame of suitable diameter. For example, a plastic bucket. Wrap it around - fix it with tape, then step back a little and wrap the tape a second time. That's it, one side is fixed. We take out the bucket (since it has a cone shape, it is easy to remove) and repeat the winding process on the other side. The trick is that the tape glides over the roofing felt and does not stick to the surface (roofing felt in the crumb coating is undesirable). It turns out that we have wound up several rings of adhesive tape, which can now be moved along the “shirt” and, accordingly, a cylinder is obtained from a piece of roofing felt.
To prevent the rings from “driving” on the formwork, we fix them with a long strip of tape, which we run along the seam of the “shirt”. We wrap the tape inside the cylinder and secure it with a paper clip or “shoot” it with a stapler.
face_ltd
Formwork made using this technology costs a penny - 300 rubles per roll of roofing felt, 2 rolls of adhesive tape is another 40. Compare this with the price for plastic or asbestos pipes, which still need to be brought.
After the piles are ready, we fill it with sand up to the level of their heads, pour it with water, tamp it, and on this basis we erect the formwork for the grillage. You can put together formwork from 150x50 mm boards and 100x50 timber for the posts.
So that the boards can be reused in the future, we cover the finished formwork from the inside with roofing felt or plastic film. We knit the reinforcement frame and fill the grillage with concrete.
It is better to fill the grillage (due to its volume) with factory-made concrete from a mixer.
This article talks about how to properly make formwork so that it does not burst open.
Vzik summed up the costs of his foundation for a house, and this is what happened.
Costs for 50 piles:
- cement – 50 bags;
- fittings – 300 kg;
- roofing felt - 3 rolls;
- gravel - 7 cubic meters m;
- sand - 2 cubic meters. m;
- ties – 600 pcs.
Total: 30 thousand rubles.
Costs for a grillage with a cross section of 30x40cm:
- boards, 5 cu. m – 25 thousand rubles;
- fittings, 0.5 t – 14 thousand rubles;
- concrete, 9 cubic meters - 29 thousand rubles;
- roofing felt - 8 rolls;
- consumables - screws, nails, couplers, bitumen mastic.
Total: about 80 thousand rubles.
The total price for the foundation was about 110 thousand rubles.
Note: prices are for 2011.
In the FORUMHOUSE topics you can find out all the details of the construction of a brick fence on a TISE foundation and view a full report on the construction of an aerated concrete house on a pile-grillage foundation. The following topics answer the questions of how to pour piles higher than 1 meter above the ground, and what to make a pick-up from. Our article describes a detailed technology for pouring a foundation in winter.
Those who are just planning to build a house will be interested in a video with a detailed story about the pile-grillage foundation.
The need to install a roofing felt pipe
A little higher, the mandatory presence of a roofing felt pipe was indicated. Non-experts in this matter may wonder why it is needed at all?
- Firstly, the setting of the manufactured concrete mixture to the limit of the desired strength level depends on the cement fluid. Without the use of a pipe, it is absorbed into the soil and thereby disrupts the technology.
- Secondly, during periods of low temperatures without a roofing material product, heaving has a much stronger effect on the surfaces of the components of the pile foundation.
As for the cost , there is no fixed cost. For example, the foundation of a house whose dimensions are 6x6 will cost approximately $1,200.
Attention! It is prohibited to cross the grillage with a pipeline! The deviation after completion of the concreting process should not exceed a threshold of 5 cm.
Laying depth - what it depends on
The depth of placement depends on the condition of the soil on the site.
All related factors are taken into account:
- Groundwater level.
- Availability and volumes of soil water.
- Possibility of flooding in spring.
- The presence of seasonal changes in hydrogeology, an increase or decrease in the degree of filling of all aquifers.
To select the correct depth, it is often necessary to collect information from local geological and meteorological departments, consult with experienced builders, and refer to various SNiP applications.
It must be taken into account that all values indicated in various sources are minimum, i.e. It is allowed to increase the lifting height, but it is impossible to reduce the gap height.
Cast-in-place piles for monolithic pile foundations
The main distinguishing feature of this type of piles is that they can be made independently at the construction site. This process occurs by placing material in already prepared holes. In this case, reinforcement is carried out if necessary. This option allows you to save on transportation, and it is also possible to carry out the construction of the facility next to other buildings. The most important disadvantage of this type is the lack of quality control. Any oversight in production may cause deformation of the object in the future.
Rice . Cast-in piles for monolithic grillage
Work order
We clear the area. We remove the top fertile layer of soil to prevent plants from growing under the foundation.
We draw the outline of the foundation and determine the locations for installing the piles. Installation of industrial products will require additional equipment, so we will consider the option of cast-in-place (made on site) piles.
Let's start drilling holes for the piles. The depth of the well should be 50−60 cm below the soil freezing level (in the middle zone it is 140−160 cm). For low-rise construction of private houses, it is enough to immerse the piles into the ground by 2-3 meters. We install reinforcement in the wells, prepare the solution, and fill the piles. If you plan to make a pile foundation with a hanging grillage (located above the ground level), then we make formwork to fill the supports protruding from the ground. When it is planned to build a rigid foundation, parts of the reinforcement should protrude from the piles, which will be immersed in it when the grillage is poured. If an overhead (hinged) grillage design is chosen, the supports must be cut to the same height. After the piles are completely ready, the construction of a monolithic grillage begins. We assemble and install the reinforcing frame of the future grillage. To do this, you will need a metal rod 1-1.4 cm thick, knitting wire and a special hook, which can be bought on the construction market. The frame structure must consist of at least 2 rows of horizontal rods connected by vertical reinforcement posts
The distance between the vertical posts is 30−40 cm.
We securely fix the frame on the piles, paying special attention to the corners of the future foundation. The reinforcement at the corners is bent in different directions
The contour of the reinforcing frame must be completely closed around the perimeter. We begin the construction of formwork for pouring the monolithic tape. If a hanging (above-ground) grillage is being erected, then additional supports are installed between the piles under the formwork. This equally applies to the grillage in the form of a monolithic slab. The last stage in the construction of a monolithic pile grillage is the preparation of concrete and pouring it into the formwork.
The reliability and strength of the foundation depends on all its components, including the quality of the concrete. The use of a particular brand is influenced by several factors:
- design load on the foundation of the house;
- the type of soil on which the house is built;
- construction of the foundation being built.
The lighter the house structure being built, the less will be the load on the foundation. The requirements for the strength characteristics of concrete have been reduced. If the soil on which the house is built is subject to swelling in the winter, then the foundation of the house will be subject to load changes from the entire structure. When choosing a concrete brand, this should also be taken into account.
Today, when pouring the foundation for fairly light frame houses, concrete grade M200 is used; for houses made of timber or logs, a solution of M250-M300 is used. For heavier buildings, concrete of at least M350 should be used.
Pile foundations with a monolithic grillage occupy their rightful place among other types of foundations for a house. They are reliable structures with a large margin of safety for most houses built in the private sector.
Bored piles
Bored piles are installed using a similar system as the previous option. If it is necessary to strengthen an existing foundation, then the technology of injection piles should be used. They are poured under a certain pressure into small-width holes, approximately 10-13 cm, with single reinforcement. After this action is completed, the foundation is pressed with water.
Rice . Creating a bored pile
Reinforcement and pouring concrete
The next step after drilling is the formation of pipes from roofing felt. Their diameter should be equal to the diameter of the well, and their length should be three hundred millimeters greater than its depth.
The upper part of the pipe is made of three-layer roofing material, after which it is tied with metal wire. This will be used as formwork. Next, the pipe is very carefully placed into the drilled well. If you find a small amount of water in the well, you can not attach any importance to this, but if there is more than one quarter of it, then before pouring concrete, it is worth pumping it out with a pump.
In order to improve the strength of the finished pillars, you will need to prepare a reinforcement frame. You can do it in the most inexpensive and simplest way: for this you take three vertical metal rods with a diameter of about seven millimeters, which must be fastened together with a soft wire.
After the frame is installed, concrete mixture is poured into the well. It is poured into layers, which are compacted using a vibrator.
Driven piles
This option consists of ready-made pipes. It is worth noting that their installation in the ground occurs only with the help of special equipment. Such piles are divided into three types:
- Trapezoidal
- Prismatic
- Cylindrical
Rice . Iron tubular piles
The latter option includes in its structure a bordering ring at the junction, the main purpose of which is to build up additional links. According to statistical data, it is known that cylindrical driven piles are the cheapest and have a fairly high load-bearing capacity.
Design and calculation
An important point before laying the foundation is its accurate calculation. For this purpose, a project and plan for the future building is created. Then a drawing of the foundation is drawn, and the layout of the piles must be indicated, taking into account their location at the intersections with the walls and in the corners. It is necessary to ensure that the width between the piles is at least 3 m. If the distance to their edge is more than three meters, then the installation of additional supports will be required. In addition, the area of the piles should be calculated - for this, their number is first determined, the minimum height and thickness are selected.
For correct calculations, you also need to know some other indicators:
- the mass of the future building - it is necessary to calculate not only all the finishing materials, but also the approximate weight of the internal “filling”;
- supporting area - using the known weight of the structure and the reliability coefficient, the load on the supports can be easily determined;
- dimensions and cross-sectional area of the piles - thanks to the known number of supports, their number can be multiplied by the selected area and get the desired value.
All results must be compared with the previously determined reference area. In some cases, it is necessary to reduce or increase the area of the supports, since their bearing capacity will depend on the diameter and type of soil.
Screw piles
Screw piles are intended for structures with fairly high horizontal loads. The tip of such a pile is an element made of steel or reinforced concrete. Screw piles securely fix the foundation and do not allow it to deform. In cases of strong horizontal loads, screwing in piles at an angle is allowed.
Rice . Screw foundation with monolithic grillage
Stages of work
The step-by-step technology for installing the support system looks like this:
- Drilling holes.
- Installation of piles.
- Wire frame fastening.
- Filling the solution.
- Construction of a grillage.
The grillage itself is poured by first installing the formwork and performing reinforcement inside it.
Selection of piles
Various materials are suitable for pile structures. The choice depends on the soil and the expected load of the structure. The supports are made of concrete, metal or wood. They have a rectangular or round cross-section.
According to the method of installation they are classified as follows:
- Hammers. Install without drilling or excavation. Used in the construction of multi-storey complexes.
- Bored. First, a hole is made in the soil, into which the formwork is secured and reinforcement is inserted. Afterwards, the entire structure is filled with a high-strength concrete mixture.
- Reinforced concrete drilling rigs. First, wells are drilled, driving reinforced concrete products into them.
- Screw. Metal piles, at the end of which there is a point with a screw blade.
For individual construction, bored piles are usually used.
Monolith calculation
To perform an independent calculation of the required materials, first determine the length of the grillage. When using a metal or wooden belt, this value is the required amount of building material. When installing a concrete monolith, the calculation is somewhat complicated.
After this, the volume of the monolith is calculated by first calculating its cross-sectional area. With tape parameters of 0.3 * 0.4 m, this figure is 0.12 sq. m. Then it is necessary to prepare the following volume of concrete for the monolith: 38 * 0.12 = 4.56 cubic meters. m.
Production of monolithic pile-grillage foundation
Since the monolithic grillage is heavy, there are certain features of its installation. To guarantee maximum strength of the entire structure and allow it to withstand ground movements, it is necessary to correctly reinforce the structure:
- Reinforcement of supports. When piles are made directly on your own construction site, you need to fix rigid metal rods vertically inside the formwork, and then connect them with horizontal wire belts. Such jumpers are made every 0.5 m, connecting them with bolts. The top of the reinforcement must protrude above the supports by at least 15 cm, or better yet, even more.
- Monolith reinforcement. For the procedure, the reinforcement belts are placed evenly, with a ten-centimeter interval, at a vertical distance of half a meter. After this, they are connected, fastened to the protruding ends of the metal from the supports.
Purpose
Unlike other types of foundations, a pile-grillage foundation ideally distributes the load-bearing loads from buildings onto the ground, so when choosing it, you can be sure that the new building will reliably serve for decades and will be protected not only from sudden temperature changes, but also from seismic activity. Such structures are widely used for both public and individual construction. They are especially suitable for areas located on a slope with heaving, permafrost soil and difficult terrain.
In addition, the following foundations are recommended:
- for building a brick house;
- in frame construction;
- for structures made of gas silicate blocks;
- on soils with high density;
- with high groundwater distribution;
- on unstable soil with quicksand.
The pile-grillage design also makes it possible to lay floors directly on the ground without additional leveling of the surface and pouring a deep tape, since piles installed at different heights compensate for all unevenness, eliminating height differences. Such a foundation can also be used in the construction of buildings weighing more than 350 tons - it will be much more reliable and economical than a strip or tile foundation. But in this case, the project will have to include an increased safety factor, which should be not 1.2, as usual, but 1.4.
What it is
Foundation for a house made of sip panels
Piles are long rods that are installed in the ground using special mechanisms, or are poured directly into the ground. If ready-made piles are purchased, then at one end there is a sharp tip, which facilitates the entry of the pillar into hard rock soil.
Photo - pile foundation for a wooden house
A pile foundation is a type of columnar foundation that is mainly used for frame or wooden houses, buildings made of foam blocks and low buildings made of foam concrete. The uniqueness of this design lies in the savings in building materials and the speed of work. Piles are often used for the construction of buildings in areas with floating soils, high groundwater levels, and also in the construction of houses without a basement.
There are different types of pile foundations:
- Submersible or driven. These are reinforced concrete piles, wood and steel;
- Recessed. And partially or completely along the entire length they are strengthened with concrete mortar;
- Rammed ones, formed when heaving soil is displaced from the area where the pile is poured;
- Drilling rigs, which are installed in a pre-drilled hole in the ground;
- Screw supports are supports that need to be screwed into the ground using a special device.
Each type of foundation is used for buildings made of different building materials. For example, a pile foundation for a brick house is made using driven or poured piles. A screw base is often used for a summer house or a small frame garage made of wood or corrugated board.
Photo - the principle of a columnar foundation
It should be noted that legitimizing a two-story house on a pile foundation is a rather difficult task, especially if you did everything yourself. To build a large residential building, it is better to use the services of specialists who will help you calculate everything correctly. Video: columnar foundation
Advantages and disadvantages
A slab foundation on piles has the following advantages:
- technical conditions are provided for construction in problem or wetlands;
- the impact of heaving loads disappears or decreases;
- the volume of excavation work is reduced, which in some cases is not carried out at all;
- it becomes possible to build on slopes or folds;
- construction adjacent to existing buildings or structures is allowed;
- the influence of hydrogeological factors is reduced.
A slab foundation on piles has the following disadvantages:
- there is no possibility of building a basement;
- large volumes of concrete work;
- construction requires certain weather conditions, which requires a preliminary calculation of the duration of the preparation and taking into account the hardening time of the concrete;
- material consumption increases;
- high requirements for waterproofing the base.
Despite the existence of serious disadvantages, foundation slabs on piles are widely used in construction on problematic soils, since there are no alternative options in such conditions.
Foundation construction process
Such a base is quite easy to confuse with a combined pile-slab base. In fact, they have the same scheme and differ only in nuances, since there are several modifications of such bases, but the cost of different options is practically the same.
Before moving on to the procedure, you will need to carefully consider the nuances of creating each type of base - pile and slab. Their technologies have quite significant differences that will need to be taken into account during operation. The work itself is quite labor-intensive and complex, especially when it comes to the construction of multi-story buildings. But if a low-rise building is being built, most actions can be performed without the involvement of specialists.
The construction process consists of the following stages:
- Preparatory work.
- Installation of piles.
- Installation of the stove.
Preparatory work
Preparation is an extremely important stage of work.
The initial steps are the same for any foundation. The area is cleared, planned, marked and calculated. The soil will need to be thoroughly compacted; gravel and sand are suitable for this. Also, do not forget about creating a drainage system, preparing the area and laying utilities.
The installation of the basement greatly influences the preparatory activities. If a decision has been made to develop it, you will need to excavate the soil and create a pit for the base. Reinforced concrete slabs will be installed vertically into it, which will serve as walls for the constructed basement.
Installation of piles
To install the piles, you will need to carry out additional calculations.
Methods for installing piles may differ depending on their type. For private buildings, asbestos-cement pipes are often used, which can save a lot of money. After installation, they are reinforced and filled with cement mixture.
When installing piles you will need to consider the following:
Due to the fact that the slab will be installed on top, the cuts of the piles must be located at the same level. The reinforcement in the piles is laid in excess. This will allow the two parts of the base to be firmly connected. The greater the number of supports, the greater the financial costs. It is best to install supports under load-bearing walls, at the junction of adjacent surfaces and in corners. The installation location also depends on the size and type of building being built. The interval between the supports of a pile-slab foundation. To determine the optimal distance, you will need to perform a calculation. The optimal interval is calculated based on the diameter of the piles
Carrying out the calculation is quite difficult, but extremely important, so it is better to seek help from a specialist. It will be much easier to calculate the required number of piles, knowing their approximate location.
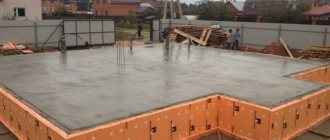
Installation of the stove
To transport the slabs, you will need to use special equipment.
The slabs can be mounted with different depths, but the installation process itself is no different. The following factors must be taken into account during operation:
- The slab not only acts as a foundation, but also serves as the floor of the lower floor of the building. To ensure a higher level of waterproofing, it is better to pour a layer of clay onto the ground, then level and compact it. Then a cushion of sand and gravel is created, and foam slabs are installed on it. Such procedures will reduce the amount of heat loss, and, consequently, save on heating the house.
- When reinforcing the slab, you will need to tie the frame to the rods coming out of the piles.
- When preparing the mixture, it is necessary to use only fillers of small and medium fractions. Otherwise, significant complications may arise when compacting the frame.
- Concrete should be poured completely over the entire area of the base. It is not recommended to delay installation of the slab until the next day, as seams and holes may form.
This completes the process of creating a pile-slab base. The following video will help you learn all the features and nuances of such work.
The pile-slab foundation has a number of features. Its use is necessary when constructing multi-story buildings or on poor-quality soil. The creation process itself is quite complicated, but if you follow the instructions, the work can be done on your own.
When and which one is better to choose?
A slab on piles is chosen for the construction of multi-storey buildings and industrial facilities, when the rigidity and reliability of the load-bearing structure on unstable soils is important. Such a structure will differ in its resistance to vertical and horizontal loads arising in the ground.
The scope of application of a pile-grillage foundation with a slab is wider. The design features of the system allow the foundation to be used in the following cases:
- the structure has many heavy floors and partitions, which necessitates the need for even distribution of weight on the base;
- the building rests on subsiding and waterlogged soils;
- underground sources on the site are located close to the surface;
- construction is taking place in an area of high seismic activity.
Foundation technology
To begin with, it should be noted that houses on a combined pile foundation must be built by professionals. It is simply impossible to independently equip such a technologically complex foundation. All work on the construction of the foundation is carried out in strict accordance with regulatory documents for construction, as well as in a clear sequence.
The entire process of constructing a combined foundation can be divided into several stages:
- Preparing the area. The first thing you need to do before starting any construction work is to plan the site. To do this, any debris is removed from the territory allocated for construction, any green spaces are removed, and all holes and piles of earth are leveled. The holes can be filled with soil from the same area, and the piles must be leveled in accordance with the main surface. Then the area for installation of piles is marked. Special markings are installed directly on the ground in the places where the support will stand. The contours where the monolithic slab will pass are also marked.
- Deepening of piles. At this stage, supports are brought to the site. The type of piles is selected depending on the nature of the building and the characteristics of the soil. Types of piles differ in the quality of the material, as well as in size. Reinforced concrete supports are considered the most durable; the size is usually selected depending on the depth of soil freezing. Then special equipment for driving piles is installed on the territory. As a rule, a piledriver and other equipment are used for this purpose. Each support is first installed directly at the point where it will be buried. Then it is leveled, after which it is driven into the ground using a hammer. There are various ways to bury supports in the ground, however, all of them involve the use of heavy equipment during such construction. After installing all the piles, they are leveled. To do this, using special equipment, the heads of the supports are cut to the zero level.
- Pouring the monolith. After all the supports are ready, you need to start pouring the monolithic slab. For this purpose, the first step is to install the formwork. The resulting box is preliminarily equipped with waterproofing; most often in this case, roofing material is used. Then a special pillow is prepared. A layer of sand about 20 centimeters thick is poured into the box, the material is well compacted and leveled. Next, the same layer of crushed stone is poured and also leveled. The pad is then covered with a small layer of liquid concrete mortar, which will help secure the bulk materials. The thickness of the concrete should not exceed three centimeters. After this, a frame of reinforcement is constructed in the formwork, which is subsequently filled with concrete mortar. During the concrete pouring process, certain technology must be followed. For example, the solution should be poured into the box from both sides.
Expert advice:
- After the concrete solution is completely laid in the formwork, it must be leveled and compacted. This action is carried out using vibrating rammers. Next, the monolith is left to dry. Complete hardening of the concrete slab is observed 30 days after it is poured. While the concrete is drying, you need to take care of the slab. To do this, you need to cover the monolith with film and lightly moisten it several times a day.
- Caring for the surface of a monolithic slab helps prevent improper and uneven drying of the concrete solution. After the concrete has completely dried and the slab has become as strong as possible, you can begin constructing the remaining structural elements of the building.
- In some cases, USHP is used as a base - this is an insulated Swedish stove. USP is not just a concrete slab, it is the most modern and effective foundation that performs several functions at once. Such a slab includes a communications system, heating the entire area of the house with heated floors, already installed sewerage systems, water supply and even marking electrical cables. USPs have a smooth surface, which allows you to lay the finished floor covering directly on the monolith.
- USP is often used in the construction of structures made of aerated concrete, frame houses, buildings made of logs and beams. The advantage of USP is that it can be erected in almost any area, regardless of the nature of the soil. The technology for constructing such a base involves various options for arranging a monolith, which makes it possible to make a base.