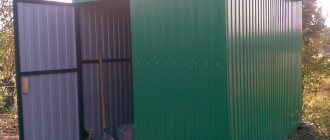
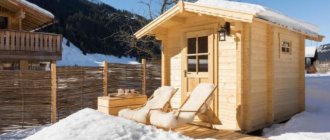
In order for the temperature in the bathhouse to be maintained for as long as possible, and the costs of maintaining it to be as low as possible, bathhouses need external insulation. In addition to solving this problem, external insulation also protects the building from direct contact with cold air and precipitation, which extends the life of the building.
The order and sequence of work on external insulation depends on the type of material used for construction. For bathhouses made of logs - rounded or simply sanded - this usually involves careful sealing of all cracks and cracks: wood of sufficient thickness holds heat well on its own. Sometimes the steam room and washing room are insulated from the inside.
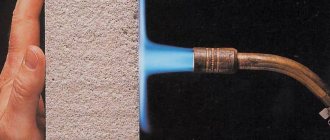
If timber is used during construction, it most likely needs to be insulated, but how depends on its thickness and region (you need to know how severe the winters are). It is imperative to insulate baths built from bricks and building blocks - they have high thermal conductivity and to ensure the required temperature conditions, the wall thickness must be at least 80 cm, which is very unprofitable from an economic point of view. That’s why such baths are always insulated.
External insulation of a bath: what do you need to know?
In our article we will talk about the technology and procedure for insulating a bathhouse from the outside. You can make your own decision about the need for such actions, based on the information provided.
Basic principles for creating an insulation pie
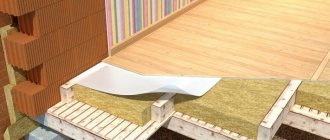
First of all, it must be said that if you decide to insulate the bathhouse from the outside, then do not forget to use steam and windproof layers.
The correct insulation “pie” should look like this:
- lathing for separating pieces of insulation and then attaching the remaining layers and finishing to it;
- insulation (which is better, everyone decides for themselves);
- wind protection;
- counter-lattice (not mandatory, but guarantees the presence of a ventilation gap, otherwise you will have to adjust it “by eye”);
- finishing materials.
We also recommend following the rule: from denser material to less dense material.
Painting work
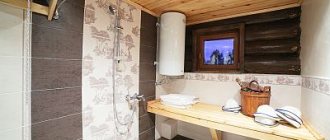
Attention, we strongly do not recommend using paints and varnishes when finishing the steam room. When heated, many of them emit toxic gases. We do not paint our baths from the inside. But we can advise you to use water-based varnishes, SUPI water acrylic impregnations from Tikkurila, the DULUX line for saunas, and domestic SENEZH.
You will say that an uncoated floor in a bathhouse will quickly become unusable. This will not happen if you strictly follow the operating instructions - thoroughly ventilate and dry wet areas.
We suggest you read: How much money does it take to build a bathhouse?
Carrying out finishing work using lining, block house with imitation timber
Using lining as a finishing material is the most cost-effective option for finishing work.
When purchasing finishing material, you should pay special attention to its moisture content. In order to avoid having to redo the lining over time, you should choose boards with a moisture content of no more than 14-16% for cladding.
When using raw lining for lining a bathhouse complex, cracks appear when it dries, and when using overdried material, the lining may begin to hump. When carrying out exterior finishing, a board with a thickness of 14-15 mm is used.
A more expensive finishing material is a block house. This material, when used for finishing, imitates the surface that is obtained when using rounded logs for construction
When purchasing material for finishing work, special attention should be paid to its moisture content. It is not recommended to use overdried and damp material for finishing.
The block house is installed on brick walls or on a pre-assembled sheathing if the wall plane is uneven. The technology for installing this finishing material is quite complex; for this reason, the finishing requires the involvement of specialists.
No insulation is placed under the block house. Laying insulation under the finishing material can provoke the development of wood rotting processes.
Imitation timber is a type of lining. The board of this material is thicker and wider. Imitation of timber is a planed board. This material has some versatility and can be used for both exterior and interior wall surfaces. This lining can be used for finishing walls built from any building material.
This finishing material is made from two boards that are glued together longitudinally. This structure of the material makes it possible to minimize the occurrence of deformation processes in it.
In the production process of panels, coniferous wood with a moisture content of 12 to 15% is used. The length of an imported panel ranges from 3 to 4.8 m; Russian manufacturers produce panels with board lengths from 2.2 to 6 m.
conclusions
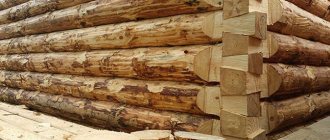
A log bathhouse, built in Russian traditions, as a rule, does not require additional insulation of the walls either outside or inside.
When choosing external insulation for a brick or block bathhouse, the choice is very wide. Without harming your health, you can use mineral wool made using phenol-formaldehyde resins, which is not recommended for insulating the inside of a bathhouse. Styrofoam and polystyrene foam are also suitable.
If you have the financial means, the bathhouse can be covered with a metal block house, which will serve for many years.
Source
External insulation of log baths
Thermal protection of such buildings comes down to eliminating cracks. During the construction process, a special jute insulation is laid between the crowns, but over time the wood begins to dry out, cracks and gaps appear, which have to be repaired regularly.
After completing the construction of the log house and eliminating the shortcomings, the building must remain under the roof for at least six months. During this time, it is advisable not to use the bathhouse. The log house will shrink, the wood will dry out, and new cracks will begin to appear that need to be caulked.
For this purpose, special insulation made of flax and jute is used. Since jute retains heat excellently and does not ignite, but tears easily, flax fibers are added to it, which eliminate this problem. Thin pieces of insulation are driven into the cracks using a metal caulking blade and a hammer. The work is carried out carefully so that the building does not warp.
In addition, when choosing the best way to insulate a bathhouse from the outside, you should pay attention to a special sealant - to fill the cracks you just need to squeeze the mixture from a syringe directly into the voids. A log house continues to shrink for two years
Experts advise not to cover it with finishing materials during this period, so that there is access to the cracks that arise, which have to be periodically eliminated. To protect the insulation from various precipitations, you should cover the outside of the bathhouse with film, securing it with strips
A log house continues to shrink within two years. Experts advise not to cover it with finishing materials during this period, so that there is access to the cracks that arise, which have to be periodically eliminated. To protect the insulation from various precipitations, you should cover the outside of the bathhouse with film, securing it with strips.
Two years after construction, finishing can be done. Buildings made of logs can be sheathed with dies, clapboards, and in addition with a block house, imitation timber. First, the sheathing is installed on the walls. If it is wooden, then it must be treated with impregnations that have antibacterial and fire-resistant properties, and then checked with a building level to ensure that it is horizontal and vertical.
Finishing material is attached to the sheathing, which is then coated with varnish or other protective agent. If metal guides were purchased, they are fixed to special hangers.
A wooden bathhouse is not insulated from the outside, since the logs themselves retain heat well. The building is thermally insulated from the inside - usually a steam room and a washing room. But if you still want to insulate the building from the outside, then a steam or hydrobarrier is placed on the material that is afraid of moisture, secured with strips, on which the finishing is then mounted.
Doors and windows
Let's move on to our sore subject of windows and doors in the bathhouse. It is these elements that most often fail and are the cause of warranty claims. We got tired of them.
Today, we recommend installing wooden frame doors on a movable basis at the entrance. What is the point: to make such a door, a frame is cut out of solid wood. In the center, the canvas consists of a type-setting frame board connected with a rubber gasket. Thus, the board “plays” - it dries and swells, but does not burst the frame. The contour of the door leaf does not change - the door does not jam, does not creak, or warps.
The ideal option for a sauna is glass doors. There is a huge assortment of heat-resistant glass sheets - matte, tinted - this is exactly what we install in our customers’ baths. Wooden sauna doors last much less, tested.
Subtleties:
- Before ordering a bath, check with the company about the range. If you are offered a standard panel, it is better to refuse and purchase a door kit yourself. Cheap wooden doors are not intended for installation in a bathhouse, where there is a high humidity environment.
- The same goes for wooden double-glazed windows - let them show you the options first. Pay attention to the strength of the structure and the quality of the fittings. A cheap window will not have good locks and handles.
Finishing the gable of the bathhouse
The cladding of the pediment is carried out depending on its design, the material that was used to finish the facade
It is also important what the pediment itself is made of:
- A wooden pediment can be sheathed with any material, but it must first be waterproofed using a membrane material.
- For concrete gables, the surface is first leveled and the sheathing is installed. The sheathing is attached to the sheathing.
Finishing the gable of the bathhouse will give the facade a finished look and additionally protect the structure from moisture.
In order not to disturb the unity of the ensemble, the gables of the bathhouse with finished imitation or siding are sheathed with the same material. For brick and concrete structures, stucco can be used in the form of various relief elements. Iron sheets are well suited for finishing the gables of a bathhouse, but due to the high cost, this option is rarely found. The easiest and most inexpensive way to cover a gable is with siding panels.
In the photo on the right you can see the pediment of the roof of the bathhouse with an attic, trimmed with plastic lining. It goes well with the siding that was used to cover the facade. If you take lining in a contrasting color, you can give the structure a unique design.
There are several ways to attach the material to the pediment:
- Using aluminum posts that are mounted on the gable.
- On a wooden gable, siding or imitation timber can be sewn directly onto the surface.
- Using wooden slats, which are pre-attached to the pediment.
After covering the outside of the bathhouse, it is necessary to take care of additional protection. A drainage system is installed on the roof, and wastewater is drained. This is all easy to do with your own hands.
When choosing a material for cladding the outside of a bathhouse, you must take into account your financial capabilities, the material with which neighboring buildings are sheathed, and design features. It is necessary to purchase from well-known retail chains, so there is less chance of encountering counterfeits. And you can do the finishing yourself, the main thing is a little diligence and desire so that the bathhouse will last for many years.
To make your bathhouse look beautiful, you need external finishing of the bathhouse. Any structure is part of the overall design of the site, but the steam room is designed to “rest” our body, so the internal atmosphere in it should always remain comfortable.
We can achieve this only by insulating the walls and finishing them with suitable material.
External cladding is the final stage of construction
Facing brick
High-quality facing brickwork will fit perfectly into the landscape of any area in the countryside.
It will look great on a frame bath.
Moreover, lining a frame structure with brick and laying it out completely will be done completely differently. This will include parameters such as finances and your own time.
As you know, a distance is created between the brickwork and the wall, so this very distance must be filled with insulation, which will add additional warmth to the frame structure.
How to tile the outside of a bathhouse yourself
The owners of a newly erected bathhouse structure in the form of a wooden frame made of rounded logs or timber do not face the problem of how to cover the outside of the bathhouse. If, when assembling the log house, all technological requirements for insulation and waterproofing were met, and the wooden material underwent the appropriate protective bio-, hydro- and pyro-treatment with impregnations, then the bathhouse already has a completed appearance in terms of beauty, and does not require any additional insulation or external cladding walls
The question of what is the best way to sheathe the outside of a bathhouse arises when the bathhouse was built of brick, or an already completed building was converted into a bathhouse, requiring external finishing and insulation.
Materials for external wall cladding
Before you finally decide how to cover the outside of the bathhouse, look at the photos with the final results of external cladding work using various decorative building materials.
For exterior finishing work on walls built from brick, stone or untreated wooden parts, a variety of natural or artificial materials are used:
- wood (lining, block house, board, etc.);
- plastic (siding, lining, etc.);
- stone (natural and artificial);
- decorative brick;
- metal profile;
- USB plates;
- cement-sand mortar (fur coat), etc.
Advice! A more complete vision of the cladding process and its final effect, depending on what you use to cover the outside of the bathhouse with your own hands, is provided by videos posted in many places on the Internet.
External finishing of the bathhouse with siding
The option to sheathe the outside of the bathhouse with siding is primarily supported by the performance characteristics of this finishing material, namely:
- lack of hygroscopicity;
- counteraction to the processes of decay and proliferation of microorganisms;
- resistance to seasonal temperature changes;
- ease of cleaning;
- environmental cleanliness;
- attractive decor with a rich range of colors, etc.
As an alternative, you can sheathe the outside of the bathhouse with boards, but this requires significant additional costs, expressed in the need for additional processing to protect the wood from moisture, fungus formation, fading and increasing fire resistance. Therefore, before you cover the outside of a bathhouse with your own hands, you need to weigh all the positive and negative aspects of a particular finishing material.
Siding, for example, in addition to obvious positive qualities, has certain features that can complicate its use. Before covering the outside of the bathhouse with siding yourself, you need to level the walls so that they are level. Only walls that are as flat as possible ensure reliable fastening of the cladding panels to the sheathing.
An installation diagram for the sheathing must be drawn up before sheathing the outside of the bathhouse with your own hands, and the drawings can help with this. Using the drawings, the dimensions of the lathing cells and the amount of material required are calculated.
If the building is made in the form of a wooden frame, then before you sheathe the outside of the bathhouse yourself using siding panels as cladding, you must wait a certain time for the final shrinkage of the entire structure. The maximum shrinkage period can reach 2 years.
Application of OSB panels for exterior finishing
The use of siding is possible only with the simultaneous installation of heat and waterproofing materials, since this material only protects the walls from mechanical damage and aggressive environmental influences. The use of OSB panels (oriented particle boards) for cladding will help solve the problem of thermal insulation of external walls and their protection at the same time.
Before covering the outside of the bathhouse with OSB panels with your own hands, you need to prepare the walls, leveling them as evenly as possible in order to avoid gaps between them and the slabs. Condensation can accumulate in such voids, which will negatively affect the material of the load-bearing walls and change the heat transfer characteristics.
Important! OSB boards are also called “the best wood”, since, on the one hand, it is a durable and at the same time elastic material. Unlike natural wood, there are no natural defects in the form of knots or changes in the direction of the internal fibers
During the production process, the slabs undergo a special (ContiFinish) treatment, which gives them water-repellent and fire-resistant properties.
Various materials can be used to cover the outside of a bathhouse, but it is necessary to take into account, first of all, the building material from which the structure is built, wishes for appearance and financial capabilities.
How to install indoors?
Raised timber is well suited for interior decoration of eco-style premises. It gives the interior a fresh look and has good heat and sound insulation properties.
You can sheathe imitation timber not only on the walls of rooms, but also on floors and ceilings and even on balconies. It is recommended to use materials with dimensions of at least 20-25 mm in thickness and 100-120 mm in width. You should not use thicker planks, as they will visually reduce the usable space of the room. The length is selected depending on the size of the wall and the method of laying the timber.
The interior decoration of the room can be made using various materials or exclusively imitation timber. The first method is called combined, the second - monolithic. In case of combined finishing of premises, the laying of timber is limited to a separate wall or part of it, combined with plaster, tiles, and stone.
In the case of monolithic finishing, the walls, floor and ceiling are completely covered with wooden planks. They must fit closely to each other, all joints and grooves must be smooth and, if possible, hidden by interior elements. Installation consists of several stages.
Before the main work, it is necessary to prepare the surface. It must be smooth and clean, without chips, cracks or other defects. It is necessary to thoroughly treat it with antiseptics and solutions that prevent rotting and the growth of mold fungi.
Lathing
To assemble and install the sheathing frame, standard medium-sized bars are used, but not less than 20 mm in one plane. Since imitation of a smaller thickness is used for the internal cladding, the pitch between the sheathing bars can be up to 600-900 mm.
Insulation
The next step is vapor and heat insulation of the room. Before laying the false timber, a vapor barrier film is attached to the sheathing to prevent moisture from penetrating inside. All joints are carefully fixed. The next layer is insulation: mineral wool, polystyrene foam, polyurethane foam or any other materials of your choice, the use of which will reduce the heat transfer of the building and maintain the optimal temperature inside the room.
Wall mount
The panels are usually installed horizontally, starting from the ceiling, and in such a way that the tenons face up and the grooves face down. The parts of the structure must fit tightly, the joints must be aligned.
It is better to fasten the first panels at the corner between the ceiling and the wall, as well as the last ones between the wall and the floor, “through the body” and cover them with baseboards. Fastening of subsequent structural elements is carried out using clamps “through the groove” or self-tapping screws with nails “through the tenon”.
Another way to lay imitation timber is using “duet” fasteners. Professional builders recommend using it for beginners who are afraid of installing the structure weakly or leaving random gaps. The fastener is first connected to the false beam in its upper part; the limiter on the part will not allow it to go above or below its intended place. Then the plank is installed in its place with the tenon facing up, and the protruding parts of the fasteners are connected with self-tapping screws to the sheathing.
This method leaves space between the sheathing and the wall made of false timber, which improves ventilation. It is invisible and suitable for interior cladding. In this case, it is better to start installing panels from the floor to the ceiling.
Headlining
This is the most difficult part of the work due to its danger and inconvenience. You should not try to cover the ceiling with false beams alone; such work requires at least 3-4 people. Before laying, it is necessary to prepare the sheathing with a batten pitch of no more than 400-500 mm. In this case, ideal fastening will be provided by a clamp or “duet”. With them, installing imitation timber on the ceiling is much easier than using a hammer and nails.
Why do you need façade finishing?
Well, with the decorative function of façade finishing everything is very clear - it’s definitely needed. And here, as you know, there are many options for taste and color. But the practical component needs to be dealt with.
So, what functions does facade decoration perform, besides decorating the house? Perhaps the main functions of facade finishing are
- protection of the building from adverse external influences
- waterproofing walls
- home thermal protection
Based on these goals, we will consider the main methods of finishing facades used in modern construction. Knowing the quality characteristics of a particular type of facade finishing, it will be easier to choose what you like.
But before we touch on certain types of facade finishing, let's figure out what exactly its insulating and protective functions are.
Whatever method of finishing the facade you choose, it should cope well with adverse external influences. What could it be? This includes pollution in the form of dust, soot, soot, precipitation, sun rays, and salty wind from the sea. All these factors have a destructive effect on the materials from which the house is built. This means that the façade finishing must be especially resistant to such influences. Waterproofing is another important task of facade finishing. Moreover, this parameter has another side. The finishing should protect the facade from external moisture, and if we are talking about cladding the base, then we should also provide for such a misfortune as the capillary rise of groundwater and melt water. Obviously, the finish must be resistant to moisture and prevent its penetration inside. But at the same time, the facade finishing must have good vapor permeability, otherwise it will not last long. Condensation, which inevitably forms on the inside of the finishing layer, without being able to evaporate, will destroy not only the façade finishing layer, but also the wall itself. This is especially true for regions with frosty winters. Condensation in such a climate is formed intensively, and the smallest droplets of water, penetrating into the structure of the building material and freezing there, contribute to the formation of microcracks, which, in turn, sooner or later leads to its destruction.
Finally, thermal insulation is another serious task that façade finishing is designed to help solve. This parameter is closely related to the previous one. If the ratio of water absorption and vapor permeability is incorrect, excess moisture accumulates in the walls, leading not only to their destruction, but also to heat loss during the cold season. Thermal insulation of facades is achieved through comprehensive measures. Here, one should take into account the thermal conductivity properties of finishing materials, and additional thermal insulation used under the cladding, if any, and the material from which the house is built.
Installation instructions
Installing siding panels is easy. To work, you need to prepare a minimum set of tools that any home craftsman has:
- hammer drill or impact drill;
- metal scissors and stapler;
- level, tape measure and plumb line;
- hammer and pliers.
The sheathing for siding can be made from both ordinary bars and metal profiles.
There is nothing supernatural about installing siding. And given that the bathhouse, as a rule, is not large in size, you do not need to build scaffolding to install the slats under the roof; you can get by with a good stepladder. The material is prepared in advance, and before installation it must be allowed to rest outside the packaging for several days. It is better to choose vinyl panels for a bathhouse; they are less susceptible to moisture.
If enough time has passed since the construction of the bathhouse, that is, the shrinkage process is over, and the log house has already found its permanent place, you can begin work. And first you need to prepare the surface. Recommendations for cladding will be given regarding a log bath, and for each material the preparatory process is carried out in its own way.
First, the surface of the wood is completely cleaned of all kinds of deposits, then the wood is impregnated with fire-resistant preparations and fire retardants to protect against fungus. Afterwards, over the entire surface, with a frequency of 50–60 cm, a sheathing of bars with a section of 50x50 is laid. Here it is necessary to maintain the level. This is easier to do on the walls of a brick bathhouse, because the stone has a uniform surface. Logs can be different in diameter and any differences in level must be filled with small inserts, adjusting each plank to the level.
Lathing made of wooden beams. Less technological option. For vertical alignment, inserts of various sizes are placed under the racks.
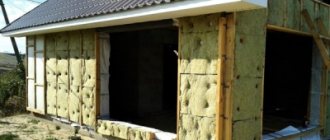
If you plan to insulate the bathhouse, then it should be done at this stage, laying the material in the space between the bars. It would be better if, having previously purchased insulation, install vertical sheathing with a step equal to the width of the material. It can be laid without cutting, in a whole roll. Afterwards, the material must be covered with a waterproofing film. They apply it in a horizontal plane, covering the sheathing bars as well. The material is secured to the wood with staples from a construction stapler. All joints are fixed with reinforced tape.
How to caulk timber
The properties of several natural materials are most suitable:
1. Since ancient times, builders have used tow to insulate Russian baths and Finnish saunas made of wood. Such popularity is ensured by the fact that tow is a cheap and easy-to-handle material. As it turned out, I myself am able (without having special experience) to insulate the timber walls from the outside using improvised means. Tow is sold in rolls, which further simplifies the installation process. In addition, they also sell improved tow with resin impregnation. It is more moisture resistant and has greater strength. The only drawback of the material is its short service life, so the insulation will have to be repaired from time to time.
2. You can also use moss, which is still used in Siberia. The lack of moss is a rather difficult installation process, which can take several days. In addition, moss that is not impregnated with special compounds can be destroyed by moths.
3. Experts consider the most profitable mixture of flax fibers with jute, called flax-jute felt. This is the most reliable insulation for timber walls. Among the advantages, we can emphasize the high density, which will allow quick and even organization of seams
Also, one cannot ignore the ease of processing; insects and mold and fungi do not touch it. Jute insulation has excellent heat resistance
In addition, you can use insulation of the beam with foam plastic from the outside, as the most inexpensive method, but the high fire hazard of the material has more than once led to tragic consequences, so this decision should be approached very carefully and only if other insulation is impossible
Wood species
Each type of wood has its own characteristics. The difference in characteristics allows you to optimally select the material for finishing.
Oak
The interior decoration of the house with imitation oak timber is dense and durable. In addition, this is a material that is practically not subject to rotting. Oak is presented in several natural shades, which allows you to select exactly the tone that is needed. A significant disadvantage is the high price.
Oak is distinguished by its high density and strengthSource handbuilder.ru
Linden
This type of wood is used mainly for interior decoration of ceilings and walls. The beautiful shade of the material lasts for a long time.
Larch
This material has many advantages:
- fire resistant;
- has a beautiful color;
- pleasant texture;
- strength.
This tree has healing properties. It is environmentally friendly.
Larch material is durable and fire-resistantSource baykalles.ru
Aspen
This wood is easier to process than most varieties. It tolerates changes in humidity well. Proper processing allows aspen to acquire heat-resistant properties.
Pine
This type of finish is relatively inexpensive, but is sensitive to changes in temperature and humidity. In this regard, you should not use pine in the bathroom, sauna or bathhouse.
Pine material is not recommended for use in bathrooms and saunasSource fas-deck.ru
Cedar
Imitation of timber in the interior of a house, made of cedar, is a high-quality product that will last a very long time. Its high strength is combined with the release of natural resins that have a healing effect.
Cedar material is highly durableSource kublesa.ru
Wall decoration using siding
Siding for exterior finishing of bathhouses is used in the construction of buildings made of brick, foam block or cinder block. In addition, siding has become a popular material for finishing buildings constructed using frame construction technology.
The technology for carrying out finishing work is quite simple, but before finishing the bathhouse with siding from the outside, you should look at photos of the step-by-step work, which are often presented on specialized websites dedicated to finishing materials and technologies for their use.
The advantage of this material is that siding is not susceptible to corrosion and is not afraid of sudden temperature changes.
This material does not lose its properties in the temperature range from -50 to +50 °C
The material is non-flammable and non-toxic, which is a very important property of the finishing material, since the bath complex is an object of increased fire hazard. The finishing material, when used to finish the outer surface of the walls of a bathhouse complex, is very resistant to the destructive effects of ultraviolet radiation from the sun.
The average service life of this material is about 50 years. This service life is quite sufficient for comfortable operation of the bath complex for a long time without additional repair work.
Siding produced by the manufacturer offers the consumer a wide range of colors. Some types of finishing material resemble wood in surface structure and appearance. Using this type of siding when carrying out finishing work will allow you to create a bathhouse that resembles a wooden one in appearance.
When carrying out work on the exterior cladding of the bathhouse complex, it will be necessary to purchase a large number of additional cladding elements. These elements are:
- corners;
- basement drains;
- special elements to ensure docking;
- initial and slope special planks;
- mounting brackets.
In order to do high-quality siding finishing, you should hire a specialist who has experience in this type of work, since the cladding technology is quite complex, and only a specialist can perform it efficiently.
Thermal panels
The standard assembly of a bathhouse from a frame one way or another requires insulation of the walls.
Let's look at an example of using a thermal panel.
What they are, what they look like - a three-layer structure with insulating material (mineral wool, polystyrene foam).
The appearance of the panels is in the form of brickwork.
During installation, a monolithic display of brickwork is formed.
Delivery set: base profile, facade dowels, embedded elements and grout for joints.
The procedure for installing thermal panels:
- Using a water level, we mark the beginning of the finishing (we always start from the bottom), install the initial profile with dowels in increments of fifty centimeters. It is important to maintain a distance of one or two centimeters from the wall, using embedded elements (in our case, plastic washers);
- Filling the space with polyurethane foam formed between the profile and the wall;
- When installing the first thermal panel from the corner, we cut it along the joint at forty-five degrees;
- At the cut of the joint we make a groove three centimeters wide and one to one and a half centimeters deep (the polyurethane foam is laid in this groove);
- We apply mounting foam under each first thermal panel;
- We are installing the first thermal panel;
- If the walls are not level, we set them according to the level. The gap should be no more than five centimeters. We line plastic washers for partial fixation;
- There are marked places in the thermal panel into which mounting axle boxes are molded. There may also be metal washers shaped like a seam; they are located on the outside of the panel and are clearly visible. Using a drill, we make holes in the seams at the designated locations;
- We fill the resulting holes with mounting foam so that the space at the attachment point is filled;
- Important! With the utmost care, we fix the thermal panel with dowels to the wall, use a punch - the head of the dowel should sit tightly in the mounting box, but not squeeze the material;
- We fill the resulting hole up to the dowel with mounting foam;
- Next, we fill the external gap of the sinus between the wall and the thermal panel along the entire perimeter;
- We carefully fasten the hidden surfaces of the half-tenon and half-groove of the axleboxes, using “umbrellas” for this;
- Corner and arch parts of window and door openings are made separately;
- Installation of subsequent panels is carried out by applying polyurethane foam to the closed joint surfaces;
- We grout the seams with special grouting compounds supplied in the kit.
Why do you need exterior finishing of a bath complex?
Finishing the outside of a bathhouse is almost always required when constructing a bathhouse complex using the following building materials:
- foam block;
- aerated concrete;
- wood;
- bricks;
- cinder block, etc.
When deciding what material to use to decorate the outside of the bathhouse, it is recommended to familiarize yourself with the photos, which show various options for such finishing. When choosing a material for finishing work, one of the first determining factors is the cost of the material and its aesthetic properties. However, it is worth remembering that the finishing of the bath complex must first of all perform several functions that are assigned to it. These functions are the following:
- ensuring good thermal insulation;
- providing waterproofing protection;
- ensuring high-quality sound insulation.
The beautiful façade of a building is an adornment to any building; in addition, the cladding of the building performs a large number of additional functions. Finishing the outside of a bathhouse, done by yourself, is a specific process that should be carried out only after familiarizing yourself with each stage from the photo in order to prevent the occurrence of technological errors during the installation process.
The fact is that during the operation of the bathhouse premises, the moisture content in them increases, which negatively affects the structural elements of the building. The main task of finishing is to achieve the effect of a thermos, which allows you to make maximum use of the capabilities of the bath complex.
To perform these functions during external finishing work, you should choose high-quality materials for insulation and finishing.
Warm plaster
Before cladding, the building is insulated. You should prepare a beam 3–5 cm in size, which will be used to create the sheathing. In addition, you will need dowels shaped like “umbrellas,” glue for polystyrene foam, polystyrene foam, a reinforcing mesh made of plastic, and a frame for creating “warm plaster.”
Installation must be carried out in strict sequence:
- Make a sheathing.
- Attach the insulation panel with dowels (strictly horizontally). When fastening, it is necessary to monitor the position of the seams. They should not be along the same line.
- Lay the second heat-insulating layer vertically. Secure it with glue capable of securing foamed polystyrene.
- Cover the structure with reinforcing mesh.
- Apply “warm plaster”.
When is it necessary to insulate a bathhouse from the outside?
According to the general rule of improving the thermophysical properties of domestic buildings, effective thermal insulation should be placed outside. What is the reason for this requirement? The fact is that water vapor migrating through the walls to the street, when the temperature drops, condenses in the thickness of the structures, and in winter it generally turns into ice. Neither wood nor stone materials can withstand such exposure - the former rot, and the latter defrost and crumble. Therefore, the thermophysical system must function in such a way that:
- ensure the operation of walls at positive temperatures;
- prevent moisture from getting into them.
In practice, the best fulfillment of the first condition is easier to achieve by installing an external heat shield. That is, the walls in the bathhouse will be located away from the street behind a layer of thermal insulation - in a warm zone. However, we still have the factor of high humidity, and extreme temperatures (in the steam room) should also be taken into account. Therefore, perhaps the ideal solution would be to insulate the bathhouse from the outside, creating a high-quality reflective internal vapor barrier made of rolled foil or foil paper (Fig. 2).
Why is it possible? Firstly, the efficiency of a thermal insulation system depends on the competent selection of source materials for it and compliance with the technology for their installation. Secondly, there is also a practical aspect of insulating the walls of a bathhouse, associated with the mode of its operation, which even experienced builders rarely take into account.
Figure 2
The influence of the mode of use of the bath on the design of the thermal insulation system
Internal thermal protection will reduce the preparation time for hygiene procedures. After all, the walls are practically located outside the energy contour of the building, so there is no need to warm them up. Air masses in a closed volume are quickly brought to the required temperature by a heat generator of even the smallest power. On the contrary, covering the outside of the bathhouse with insulation leads to the fact that the walls also have to be heated. This is more expensive at the initial stage, but allows you to level out short-term temperature fluctuations. Simply put, arrays of enclosing structures participating in energy exchange increase the comfort of using the bathhouse structure.
From the above we can conclude that the owner of a private building, when deciding how to insulate a bathhouse, can choose the internal option for its irregular use. For buildings that are constantly heated, as well as those in which several people steam at once, it is better to consider installing energy-saving outdoor cladding.
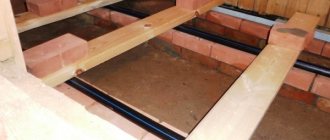
Floor with drain and ladders
Briefly about the arrangement of the floor in the bathhouse. Floor joists and a subfloor are placed on the timber frame. Next, vapor barrier and expanded clay are laid. It has heat-saving and moisture-absorbing properties. The finishing floor is laid on top.
In rooms where large amounts of water are expected to be used - in a sauna, washing area or shower - the floor is made with a slope and special drain holes. A flexible pipe is connected to them to drain wastewater into the site’s drainage system.
Walkways - well, to make it pleasant to walk in the bathhouse - not slippery, not through puddles. To ensure they last a long time, they must be dried thoroughly after each use.
Vinyl
Of all the options, PVC siding is considered one of the best solutions when it comes to cladding the external walls of a bathhouse. Siding panels are made in two layers; the outer sublayer is saturated with additives that increase the resistance of the plastic to ultraviolet radiation. The inner layer has high density and strength, is not afraid of water, high temperature and deformation.
Vinyl is preferred when planning to cover the outside of a bathhouse with siding for several reasons:
- Affordable price, for a bath there is no point in overpaying for exclusive aluminum panels;
- Excellent decorative qualities of the cladding. Even the old bathhouse box looks like new after finishing;
- It is easy to repair and does not require heavy lathing for finishing with panels.
The disadvantages include the flammability of the material and the increased coefficient of thermal expansion.
Important! This means that finishing a bathhouse with vinyl siding cannot be planned if the stove chimney exits through the wall. Also, you should not use vinyl for decoration if the surface is heated unevenly, for example, due to poor thermal insulation, part of the walls in the steam room area heats up to a high temperature, while the rest of the bathhouse remains moderately warm
In such a situation, vinyl panels are easily deformed and lose their original appearance.
Also, you should not use vinyl for finishing if the surface is heated unevenly, for example, due to poor thermal insulation, part of the walls in the steam room area heats up to a high temperature, while the rest of the bathhouse remains moderately warm. In such a situation, vinyl panels are easily deformed and lose their original appearance.
Wood
Aspen siding is often used for the restoration of original sauna buildings, when the sauna owner needs to restore and update the previous appearance of the building. Old log houses and boxes with carved crowns, platbands and shingled roofs are never sheathed with plastic. In this case, finishing with wooden siding will be the only correct solution.
An excellent alternative to wood are panels made from polymer-sawdust or decking boards. In appearance, such siding cannot be distinguished from natural wood by its pattern and texture, the price is affordable, and its resistance to sun and moisture corresponds to the characteristics of vinyl panels.
Cladding with wood-look metal panels
Metal siding panels
The most expensive and durable finishing option. It is widely used for decorative design of frame residential buildings. Siding metal can last at least 25 years without signs of corrosion on the front surface. Unlike vinyl, it perfectly withstands the strongest gusts of wind, which often happens if the sauna box is installed in an open area.
Not every bathhouse can be lined with metal siding on the outside. Metal panels have one significant drawback - the high thermal conductivity of the material. This means that if the walls of the bathhouse have high vapor permeability, and this is how good steam rooms should be, then in winter ice will definitely build up on the inside of the finish. As a result, the decorative finishing of the bathhouse may simply collapse under its own weight.
Advice! Metal siding is perfect for frame buildings of a bathhouse made of SIP panels.
The vapor permeability of a sandwich made of OSB board and polystyrene foam is practically zero, in addition, there is almost no shrinkage of the structure, so for this type of bathhouse box, finishing the walls with metal will be the ideal solution.
Tsokolny
The lower part of the wall, adjacent to the foundation of the bathhouse, is considered the most vulnerable to moisture. The wooden crowns on the base are rotting, the brick walls of the bathhouse are overgrown with moss. Therefore, to combat negativity, several types of basement siding are used:
- Composite panels based on polypropylene and granite chips imprinted into the front part of the finish. One of the most durable materials, easy to cut and cut, withstands even impacts from icicles and snow falling from the roof of the bathhouse;
- Metal siding coated on both sides with polyester resin. Most often used to finish the base of bathhouses of any type and design, from projects on stilts to strip foundations. Durable, easy to repair;
- Asbestos-cement panels with the texture and pattern of brick or rubble masonry. It is heavy and difficult to install, but costs several times less than previous models.
Vinyl siding can be used to finish the base of the bathhouse. For example, if you need to cover the lower part of the walls of a timber or log steam room. It is clear that the problem of damaged crowns cannot be solved in this way, but vinyl material is quite suitable as a decorative finish.
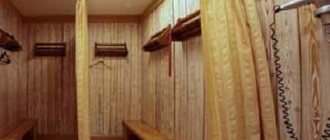
Lining
To preserve the appearance of a traditional Russian bathhouse, when decorating the external walls, a common cladding material is used - clapboard. Eurolining is especially in demand. This is a wooden board of small thickness. Lining has all the advantages and disadvantages characteristic of wood. To extend the service life of eurolining, it is treated with antiseptics and coated with varnish or paint.
In order for the cladding of the bath to be done correctly, it is necessary to strictly adhere to the installation technology. Step-by-step execution of all operations will allow you to carry out the cladding yourself:
- Install brackets on the wall. In this case, it is necessary to observe a step that should not exceed 50 cm. The brackets must be positioned horizontally.
- Cover the outer surface of the wall with mineral mats. For fastening, use the prepared adhesive composition. The use of dowels is acceptable.
- Attach a guide to each bracket. To check the correct location of these finishing parts, use a building level or plumb line.
- Cover the insulation with waterproofing material.
- Attach the lining to the fixed guides.
Recommendations
To avoid difficulties when working with a block house, you need to take into account the recommendations of experienced builders:
- Exterior finishing work cannot be carried out in the cold or during rain.
- When choosing a material, you need to inspect it for chips, cracks, unevenness, darkening, and through knots.
- Before installation, the boards must lie indoors for 3 days.
- The choice of fasteners depends on the thickness of the wooden panels. Up to 21 mm - nails. Thickness over 21 mm - self-tapping screws. Fasteners must be coated with an anti-corrosion compound. Their length should be 1.5 times greater than the thickness of the boards.
- For the outer cladding of a bathhouse, it is better to use panels of greater thickness.
- It is prohibited to attach a block house to walls without hydro- and thermal insulation.
For wooden surfaces located inside bathhouses, it is better to choose antiseptics with the lowest content of harmful substances.
Block house is a popular material used for decorative finishing of bathhouses outside and inside. The panels have an attractive appearance and improved technical characteristics.
Strip foundation
Such a foundation is installed when there is heaving soil on the plot.
The work on its construction is carried out step by step:
- Markings are made on the site and a trench is dug, the width of which is 40 centimeters and the depth is approximately 50 centimeters.
- The hole is filled with sand layer by layer until the ground level is reached, compacted each time and watered with water to ensure compact shrinkage.
- They construct formwork 50 centimeters high and 30 centimeters wide. For greater strength, it is reinforced using rods and metal pipes.
- Pour the concrete solution in several approaches (without allowing the previous layer to dry) or at a time.
- Roofing felt is laid on top of the concrete to waterproof the frame walls.
Projects and drawings of a two-story frame bathhouse provide for the provision of the most reliable support on any type of soil, with the exception of floating ones. The base is a prefabricated strip foundation.
Peculiarities
A building can be made of many materials, each of which has one or another advantage. This includes foam block, aerated concrete, brick, and many other materials.
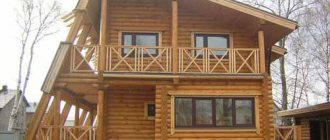
From logs
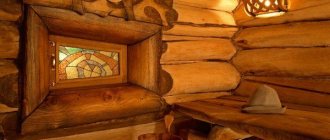
The most common and traditional material is wood. Most often, owners choose rounded logs. This choice is quite understandable, because a bathhouse made from such material looks very beautiful and natural. Plus, you can save time on construction and also simplify the work process. In addition, wood creates a wonderful microclimate inside the bathhouse.
From foam block
When choosing such a material, you need to familiarize yourself with its qualities. After all, foam concrete has both advantages and disadvantages. For example, it has good thermal insulation, the level of which is much higher than that of ordinary concrete. The foam block also has a small weight, which simplifies cargo transportation. In addition, it is an environmentally friendly material, the constituent elements of which are sand, cement and water. The foam block is resistant to frost, it is not afraid of fire. But sometimes you can buy low-quality material that has low strength. It will be of poor quality, especially if you compare such a fake with aerated concrete or expanded clay.
From aerated concrete
It has almost the same qualities as a foam block, its only difference is that it is vapor permeable and slowly absorbs moisture. But the damp material dries well.
Made of brick
Unlike the northern regions, where wood is preferred, in the south brick is most often used to build baths. It is made from clay, which is an environmentally friendly material, because in such a building they not only wash themselves, but also improve their health. In addition, such material is durable and not afraid of fire. Its only drawback is its high thermal conductivity. But having done good insulation, a brick bathhouse will be as warm as a wooden building.
From cinder block
Cinder block is used to make the construction of a building faster and cheaper. At the same time, the quality of the bathhouse does not suffer, since this material is no less durable than brick.
From gas silicate blocks
Building a bathhouse from such material will cost less than building from wood. It consists of cement, sand, gypsum, lime and water. Gas silicate is not afraid of mold, is immune to frost, fire-resistant, environmentally friendly and soundproof. The only drawback is that it has high moisture absorption.
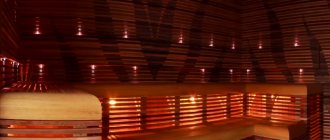
When determining the necessary materials for the construction and decoration of a bathhouse, it is necessary to remember that they should not emit harmful fumes at elevated temperatures. The interior finishing should retain heat well and release it into the room after heating.
A bathhouse, like any room, consists of different surfaces, the materials for which are selected separately. For example, the wall decoration in every second bathhouse is made of natural wood. This is done because it absorbs moisture well, is resistant to high temperatures, and also has a long service life. In addition, thanks to its qualities, wood fills the room with a unique atmosphere.
For wall cladding in bathhouses and saunas, lining or imitation beams are most often used. The surfaces are also sheathed with unedged boards made of various types of wood. The cheapest material is pine, but it cannot be used to decorate a steam room, because it contains a large amount of resin, so touching such surfaces can cause burns.
The best option for the interior lining of a bathhouse would be types of wood such as linden or larch. Linden not only does not darken over time, but also does not crack. Plus, its use will enhance the healing effect of being in the steam room. Larch has a long service life and is also not afraid of mold.
You shouldn’t cover it with OSB boards, because it contains many harmful substances, which only increase with increasing temperature.