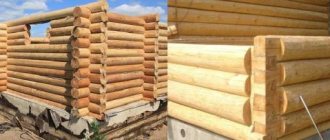
Wooden houses are environmentally friendly and beautiful. In addition, subject to the technology of laying logs and appropriate processing of wood, they are also quite durable. The foundation is the basis for any structure, a wooden house is no exception. The wrong choice of base will lead to the formation of cracks, uneven shrinkage of the house, the appearance of gaps between the logs and even the complete destruction of the building. To decide which foundations for log houses you should best know the type of soil and the characteristics of the future structure.
Log house
When building a house from logs, the following types of foundations are mainly used:
- pile-screw;
- columnar;
- tape;
- monolithic;
- block
Each of them has its pros and cons. To understand which foundation is better, you should evaluate their characteristics and installation methods.
Online foundation calculator
To find out the approximate cost of various types of foundations, use the following calculator:
Concrete strip
The strip foundation for a wooden house is one of the most beloved by our compatriots and, perhaps, the most reliable. Its width is the same around the entire perimeter, and leaves 50 cm “plus” to the width of the walls.
It is divided into three subspecies: deep, shallow and non-buried. Deeply buried is designed for “difficult” conditions: in the presence of basement premises (garage, basement), multi-story buildings, heaving soil on the site, large freezing depth. It is designed to hold the building stably even when weather conditions change and the ground moves. It is believed that such a base should be buried at least 200 mm lower than the freezing depth (the values for a certain latitude are known and can be easily recognized from the reference book).
Classic strip foundation for a wooden house Source tr.decorexpro.com
If the soil allows, then for the construction of low-rise wooden houses, a shallow foundation is most often used - it is buried to a depth of about 500-700 mm, which, although less than the freezing depth, is quite enough to support a light-weight house. And, of course, it will cost much less than a deep-seated belt one.
In the case of very light buildings (sheds or utility rooms), you can get by with a shallow foundation. This type of foundation can be made of concrete or brick, stone or blocks.
A relative novelty on the construction market is a foundation made of permanent formwork, which consists of ready-made elements that are combined into blocks, and then concrete is poured into them.
A non-buried foundation is essentially a plinth on a sand cushion. Source postroim-svoi-dom.ru
The production time for any strip foundation is about a month, since after pouring it is necessary to wait a certain time until the concrete reaches its design strength.
Slab concrete monolithic
A slab foundation is simply a large concrete slab. This is a good choice for heaving and mobile soils, since the slab base has the ability to move along with the soil when it shifts. You should not think that the house will move around the site - moving soil means displacements of a couple of centimeters per year, but even such values can cause cracks to appear on the walls when using a strip base.
Making a monolithic foundation cannot be called an easy task - in terms of installation time, they are approximately equal to those of a strip foundation. It also requires clearing the site, deepening it, pouring concrete - and, given the harsh conditions, some experts ask for a grade no lower than M400, in principle, given the cost, you can get by with M150, but these are very minimal requirements. A big problem is also the uniform drying of the slab surface (a large area dries poorly, and it will take a long time to dry completely and begin the next stage of work). It will also be necessary to arrange a sand cushion for cement, a blind area on the finished foundation and waterproofing (as a means of protecting concrete from water - film or special compounds).
Ready slab foundation Source stroidom-shop.ru
Pile: steel screw or concrete driven
A pile foundation for a wooden house is a good choice for a site where there are problems with groundwater, and, in addition, the site itself has unevenness, the leveling of which will require significant effort. Proper calculation of the pile field makes such a foundation reliable and stable. In addition, the cost of a pile foundation is significantly lower than a concrete one, and installation is carried out in one day.
The main disadvantage is that with a pile foundation it will not be possible to create a basement or ground floor in the house. Auxiliary buildings on the same foundation as the piles are undesirable - due to the elevation above the ground. Entering a garage, for example, will not be very practical.
Block foundation
Block foundation
The construction of a block foundation for a log house will not take much time. The use of ready-made blocks gives the advantage of not having to wait for the foundation to dry out. This process usually takes two or more weeks. These types of bases are applicable on almost any type of soil. The finished blocks are equipped with correctly selected fittings.
Advantages of a block foundation:
- Frost resistance. The blocks can be used in regions with large temperature fluctuations due to the fact that special additives are mixed into the concrete.
- Good resistance to acidic soils. This allows them to be used on problem soils. For this purpose, the blocks contain crushed granite stone, which ensures this property.
- Large selection of product sizes. The manufacturer provides a wide selection of block sizes. There are large blocks for high-rise buildings and small products weighing 30 kg, which can be installed without the use of special equipment.
Foundation construction process:
- First, you should dig a pit for laying the foundation. To do this, you should make markings with pegs and tape, and hire equipment.
- Prepare the bottom of the pit. If there are soils of unknown quality at the bottom of the pit, it is better to make a sand cushion of about 15 cm and then compact it.
- Both columnar and strip foundations are built using the same masonry technique.
- The solution is prepared just before work. The strength of the foundation directly depends on its quality. Water should not be added to the solution, as this will worsen the adhesion of the structural elements.
- The masonry is made according to the type of brickwork. You should fill the seams with mortar very carefully, leaving no gaps. The thickness of the seams should be 10-15 mm.
Video description
What are the pros and cons of a pile screw foundation? Is it possible to make a high-quality foundation for little money? Watch in this video:
Pile foundation - screw and concrete Source stroy-dom-pravilno.ru
See also: Catalog of wooden house projects presented at the Low-Rise Country exhibition.
Installation of the bottom frame of a log house
The frame is the bottom row of the house, which in most cases is made of timber. The strapping is laid on all support posts, connecting them into a single structure. The strapping serves as the basis for laying the first row of a log house.
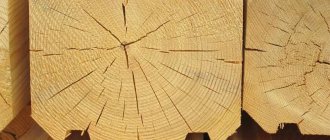
The bottom trim should be made from the densest tree species, for example, larch. However, this wood is less easily processed, so you can more often find the lower crowns of a house made of rounded pine or oak logs.
Framing a log house
Before installation, a longitudinal cut of the log is made so that the fit to the foundation is very tight over the largest possible area. In this case, it is possible to achieve uniform distribution of the load of the house on the foundation and build a more stable structure.
The logs of the lower crown must be treated with all protective agents, including antiseptic compounds and fire retardants. The treatment should be carried out at least 3 times.
After laying the bottom trim, it is imperative to check the correctness of the angles and the equality of the diagonals. The maximum possible deviation is 0.5 cm.
Video description
What are the features of concrete driven piles? We'll talk about pile foundations in our video:
Columnar: brick, block or concrete
Columnar foundations do exist as a separate type of foundation, but it must be noted right away that they cannot be used for the construction of a residential building.
In general, this is an inexpensive and easily erected foundation, which is a hole 50-70 cm deep, at the bottom of which sand and crushed stone cushions are laid, on top of which the pillar itself is built.
The methods for making “pillars” are completely different - bricks, pouring concrete into formwork, asbestos pipes, ready-made blocks. As with any technology that uses concrete, care should be taken to ensure that sand cushions, formwork and reinforcement are installed when making the bases on site.
Columnar foundation poured and made of blocks Source nauka-i-religia.ru
The distance between the pillars, regardless of unevenness, should not be more than 1.5-2 m; in addition, pillars must be present at the corners of the building and at the intersections and junctions of walls. Columnar foundations are installed almost everywhere, with the exception of floating areas (areas completely unsuitable for construction), using special device technologies - for example, TISE, where the pillars “expand” at the bottom, giving additional strength to the structure. But even when using this technology, you should also take care of additional insulation and waterproofing, and this work must be performed together with the construction of the walls (that is, the places where the pillars adjoin the walls are processed together).
Considering that columnar foundations are suitable exclusively for ultra-light buildings - gazebos and the like, it can be argued that they do not have many disadvantages. But in any case, such foundations are not suitable for complex soils - loose, with a large freezing depth.
No specialist would use such a foundation for a residential building. In addition, it is strongly recommended not to experiment with such a foundation when building a house through the efforts of “gray” construction crews, who do not care what they build, because they do not bear warranty obligations.
If the soil is even slightly mobile or susceptible to heaving (and usually it is), then eliminating the consequences will cost a pretty penny.
Incorrect use of a columnar foundation - the work will have to be redone Source stroy-dom-pravilno.ru
See also: Catalog of companies that specialize in foundation repair and design.
Features of various supports for a columnar foundation
From the moment of actual manufacture and installation of the pillars, work is carried out in different ways:
- If the concrete support is installed in dense soil, it is permissible to pour concrete directly into the soil. As waterproofing, pieces of roofing felt are used, twisted along the diameter of the hole and inserted into it. Before pouring, an asbestos-cement or plastic thick-walled pipe is inserted into the well, inside which a U-shaped metal rod is installed as reinforcement. The concrete solution is poured. If an asbestos cement pipe was used for pouring, it remains in place as permanent formwork; the plastic pipe must be carefully removed.
- If TISE technology is used, then before manufacturing the narrow part of the support, the bottom of the well is pre-expanded using a special drill and filled with concrete. After its initial setting, pouring is performed according to the above method.
- Installation of wooden poles requires mandatory treatment of the poles with antiseptic agents against mold and mildew, as well as high-quality waterproofing. To do this, the end of a beam or log located in the ground is carefully wrapped in sheets of roofing felt, which are fastened together.
- Screw piles require virtually no preparation and are used on sites with any terrain complexity. For such supports, the only important thing is the installation location and the absence of large rocky inclusions in the drill’s path.
- If necessary, a hanging grillage is made on top of the pillars.
Example of a foundation with a hanging grillage
Pros and cons of a pile-screw foundation
After considering the main types of foundation, it would seem that choosing a pile-screw foundation is the most optimal, however, there are both advantages and disadvantages.
Advantages:
- Installation speed - just determine the freezing depth and order a drill, and literally within a day the piles will be installed;
- Simple process - does not require additional time or money;
- Versatility - good performance of this type of foundation was obtained on all types of soil, including peat;
There are only two disadvantages , but they must be taken into account:
- Calculation complexity - the heavier the building and the more complex its shape, the more careful calculations will be required;
- If a geological examination of the soil was not carried out before installing the pile field, then in the case of loose or peaty soil, a certain percentage of subsidence of the structure is possible - unfortunately, often uneven.
Pile field for a wooden house Source art-stroynn.ru
conclusions
Which type of foundation should be preferred for a log house?
From all of the above, the following conclusions can be drawn:
- A columnar foundation is not suitable for a full-fledged wooden house. It is intended only for light wooden structures of a small area, bathhouses, verandas, as well as supports for porches and gazebos.
- The recessed strip foundation is designed for multi-story heavy structures and is redundant for log houses.
- It turns out that the most suitable foundations for a wooden house will be shallow strip and pile-strip foundations. These types of foundations are reliable and durable. Which one is preferable depends on the specific geological conditions of your site.
- You should not skimp on geological surveys - their results will show exactly what type of foundation is suitable for your site. Often this knowledge saves up to 50% of the cost of the foundation, and will also allow you to be 100% confident in the correct type of foundation.
- Shallow strip foundations are more popular due to their efficiency and ease of installation. It can be successfully used for a house made of rounded logs and a wooden cottage on slightly heaving soils or with additional insulation.
- The tape-pile method has a fairly high cost; it is a fairly new method and is not used very often in construction.
In order to decide which foundation is better in each specific case, the entire set of factors should be taken into account, such as the area and weight of the building, the nature of the soil, the region of residence, etc.
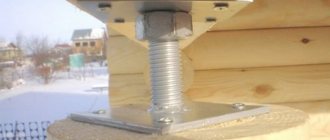
Screw foundation with channel or beam strapping
If you choose a screw foundation for a wooden house, then after installation you need to decide on the type of strapping, which is divided into beam and channel strapping.
Bonding is a method of stabilizing a foundation of piles after they have already been installed and concreted.
Timber strapping looks good under wooden buildings - bathhouses and houses. The main requirement is that all piles be cut to the same height, but then the frame can play the role of the lower crown of your log house, taking into account that the floor joists are located quite high (at least 2-3 crowns higher).
Tying a pile foundation with timber Source 2gis.ru
A channel (rolled metal in the shape of the letter “P”, if viewed from the side) is used in cases where the alignment of all piles is difficult (for example, there are too many of them), and, in addition, the channel supports heavier structures. It is laid around the entire perimeter and along load-bearing partitions. It will be a little more expensive, because with this technology you will need to order special equipment. The channel can be laid on top of the piles (a more common option) or between them. It is also worth considering that channel tying must be done immediately after the stage of screwing in the piles in order to avoid changes in their position.
Anti-corrosion treatment is carried out after installation of the harness.
Tying a pile foundation with a channel Source korden.org
Slab foundation structures
Slab foundations are direct successors to a solid monolithic grillage. Determining the size of a slab foundation for a log house is not difficult. If a 6x6 house is planned to be placed on a solid foundation, then the dimensions of the slab will be similar. It is important to fit within the perimeter of the house, and a small protrusion beyond the outer boundaries of the wall structures will not interfere with the work of the foundation - 5-10 centimeters of reserve will be enough. It is not recommended to leave the wall overhang, since it is important to rest the entire wall base on the edge of the foundation. The depth of the slab foundation is another important dimension.
Insulation of a slab foundation is a very important stage, since it often serves as both a support and a ceiling for the first floor. Whatever insulation is chosen, it will not affect the dimensions of the foundation in plan - the vertical size of a slab foundation is calculated based on the load-bearing part, without taking into account the insulation and protective structures.
Construction of a log house on a slab
Usually, they tend to make such foundations for a log house prefabricated, and in order to save money, floor slabs are laid on the ground, the dimensions of which depend on the parameters of the material used.
Typically, these are hollow-core floor slabs with a thickness of 220-250 centimeters. If you plan to fill a monolithic slab, you should take a minimum thickness of 30 centimeters.
Concrete works well in compression, but practically cannot withstand tensile loads, so reinforcement is laid - this thickness will ensure uniform distribution of two rows of flat reinforcement frame and leave room for a protective layer of concrete, which should not be less than 1.5 cm.
Criteria for choosing a base
The main criteria are, of course, the condition of the soil and the climatic features of the region:
- Freezing depth - the greater it is, the deeper the foundation should lie;
- Material consumption is also an important criterion;
- Aesthetics – the foundation of the house must be combined with the environment and the building itself;
- Position of the house - if possible, you should choose places away from cliffs and ravines;
- Plinth and its use - is the device planned to be installed in the basement of a garage or other ancillary premises? Depending on the answer to this question, you will need to use a certain type of foundation;
Assembling the walls of a log house with your own hands
Types of log house assembly
There are several classifications of log house assembly: by type of corner connection and by place of origin or territory where this technology is more widespread.
According to the type of corner connection of the crowns, they are divided into:
- Corners with release of crown ends. More durable because the locking joints are minimally affected by environmental changes. A log house with an outlet prevents heat loss in the corners, the corners do not freeze and look more aesthetically pleasing. However, from 6 meters of the working surface of the log, due to the corner outlets, the usable area of the house is reduced.
example of a log house with the ends of logs released
- Logging in the paw - without releasing the ends of the crown. Less durable due to the openness of the coronal joints. Wind and humidity directly affect crown locks. The corners of such a log house are colder and it is recommended to additionally protect them with insulating and protective materials. The advantage of this technology is the preservation of the usable area of the log house by saving the length of the log on the outlets.
example of a log frame angle
According to the distribution area, assembly technologies are divided into
- Russian assembly
- Norwegian
- Swedish
- Canadian
Let's take a closer look at each of the methods of coronal connection.
Types of connections with the release of crowns
Cutting into the lower bowl
It is the oldest, most effective way of cutting and joining crowns. This method is also called Russian. Previously, in Rus' only this method was used. The essence of the technology is to cut out a semicircular bowl in the lower crown of the log house, with a depth equal to the radius of the upper log, with or without a tenon. The upper log is placed perpendicularly into the cut out lower bowl.
The advantage of this method is the prevention of cracking in the lower part of the log during shrinkage of the log house, and therefore a longer life of the log house. The disadvantage is the complexity of cutting, since this technology involves working with a log at the top of the well, which affects the speed of construction and labor costs. Therefore, construction organizations extremely rarely practice this cutting method, justifying their choice by the fact that supposedly with a lower bowl there is a greater risk of moisture entering and accumulating, and the percentage of formation of cracks in the corners allegedly increases.
lower bowl with spike
However, in practice we see absolutely the opposite result; when the log dries out, it begins to crack from below, since a longitudinal groove is selected at the bottom. And in the case of the bottom bowl, its walls hold the bottom of the log where cracking occurs and prevent the log from curling and expanding. If the cutting is carried out in the upper bowl, then the crack that appears at the bottom of the log is not restrained by anything and simply begins to expand, spreading along the walls of the lower crown. The angle into the lower bowl is well enhanced by the sharp tenon.
an example of a crack in the lower groove that is restrained by the walls of only the lower bowl
cracks in the lower grooves of the crowns
Felling in Okhlop
Another way of Russian cutting. Logs are also chopped into a bowl, but unlike the first method, the bowl is selected in the upper crown of the log house. A more effective method for the longevity of the house, since the locks are less susceptible to the effects and accumulation of moisture. But more labor-intensive due to
logging
Felling in Kurdyuk
It is the same as cutting into a bowl, only with a more complex cutting of a special tenon in one log. A protrusion is cut out, which will create a stronger connection with the next log, in which a groove is in turn cut. This connection enhances strength and tightness and eliminates the occurrence of slot blows after shrinkage. A modern, technologically advanced tool allows you to use this installation technology no less often than cutting logs into a bowl.
chopping in the okhryap
Felling in Ohryap
Provides for double-sided selection of castle bowls, but with a flat and straight bottom, and not with a semicircular one, as in the methods described above. The inner sides of the bowls remain semicircular. Okhryap joints were previously used for the construction of cabins and utility structures, since when they shrink, noticeable gaps form in such joints, the density deteriorates and the building is noticeably blown in the corners.
Types of connections in Lapu
This type of connection of the crowns of a log house, without releasing part of the log beyond the corners of the log house, forming a right angle. Joints are cut with a straight or oblique paw.
Straight paw
Rectangular projections are cut out at the ends of the logs, with straight ends. Each subsequent end of the log, located perpendicular to the previous crown, is laid out on the lower rectangular ledge. Since such a connection is not particularly strong, the logs at the corners are fastened with dowels.
straight paw
Oblique paw
As in the previous version, connecting protrusions are cut out at the end of the logs, but not in a rectangular shape, but in the shape of a trapezoid, at a certain angle of inclination. This connection is characterized by greater strength and resistance to blowing. To strengthen the joints, a tenon and a groove can be cut on both a straight and an oblique paw.
Canadian cabin
This is an improved technology of Russian cutting, which arose experimentally. Unlike the traditional semicircular bowl, the Canadian bowl has a trapezoidal shape. It is cut out at the bottom of the crown. A spike forms inside the bowls. A groove is cut into the top of the log for the tenon to enter. The locks leave a reserve - a gap of up to 2 cm, which self-jams as the log dries out. That is, as the frame shrinks, the corners of the frame shrink more and more tightly and, unlike previous technologies, do not require additional caulking. In the upper part of the log, on the sides and at an angle, flat “cheeks” are cut out, on which the sides of the trapezoidal bowl sit.
The advantage of such cutting is a strong locking connection in the corners, the corners are not blown out and only become stronger over time, moisture will not get into the joints of the logs, during rainfall the liquid does not enter the bowl and flows onto the ground. There is only one drawback - the laboriousness of the process, which involves additional selection of the tenon and groove.
Canadian cabin
Swedish cutting
A distinctive feature of the Swedish loghouse is the hexagonal protruding ends of the crowns. The bowl itself is not semicircular, but in the shape of a trapezoid (half a hexagon). The process is labor-intensive and long-term. A distinctive feature is its unusual appearance. The peculiarity of the connection prevents moisture from penetrating into the corners.
Swedish cutting
Norwegian cutting.
Identical to the Canadian method of joining logs, with the only difference being the shape of the log. For the construction of Norwegian log houses, carriage logs are used, which are timber with semicircular edges. The cross-section of such a beam resembles an oval. Has all the advantages of a Canadian connection. The difference between a Norwegian log house and traditional ones is that it has smooth walls, without semicircular transitions.
Norwegian cabin
Laying the lower, frame crown
The lower crown of the log house is the fundamental part of the entire structure. The lower crown bears the maximum weight load, and is also most susceptible to humidity and other mechanical influences from the outside. Therefore, if you are building a log house from one type of wood, then a log with the largest diameter should be selected for the frame crown. For the lower crown, it is recommended to specifically look for or purchase logs of larger diameter. The best option for the lower crown is hardwood, such as larch or oak, which are most resistant to any changes and influences. Read more about the properties of larch.
Before installing the first crown, the surface of the foundation, be it a concrete or piled metal foundation, must be covered with three layers of waterproofing material: roofing felt or other bitumen-based materials. The foundation itself is also recommended to be covered with bitumen mastic for additional protection from moisture. Waterproofing will protect the tree from direct contact with the foundation.
Next, between the waterproofing and the first crown, a sealing material is laid out, which is used as tow, jute or classic natural moss.
the foundation must be covered with bituminous materials to protect the casing
The crowns of the log house are laid to each other at an angle, according to the design of your log house. Often the crowns are mounted at right angles to each other. But by experienced craftsmen, the crowns can be cut and folded at both wide and sharp angles. This kind of cutting requires a lot of experience and high skill.
The first method of laying the casing crown
The side of the log that will interact with the foundation, for greater stability and reducing the load on the foundation, by increasing the contact area, is trimmed to 5 cm from the total diameter. Such crowns are laid on two parallel sides of the foundation. After which, logs with already cut out bowls are mounted on the other two sides of the foundation, perpendicularly. In this case, a gap is formed between the logs with bowls and the foundation, approximately the height of the radius of the log. The resulting gap at the foundation, after complete assembly of the log house, is filled with bricks or additionally filled with a monolithic foundation, or a part of the log is cut to size and mounted in the gap.
the gap under two parallel rims will have to be filled.
the gap between the casing and the foundation is filled with bricks
The second method of laying the casing crown
It differs in the area of contact with the foundation of the first two parallel-laid crowns and eliminates the occurrence of a gap between the foundation and the other two sides of the log house. The logs of the first two crowns are cut to exactly half the diameter, through the core of the log and laid flat on the foundation. Two other crowns perpendicular to them with a cut out bowl are mounted on top and are already in close contact with the foundation without forming a gap. The lower surface of the crowns, which rests on the foundation, should be well treated with an antiseptic and coated with bitumen mastic.
the frames on all sides are completely laid on the foundation
The advantage of this method is: there is no need to raise the level of the foundation in order to create a gap between the crown and the foundation, as well as less mechanical load on the foundation. The disadvantage is the lower durability of the crown as a result of the violation of the integrity of the core of the log.
The strongest and most durable is the base of the log house with a clearance, mounted using the first method.
If desired, the lower crown can be further protected using external finishing, by coating with mastic, constructing a blind area or canopies.
Cutting the corner of a log house with a lower bowl
Marking and cutting a longitudinal groove
We mark the longitudinal groove. At the bottom of the log, perpendicular to the diameter line, we mark the width of the groove you have chosen, from 10 to 14 cm. Often they stick to the average value of 12 cm. Using a line, measure the vertical distance between the edge above the marked line, to the bottom log. Using a line, we draw the boundaries of the groove on both sides of the log along the entire length of the log. At the same time, we draw a pencil line along the log without lifting it, and draw the second end of the line tightly along the surface of the lower log. In this way, all the unevenness of the lower log is projected onto the upper one, which will ensure a tight fit of the crowns after cutting.
After marking the groove, using a chainsaw, we make transverse cuts in the groove every 10 cm. If you don’t have a chainsaw, you can make cross-cuts with an ax. Next, we make a longitudinal cut to the depth of the groove. Using an ordinary ax or an adze ax, we cut out cuts in the groove to the marking line and give it a semicircular shape. To measure the correspondence between the inner circumference of the groove and the circumference of the lower log, craftsmen recommend making a template for the circumference of the lower crown. To smooth the inner surface of the groove, after cutting it is recommended to go through it with a stapler.
longitudinal groove cutting
Marking and cutting a bowl of logs with a tenon
Let's look at a practical example in more detail about the most reliable method of cutting logs for a log house, namely, into the lower bowl with a spike.
First of all, it is necessary to correctly mark both ends of the log for the bowls. For convenient work with the log, we securely fix it on the lower crown, as it will be located after installation. Using a measuring tool and a construction pencil, draw a diameter in the center of the end of the log. The diameter line is needed so that the correct position of the log relative to the lower crown can be seen and should be located perpendicular to the lower log. The center lines at all ends of the logs must coincide when measured with a plumb line.
1. Log diameter line; 3.Mark the depth of the bowl in the central part of the log; 2. vertical mark coinciding with the mark of the lower log 4. mark of the center of the lower log coinciding with mark No. 2
The second mark is placed along the central part, on the log, at a distance from the end, no less than the length of the diameter of the log. It is recommended to add 10-15 cm to the diameter size. This mark fixes the depth of the crown bowl. Next, using a building level, you need to draw a vertical line that will intersect the bowl depth mark at a right angle. The vertical mark must coincide with the control mark of the center of the lower crown when laying.
We set the dimensions of the line equal to the distance from the central mark of the upper log to the mark of the lower log. Draw a line along the bottom log of the bowl.
marking the bowl with a line
We mark the spike in the bowl. On the flat surface obtained inside the bowl, draw a central line, which will be the center of the tenon. We mark a spike 10 cm wide relative to the center line. That is, 5 cm on each side of the center line in the bowl. Then we cut along the lines with a chainsaw, make longitudinal cuts to the tenon line, and cut out the tenon with an ax or chisel.
marking the spike in the bowl
Strip foundation for a bathhouse
Often, a strip foundation is the best choice for building a wooden bathhouse. In addition to the reliability of the design, this option can also be considered from an aesthetic point of view - to play on the contrast of materials.
For the construction of a bathhouse, a shallow strip foundation is recommended - it is quite enough to support a structure that is not too heavy. If the soil is heaving and the freezing is deep (over 1.5 m), you will have to opt for a deep strip foundation.
Factors to consider when choosing
- When determining the depth, first of all, it is necessary to take into account the type of soil on the site. For this, a geotechnician is involved, who conducts a study of the site and makes a verdict, on the basis of which recommendations are made.
Depth of bookmarks.
- Shallow foundations can be laid on compact, stable soils. Porous, marshy and sandy soils, as well as quicksand, require deep embedding or slab pouring.
- The next important factor is the level of frost penetration into the soil. As a rule, in this case there is no need to conduct field studies; it is enough to use average data for the region. But in any case, it is recommended to lay strip and pile structures at a depth of more than 200 mm from the maximum freezing depth.
- The enemy of all buildings without exception is the so-called frost splash. As you know, when water freezes, it expands and can push even strong structures out of the ground. To minimize this effect, the posts and straps can be arranged in a trapezoidal shape, where the cone runs from bottom to top.
Types of strip foundations.
- Nearby groundwater can not only undermine the foundation, but also destroy the concrete monolith. Therefore, experts recommend waterproofing structures and using concrete that is resistant to constant exposure to moisture.
- With the exception of auger piles, all other types of foundations must be mature before construction begins. Ideally, the structure should winter or stand for at least 6 months. The point is that the foundation will naturally shrink and you should let it finish before you start building your log home. Otherwise, cracks and distortions will appear.
Mixed design option.
The video in this article gathers more information on the topic.
Shallow or non-buried foundation
This type of foundation is built on gravel, sand and other drainage materials and is suitable for undulating soils with high groundwater levels. In this case, part of the soil around the foundation is replaced with a cushion, and the foundation itself is built above the ground level or buried at a very small depth - 0.4-0.5 m. Can be used for log and wooden houses.
Options for restoring the old foundation
When the foundation installed under an old log house has passed the preliminary assessment procedure, it is time to determine the type of work to restore it.
Foundation repairs can be partial or complete. For the first case, it is necessary to identify the most problematic, damaged areas that require replacement with wooden inserts, brickwork or a concrete structure.
If it is clear that the foundation on which the log house is built cannot be restored, then a procedure is planned for completely dismantling the old foundation and installing a new one. Its implementation requires significant effort, as well as the presence of specific knowledge and skills. Therefore, when deciding to lay a new foundation for your old wooden house, step-by-step instructions are not always able to help. It is better to seek professional help.
Plinths of a log house (building)
Before laying the first crown of rounded logs, it is necessary to waterproof the foundation.
The basement plays a significant role in the operation of the building and is a continuation of the foundation. The basement part of the structure rises above the ground and the temperature in the house and the level of humidity depend on its quality. In small houses, the basement is often the ground part of the foundation, but its height is rarely more than 50 cm. The basement can reach 1.5 meters or more and becomes the lower basement floor of the building. In such a basement you can equip a basement for storing vegetables, a garage, and even make a heated room for various purposes.
To install the base, it is recommended to use high-quality materials that can withstand any weather conditions, including rain, snow, repeated freezing, ultraviolet rays, hail, etc. Therefore, brick, rubble concrete, stone and some other building materials are more often used. In appearance, the above-ground part of the base can be sinking, that is, located deeper than the outer part of the wall, protruding - protruding beyond the edge of the house or being flush with it.
During the construction of the basement, it is advisable to insulate it, for example, with modern perforated insulating panels, which perfectly ventilate the basement space and at the same time are a good heat-insulating material.
Return to contents
Preparing a working design for a wooden bath
The construction of a log bathhouse is a labor-intensive and responsible process that is carried out in stages. The initial stage is preparing the bathhouse project.
A typical project includes:
- choosing a suitable location for development;
- layout of the number of floors and interior spaces of the bathhouse;
- layout of the location of window and door openings;
- selection of heating, ventilation equipment and lighting devices;
- selection of construction and finishing materials;
- development of premises design;
- calculation of construction costs.
Finished projects are presented in the public domain, but to receive an individual sketch, you should contact the design office.
Some features
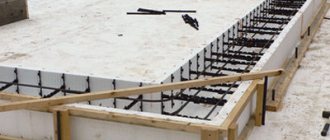
Metal rods are mounted in the formwork and filled with cement mortar.
Before you begin construction, carefully consider all the details, including the type of foundation and type of wood. Any type of wood has high heat and sound insulation, is not harmful to health and looks great in a log house, but nevertheless you have to make a choice. If you compare cost and quality, then choose larch or pine. This is an affordable material at a competitive price. Oak and linden are also suitable for construction, but the cost of a log house will be much higher. After you have decided on the type of wood, find a supplier who is ready to offer you even logs with a diameter of 20-26 cm; ideally, these should be rounded elements ready for laying in a log house.
The material for construction has been chosen, now think about the foundation, which must be strong to support the weight of a heavy log house. In addition, it must be stable and not change position when the soil freezes in winter. When choosing, the following important factors are taken into account: depth of soil freezing, groundwater level, soil type, etc. If groundwater passes close to the surface, then calculate the depth so that the base of the foundation is below the water level. Otherwise, when the water freezes, it will push the foundation for the house out and the structure as a whole will become distorted.
The height of the foundation for a wooden structure must be at least 50 cm from ground level.
A columnar foundation consists of supports that are poured from concrete into pre-dug holes.
If you make it lower, then the first crowns of the log house will quickly begin to rot from moisture and snow. When the foundation is ready, pay attention to such an important point as the connection of the log house with the base. A cement mortar several centimeters thick should be applied to the surface of the foundation and carefully leveled. Waterproofing made of special materials or roofing felt is laid on top of the cement with obligatory overlapping of the joints to prevent moisture from entering. This is not all preparation; it is too early to lay the log house until the special boards soaked in antiseptic are ready.
If the boards are not laid, then a fairly large gap will form between the bottom log and the base, which will have to be repaired for a long time. Boards for connecting the foundation and wooden walls must have a thickness of at least 30 mm and a width of about 300 mm. Only after long and painstaking work can you begin to assemble walls from rounded logs with laying tow or special felt strips between each crown of the future house.
Return to contents