Laying floor tiles in a bathhouse is practically no different from work in any other room. All features are a special adhesive composition and grout for seams. These components must have water-repellent characteristics and be able to withstand temperature changes and exposure to aggressive environments. There is one more feature - a slight slope towards the drain, but this is rather a feature of the floor, although this should not be forgotten during finishing work.
[toc]
Before laying the tiles, the floors in the steam room and washing room should already have a slope towards the drain. The surface must be flat. When pouring concrete screeds, you can use guide rails - this way you can ensure the required slope. When laying tiles on a surface that is not properly prepared, the adhesive consumption will increase significantly. Moreover, on a thick layer of glue, the tile will “float”, which will create additional difficulties when laying it.
The process of laying tiles in a steam room.
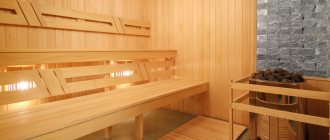
Please note that the base for the metal stove is made approximately 50 mm higher than the main floor. The tiles for the floor in the bathhouse must be chosen matte with a rough surface so that they do not slip. Its base should be non-porous so that it does not absorb moisture (in relation to the dressing room, you can choose any tile with a rough surface, since the humidity in the dressing room is low).
There are several more selection criteria - frost resistance and abrasion resistance, but whether you need to take these parameters into account depends on the type of bathhouse (all-season or not, how many people there will be, how often it will be visited, etc.). The sizes of ceramic tiles can vary, as can the shape, but it is easier to work with medium-sized square or rectangular tiles.
Non-leakage floors
Layout of a leak-proof floor with a slope
Laying wooden floors with a slope is required only if a leak-proof base is installed. How to lay floorboards at a certain angle to the drain?
- The rough coating is cleaned of dirt and a drainage system is installed;
- Then the concrete screed is supposed to be poured, which is done using the technology described below;
- After the screed hardens, the tongue and groove board is laid;
- The finished floorboards are positioned at a slight angle to the drainage system due to the previously formed screed slope.
Unlike pure concrete, wooden floors can be installed in a sink, steam room or shower, as they are not prone to dust formation.
Why is tilt necessary?
If the degree of inclination is too small, not all the water accumulating on the surface will enter the drainage system.
Tilt of the base towards the drain allows you to quickly remove water from the washing room or steam room in the bathhouse. A rather complex design performs several tasks:
- Prevents fluid accumulation;
- Prevents damage to floor materials;
- Provides quick drying of floors;
- Significantly reduces the chances of developing fungus and mold.
The design of a rough foundation with a slope must be carried out taking into account many technological nuances. If the degree of inclination is too small, not all the water accumulating on the surface will enter the drainage system. If you make the floor slope too large, this will affect the material component of the issue, since it will lead to unnecessary expenses.
What are the benefits of ceramic tiles in a bathhouse?
Ceramic tiles in the bath
Moisture-resistant wooden tiles that have undergone special treatment have appeared on sale: “thermo-birch”, “thermo-aspen” and other types for laying floors in bathhouses. Treated wood has unique properties: it is not subject to deformation, cracking, drying out, does not absorb water and is lightweight.
Such products are quite expensive. Nowadays, ceramic tiles are increasingly used for bathhouse floors and baseboards, under which a heated floor system is installed.
This tile has a number of useful qualities that make it indispensable in conditions of high humidity and can please connoisseurs of beauty and aesthetics:
Tile structure
- high resistance to moisture;
- resistance to any detergents;
- heat resistance;
- environmental friendliness and safety - contains only natural materials and does not emit harmful substances when heated;
- distinguished by a variety of colors, textures and patterns;
- durable and inexpensive;
- makes it possible to make a heated floor using modern systems.
Selecting a fixing composition
Before starting work, you need to select a tile composition for laying. The quality and durability of the future decorative coating will depend on it.
Cement mortar
If you don’t have glue, you can prepare the masonry mortar yourself. To do this you will need 3 components:
- 3 parts sand;
- 1 part cement;
- PVA glue.
The components are mixed in a bucket, diluted with water until a homogeneous thick mass is obtained.
Glue
The main indicator that you need to pay attention to when choosing tile adhesive is elasticity. If porcelain stoneware will be used, to work with it it is necessary to choose an adhesive with a high adhesion rate
You can find various specialized formulations on sale. The packaging indicates the main characteristics and describes the process of mixing the dry mixture until the finished solution is obtained.
Options for installing inclined floors
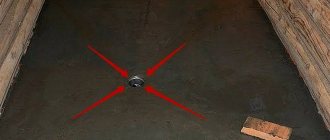
An example of a floor arrangement with an Envelope type drain.
Designing a base with a ramp always begins with choosing the type of slope, which can be of two types:
- “Envelope” is a special type of base cladding in which the drainage system is located in the center of the room. For normal water drainage, the base is conventionally divided into 4 parts in the form of an envelope, making a slight slope towards the ladder;
- From two planes - a design in which the base is divided into two parts and made with a slight inclination relative to each other. At the lowest point of such a system, a drain is installed into which liquid from the floor covering flows by gravity.
How to organize a slope for drainage
It is not very convenient to wash in a room where there are always puddles. The sewer drain allows you to remove waste and prevent the appearance of puddles. But in order for it to work effectively, you need to make a slight slope in its direction on the floor. If the drain is placed along the wall opposite the front door, making a drain will be as easy as shelling pears. To do this, you just need to lift the edge of the floor located on the opposite side of the tray.
When the drain is located in the middle or in the corner of the room, it will be quite difficult to make a screed with a slope yourself. It's difficult, but it's possible. To do this, you need to correctly calculate the height of the drain. To do this, appropriate height marks are made in the corners of the room. From them, bundles of threads are pulled to the center of the drain hole. Beacons or metal profiles are laid on them. The floor screed is performed on them.
Choosing tiles for a bath
Table of the types of ceramics from which the tiles are made
Tiles can be glazed or unglazed. The glazed one undergoes double firing, so it is more durable and resistant to temperature changes.
The front side should be rough so that the coating does not become slippery. This will help prevent injuries from falling.
The back side of the tile should be embossed for better adhesion to the surface using glue. In addition, this side should not be porous so that the cladding does not absorb moisture and lasts as long as possible. The best option for the floor in the bathhouse is porcelain stoneware or clinker
When choosing regular glazed tiles, you should pay attention to the brands: A1 and B1 have low moisture absorption
The dimensions of the tiles for the bath should be selected taking into account the complexity of the configuration of the floor slope towards the drain. The more complex it is, the smaller the tile dimensions should be. The ideal option for a bath floor is ceramic mosaic, but it is not cheap.
Floor tiles must be thicker than those for walls and be at least 9 mm. Its quality can be determined visually. You need to choose tiles without defects, with smooth corners and edges. If you stack two tiles from the same batch with their backs facing each other, their corners and sides should line up perfectly. Floor tiles must be taken with a margin of 10% of the area. The stock is needed in case of need for pruning and possible defects. For DIY installation, rectangular tiles are suitable; octagons are best left to professionals.
Tile shapes
Wooden floors leaking
General scheme for creating a floor in a bathhouse
The simplest floors. The design of leaking floors does not provide insulation, so they are used either in the south or in the warm season, in the country. There is no water drainage system as such in the design of such a floor. Waste water is most often drained directly onto the ground. But, if the soil is clayey, then you will have to install a water drainage system. To do this, we make a reservoir, as described in the section describing the construction of concrete floors. There is no need to bring the pipe into the bathhouse. The design of the floors does not require a special drain hole.
If we lay the logs on the ground, then perform the following steps:
- we treat the logs with an antiseptic;
- level the site;
- add gravel;
- we compact the site. On clay soils, it is imperative to slope towards the reservoir;
- install support posts for the logs;
- we lay the logs. Step – 50 cm;
- lay the floor. Leave a gap between the boards, floor and wall. The gap is up to 3 mm. Water will flow through these gaps. We do not attach boards to the joists. Leaking floors are removed from the joists and taken out to dry after using the bath. The cushion under the joists and the joists themselves must be laid so that the lower edge of the floor is higher than the upper edge of the foundation (basement).
The service life of such floors is short. They will last no more than five years.
Video - Laying posts for logs
There is another option for installing leaky floors:
- After preparing the site, beams are installed along the perimeter of the foundation. They are made from timber treated with an antiseptic. Its size can be 100 x 100, 100 x 150, 150 x 150 mm;
- logs are attached to these beams;
- The floor covering is laid on the joists.
Attaching joists to foundation supports
Floors can be made from both softwood and hardwood. Larch is considered the best wood for making floors. But, unfortunately, in our time it is very, very difficult to find larch. Therefore, pine is used when constructing floors. Linden is the most commonly used hardwood tree. Oak should not be used. It becomes slippery when wet.
Laying boards for leaking floors
The boards used for flooring are edged and planed. Its thickness must be at least 30 mm. The most common board for flooring is a 50 mm thick board.
Required Tools
Before starting any work, you must prepare all the necessary tools in advance. You need to work concentratedly and measuredly, and not rush around headlong in search of missing equipment. What you will need for this job:
- Crowbar, nail puller, heavy hammer, hacksaw for dismantling the old floor or its fragments for subsequent replacement.
- Rule, level and tape measure for arranging a new coating and marking it.
- Glass cutter, tile cutter and grinder with discs for cutting ceramics.
- A drill with a mixer attachment and a container of sufficient volume for stirring assembly mixtures.
- Roller or brushes for priming.
- Convenient spatulas, trowel and comb for applying adhesive.
- Rubber hammer for shrinking and leveling tiles during installation.
- A set of rubber spatulas and rags for working with grout.
When selecting a comb, remember that for tile sizes from 5x5 to 15x15 cm, the tooth width should be 3-6 mm. For squares with a side of 25 centimeters, the tooth will be 8, and for 30 - 10 millimeters. If you need anything else, think about it in advance and put the tool so that it is always at hand.
Horizontal drain
It is better to place a horizontal drain close to the wall, since the trim does not look aesthetically pleasing.
- This option for laying tiles is as easy as shelling pears to do with your own hands, even if the screed was initially poured without a slope. First, we calculate the distance from the drain to the opposite wall. The level of floor slope in centimeters towards the drain will be equal to the number of meters. For example, if there is 3 m from the ladder to the wall, then the slope level should be 3 cm.
- Now we measure 3 cm up from the floor on the wall opposite the gutter and attach the beacons. We pull the cords from them towards the drain and fix them in this way. As a result, we have a template according to which we will lay the tiles.
The process for laying each tile is as follows:
- Apply the required amount of glue to the back side of the tile using a notched trowel and lay the tile. We adjust the height of the masonry with a rubber mallet if the screed was poured without a slope.
- Between each tile we install plastic or wooden crosses that regulate the width and uniformity of the seams.
- First, lay all the whole tiles towards the drain and only then lay the outer cut ones. While working, use a damp cloth to remove excess adhesive on the tiles. Otherwise, once it dries, it will be difficult to remove.
- Leave the laid floor for 12-24 hours until the glue dries completely.
- Once the glue has completely dried, you can rub the seams. The grout is applied with a special rubber spatula. Remove excess with a cloth. We treat the joints of the facing material with the wall with silicone.
Grouting joints
The final stage will be grouting the joints. Choose a composition in a contrasting color or to match the general background of the surface - your taste and desire will tell you. Main quality. If, as an example, we consider the range of grouts from the Ceresit company, then there are silicone grouts, elastic water-repellent grouts, and two-component grouts. Antifungal impregnation is offered to protect the grout.
Therefore, your experience, information that you can find in sufficient quantities on our website or consultation with a specialist will help you make the right choice. After the tiles have completely dried, we begin grouting. Mix the solution with a mixer, and use a rubber spatula or small grater to fill the seams. We hold the tool at an angle of approximately 45 degrees - this is how the grout most effectively fills the seam. You need to prepare as much mixture as you can produce in 20-30 minutes. After this time, it will begin to dry out and lose elasticity.
After letting the grout dry a little, use a dry, clean rag to carefully remove excess gypsum from the surface of the tile. After this, wipe clean with a damp cloth and leave until completely dry. As you can see, there is nothing complicated or supernatural about laying tiles on a wooden floor in a bathroom. Please note an important point: the floor level in the washroom should be lower than the floor level of the remaining rooms of the bathhouse, so that in case of problems with the drainage, the water does not flood the neighboring rooms.
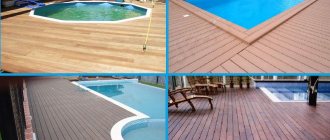
Floor covering
With high-quality preparation of the base and the correct choice of materials, tiling the floor of a bathhouse with tiles is not much different from laying ceramics in residential premises under normal operating conditions. And yet there are features:
- the thickness of the tile joints is no more than 2 mm;
- along the perimeter of the junction of the cladding with the walls, it is necessary to leave a gap of 1-1.5 cm, which is filled with an elastic insulating filler (rubber sealant);
- performing cladding with a slope towards the ladder.
The tiles are cut with a mechanical or electric tile cutter, and drain holes are cut with a drill with a core drill bit.
Before laying, ceramics (except porcelain stoneware) are soaked for 5-10 minutes in a bucket of water, then taken out of the container and allowed to drain.
Facing tiles withstand high temperatures well
If the drain is located in the central part of the floor, then the floor covering begins from there, forming a finishing slope that is uniform on all sides. It is advisable to first lay out the tiles without glue, so that later you do not have to place small fragments of tiles around the drain.
The product is placed on the design site, pressed, ground in and tapped with a rubber mallet. If the leveling screed is of high quality, the thickness of the total layer of tile adhesive should not exceed 8 mm. The width of the tile joints is 2 mm using plastic crosses.
Two days after laying the tiles, the joints are grouted, trying to do this to the full depth of the joints.
Tiling the floor of a bathhouse, especially a wooden one, with ceramics is a responsible operation, but if you have the skills to finish tiling a floor with a drain and know the technology, this work can be done without haste and with high quality on your own.
Laying technology
To lay tiles you need the following tools:
- notched trowel with teeth height 8–9 mm;
- manual or electric tile cutter;
- plastic crosses for aligning seams;
- level;
- attachment with a drill for mixing glue.
Before laying tiles in a bathhouse, it is recommended to soak them in water for 5–10 minutes. This will reduce the absorption of moisture from the construction adhesive into the finishing material.
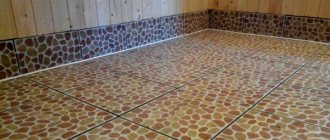
Floor tile laying technology
Creating a tiled floor
In Russian bathhouse traditions, it is not customary to use tiles to cover the floors in bathhouses. Despite this, lovers of steam baths still opt for a ceramic floor. When creating it, craftsmen take into account the type of floor base (concrete or wood) and its slope towards the drain. Let's consider creating varieties of tile floors.
Flat floor
Before laying ceramic tiles, preliminary preparation of the floor base in the bathhouse should be carried out. The next step is marking the floor. It is done if you plan to lay out a tile pattern on the floor.
If the installation is made of single-color tiles, then markings will not be required. In this case, the floor is laid with tiles, starting from the front corner of the room. The adhesive used should be diluted in water according to the instructions for use on the package. To mix and obtain a homogeneous composition without clots, use a construction mixer or drill with a special attachment.
First, the adhesive is applied to the area of the floor required to lay 4-6 tiles. To apply it, use a medium-width spatula or trowel. Then the applied layer is spread with a toothed spatula.
The adhesive is also applied to the back side of the tile using the same spatulas (flat, then serrated).
With drain
Laying tiled floors in a bathhouse requires a slope towards the drain. For guidance, craftsmen use either a building level, a fishing line, or a block with the desired slope. It is placed on the tile, and then measured on top of it with a building level. The tiles are cut with a special tool - a tile cutter; the holes for the drain are cut using a drill with a core drill.
If the drain in the bathhouse is located in the middle of the room, then laying the floor with tiles begins from the central part (from the place of the drain). In this case, the required finishing slope is formed. First, the tiles are laid out without glue to more accurately measure the required slope.
On the concrete floor
First of all, the entire area that is planned to be tiled is cleared of debris and dirt. You can use a vacuum cleaner for this purpose. After cleaning, you should seal the cracks, crevices and flaws in the base of the floor and at the junctions of the walls and floor with sealant. When the sealant has dried, remove any excess. Then a ready-made liquid primer is applied to the base of the floor. The required height of the primer layer is 20 cm (measured along the wall).
After the soil has dried, the floor should be waterproofed. For such purposes, it is practical to use rubber or so-called liquid glass. These waterproofing compounds are applied to the base of the floor using a wide brush in two or three layers. Then you need to let them dry. The tiles are laid on the floor prepared in this way according to the usual pattern.
On a wooden floor
The wooden base boards must be of good quality and condition, not rotten. If there are damaged boards, they should be replaced. The best option is to completely disassemble the base, lay down insulation, remove varnish and paint from old boards, and treat the floorboards with an antiseptic. Gaps of 3–5 mm should be left between the floorboards. Fill these holes with foam.
Then you need to fill all the holes, apply latex impregnation or heated drying oil to the boards. This will be the first layer of waterproofing for the wood floor. The second layer is performed using fluid or bulk components or roofing felt or other rolled materials.
The next stage is the screed. A metal mesh is installed around the perimeter of the bathhouse, which contributes to the stability of the screed. Filling is carried out taking into account the slope towards the drain. Laying tiles on a wooden floor is done in the usual way. Of course, taking into account the slope towards the drain.
Tile is a practical solution for finishing a bath. It is durable, wear-resistant, aesthetically pleasing, easy to clean, and most importantly, it fits perfectly into a “water” room such as a bathhouse or sauna. And it is quite possible to lay tiles with your own hands on any floor: both wooden and concrete. And even the presence of a drain in the bathhouse will not be a hindrance - you will get a perfectly flat plane.
Preparing the base for laying tile material
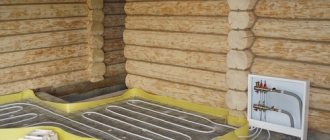
Before laying the tiles, it is necessary to level the floor surface and make a slope towards the drain. To ensure the required slope when pouring a concrete screed, guide rails are used.
Preparation of the base is an important stage of cladding. You cannot skimp on materials - the base must be strong. It is necessary to waterproof the floor and slope to the drain.
Stages of work:
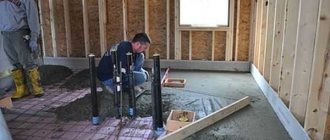
One of the options for preparing the floor for laying tiles
- the slope towards the drain hole is made at the rate of 1 cm of height difference per 1 meter of laying area;
- the drain hole must be made when constructing the foundation;
- to prevent air from the sewer from entering the steam room, water seals are installed in the sewer pipe;
- the concrete base is poured with a cement-sand screed, and the wood requires more complex preparation;
- when preparing a wooden base, you need to make sure the strength of the floorboards and replace them if necessary;
- there should be a gap of 1 cm along the perimeter between the boards and the walls. If there is no gap, the movement of the boards during temperature changes will destroy the cladding;
- All existing holes must be filled with putty and the wood treated with heated drying oil. This will be the first layer of waterproofing;
- the second layer is made using roofing felt;
- a reinforcing mesh is laid on top of the roofing felt and the screed is poured;
- When laying floor tiles on a mortar, the slope can be created during the tiling process.
Features of the floor
For a Russian person, a bathhouse is always a rather extreme way of relaxation.
The floor in the steam room is exposed to various aggressive factors:
- water constantly gets on the floor covering;
- not only steam collects on the floor, but also its condensation, so the surface is constantly wet;
- the air temperature below the room is approximately 40 to 45 degrees;
- strong mechanical stress.
If you choose tiles for the washing area, you should take into account that there are no high steam temperatures in this room, but high-temperature water pours heavily onto the flooring. Therefore, it is necessary to carefully select building materials to create a durable and anti-slip coating.
Concrete
Concrete flooring is often found in a steam room or washing area because it has better properties than wood flooring. The concrete solution contains additives that have a positive effect on the water resistance of the coating. It is reliably protected from rotting and perfectly withstands high humidity.
Laying ceramic tiles in a bathhouse can be done on a concrete floor
However, before you begin creating a concrete base, you should pay attention to creating a drainage system that is responsible for draining water from the floor outside the bathhouse structure
The construction of the drainage system should be carried out in the following order:
- it is necessary to compact the soil;
- create a cushion from crushed stone or sand, you can use broken bricks. The formed pillow should have a thickness of 12 to 18 cm;
- pour a concrete layer, its thickness should be from 5 to 7 cm;
- make a layer for thermal insulation from felt, expanded clay or mineral wool;
- create waterproofing using a thick film of polyethylene, or use roofing felt;
- for reinforcement, use steel wire or mesh made of high-quality metal;
- pour the next layer of concrete, the thickness of which should be from 10 to 15 cm, while forming a slope towards the drain;
- cover the concrete floor with an adhesive-based primer, which will improve adhesion to ceramics.
Wooden
Wooden flooring is a classic option in a Russian bathhouse, since traditionally the entire building is made of natural wood. A wooden floor can be perfectly used for further laying of ceramic tiles if the correct preparation is made.
It must be taken into account that natural wood is an organic material, so it is not characterized by increased resistance to various factors. As you know, wood can swell in rooms with high humidity or shrink if there is not enough moisture in the air
A new wooden floor usually tends to sag within two years, and after this period it may continue to move. Displacements are invisible to the eye, but this property negatively affects the strength of the floor surface. If you lay tiles on a wooden floor, they will soon begin to crack and peel off from the main covering.
To avoid such an unpleasant situation, save your energy, time and money, you need to create a damper layer before using the tiles. It is this that will absorb the movement of natural wood. The damper should be laid in such a way that the elastic side is in contact with the wood, because it is this side that will take the shocks, and the outer hard part can be used for laying tiles.
Two main stages: preparatory and main
Let's consider the option of a concrete floor, using the example of arrangement on the ground, with a ground water level above 2 meters.
The work is carried out in the warm season. It is assumed that the system for drainage has already been laid and backfilled in an appropriately prepared trench, and the sewer pit is located outside the bathhouse (i.e., not under the floor). At the first stage, you should decide on the type of tilt. The most common options are drainage in two planes or the so-called envelope. So, how to properly fill sloping floors?
Preparatory stage
Close the hole in the drain pipe with a lid or plug it with a “stopper” made of a thick rag. This will prevent accidental clogging during work.
The sand must be free of construction debris, clay, silt deposits and other impurities. During the compaction process, it is recommended to moisten it with water.
If crushed stone and gravel are not available, you can use broken bricks. The surface after compaction should not have pronounced irregularities in the form of protruding debris.
Main stage
A reinforcing metal mesh is laid on top of the roofing material with a cell pitch of 50-80 mm. It is fastened with knitting wire or polymer clamps (if it is a polymer reinforcement). Instead of roofing felt, you can use “liquid rubber” products or waterproofing films with a thickness of more than 200 microns.
The most practical way to fix beacons is with plaster, making a slide out of it (this mixture hardens quickly). We maintain the distance between the beacons at 1.5-2 m. Pipes or profile guides can be used as beacons.
The mass is leveled with a trowel and equalized by the rule. Distribution is carried out according to beacon profiles and is constantly monitored by the building level. During the process, it is necessary to compact the solution to prevent the formation of air cavities. Then it is left for the concrete to gain primary strength. This depends on the current temperature and humidity conditions, the thickness of the fill and usually within 7-10 days. Before pouring, we check the functionality of the drain (so as not to drill into hardened concrete later).
a) lay waterproofing on the rough screed and lay insulation on it (if it is expanded clay);
b) attach the insulation directly to the concrete base using tile adhesive (this applies to extruded polystyrene foam (penoplex), polystyrene foam, etc.);
Some craftsmen advise laying plastic film under the mesh.
Here is a picture that quite “ideally” fits the description. Of course, you can simplify this scheme and not make a rough concrete base. Here you can compact the sand and gravel cushion well and use modern technologies - use geotextiles. Here is an article about this material. For this option you will need geotextiles, penoplex, reinforcing mesh and concrete itself...
On a bath floor with a slope, it is practical to lay small elastic tiles fixed on a soft backing - a mosaic. It is simply cut and adjusted to fit the drain hole. It’s easy to cut a hole of the required diameter in the middle of its surface and, smear it with tile adhesive, put it on the pipe.
The seams between the tiles are covered with moisture-resistant jointing. It matches the color of the material. Removable wooden flooring can later be laid on top of the tiles or mosaics.
I hope I was able to convey information about how to pour a concrete floor with a slope in a bathhouse. Subscribe to the blog and stay up to date with all the news. Concrete and "dodge properly."
Good luck in your work and peace to your home! Bye.
Wisdom Quote: When a woman is angry, don’t look for common sense in her speeches! (Pierre Beaumarchais).
Source