Ceramic tiles are one of the most common finishing materials. If there is no flat surface, tiles in the bathroom are laid on gypsum fiber board or gypsum fiber sheets. Installation can be carried out on the floor or wall, regardless of the type of coating. The sheets are securely attached to concrete, brick and other bases, which makes this material truly universal.
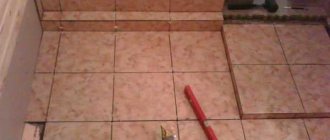
Laying tiles on GVL
In addition, gypsum boards differ from standard plasterboard sheets or gypsum boards in their reliability, durability, and long service life. Gypsum fiber sheets are characterized by high performance characteristics, so they are excellent as a base for laying tiles on floors and walls. By and large, installation of the material is no different from ordinary drywall, so no extra tools or skills are required.
A little about GVL and GKL
GVL in warehouse
The abbreviation GVL stands for Gypsum Fiber Sheet.
Comparative performance characteristics of gypsum plasterboard and gypsum fiber board
| Characteristic name | GKL | GVL |
| Compound | Homogeneous | Multilayer |
| Density kg/m3 | 650 | 720 |
| Thermal conductivity | 1,45 | 1,4 |
| Resistant to natural degradation | Short operating period | Long service life |
| Possibility of painting | Quite good effect | Oil paint is applied to the paper layer |
| Frost resistance cycles (F) | Up to 15 | Up to 4 |
| Sound insulation (db) | 35 | 25 |
Table of geometric parameters
| Name | Dimensions (mm) | |||
| Length | Width | Thickness | Flange width | |
| Ordinary gypsum fiber sheet (GVL) and moisture resistant (GVLV) | 2500* | 1200 | 10-12 | — |
| 2700** | 1200 | 10-12 | — | |
| 3000** | 1200 | 10-12 | — | |
| Small-format GVL and GVLV | 1500* | 1000 | 10-12 | — |
| 1500 | 1200 | 10-12 | — | |
| 1200*** | 1200 | 10-12 | — | |
| Elements of prefabricated dry screed | 1500* | 500 | 20 | 50 |
| 1200** | 600 | 20 | 100 | |
Explanation of the table: * - standard parameters, ** - parameters are set at the customer's request, *** - parameters are planned for release.
Necessary calculations
In order to calculate the required number of base slats, it is necessary to carry out the following calculations:
- the number of “UD” guides is determined by the formula. First, to the height of the wall multiplied by 2, add its length multiplied by 2. Then we multiply the resulting amount by the correction factor, which is 1.2. We divide this figure by 3 (three meters is the length of one guiding profile). As a result, we will obtain the required number of slats. If the result is not a whole number, round it up;
- The number of rack-mount CDs is calculated using a different formula. Divide the length of the room (the figure is given in cm) by 60 and multiply by the correction factor, which is 1.2. From the resulting value we subtract one and get the number of rack “CDs”. If the value is not an integer, we also round it up.
Determining the number of required jumpers for a drywall frame can be done in several ways. To carry out the required calculations, you need to know the width of the distance between the slats and their number. To do this we need:
- divide the length of the wall by 0.6 (the figure represents the distance between the rack rails, or more precisely, their centers);
Distance between guides
- As a result, we will obtain the number of lintels per span. If the result is a remainder that is only 10 cm, then in this case the bridging rail is not installed in this place at all;
- We multiply the resulting number by the volume of lintels required to install drywall for one span and get the final figure. This is exactly how many bridging slats we need.
The width of the profile is a fixed figure - 5 cm. In the calculations, you need to add an additional 10 cm on each side of the guide. Now we subtract the width of the profile slats from the distance between them and add additional cm. So, we got it: 60-5+20=75. Further:
- multiply the resulting number (75) by the number of jumpers for the entire frame;
- divide the result of multiplication by 300 cm (the length of one guide rail);
- As a result, we get a figure that needs to be rounded up and we get the desired number!
Using another method, you can find out not only the number of guides, but also the required volume of the rack profile.
Note! All vertical slats must be oriented in the same direction, i.e. All of them must be attached on one side (it’s better to orient yourself along the “empty side”).
Below are the following calculations:
- multiply the total number of jumpers by 10 cm (length of the segment);
- We round the resulting figure. Usually it is approximately 300 cm, which is the length of one guide;
- the length of the jumper is then used. Since the distance between the guides is 60 cm, the length of the jumper will be the same. Here you need to subtract a couple of cm, which will go towards fastening. As a result, we get approximately 58 cm;
- multiply the total number of jumpers by 58 and divide by the length of one guide;
- We round the resulting figure and get the number of rack rails.
It is worth remembering that in order to obtain the number of U-shaped hangers for attaching drywall, a slightly different formula is used. It has the following form: multiply the number of rack “CDs” by 5. This type of layout is applicable for any wall structure.
Why gypsum fiber board?
What is GVL? Essentially the same drywall, only improved. Gypsum fiber boards have more advantages than gypsum boards. The material has high strength characteristics, is moisture-resistant and fire-resistant. According to these characteristics, it is in many ways superior to plasterboard, therefore it is more often used as a base for a tiled floor. Another advantage that distinguishes gypsum fiber board from gypsum plasterboard is the excellent strength of the material, which allows the slabs to be used when arranging a smooth floor covering using the dry screed method.
Hypo-fiber plate
If the tiles are laid in the bathroom, then special gypsum fiber sheets, which are moisture resistant - GVLV - are laid as the base for the tiles. The technology for laying gypsum fiber flooring under tiles will not present any difficulties; the main thing is to follow the technology and recommendations of specialists. Below are some useful tips from experienced tilers that will help with tiling work.
GVLV slab is a reliable basis for laying tiles in wet rooms
Characteristics and features of the material
Gypsum fiber panels have a lot of parameters that set them apart from other sheet products:
- Strength. The homogeneous structure ensures high performance. This is explained by the composition: gypsum and cellulose fibers, which give a reinforcing effect.
- Viscosity. Elements can be processed in various ways: sawing, milling, etc., this will not damage the structure or deform the parts. It is due to this that a good result is achieved when installing a heated floor.
- Fire safety. The product does not support the spread of fire, which allows the slabs to be laid on various communication systems.
- Low thermal conductivity. The resulting gypsum fiber surface can be used as additional insulation. But this significantly complicates the process of installing a heated floor, since the system has to be literally built into gypsum fiber board sheets.
- Wide range of applications. The slabs are suitable for concrete and wood bases, as well as for dry screeding. The sheets are relatively light in weight, so they do not put a significant load on the base . The material can be laid with your own hands without the involvement of specialists.
Gypsum fiber sheet, compared to its main competitor - gypsum plasterboard, has improved characteristics
Gypsum fiber includes two main groups of products used for flooring on horizontal bases: the standard version and moisture-resistant gypsum fiber board for flooring - GVLV. The resulting floor covering will be reliable and durable, but only if the variety is chosen correctly.
On a note! Waterproof material is used for flooring in rooms with high humidity (bathroom or kitchen) and is the best solution when laying a heating system.
Unlike conventional gypsum plasterboard, moisture-resistant sheets incorporate a fiberglass reinforcing mesh
The last stage of floor treatment
After three to four days, the seams are rubbed with a special solution. After removing the plastic spacers, apply the solution using a thin spatula. Excess mortar is removed from the tiles using a damp cloth.
After 3-4 days, it is necessary to treat the seams. They are rubbed down using a special solution: the crosses are removed, and the product is applied to the seams with a thin spatula. Excess solution is removed with a damp cloth.
Experts also recommend additionally treating the seams with a varnish with water-repellent properties - this will improve waterproofing, which is especially important in rooms with high humidity - in the kitchen and bathroom.
The cleaning process using chemicals can be carried out no earlier than 24 hours after finishing the treatment of the seams.
A few recommendations:
- When laying tiles on GVL, you should use the same adhesive composition for gluing sheets and laying tiles. This will equalize the tension as the glue dries.
- Polyethylene film should not be used as waterproofing.
- Fastening the sheets with self-tapping screws is mandatory, regardless of the choice of base. This reduces the likelihood of cracks in the seams.
Views: 2,795
Advantages of GVL
Gypsum fiber sheets have a number of common characteristics with plasterboard. However, this material also has its own characteristics that make it more perfect. Just like gypsum board, gypsum board sheets consist of gypsum with the addition of cellulose material. However, during the production process, gypsum fiber boards are not glued with cardboard on both sides. In addition, thanks to the addition of special components, gypsum fiber sheets are fire-resistant and more water-resistant.
GVL flooring is an excellent solution for creating a dry floor screed, as it is highly durable. This floor can be installed in any room. However, when laying tiles on the floor in rooms with high humidity, special moisture-resistant GVLV sheets should be used.
Features of work
Trims for tiles
When installing a tiled floor, do not forget about the tile corners - trim (these are special plastic corners that can be purchased at any construction and hardware stores). With their help, there will be no problems with laying tiles.
We should also not forget about the difficulty in performing some finishing work, namely, corner laying of tiles. For beginners in construction and installation work, the classic method of laying joint to joint is suitable, where the tiles, if necessary, are cut off. However, it will not be possible to bypass all the difficulties even with this technique, since corners with trimming of 450 are common, and therefore it is impossible to do without a special machine - a tile cutter.
If you study all the intricacies of the classic technology of laying tiles, the process will go much faster, and even such issues as laying corners and turns will not raise so many doubts.
Disadvantages of gypsum fiber
- Price. GVL sheets are an order of magnitude higher than gypsum board sheets. But considering the technical characteristics and service life, it is better to overpay once than to change the floor every few years.
- Rigidity. Gypsum fiber is a very hard material. Therefore, it will not be possible to use it in a curved form. For figured coverings it is better to use plasterboard.
Such modern material as gypsum fiber is widely used on an industrial scale. It has positively established itself in the construction market. Therefore, in the modern world it is in great demand, despite the price.
Types of profiles for drywall
Today, profiles for installing gypsum boards come in the following types:
- “UD” guides. They are usually installed around the entire perimeter. Such profiles are responsible for the strength of the assembled frame. Rack profiles are attached to them;
- rack “CD”. Their installation is carried out between guiding profiles. They are usually attached every 60 cm. They are used to screw drywall sheets to the created frame.
If you were able to calculate everything correctly when drawing up the drawing, then installing the frame will not cause you any difficulties.
Area of use and varieties
If you need a high-quality finished bathroom, finishing with glvv plates will be the best option for leveling the walls, floor and ceiling. GVLV, like drywall, is divided into several types. By area of application it is divided into:
- floor;
- wall.
According to physical characteristics it is divided into:
Are you wondering how to cover a bathtub with plasterboard? Work procedure and installation recommendations
- ordinary;
- moisture resistant.
Floor or wall slabs differ from each other not only in thickness, but also in size. For the convenience of laying dry screed, smaller slabs of 1500 x 1000 millimeters are used, while standard wall sheets are produced with dimensions of 2500 x 1200 millimeters.
The use of gypsum fiber has already become widespread among large construction companies, so the advantages of this material when finishing rooms with high humidity are obvious. Strength allows you to build not only various wall structures with increased load, but many people even use this material to build steps on a metal or wooden frame. The surface of each slab is finely porous and has a heterogeneous structure, which contributes to good adhesion of any decorative finishing material using standard adhesive solutions.
Using moisture-resistant gypsum fiber for the bathroom would be the best option.
Fugue application
Fugue is the last stage of installation. And very important - it is with the help of grout that the masonry itself is protected.
However, before grouting, you need to remove the crosses from the seams so that the fugue subsequently has the same shade along the entire length of the seams.
So, are you ready? Then we start mixing the grout. To do this, pour a small amount of fugue into half of a rubber children's ball, add water and, using the same rubber spatula that we will use to apply the fugue, mix.
Why half the ball? It’s just so convenient, holding this container in your left hand, to apply the mixture into the seams, calmly moving along the laying of tiles on the gypsum fiber, and without constantly dragging a bucket behind you.
So, take the mixture onto a rubber spatula and run it first with force across the seam, and then along it. And just like that, carefully and slowly, you cover all the seams.
Now you know how to lay tiles on the gvl.
| How to select and install grout for bathroom tiles: a guide |
| Crosses for tiles: how to choose the right one and not make a mistake? |
| Learning how to cut tiles without a tile cutter |
| How exactly to clean bathroom tiles |
GVL is bad. No one said that it needs to be tightened with self-tapping screws 20cm apart - experts. There is no better tie
What should I use to cover the gypsum fiber board seams? if not for tiles, but for painting??
When installing gypsum plasterboard, it is advisable to leave a small gap between them - about 2 mm - this will allow the putty solution to be pressed into it. Moreover, first apply putty to the seam, then press in the serpyanka and only after that do the final, leveling layer of putty, moreover, this must be done in one step so that the first applied layer of putty does not harden. Select putty specifically for GVL.
I was worried that when laying tiles on the gypsum plasterboard it would be damaged by moisture, gypsum plasterboard is moisture resistant, but everything worked out and was even great. The whole process went pretty quickly. This option is quite viable!
This is indeed true - the option is more than viable. With the use of drywall, the process of leveling the surface of the walls becomes faster and cleaner than plaster. There are pros and cons, so everyone chooses the option that they consider more suitable.
I would like to clarify - what leveling method do you recommend as a specialist?
I am still a supporter of plastering on beacons - in my opinion, this is a more durable base if done in compliance with all technical aspects, but sometimes you need to make a box - this is where gypsum fiber board with subsequent finishing of the tiles is perfect
Good day! I “filled” a niche in the wall in the bathroom with moisture-resistant gypsum plasterboard, although there are differences and unevenness. You need a flat surface for laying tiles. Tell me what is the best way to level it?
The question is not entirely clear, namely, why did the unevenness appear? Was it because the niche was “flooded” and the plasterboard gave way, or was the problem because the frame was assembled with errors?
Laying tiles on gypsum fiber
To lay tiles, you need to prepare the necessary materials and tools in advance. The general procedure is as follows:
- The premises are being marked out. To do this, lines are drawn from corner to corner and between the center of adjacent walls. This will allow you to stick the products with the pattern adjusted.
- The base is treated with two layers of primer to ensure good impregnation and dried.
- The starting point of installation is determined and a diagram of the arrangement of elements is created. Pre-layout is often required.
- Glue is applied to the surface. You can mix it yourself or purchase a ready-made mixture. The mixture is spread over the base using a notched trowel.
- The parts need to be glued in a clear sequence; to do this, the element is pressed and, if necessary, tapped with a mallet and adjusted to the level.
- The parts are placed at intervals, the joints are formed using plastic crosses or a tile leveling system (SVP).
- The outermost fragments are trimmed taking into account the gap from the walls.
- The coating is left until it dries, after which it is necessary to rub the seams with a special mixture of the desired shade. The composition is applied to the joints and spread with a rubber spatula, the excess is removed.
When working with GVLV, the tiles are laid using regular tile adhesive.
If you do not violate the process technology, the surface will last a long time.
Necessary stages of work before laying gypsum fiber board on the floor
- The room should be free of furniture and equipment. It is easier to lay out gypsum fiber sheets in an empty room. They are of impressive size.
- Before laying gypsum fiber boards, the condition of the old floor should be assessed. If the base has become unusable, it must be dismantled and the defects corrected.
- Remove all construction debris.
- If there are bumps, they need to be removed by grinding. Fill deep holes with wet solution. If the depth of the holes is more than 2 cm, they are covered with expanded clay, and then the screed is poured.
- On a wooden floor, it is necessary to check the boards for integrity. To prevent them from creaking, it is advisable to tighten them with self-tapping screws. Self-tapping screws are screwed in a checkerboard pattern into wooden joists.
- Large gaps between the boards are foamed with polyurethane foam.
- If the floor is rotten, gypsum fiber board cannot be laid on it. In this case, in order to save money, you can make a wooden sheathing. A beam is attached to the logs. The thicker the timber is laid, the greater the load the floor can withstand. You can pour expanded clay into the cells between the beams or put insulating insulation.
- Then the GVL is laid on the floor. Gypsum fiber sheets are attached to the beams using self-tapping screws.
Subtleties of the facing process
To properly glue the tiles to the gypsum plasterboard, the solution is applied not directly to the tiles, but to the surface of the base. For this purpose, the adhesive composition collected with a spatula is distributed in an even layer over the floor. In this case, the glue covers an area of no more than 1 square meter. Then they take the tile and place it at the corner from which the layout of the diagram will begin.
The tiles are pressed tightly, which ensures optimal adhesion of all surfaces to the adhesive. Then, using a level, the levelness of the element is checked. When protruding the edge, take a rubber hammer and tap the tile on top, trying to give it the desired location on the surface.
Sometimes during installation a small mistake may occur - the tiles may sink. Then the recessed element must be removed and placed again. According to this principle, the entire surface of the base is laid out sequentially. After each element, be sure to check how it is laid relative to the previous ones.
Tips and tricks
Now here are a number of tips and recommendations given by professionals:
- Tile adhesive must be applied to a small area, which will be processed within 20 minutes. Otherwise the glue will harden.
- All excess glue that protrudes during installation must be removed immediately, otherwise it will be impossible to remove it later.
- When laying gypsum fiber boards, it is imperative to bandage between the sheets, which will provide greater resistance to loads.
- Before laying the tiles, the gypsum fiber board flooring must be left for at least 3 days, after which priming and installation begin.
- When purchasing an adhesive mixture, you need to make sure that it is suitable for gluing gypsum fiber sheets.
- Laying should be carried out only when the primer is completely dry, strictly following the technology presented above.
By following these recommendations, you can avoid a lot of problems and difficulties.
Preparation of adhesive composition for tiles
The process of laying tiles involves the use of glue. When choosing it, attention is paid to the specifics (for which surfaces it is suitable) of the composition and service life. The manufacturer indicates this information on the packaging. Mixing dry powder with water is done with a drill with an attachment. After mixing the glue, wait 15 minutes, after which they proceed to facing work.