When building a bathhouse, everyone is faced with a large number of issues, among which the choice of flooring material is not the least important. The first thing that comes to mind for many is a tree. But there is another option - concrete floor screed. Such a floor will cost more, but it has a number of undeniable advantages.
Types of floors in the bathhouse, their features
Bath floors can be:
- concrete;
- brick;
- wooden.
Wooden floor
In the bathhouse, the wooden floor is made from coniferous trees in small steam rooms. It is not recommended to use oak boards for laying the floor in a bathhouse, as they are slippery. The floor is made of wood, inexpensive, environmentally friendly, and has an aesthetic appearance. There are two types of wooden floors. It can be leaking or not leaking.
When the floor leaks, waste water flows into the gaps between the boards directly into the soil under the bathhouse. This method does not require laying communications.
Its advantages:
- erecting a floor does not require large financial investments and time;
- is resistant to dirt and rot;
- has good ventilation and dries quickly.
Minuses:
- lack of thermal insulation layer.
Non-leakage floors are more difficult to install. Water flows into holes that are located on the surface, falling into a catch basin and then into a drainpipe.
Advantages of this floor:
- floor warmth;
- low heat transfer.
Flaws:
- long drying period after bath procedures;
- susceptibility to the proliferation of various bacteria and rotting;
- requires a lot of building material and time for its construction.
Concrete floor
One type of bath floor is a concrete floor, which has a long service life compared to wood. The manufacturing process is long and labor-intensive.
The main advantages of a concrete bath floor:
- fire resistance;
- strength.
Flaws:
- cold;
- labor intensity;
- requires significant financial costs.
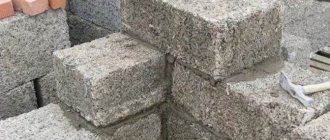
Brick floor
This type of bathhouse is used very rarely; it usually serves as the basis for a concrete floor.
But still, a brick floor has a number of advantages:
- has good heat resistance;
- it is not susceptible to bacterial growth and rotting.
Minuses:
- has low heat transfer. Since brick accumulates heat well, in order to avoid burns, it is recommended to lay wooden flooring on top.
Construction technology
Monolithic slab foundations, as a rule, are built on difficult soils, and therefore the most stringent requirements are imposed on their design and construction, as well as on materials, which are regulated by the following regulatory documents: SNiP 3.03.01–87 and SP 50–101–2004.
The construction of all monolithic slabs is carried out according to the same scheme:
- Creating a project.
- Marking the contours of the future structure on the site.
- Preparing the soil for the construction of the foundation.
- Laying utility lines in the ground (sewage, water, etc.).
- Installation of a sand and gravel cushion of the required thickness.
- Laying a thermal insulation layer with its subsequent waterproofing.
- Creation of a reinforcing frame.
- Assembly and careful fastening of formwork.
- Pouring the “sole” with concrete.
If you decide to build a monolithic slab foundation, then you need to proceed according to the same scheme.
Why concrete floor?
The only drawback of a concrete floor on the ground is that it is very cold and requires insulation. In principle, two types of floors are used for a bath structure: wooden and concrete.
However, concrete floors are more suitable for installation on the ground. Judge for yourself, any wooden structure, even one made of moisture-resistant larch wood, will in any case be subject to constant exposure to moisture. Even if a special antiseptic impregnation protects the material from rot and decomposition, the wood will still absorb moisture, which will lead to a persistent and unpleasant odor in the room. In addition, it is better to lay the logs not on the ground, but attach them at a short distance from it to the base frame. Concrete flooring is the best option, since such structures have many advantages:
How to insulate the floor in a frame bath?
- strength and reliability;
- if the floor was poured according to all the rules, the structure will last a very long time;
- a heating system can be installed in the concrete floor layer;
- the design has good moisture resistance;
- The versatility of the concrete base allows you to lay any flooring in the bathhouse that is suitable for the operating conditions, for example, porcelain stoneware or tiles, wooden flooring made of moisture-resistant larch or oak.
The only downside to concrete flooring is that it is very cold, but this can be easily dealt with. It is enough to make high-quality floor insulation. There are many different options and materials for this. For example, insulation can be done with polystyrene foam. In addition, a heated floor system will perfectly cope with the problem of cold surfaces.
More about waterproofing
The service life of a bathhouse, the safety and comfort of staying in it largely depends on high-quality waterproofing.
Traditional methods of floor waterproofing include coating and laying. We are talking about bitumen mastic, which is applied in several layers to the cleaned floor. A waterproofing coating and finishing are laid on top. This simple method provides excellent protection from moisture, but has its drawbacks. The height of the room decreases, as the floor level rises by an average of 5 cm. It is likely that the wooden cladding of the ceiling and floor will become saturated with a specific pungent bitumen odor.
Another traditional method of waterproofing is the use of glass roofing material, various polymer films, hydroglass insulation and other materials that are not afraid of moisture.
Waterproofing with polyethylene film
Often in baths they use penetrating waterproofing, which does not have the disadvantages of the above methods. We are talking about special waterproofing compounds that are applied over a cleaned and primed floor. As a result, a layer is formed that, after drying, reliably protects the surface from moisture.
Penetrating waterproofing is:
- concreting;
- polymer cement;
- cement inorganic;
- seamless.
Of all the varieties, the polymer-cement composition is suitable for use in a bath - environmentally friendly, durable, with excellent adhesion and seamless coating.
In a bathhouse with a wooden floor, the work of waterproofing the floor is firmly connected with the process of its thermal insulation. A floor without insulation will freeze, become covered with ice and release heat from the room. Therefore, heat-insulating material with fire-fighting properties is laid on the waterproofing layer (2-3 layers of roofing felt, for example or polyethylene film). Mineral wool is excellent for these purposes. A waterproofing layer is placed on top of the thermal insulation.
How to choose good mineral wool?
Requirements for making concrete screed in a bathhouse
First of all, before making a concrete floor in a bathhouse, you need to think about the design of the drainage system. If the drainage is not performed correctly, after some time dampness and fungus will appear in the room and, as a result, a persistent unpleasant odor will appear.
The best solution to this problem would be to connect the drains to a centralized sewer system. But such an opportunity is not available in all private households, and therefore the waste liquid is usually poured into a septic tank or pit, which must be located at a distance of at least 3-5 meters from the bathhouse building.
The walls of the drainage pit are made of concrete, and broken brick or crushed stone is laid at the bottom so that the water flows out unhindered. To prevent debris from entering the sewer system, the hole should be covered with a grate.
If there is a septic tank on your personal plot, the pipe must be led into it, but at the same time a special shutter will be installed, which will be an obstacle to the penetration of unpleasant odors into the steam room.
Requirements for pipe parameters:
- to create an internal pipeline, you can use ceramic, cast iron, asbestos or polyvinyl chloride products;
- laying pipes made of steel is not allowed, since this material becomes unusable upon systematic contact with a liquid medium;
- the minimum diameter of the drainage structure must be 50 millimeters;
- for laying an external pipeline, you should purchase PVC pipes;
- a drain is created by directing liquid to the drainage pit.
In some cases, an absorption pit is installed under a bathhouse building. But to prevent it from becoming a source of unwanted odors, ventilation ducts are installed in the base to ensure air circulation. It is possible to place a drain over a pit only if the foundation pit for it is dug in light sandy soil. Other soils are not suitable for it.
To be able to clear blockages, it is necessary to build a manhole as follows:
- Having retreated 3-3.5 meters from the bathhouse, they dig a ditch with an area of about one “square” of round or square shape.
- The walls are made of brick, wood elements or a concrete covering.
- The lower part is filled with concrete mortar so that a kind of tray is formed for connecting the pipes.
- A lid is mounted at the very top and insulated.
- The structure is covered with earth, sawdust or slag.
Pros and cons of concrete pavement
Filled floors are characterized by strength, reliability, durability and heat resistance. They don't rot. Concrete does not require special care. A large selection of cladding will allow you to realize any design idea.
Pouring a floor in a bathhouse is a labor-intensive and costly process. It will cost more than wood. Arranging the base takes a long time, as the material must harden. Without an additional heating system, the surface will be cold and requires the installation of running grates. The unattractive appearance requires decorative finishing.
Despite all the shortcomings, concrete will serve properly for 30-40 years, provided that high-quality materials and building codes are used.
Features of a concrete floor for a bath
Concrete floor in the bathhouse
It is more advisable to equip a small bathhouse, which is planned to be used only in the summer, with only a dressing room and a steam room, with a wooden floor. But when making the floor in a bathhouse from wooden elements, after some time they will require complete replacement due to the effect of destructive moisture on them.
Therefore, it is worth thinking about constructing a concrete foundation; this is advisable in capital buildings used all year round, in which several rooms will be planned, such as a relaxation room, washing room, dressing room, steam room.
The concrete floor in the bathhouse is fully justified by its operational and quality characteristics, since it is not subject to rotting processes, is resistant to dampness, can withstand mechanical and physical loads, and is easy to maintain. In addition, proper installation of the structure will ensure its strength increases over time.
Selection of materials and calculation of their quantity
Both leaky and non-leaky flooring consists of planks laid on beams called joists. The logs, in turn, rest on the foundation or grillage (if the foundation is columnar), and, if necessary, also on intermediate columns. Before starting work on arranging a plank floor, you need to determine a number of parameters.
Lag section
The cross-sectional dimensions of the logs are selected taking into account the expected distance between the supports. With a standard floor load (up to 300 kg/sq. m), the following relationship takes place:
- with a distance between supports of 2 m: section dimensions - 110x60 mm;
- at 3 m: 150x80 mm;
- at 4 m: 180x100 mm;
- at 5 m: 200x150 mm;
- at 6 m: 220x180 mm.
If the distance between the walls exceeds the load-bearing capacity of the existing timber, in the middle of the span, one or more intermediate supports - the so-called chairs - must be installed on the ground base. They are usually brick pillars with plan dimensions of 250x250 mm, installed on a low concrete foundation with plan dimensions of 350x350 mm.
There is also a simpler version of the “chair”: an asbestos-cement pipe of sufficient diameter is dug into the ground, and then concrete or cement mortar is poured into it.
If there is no timber of suitable thickness available, the logs can be made composite by installing several thinner boards nearby, which together will give the required thickness. Since such a structure, unlike a solid beam, is not monolithic, its height should be taken 10–20 mm higher than indicated in the list just given.
Step between joists
Knowing the installation step of the logs, the builder will be able to calculate the amount of timber for their manufacture and the volume of materials for the support posts.
The pitch will depend on the thickness of the finishing boards. You should be guided by the following dependence:
- with a board thickness of 20 mm: the pitch between the logs is 300 mm;
- at 24 mm: 400 mm;
- at 30 mm: 500 mm;
- at 35 mm: 600 mm;
- at 40 mm: 700 mm;
- at 45 mm: 800 mm;
- at 50 mm: 1000 mm.
Approximate ratio of log height and width
To make the flooring, you should use a smooth planed board of the 1st or 2nd grade. Aspen is considered the most preferred species - it is resistant to moisture and is warm to the touch. Oak also tolerates high humidity well, but it is colder.
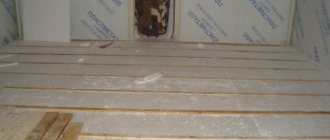
Non-spill flooring board
You can also use coniferous wood, but you need to be prepared for the fact that the resin protruding from them can appear in the form of unsightly stains and even cause allergies in some users.
When calculating the number of boards for a leaking floor, you should take into account the width of the gap between them - 5–7 mm.
Concrete floor structure in a bathhouse
Scheme of a concrete floor on the ground
A standard floor in a concrete bathhouse consists of several layers alternating one after another, which are laid on a prepared soil base and used on a strip or columnar foundation.
The design of a concrete floor in a bathhouse looks like this:
- Compacted gravel (10-15 cm);
- First layer of concrete (5 cm);
- Insulation (for example, expanded clay 5-8 cm);
- Waterproofing (bitumen, roofing felt);
- Subfloor (second layer of concrete);
- Reinforced (for large rooms) cement screed;
Foundation arrangement
Types of slab foundations for a bathhouse.
The underlying layers under a slab foundation can only be laid on a dry base. Otherwise, the crushed stone will begin to sink into the muddy soil during the process of laying and compaction. If the base is not completely dry, this phenomenon can be combated by laying a geotextile fabric substrate on the bottom of the pit. With small crushed stone of a fraction of about 5-20 mm, it reliably separates the bedding and the natural base.
Crushed stone and sand are poured and compacted in layers, 5 cm in one pass. Compaction is carried out from the edges to the middle, overlapping the traces by a third. Carrying out this type of work with a manual rammer is a difficult task; it is better to rent a vibratory rammer. Laying begins with a crushed stone layer, it is compacted “dry”, the sand layers are compacted with watering. With a pit depth of 40 cm, after laying alternately two layers of crushed stone and two layers of sand, the final thickness of the sand-crushed stone base, taking into account compaction, should be about 15 cm. If the depth of the pit is greater, the number of layers will have to be increased by the corresponding value. The resulting base should be level and level. The bedding should occupy the entire area of the pit, and not just under the spot of the future building.
A water drainage system is a must!
There is always water in the bathhouse, and in large quantities. Therefore, you need to think over a system that will effectively remove it. Water removal is carried out by arranging drainage and ensuring a certain slope of the floor base.
If the soil in the area where the bathhouse is being built is clayey, you need to dig a small ditch under the foundation of the building, lay pipes in it and drain the latter into the gutter. It is advisable to line the walls of the ditch with tiles or concrete, and cover the ditch on top with a metal grating. Be sure to install a special valve at the end of the last pipe designed to drain water. Then there will be no unpleasant odors in your bathhouse.
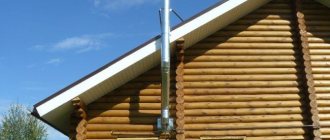
Exiting the bathhouse pipe into the gutter
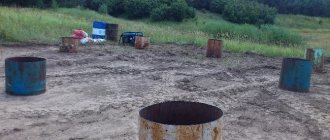
When the soil under the building absorbs water well (for example, sandy soil), it is necessary to dig a special drainage hole under the bathhouse. Its dimensions are 0.5x0.5–1x1 m, and its depth is 0.7–1 m. The pit must be filled with construction sand, broken stone or brick, and large crushed stone. In this case, the backfill is done so that it does not interfere with the water flowing calmly into the drainage structure.
In the base of the pit, make several vents (they are called vents), which will ensure the through passage of air masses. Essentially, you will make a simple ventilation system with your own hands. Believe me, she will cope well with the task assigned to ventilation. But it is better to dig a drainage hole away from the bathhouse. Then you need to run a pipeline to it according to the diagram described above.
Note. The discussed options for arranging a pit for drainage and water collection are used in situations where the concrete floor base is raised above the soil. If you plan to pour the floor directly onto the ground, you should immediately embed the sewer pipes into the concrete screed.
Monolithic foundation slab for a bathhouse
A slab foundation is ideally suited for small utility structures, such as a bathhouse. It is not demanding on the properties of soils and the qualifications of the performers, which makes it possible to avoid expensive geological surveys and hired labor. The foundation for a bathhouse in the form of a monolithic reinforced slab can be made independently.
Construction of a slab foundation.
How to prepare concrete mortar?
A simple option is to buy a ready-made dry mixture. If you decide to prepare it yourself, then you will need cement, water and sand. For the solution you need to use cement M-400 or higher. For 4 portions of sand you need 1 portion of cement and water. The solution should not be liquid, as in this case the concrete will not be strong enough in the future.
Instead of regular sand, you can use perlite. It has high thermal insulating properties. The disadvantage of the material is its low weight, which makes the sand very dusty, so you can’t work in windy conditions.
To prepare the solution you need to do the following:
- Fill in 2 buckets of perlite or sand and 10 liters of water.
- Add 5 liters of cement.
- Stir, add another 5 liters of water. Stir until the mixture becomes homogeneous.
- Add 1 bucket of perlite and 2 liters of water. Mix.
- Leave the mixture for 10 minutes to make it more flexible.
When the solution is ready, you can proceed to the main work.
Excavation
A slab foundation, like any other, begins with markings for excavation work.
The size of the pit in the plan should provide for a 600 mm offset from the foundation walls for the installation of formwork. The foundation is made under the entire structure at once, taking into account the porch or any other protruding parts.
Pie of a monolithic slab foundation for a bathhouse.
This will avoid damage to integrity due to uneven shrinkage. The minimum depth should be 400 mm. A greater depth of laying may be required when the fertile plant layer of soil is thick, which is removed completely.
When performing excavation work, you should strive to form a foundation base that is close to a flat horizontal surface. The resulting base must be a pillar; all loosened soil must be removed. You can also remove all the developed soil; it will no longer be useful on the site.
When the main excavation work has been completed, it is necessary to dig trenches for utilities and communications and lay them. After all, the future foundation is a slab, solid and monolithic. It won't be possible to install them later. The risers must be brought to the design height or above the foundation level. Backfilling of trenches with excavated soil under the building's footprint is not carried out. Even compacted soil can subsequently sag, and the slab foundation will work under unnecessary stress. Therefore, the trenches are filled with sand and compacted with a hand tamper.
Filled floor in a bathhouse: installation methods
How to pour a concrete floor so that it meets all its stated advantages? Consistency is important. The correct pie for tiles is performed in the following order:
- Soil compaction.
- Backfilling with gravel-sand mixture.
- Laying polyethylene film.
- Rough cement-sand layer.
- Hydro- and thermal insulation.
- Finishing screed
- Finishing
You can install a concrete floor with your own hands in two ways: on the ground and on joists with a ventilated underground. Preference for technology is given based on the budget, requirements and time.
Filling on the ground
To create the base, the first layer of earth is excavated to a depth of 400-500 mm. Afterwards, gravel is poured with a thickness of 100-150 mm, then a sand cushion of 50 cm is made. Everything must be compacted. Expanded clay can be used as additional insulation. Next comes a screed with a slope for the drain according to the markings and design data.
Installation of a concrete floor on joists
The ventilated space obtained through the use of wooden logs makes it possible not to install auxiliary means of air inflow and outflow. The wood is treated with antiseptics against fungus and rot. Logs in the form of a grid are mounted in laid beams measuring 10x20 cm. Reinforced pouring of concrete with insulation and waterproofing implies a rough flooring made of boards measuring 20-40 mm.
Arrangement of the pillow
Diagram of the installation of an insulated concrete screed with reinforcement on the ground In order for the concrete base to retain heat better, when backfilling the mineral cushion in the ground, a depression of 0.5 m is made, of which 0.3 m will be used for backfilling coarse-grained materials:
- broken brick;
- granular gravel;
- large crushed stone.
After this, the filled materials are thoroughly compacted, and the entire perimeter of the future bathhouse is coated with a clay composition. Then you need to lay a small layer of shock absorber. For these purposes, sand with fine gravel or crushed stone is used. The height of the shock-absorbing layer should be no higher than 15-17 cm. Why is it even needed?
How to make a concrete floor in a bathhouse with your own hands - a step-by-step guide
Installing concrete floors in a bathhouse is the most optimal option, thanks to which it is possible to create a strong, reliable, resistant to various influences and durable coating in a fairly humid room. Despite the fact that a concrete floor requires quite complex and time-consuming work, it is quite possible to complete the task yourself.
For rooms with high humidity levels, a wooden floor is often chosen, which requires regular maintenance, repair and replacement. At the same time, the concrete floor in the bathhouse is of high quality, warm, and can last as long as possible without any manipulation.
Preparing the base
Before pouring concrete on the bathhouse floor, it is necessary to properly prepare the base. Otherwise, the floor will have low strength and reliability characteristics, will last much less and is unlikely to provide adequate comfort.
Alignment
Drainage from the pit is carried out beyond the foundation and is realized through a drainage pipe with a cross-section of 10-20 centimeters dug in the corner under a slope. Thanks to this design, it will be possible to ensure maximum comfort in the operation of the bath and avoid the accumulation of large volumes of water.
Seal
Before concreting, the surface must be compacted with a vibrating plate or a manual tamper made from scrap timber or logs. Sand is poured onto the compacted soil in a layer of 5-10 centimeters, then a layer of gravel 10 centimeters thick.
Both layers must be thoroughly compacted. They will protect the concrete floor in the bathhouse from rising moisture from the soil and other troubles.
Rough screed
Before making a concrete floor in a bathhouse, it is necessary to perform a rough screed. Typically, the thickness of such a layer is no more than 10 centimeters (optimally 5-7).
Insulation
After the insulation layer has been laid, the floor in the concrete bathhouse can be poured. Filling is carried out layer by layer and quickly, carefully leveling the surface with the desired slope. Then they pause in work, waiting for the screed to harden and gain strength (2-3 days). These days the floor is moistened by spraying water or covered with a damp cloth.
Pit concreting
To concrete a pit, first crushed stone is poured into it, then the solution is poured into a layer 5 centimeters thick. It is advisable to first cover the head of the drainage pipe with a lid or rag to prevent the solution from getting inside.
Performing hydro- and thermal insulation
When studying the issue and trying to understand how to properly pour a concrete floor in a bathhouse, you cannot ignore the laying of layers of insulation. Without proper protection, the floor will not last long and will not provide comfort. Protection is needed both inside the room itself from moisture and from the ground.
Laying roofing felt
The second layer of waterproofing is laid in the same way, slightly moving it tangent to the first. The bottom and walls of the pit must also be covered with two layers of waterproofing.
Finishing screed
To properly fill the floor in a bathhouse with concrete, two screeds are made. After the rough and insulating layers, the finishing coating is poured. The solution is prepared in the same way as for a rough screed; the layer is made up to 10 centimeters, remembering the need for a floor slope towards the water drainage.
Finishing work
At the last stage of concreting the bath bases, they are finished. You cannot leave a concrete floor without finishing material, because in places with high moisture and high temperatures, even such a durable surface will soon begin to collapse. Ceramic tiles are often used as a finishing material. The tiles are installed with a special glue, and the tile itself should be selected with a textured surface to prevent slipping on it.
Bathhouse projects
Number of projects 681
- 2 rooms
- 1 bathroom
Project AS-2000-9
To favorites
65.7² Total area
from 886,950 rub. Construction time individually
- 2 rooms
- 2 bathrooms
Luxor Bath Project
To favorites
- 77.7² Total area
- 11 x 10m Construction area
from 1,233,000 rub. Construction time individually
Bathhouse project “Slavyanka”
To favorites
- 15² Total area
- 3 x 5m Building area
from RUR 292,294 Construction time individually
- 1 room
- 2 bathrooms
Bathhouse project No. 15067
To favorites
- 140² Total area
- 14 x 14m Construction area
from RUR 4,615,596 Construction time individually
- 1 room
- 2 bathrooms
Bani Toliman project
To favorites
- 40.5² Total area
- 8 x 7m Construction area
from 546,750 rub. Construction time individually
- 1 room
- 2 bathrooms
Bani Country Project
To favorites
- 50.5² Total area
- 12 x 7m Construction area
from 681,750 rub. Construction time individually
1 room
Project Baths Actaeon 8*11.2
To favorites
- 75² Total area
- 11 x 8m Construction area
from 952,450 rub. Construction time individually
Bathhouse project 5x4m with veranda
To favorites
5 x 4m Building area
from 290,000 rub. Construction time individually
- 2 rooms
- 4 bathrooms
Corner Baths Project
To favorites
- 226² Total area
- 20 x 17m Construction area
from 4,062,600 rub. Construction time individually
- 2 rooms
- 1 bathroom
Log bathhouse project BO-043
To favorites
- 76² Total area
- 7 x 8m Construction area
from 1,026,000 rub. Construction time individually
- 1 room
- 1 bathroom
Bathhouse project Chistye Prudy
To favorites
- 82² Total area
- 20 x 9m Construction area
from 1,069,620 rub. Construction time individually
- 1 room
- 1 bathroom
Project Baths on the Pebbles
To favorites
- 31.6² Total area
- 6 x 6m Construction area
from 426,600 rub. Construction time individually
- 1 room
- 1 bathroom
Project AS-2002-14
To favorites
76² Total area
from 1,026,000 rub. Construction time individually
Log bathhouse project BO-007
To favorites
- 21² Total area
- 4 x 6m Building area
from 283,500 rub. Construction time individually
- 1 room
- 1 bathroom
Bani B-13 project
To favorites
5 x 6m Construction area
from 452,000 rub. Construction time individually
- 1 room
- 1 bathroom
Bath Parnushka project
To favorites
- 23² Total area
- 5 x 6m Construction area
from 310,500 rub. Construction time individually
- 2 rooms
- 1 bathroom
Bathhouse project No. 25-4
To favorites
- 26.5² Total area
- 6 x 6m Construction area
from RUB 357,750 Construction time individually
Barrel sauna project “Standard”
To favorites
2 x 4m Building area
from 149,900 rub. Construction time individually
- 1 room
- 1 bathroom
Project of log bathhouse 6x4 m
To favorites
- 36² Total area
- 6 x 4m Construction area
from 199,000 rub. Construction time individually
- 1 room
- 1 bathroom
Project AS-2000-6
To favorites
48.4² Total area
from 653,400 rub. Construction time individually
View all projects
Many owners of country houses are thinking about building a bathhouse on their site. If you are one of those, find out in advance how to fill the floor in the bathhouse so that it can withstand harsh operating conditions
Attention should be paid not only to the order of work, but also to the requirements for the materials used. This will allow you to avoid typical mistakes and achieve high performance characteristics of the formed base.
The floor of the bathhouse must be filled in compliance with technological requirements Source twimg.com
Floors in the waiting room
There are no special requirements for them. The easiest way to install a floor in a dressing room:
- level and compact the ground, first cutting off the turf;
- fill the resulting hole with gravel with a layer of 10-15 cm and fill it with concrete 4.5-6 cm thick;
- Well, then, depending on the wishes of the owner, the floors in the dressing room can be of the following types:
- the concrete surface can be thoroughly sanded and painted;
- Also, no one forbids putting ceramic tiles in the dressing room. But in this case, only a non-slip option, preferably with a matte surface, is suitable;
- On the concrete screed you can put logs on which the wooden floor is attached. It can also be painted later.
Installation of formwork
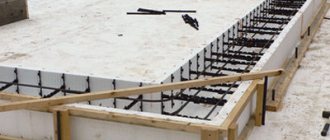
The foundation slab is reinforced with two meshes of single reinforcing bars connected at a pitch of 150×150 mm.
The foundation for a slab-type bathhouse can be poured into permanent formwork. Flat slate is well suited for its manufacture. But this design complicates the construction of the foundation blind area, so it is better to use factory formwork panels or make them yourself from moisture-resistant plywood, OSB sheets, or simply put them together from boards and bars.
In any case, the easiest way to attach the formwork is to vertical pieces of reinforcing bars driven into the ground through the bedding. The corner rods are hammered in first; they mark the future foundation. When marking, it is necessary to take into account the thickness of the formwork, because it will be placed on the inside of the fixing rods. Measure the diagonals carefully; they should not differ by more than 10-15 mm.
The easiest way to achieve this result is as follows. Choose one of the sides as a base, preferably a longer one, and drive two rods into its ends. Then you tie cords to them with knots tied at a certain distance. The first distance is equal to the diagonal calculated using the Pythagorean theorem, and the second is equal to the length of the short side. Both sizes are measured taking into account the thickness of the formwork. Then you need to tighten the cords and combine the knots. This will be the third angle you are looking for. The fourth can be found by swapping the cords. If you mark using this technology, the foundation will have the correct geometric dimensions.
Cords are stretched between the outer rods to form a contour. Intermediate rods are driven in along the cord. The formwork panels are placed inside the contour and tied to cords. At the joints, the shields are nailed together. The nails are driven in from the outside in, which makes it easier to remove the panels later. The base inside the formwork is covered with polyethylene film, overlapping and extending onto the walls.
Floors in the washing room
This room is characterized by both high temperature and humidity, and the presence of a large flow of water, which is discharged using the sewer system. A special feature of the floor in the washing room is the presence of a slope along which water must be removed from the room. In addition, it is necessary to take into account that the surface of the floors in this room should be warm and comfortable for walking barefoot. Therefore, when arranging the floor structure under this room, special attention is paid to insulation; you can also make an additional warm water floor.
Steam room floors
Here, like at the washing room, water drainage must be organized, but in the steam room the water consumption is much less. As a rule, the sewage system is installed in such a way as to connect the steam room and washing wells. Wooden flooring is laid on the floor of this room, although there is one limitation - resinous wood cannot be used in the steam room, as you can get burns. Masters recommend using linden.
In addition, special attention is paid to the steam room - this room must maintain the temperature, otherwise there will be no effect from the bath procedures. Therefore, the floors under this room are carefully insulated; it is recommended to use modern materials that reduce thermal conductivity.
Making a sauna with your own hands is not as difficult as it seems, the main thing is to stick to the technology and not rush. After all, a properly made bath will give a lot of pleasure, strengthen the spirit, rejuvenate the body, and the owner himself will additionally receive a large number of positive reviews about his skill.
Video on how not to make bath floors
Finishing options for further use
When studying the question of how to make concrete floors in a bathhouse, every master thinks about further finishing. Concrete allows you to implement any option - leave the screed in its original form and arrange wooden pallets or cover the floor with any material.
Ceramic tiles (an ideal choice in terms of durability, environmental friendliness, and resistance to moisture), a wooden false floor, or simply wood flooring (a less durable option) are perfect for a bathhouse.
When planning to create concrete floors in a bathhouse with your own hands, you need to study the whole process very carefully. Subject to compliance with technology and established rules, as well as the selection of high-quality materials, it will be easy to create a durable and durable floor covering.
Concreting the floor in a bathhouse under tiles
Concreting floors in bathhouses should be carried out at an angle, while ensuring water drainage. The prepared solution is poured onto the surface and all stages of concreting the floor are carried out, but observing the main condition for the subsequent installation of the tiles - the surface must be smooth and have no cracks.
The tiles must be laid on a flat, prepared base, so the first step is to remove debris and seal any possible cracks with sealant. After the soil has dried, begin waterproofing the base using rubber or liquid glass. When laying tiles on a concrete base, it is important to maintain the evenness of the surface, which is periodically checked with a building level.
How to lay ceramic tiles with a uniform slope?
Step 1. Take four tiles, place them with corners on the drain and mark the diameter of the hole on them. Using a grinder with a diamond blade, carefully cut out the holes.
Step 2. All tiles near the drain should have a slope in two directions. We have already mentioned that there is no need to make a large angle, a few millimeters are enough. Small slopes can be made with glue; for larger ones, you will first have to screed or use cement-sand mortar for gluing.
Step 3. Throw the material under the surface of the first tile, put it in place and gradually push it in with your hands so that the drainage point is the lowest. Immediately control the amount of tilt. Place the remaining tiles near the drain in the same way, making sure that they all slope towards the hole.
Checking the levelness of the floor
Application of the solution
Leveling the solution
Step 4. Finish the first row, while controlling only one plane between adjacent tiles. This is much easier than setting two planes at the same time.
Applying mortar to tiles
Tile laying process
Step 5. The position of the tiles of the second row must be controlled according to two parameters. The edges must be located in the same plane as the first row and be parallel to each other.
Practical light. To prevent the tiles from moving spontaneously, you should make the solution a little thicker than usual.
First, it is recommended to lay four tiles around the perimeter of the drain and allow time for the glue to harden. The fact is that these tiles will be used as a template in the future; any displacements are strictly not allowed. The position of the others is constantly monitored using the first tiles; the load on them during the work is the greatest.
Trimming tiles
Slope check
Step 6. It is recommended to continue further work in parallel rows. If you have concerns about your qualifications, you can increase the area of the square plot by alternately laying tiles on each side of the square. This algorithm requires much more time, but allows you to correct mistakes in a timely manner. For beginners, it is advisable to first lay out the tiles dry and use supports of varying thicknesses instead of glue.
Tile marking
The process of laying tiles near the ladder
Tiles laid near the ladder
Laying is controlled by level
Drain in the corner, tiling completed
The larger the floor area, the longer the level should be. The tool must simultaneously control the position of at least three tiles; this is the only way to avoid kinks. The seams are sealed after the glue has completely hardened; with their help, you can slightly smooth out the sharp joints of the tiles.
Tile grout
At this point, the work on pouring the concrete floor in the bathhouse is completed, and you can begin finishing the interior surfaces of the room.
Screed care
After the screed is poured, make sure it dries. It is necessary to catch the moment of initial solidification, when the beacons can already be pulled out. Hardening time will depend on temperature. When you can stand on the screed, you should fill in the strips in which the beacons were located. Full load on the screed is allowed no earlier than after a week, or better, if you have time, after three. During the drying period, it is necessary to moisten the screed regularly (at least 2 times a day) to avoid cracking.
Wetting the floor screed during the drying period
Impregnations for concrete floors in bathhouses
Protective agents for concrete are organic and inorganic. The first ones are made on the basis of acrylic, polyurethane and epoxy. Inorganic agents convert soluble components into insoluble ones. The use of such compositions makes it possible to improve the resistance of the coating to the influence of chemical compounds. These impregnations are less popular than the first type.
Types of organic impregnations
| Varieties | Characteristics |
| Moisture-repellent. | Clogs the pores of concrete. As a result, moisture that gets on the floor cannot penetrate the thickness of the coating in the bathhouse. |
| Dust removal. | Protect concrete from abrasion. They bind the surface of the concrete floor, giving it strength. Ideal for painting. If you rub the floor with fine sand before applying the impregnation, you will get a durable surface that will not slip. |
| Strengthening. | Absorbs into the top layer of concrete. As a result, the floor is obtained with increased resistance to various mechanical influences. |
It is important to remember that protective compounds react chemically with the concrete itself, so before carrying out work, you need to check whether the composition is suitable for your floor. To do this, apply the product to a small area of the surface and wait for it to dry. If the concrete does not darken or crumble, and the impregnation covers the floor with a strong, even layer, then you can safely use it.
Are the same drugs suitable for different rooms?
Before choosing an impregnation, you need to decide on the purpose of its use, since each compartment of the bath has a different level of humidity. It is important to remember that the products used for floors should not emit harmful substances or have a strong odor. Due to the fact that there are high temperatures in the sink and steam room, there is a threat of evaporation from the surface of the treated floor, which can be harmful to health.
To prevent the negative effects of impregnation preparations on the body, it is necessary to remember the following.
- In the rest room and locker room, the air temperature usually does not exceed 28 degrees. Therefore, synthetic impregnations can be used in these rooms.
- The washing room is dominated by high temperature and humidity. The wooden floor there must be impregnated with only organic-based products.
Protective impregnations are presented in a fairly wide range. Modern means make it possible to combat the destructive process - first of all, rotting. To make the right choice, pay attention to the properties of impregnations and correlate them with the characteristics of your bathhouse or sauna - this is the only way you can find the ideal protection option specifically for your case.
Ventilated floors
A concrete floor with joists in a bathhouse is an excellent solution if there is a need to raise it above ground level. Just keep in mind that the logs must be strong enough. This method will create the opportunity for excellent ventilation of the underground space through special windows left in the base. This method is often used when baths, due to the peculiarities of the soil composition, are installed on supports in the form of piles.
The sequence of actions is as follows:
- a beam is prepared under the logs, the cross-section of which is 10 by 20 cm. Its installation is carried out in steps of half a meter to make it more convenient to use insulating cotton mats;
- if the area of the room is large, then supporting brick columns are placed under the logs;
- a 5 by 15 block is attached to the lower edges of each joist, creating shelves;
- The rough plank floor is laid on them. Do not forget that all wooden elements must be pre-treated with antiseptic compounds;
- Before installing the subfloor, drainage pipes are laid;
- it’s the turn of the waterproofing material;
- now - an insulating layer. Mineral wool, expanded clay, and expanded polystyrene material are used;
- install a mesh for reinforcement, beacons with the required slope;
- the solution is poured.
It is possible to install a concrete floor in a bathhouse with your own hands. But in all cases it is necessary to remember one important condition. To avoid the occurrence of dampness, the level of all floor layers is determined so that it ultimately does not exceed the upper edge of the plinth part (the casing).
Useful advice from experts
To increase the strength of a concrete floor, you can pour an additional layer of cement-sand screed on top of it. This will level the surface of the base, best preparing it for laying the finishing coating.
You can begin finishing work only after the concrete has sufficiently dried. In the case of laying ceramic tiles, this period is 4-7 days.
If the final finishing of the concrete floor in the bathhouse will be done with ceramic tiles, be sure to first make a screed to level the base. It is most convenient to use ready-made solutions. It is important that the screed is as strong and uniform as possible. The presence of chips and cracks is unacceptable.
Pouring concrete is a relatively inexpensive and quick method of arranging a high-quality floor. Follow the instructions and everything will definitely work out. Good luck!
Installation of a water floor heating system
If we are talking about how to make a warm water floor in a bathhouse, then the fundamental criteria for the installation method are the technical characteristics of the base on which the installation is carried out, as well as the wishes of the owner.
There are two main installation methods:
- concrete type, which involves pouring a screed over the laid heating circuit. In fact, the installation technology is similar to that used when installing an electric heating system. The difference lies in the greater thickness of the screed due to the significant diameter of the pipes used;
- the floor type involves laying the heating circuit on top of polystyrene foam boards or wooden flooring. It is used in cases where the foundation or wooden base does not have sufficient strength to withstand a massive cement-sand screed.
The most common option is to pour the screed, but it has one significant drawback, which is that the solution takes an excessively long time to harden. As for water heating, its distinctive feature is its absolute resistance to overheating.
This allows the heating circuit lines to be laid with almost any interval between the lines. However, it is worth understanding that if the gaps between the lines are too small, the total length of the circuit will increase, which will lead to a decrease in its efficiency. The optimal value is considered to be a step of 40 centimeters.
As in the case of an energy cable, sharp bends and creases in the circuit should not be allowed. The contour is secured with clamps and dowels. You can also use reinforced mesh, to which the pipes are easily wound with wire. A more massive reinforced mesh must be laid under the heating circuit than in the case of an energy cable.
On the modern construction market you can find polystyrene foam boards with already prepared clamps, along which all that remains is to lay the elements of the heating system. In this case, the fastening method is simultaneously combined with thermal insulation of the floors.
conclusions
From all of the above, a number of conclusions can be drawn. It is worth noting the fact that there are no special rules regarding the use of a particular heating system in a bathhouse.
Emphasis can be placed on a number of features of the process of arranging underfloor heating:
- Infrared film systems with the simplest installation and operation scheme are leaders in this issue;
- An electric floor differs from an infrared floor in the complexity of installation and increased power, which is counterbalanced by the high cost of consumed electrical energy;
- water floors are intended for the most economical owners, but they must understand in advance that during installation the height of the room will be significantly reduced, and they will also have to solve the problem of connecting the system to an autonomous heating installation or a centralized system. Aesthetically, this system is also the most ugliest, since the photo and visual inspection show the intricacies of pipelines and other elements necessary for the functioning of water floor heating.
Of course, it is possible to combine different types of underfloor heating, which will create a single heating system. The installation method and scheme is the personal choice of the owner, which he can make based on the information presented in the article, or by contacting specialists. The latter can help with installation, taking responsibility for all stages - from purchasing the necessary materials to putting the system into operation.