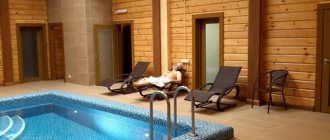
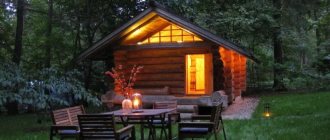
A sauna with a pool is a luxury that makes visiting a steam room more enjoyable and rewarding. It is known that after warming up in the steam room, it is useful to plunge into cool water. This procedure strengthens the body, improves well-being and gives the feeling that a person has been “born again.” Many people are afraid to choose a bathhouse with a swimming pool because they believe that it is an expensive pleasure. But pools are different, you can find a complex and expensive project, or you can choose a simple and budget option.
Of course, building a sauna with a swimming pool is more difficult, but everything will pay off when you start using the sauna!
Types of saunas
There are many variations of saunas. They differ in design, dimensions, temperature conditions, type of heating, and layout.
The steam room can be located in the house or in a separate building. Because of this, it is important to decide in advance which type of sauna is most suitable for you.
The most commonly used options for paired structures:
- Dry air sauna. The most common type. Differs in smaller sizes. It is built from linden or aspen wood. Cedar, pine, etc. are used as finishing materials. The main premises are a steam room, a dressing room, and a swimming pool. Can be equipped with a shower.
- Infrared sauna. Suitable for a private home. Fits perfectly into the apartment. Does not require forced ventilation. Easy to install and maintain. Heating is provided by infrared equipment.
Materials
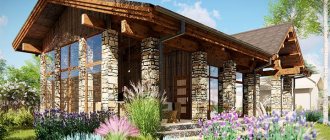
We have not preserved all the secrets of the craft of bathhouse building from our ancestors, and obviously not all the rules are followed by modern connoisseurs. But there is a fact that is difficult to argue with: a Russian bathhouse should be built from natural wood. A classic bathhouse includes a log house. And the project option depends only on your imagination and wallet size.
It is no coincidence that rounded logs are one of the most popular materials today. It is characterized by the following features:
- Each breed contains resins that have medicinal properties for humans;
- wood can maintain high temperatures for a long time;
- walls do not accumulate moisture;
- the low weight of the structure will save on the foundation;
- You don’t have to worry about subsidence of the structure, because finishing materials are often not used.
And it feels much more pleasant to take a bath in an environmentally friendly and healthy wooden building than in a brick or cinder block building.
But the first thing that can push you to choose a cinder block is a reasonable price. It is used both for building walls and laying foundations.
Pros:
- easy to use, because 1 block is approximately 7 bricks, so the time for building walls is significantly reduced;
- good thermal insulation of the material;
- walls made from it dry quite quickly;
- non-toxic and fire-resistant, absolutely safe for humans.
Minuses:
- low sound insulation;
- often requires finishing, because cinder block buildings are not particularly attractive;
- poor resistance to moisture;
- the enormous weight of the walls requires strengthening the foundation;
- to work with it you need appropriate physical strength.
Brick also has some advantages when building a bathhouse:
- long service life. Together with a high-quality foundation, a brick bathhouse will last much longer than similar buildings, for example, made of wood;
- the brick building is well protected from fires;
- large selection of architectural solutions.
Brick baths also have disadvantages. These include high cost and the need to install additional thermal insulation.
It is quite difficult to build a pool on your own; factors such as soil, topography, and groundwater play a big role in this matter.
Among all foundation materials, concrete is most often used.
Stages of building a swimming pool.
First you need to dig a pit, which will be slightly larger in size than the future pool. Sand and waterproofing are placed at the bottom. If desired, the walls and bottom are covered with thermal insulation.
For the interior decoration of a bathhouse, deciduous and coniferous woods are best suited. They are not capable of heating up and dry very quickly, preventing mold and mildew from spreading. These are linden, aspen, alder, abash, spruce, fir, pine
It is important to remember that when finishing wood, you should not cover it with paint or varnish, because
When heated, it will emit an unpleasant chemical odor.
Fire regulations
If you need to convert a living room into a sauna, you must:
- Organize supply and exhaust ventilation in it;
- Equip the room with fire-resistant partitions;
- Maintain a distance of 20 cm between the stove and the wall;
- Equip the oven with an automatic shut-off system.
Also, do not forget that it is prohibited to install a steam room in the house for 10 or more people.
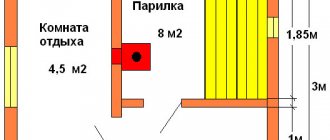
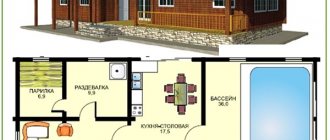
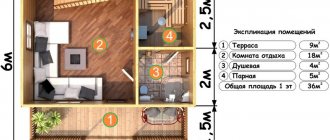
Room layout
There are many possible planning solutions. It all depends on the size of the family budget and personal preferences. Some people prefer several multifunctional rooms.
And for some, a modest-sized room with a stove and a couple of shelves will be enough. A popular idea is a swimming pool. But here you need a drawing, which will significantly affect your wallet.
As for the dimensions of the sauna, each user should be allocated a minimum space of 3 cubic meters. m. However, experts advise abandoning an overly spacious room - it is difficult to warm it up.
Flooring
For a sauna, it is recommended to choose floors made of natural wood. For beauty, it is possible to decorate with artificial stone. You can refuse additional thermal insulation.
In addition to wood, it is appropriate to use granite and ceramic tiles. The main thing is to choose an option with a rough surface.
Steam room frame
First you need to install and sheathe the ceiling. Only then do they move on to building walls. This algorithm ensures the reliability and rigidity of the corners of the room, and it is also the simplest.
- Before you begin installing the frame, you need to measure the diagonals of the room - it must be strictly rectangular in shape. If this is not the case, it should be corrected.
- For the frame, pine beams with a section of 50*50 are used. The installation option depends on how you plan to place the lining.
- It is necessary to retreat from the wall at a distance equal to the thickness of the thermal insulation. The frame should be installed from the corners.
- The outermost beams along the perimeter are fixed with long screws or anchors. For ease of installation of intermediate elements, a tensioned thread is used.
Since the stone stove is mounted on a ready-made wall structure, the embedded parts should be provided ahead of time - they must match the mounting holes of the heating device.
What pools are suitable for a sauna?
According to their technical characteristics, all swimming pools or bathhouses can be divided into three categories:
- stationary;
- collapsible or mobile;
- SPA pools.
Stationary swimming pools for saunas are the best choice in many cases. They are created together with the main building. Or you can make a special extension to the main bathhouse, in which a swimming and bathing area will already be installed. This design is the most reliable, although you will have to spend a lot more money on it than on the portable version. The basis is a reinforced concrete bowl, which provides the required level of waterproofing. Or you can purchase bowls made of polypropylene or fiberglass. They will cost less than their concrete counterparts and will not require waterproofing work.
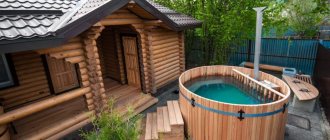
Collapsible pools or plunge pools are the best option if you do not have enough space to organize a stationary option. Plus, they allow you to spend less money because they are made from cheaper material. The most common option is plastic fonts mounted from polypropylene sheets. You can get a font for a bath if you don’t plan to use it often or move often. The main advantage is the ability to disassemble the structure while it is not needed and free up space for other needs.
Wooden bathtubs look aesthetically pleasing, but require more careful maintenance.
SPA pools are ready-made structures designed for hydromassage procedures. You won't be able to swim in these pools, but you can have a good time relaxing and letting the streams of water take care of your body. Installation of the structure will not require much time, since it is delivered to the client already assembled. Spa pools, like collapsible swimming pools, do not take up much space, which can also be called their undeniable advantage.
Ventilation in the sauna
When equipping a sauna, you need to provide the room with high-quality ventilation. Near the stove, a hole should be created to allow fresh air to enter, and on the opposite side, an exhaust hood should be installed to the street or into the general ventilation system.
If desired, it is possible to make another hole, which would open only to ventilate the room.
In some cases, it is not possible to achieve air passage naturally. The solution is forced ventilation. In this case, the capital supporting structures need to be sleeved and only then ventilation should be installed. Moreover, it must be closed with a grill. The hood must be equipped with a valve.
Above ground hot tub with plastic bowl
For such a bowl you don’t even need to rebuild the rim
The easiest way to make a pool is to purchase a plastic bowl and place it at floor level. Then only the supply and discharge pipes will be under the floor, and all other appliances can be placed in the basement. Minimum excavation work, no risk to the foundation, no costs for waterproofing and no complex calculations. From the purchases: the bowl itself, facing panels (you can use the remains of the lining), water pipes made of cross-linked polyethylene or polypropylene, connectors for them, as well as additional devices: pump, filtration system, water heater, skimmer and pressure gauge. You can monitor the quality of water yourself, without automation.
Complex tools are also not needed. A standard gardener's kit will be enough: a jigsaw for trimming the front panels, a mallet for fitting them, the simplest soldering iron for assembling pipes, a sensor, a utility knife and a screwdriver for installing the electrical part of the system.
Those who want to have a built-in automated pool will have to look into excavation robots.
Sauna power supply
Baths and saunas are classified as high fire hazard areas. As a result, all materials used for their construction must be resistant to high temperatures.
The use of metal hoses and corrugations is prohibited. Any connections are not allowed: everything is done as one whole. Sockets and switches are not allowed.
- If possible, the cable should be laid on the outside of the enclosing structures.
- The ends of the wires must be placed opposite the lighting fixtures and electrical receivers, and the power for the electric furnace must be laid in the floor.
The recommended installation height for luminaires is > 0.3 m from the ceiling. All their parts must be heat-resistant.
When building a sauna, all safety rules must be taken into account. Nowadays, fiber optic lighting has become in demand - it is more reliable and safe than conventional lighting.
Construction of a concrete bowl
Creating a concrete font is not an easy process, but the result itself quickly justifies all the efforts of the master. This design is strong and durable. She has a minus. This is a necessity for its construction at the stage of building a bathhouse, since it definitely requires a foundation pit. Its depth is usually 1500-1700 mm; the owners usually choose the width and length themselves. The construction process itself includes several stages. This:
- pit preparation;
- pouring the solution;
- waterproofing and finishing.
At the planning stage, the bathhouses also include a suitable place for the font. For construction you must have:
- reinforcing bars (diameter - 10 mm);
- concrete mortar, sand;
- beam for spacers;
- roller or wide brush;
- waterproof plaster;
- waterproofing impregnation;
- wooden panels or plywood;
- wire for staples (5 mm);
- level, plumb.
The first step is to determine the dimensions of the pit, taking into account the thickness of the walls of the concrete structure. It is at least 150 mm. Then they get to work.
Pit
- They dig a hole (square, rectangle) of the required depth, then its walls are leveled vertically, excess soil is removed from the bottom and leveled. If the water is pumped out with a pump, then no further manipulation is required. When a drainage system is planned, a trench is dug from the pit wall with a slope that leads towards the drainage pit. A plastic pipe is placed in it.
- A sand cushion, 100 mm thick, is poured onto the bottom of the pit, it is spilled with water, then the sand is thoroughly compacted. Pieces of brick, small stones or pipe cuttings are evenly placed on top. A lattice made of cut reinforcing rod tied with wire is placed on them. The size of its cells is 100x100 mm. The grating is secured to the walls using wire staples. The distance between the walls and the reinforcement is 5-7 mm.
Formwork and pouring
- Proceed with the installation of formwork from sheets of plywood or wooden panels. Its height is made 150-200 mm above the surface. The distance between the reinforcement grid and the formwork is 150 mm. When installing the structure, its verticality is checked with a level and secured with spacers made of timber; they are required to protect the material from potential deformation.
- Make a solution by mixing sand, cement and crushed stone (1:3:6). Concrete is poured in stages, and in the intervals it is compacted using a metal rod. After filling the space, the surface is leveled with a trowel, covered with plastic wrap and left. From time to time, concrete is moistened to protect it from cracking. The period required to gain strength is approximately 28 days.
- After the concrete has hardened, the formwork structure is carefully dismantled. When the solution finally reaches the desired condition, the bottom of the pit is leveled with a screed, the thickness of which is 60-80 mm, and the proportions are 1: 3: 5 (cement M400 or higher, sand, crushed stone). The dried bottom is plastered with a homemade cement-based composition. The optimal layer thickness is 0.3-10 mm.
Processing, decoration
- The inner surface of the dried walls of the font is treated with deep penetration waterproofing impregnation, it is applied with a wide brush or roller. For a mini-pool, this operation is repeated 3-4 times, each layer of this composition must completely dry.
- The penultimate stage is decorating the font. In this case, each master is free to choose his own material. Some lay the usual ceramic tiles, others use “innovation” - rubber paint. To install the tiles, buy a special moisture-resistant tile adhesive. Liquid rubber is applied with a roller or spray gun.
The last stage of the work is the installation of a ladder, which you can buy in a store or make yourself from a stainless steel pipe. The optimal installation option is to embed it into the floor near the font; purchased models are attached to the side of the mini-pool.
Sauna thermal insulation
To save electrical energy in a sauna, experts advise using high-quality thermal insulation when arranging it. Recommended thickness – 50 mm.
It is important to remember that the thicker the insulation, the faster the air will warm up and the lower the numbers on the electric meter will be.
- You can add a layer of foil on top of the thermal insulation, and treat all joints with special tape.
- If there are no gaps, then you can use the steam room for a long time and without damaging the family budget.
- Particular care should be taken to insulate the ceiling, since the main heat loss occurs through it.
The sauna project is the first step towards the construction of a sauna structure. If you are not lazy when developing it, it will help bring all your ideas to life. It is the correct calculations and the correct drawing that will allow you to choose the most suitable solution for the steam room.
Recommendations for use
To use the pool in the bathhouse comfortably, it is recommended to do the following:
- Before filling the pool with water, treat the lined walls and bottom with an antiseptic composition against fungi;
- fill the concrete bowl with tap water, not river water, which does not pass through special filters;
- do not use hard water for the pool, as it can cause limescale to form on the walls of the pool;
- periodically check the pH level, which should be in the range from 7.2 to 7.6, and remove silt and algae from the water;
- use long-term chlorine or a coagulant in granules to destroy bacteria in water;
- create lighting in the pool so that the bottom does not seem dark.