What types of coatings are there?
In bathhouses, concrete, wood or brick floors are most often made. The latter option is used infrequently due to the high heat capacity and minimal heat transfer of the material. It gets very hot, which can cause burns. Brick is mainly used as a base when arranging the first two types of floors.
Pouring concrete screedSource eyecorrector.ru
The concrete floor in the bathhouse is designed for long periods of use (up to 50 years), but it is cold. In addition, its installation requires large financial, physical and time costs. Arrangement of floors in a bathhouse from wood raw materials is considered the best solution in all respects. Two types of wooden floors are widely used: non-leaking and leaking. They look presentable, but after some time they require partial repairs or even replacement. If used correctly, they will last from 5 to 10 years.
Design
Concepts such as color, pattern, texture, and size play a big role in the choice of finishing materials.
Under natural materials. Tiles that imitate wooden planks or natural stone are very popular. The stone-like ceramic product has a matte textured surface, which makes it non-slip.
- Floral design. You should not decorate the entire room with tiles with a floral pattern. It is better to use this design partially, highlighting accents.
- Geometric ornament. This tile design is suitable for a room in a restrained, laconic style, which will make it not boring and add originality.
- Oriental patterns. A floor decorated in this style will become the stylistic center of the room. You can complement it with calm colors and discreet details.
At the peak of popularity are light natural shades and simple lines. The use of ceramic products of non-standard shapes, a variety of textures and their combination will help make this design less boring.
Features of the floor
For a Russian person, a bathhouse is always a rather extreme way of relaxation.
The floor in the steam room is exposed to various aggressive factors:
- water constantly gets on the floor covering;
- not only steam collects on the floor, but also its condensation, so the surface is constantly wet;
- the air temperature below the room is approximately 40 to 45 degrees;
- strong mechanical stress.
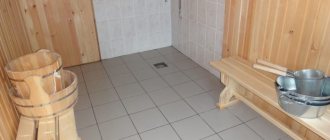
If you choose tiles for the washing area, you should take into account that there are no high steam temperatures in this room, but high-temperature water pours heavily onto the flooring. Therefore, it is necessary to carefully select building materials to create a durable and anti-slip coating.
Concrete
Concrete flooring is often found in a steam room or washing area because it has better properties than wood flooring. The concrete solution contains additives that have a positive effect on the water resistance of the coating. It is reliably protected from rotting and perfectly withstands high humidity.
Laying ceramic tiles in a bathhouse can be done on a concrete floor
However, before you begin creating a concrete base, you should pay attention to creating a drainage system that is responsible for draining water from the floor outside the bathhouse structure
The construction of the drainage system should be carried out in the following order:
- it is necessary to compact the soil;
- create a cushion from crushed stone or sand, you can use broken bricks. The formed pillow should have a thickness of 12 to 18 cm;
- pour a concrete layer, its thickness should be from 5 to 7 cm;
- make a layer for thermal insulation from felt, expanded clay or mineral wool;
- create waterproofing using a thick film of polyethylene, or use roofing felt;
- for reinforcement, use steel wire or mesh made of high-quality metal;
- pour the next layer of concrete, the thickness of which should be from 10 to 15 cm, while forming a slope towards the drain;
- cover the concrete floor with an adhesive-based primer, which will improve adhesion to ceramics.
Wooden
Wooden flooring is a classic option in a Russian bathhouse, since traditionally the entire building is made of natural wood. A wooden floor can be perfectly used for further laying of ceramic tiles if the correct preparation is made.
It must be taken into account that natural wood is an organic material, so it is not characterized by increased resistance to various factors. As you know, wood can swell in rooms with high humidity or shrink if there is not enough moisture in the air
A new wooden floor usually tends to sag within two years, and after this period it may continue to move. Displacements are invisible to the eye, but this property negatively affects the strength of the floor surface. If you lay tiles on a wooden floor, they will soon begin to crack and peel off from the main covering.
To avoid such an unpleasant situation, save your energy, time and money, you need to create a damper layer before using the tiles. It is this that will absorb the movement of natural wood. The damper should be laid in such a way that the elastic side is in contact with the wood, because it is this side that will take the shocks, and the outer hard part can be used for laying tiles.
Beautiful examples in the interior
Correctly selected tiles for the bathhouse floor should be textured, which will ensure safety when using the bathhouse.
Ceramic tiles in natural shades will make the bath room cozy.
Ceramic tiles go well with wood trim.
A skillful combination of facing materials plays an important role in the interior design of bath rooms.
To learn how to lay tiles in a bathhouse, see the following video.
How to lay it down?
It is quite possible to lay tiles in a bathhouse with your own hands if you treat this process with due attention and carefully study all the nuances. The result and reward for the work done will be a high-quality and beautiful decoration of the room that will last for many years
Since the floor in the room is most susceptible to mechanical stress, the installation process must be approached with great precision. First of all, you should prepare the following tools and materials necessary for installation work:
- rubber mallet;
- spatula with teeth;
- calibration crosses;
- glass cutter or tile cutter;
- mixer and container for mixing the adhesive solution;
- building level;
- pencil, roller, scraper.
Preparing the base
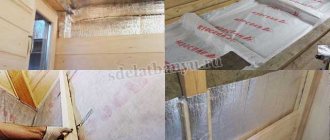
Before facing work, underground preparation and waterproofing work are carried out. It is necessary to make a kind of cake from various layers, which will serve as protection from moisture and temperature changes, namely:
- the surface should be cleaned of debris and dust;
- wooden logs should be checked for strength, leaky areas should be replaced, after which the entire surface should be treated with an antiseptic solution;
- In order to protect the wood from moisture, waterproofing work should be carried out, for example, treated with latex impregnation. For greater waterproofing, you can lay roofing felt or roofing felt on top;
- after this they make a screed. It is made with a slope towards the drain hole;
- Once the floor is dry, it can be primed.
Preparing the tiles
If laying ceramic tiles on a cement mortar, it is recommended to soak the products in water before starting work. After soaking, the tiles do not absorb moisture from the mortar as intensively, which promotes longer mobility and better adhesion to the surface. In cases where a modern adhesive mixture is used for installation, soaking is not necessary, since high-quality glue from leading manufacturers of building materials has high adhesion properties.
Laying
The choice of glue should be taken seriously, taking into account the characteristics of the room. To lay tiles in a bathhouse or sauna, you should choose a moisture-resistant adhesive mixture with good adhesion. There are three options for laying tiles:
- seam to seam;
- diagonally;
- at a run.
You should start laying tiles from the far corner. If you are laying from the center of the wall, then you first need to mark the middle and start laying tiles on both sides of the marked line. If the drain hole is in the center, then it is better to start laying tiles from this place. The adhesive solution should be applied to the underside of the tile and directly to the floor. The tile is lightly pressed and tapped with a rubber hammer to shrink it to the desired level.
To ensure that the gaps between the tiles are equal, special calibration crosses are used, which are removed after the adhesive solution has dried. At the end, you need to cover the remaining areas with tiles, cut to the desired size. Excess fresh cement mortar can be easily wiped off the tiles with a damp cloth before it hardens.
Grouting joints
When the adhesive solution has completely dried, you can begin grouting the joints. In addition to its decorative function, grout also performs a number of protective functions: it prevents the formation of cracks and fungus, provides reliable waterproofing of seams, and protects against temperature changes and other mechanical influences.
Preparation for installation
Before you begin laying tiles, you need to prepare the floor surface for work.
Before starting to describe the installation process, it should be added that on a tiled floor it is easier to make a slope for draining water. But in general, the work is no different from laying ceramics in other rooms. The only difference is in the use of adhesive and grout paste.
Returning to the aspect of creating a slope, we will assume that the concrete floors have already been poured at a certain angle. When laying tiles, all that remains is to withstand this difference without overdoing it with glue. Immediately before work, the surface is completely cleaned of the smallest dust so that nothing interferes with the adhesion of the glue to the surface.
The glue is applied with a notched trowel.
Fire safety requirements
It is quite natural that when installing a sauna stove, it is necessary to achieve a certain level of fire safety in order to reduce the likelihood of a fire to a minimum and protect sauna visitors from burns. Taking all this into account, a system of requirements was developed that must be met, regardless of the layout of the stove in the bathhouse.
All the rules for placing the stove, due to which the correct location of the stove in the bathhouse is carried out from the point of view of fire safety, are as follows:
One of the most important requirements is to create the right foundation. To prevent fire, a separate foundation is built, for which non-combustible building materials are used - brick, concrete or similar material. Considering that flammable materials (wood, for example) are often used in the bathhouse, it is necessary to install additional floor protection. As a rule, for these purposes, a steel or asbestos edging is used around the stove, extending 40-50 cm beyond its contours. The sauna stove should be no closer than 26 cm from any objects in the room - walls, beams, railings and others. There is also a small caveat - such a gap can only be left if the oven is equipped with protective screens. If they are absent, the distance to the nearest object increases to 32 cm. The two previous rules only work if the objects surrounding the stove are made of non-combustible materials. Compliance with the rules in such a situation will be completely justified. If the structure of the room contains a lot of flammable materials, then the rules will have to be seriously tightened. An example is a small home bathhouse made of wood or lined with wood. To maximally protect the structure from fire, it is necessary to move the stove away from any objects by at least 50 cm. There is also a rule according to which all elements of a sauna stove that have a high degree of heating (stove walls, chimney elements, etc.) must be separated from all those located in indoors of objects, for which various non-flammable layers are used
For example, a chimney is usually enclosed in a special box made of asbestos or a material with similar properties. When ensuring the safety of a sauna stove, special attention should be paid to its combustion chamber. It is for this reason that the firebox has special requirements that must be observed in order to reduce the likelihood of a fire in the room
According to the recommendations, the firebox door should be placed opposite the door to the room, and the distance to the nearest object should exceed 1.5 m.
Installing a stove in a bathhouse with an external firebox: fire safety rules
Regardless of what type of stove is installed, there are a number of requirements that must be met. In particular, we are talking about ensuring that surfaces heated to high temperatures (up to several hundred degrees) do not come into contact with flammable materials.
ON A NOTE! Wood lights up at a temperature of 300 degrees, but with prolonged exposure to even 100 degrees it begins to smolder!
The main source of danger in a bathhouse is the stove. Both the floor and the ceiling need to be protected from it. By the way, you don’t have to protect the walls if you place the stove at a sufficient distance from them.
RULE! According to regulations, the flammable wall and the stove must be separated by at least half a meter.
And even if you are busy installing a stove in a bathhouse with an external firebox, the first thing you need to do is protect its base. It doesn’t matter whether you place it on a foundation or directly on a wooden floor - in any case, you need to lay a sheet of fire-resistant material (asbestos or basalt cardboard, for example) under the stove, on top of which you need to place a sheet of metal.
Foundation diagram for a massive furnace (see more about furnace foundations).
Asbestos cardboard for placing under a not very heavy stove (see more about installing stoves).
Another universal point of fire protection is the correct installation of the chimney through the ceiling and roof.
Ceiling passage box
IMPORTANT! The correct way is to pass the chimney through a cutting box, which is a metal container filled with refractory. The box creates a buffer between the hot pipe and the wooden floor. The walls remain
Since in this case we are talking about installing a stove with a remote firebox, the main “problem” will be the passage of the fuel channel directly through the wall, and the distance between the wall and the stove will be minimal - about 5 cm on average. This means that covering the wall with fireproof materials alone will not do.
The walls remain. Since in this case we are talking about installing a stove with a remote firebox, the main “problem” will be the passage of the fuel channel directly through the wall, and the distance between the wall and the stove will be minimal - about 5 cm on average. This means that covering the wall with fireproof materials alone will not do.
Therefore, we will analyze two options: installing a stove in a bathhouse with an external firebox, when the walls are flammable (that is, wooden) and non-flammable (brick, block concrete). The material is also a criterion for dividing stoves into separate types; in accordance with this classification, metal and brick stoves are distinguished. Some experts classify cast iron stoves as a separate category. In addition, there are other types of stoves:
- by type of fuel: wood, gas, electric;
- by type of construction;
- to size;
- in terms of cost, inexpensive; in demand;
- hiking;
- with open or closed heater;
- for baths and saunas.
Preparation of mortar for masonry
You can purchase a ready-made solution in a store or use a sand-clay mixture. To determine the best ratio of sand and clay, make a small batch from which a cylinder or bar is formed
Pay attention to the possible appearance of cracks, the absence of which is an indicator of quality.
Preparing masonry mortar for a stove in a bathhouse
It is preferable to use clay used for masonry from deep layers, without earthen and mechanical impurities.
To give the clay the required consistency and plasticity, it is kept in water for several days, after which it is ground through a sieve to remove debris. A 1:1 proportion of clay and sand is considered good; liquid is added to it in small portions. A high-quality mixture does not stick to the trowel and does not drip from it. When running a trowel over the solution, the mark left behind should not blur or have a torn structure. To improve the quality of the masonry, add rock salt at the rate of 0.1 kg per bucket of finished mortar. It is also good to add cement and fireclay powder.
Bath tiles: types and features of choice
How to choose
- On the walls
- On the floor
- For shower
- For the steam room
- For oven
Bath tiles optimally complement wood finishes, and are also considered an indispensable material for arranging a heater, stove, sink and swimming pool. Ceramic tiles, as floor and wall coverings, are very durable. But only if the choice is weighed and competently made.
Features of choosing the type of tile for a bath
Which tiles are not suitable for a bath?
Let's look at these features in more detail:
- Glazed tiles are not suitable for finishing a protective screen over a heater or stove. Over time, it will begin to crack and crumble under the influence of high temperature.
- Porcelain tile is a material with a high density and a fairly smooth surface. There is no place for it where there is high humidity. As a floor covering, porcelain tiles run the risk of causing many traumatic situations.
- Smooth tiles are also not suitable for sinks and showers. Neither for laying on the floor nor for mounting on walls. Slippery wall surfaces can also cause injury.
- For floors, you should not buy tiles with a low level of wear resistance and a high level of moisture absorption, regardless of its type.
How to choose tiles for a bath
Bathroom wall tiles
- Glazed ceramic tiles are a material that is highly durable and resistant due to double firing. The tiles are covered with a protective glaze, complemented by patterns and ornaments for greater color and species diversity.
- Unglazed ceramic tiles. Ordinary tiles, not covered with glaze, are only suitable for installation in warm, dry rooms.
- Metlakh tiles are a material that came from the Soviet Union. Main advantages: rough surface, resistance to extreme microclimatic conditions, high level of strength. As before, Metlakh tiles are sold in markets and hardware stores, but now they come in a much wider variety of types and colors.
Tiles for use in a shower can be:
- Glyantseva;
- Matt;
- Embossed;
- Flat.
Tiles for the stove in the bathhouse
- Durability and strength;
- Thickness not less than 8 mm;
- Heat resistance;
- Structure without strong porosity.
- Terracotta tiles for baths
. A product with high porosity and no glazed surface. Externally it has a bright brown color and sufficient strength. Terracotta tiles do not crack when exposed to high temperatures, so they are excellent for finishing a sauna stove. Ideally, it is better to give preference to this type of material with a thickness of at least 8 mm and a suitable composition (including refractory clay, quartz and fireclay sand). - Clinker tiles for baths
. A finishing material made from several different types of clay. It is characterized by incredible heat resistance, high strength, low porosity, and the presence of many options in natural shades. The thickness of the clinker tiles is 9-12 mm, which is considered optimal for finishing the stove. Today, this type of ceramic product can be called the most durable. - Coil tiles for a bath
. A product made from a semi-precious rock mineral. Laying tiles in other rooms of the bathhouse is too expensive, so it is used only for finishing the sauna stove. In fact, the serpentine is a miraculous stone. When heated, its therapeutic effect is significantly enhanced; the material normalizes blood pressure and increases blood circulation in the brain. - Tiles
. Unique smooth or embossed material, patterned or plain. On the reverse side, the elements are made in the form of an open box or rump. This material has a high level of heat transfer. The cost of tiles is quite high, but this factor is dictated by manual production from faience and marly clays.
https://youtube.com/watch?v=dVoSoPDVVQs
tutknow.ru>
Other articles
- How to fill a bathhouse floor under tiles
- Bathroom tiles on the walls
- Glue for tiles in a bathhouse on the floor
- Installing a window in a bathhouse
- Bath accessories photo
- Antiseptic for baths
- Tiled floor in the bath
- Salt bricks for baths
- Which antiseptic for a bathhouse is better?
- How to properly install a stove in a bathhouse
- Veranda attached to the bathhouse with your own hands
- Installing a stove in a bathhouse with your own hands
Markings to pay attention to
When choosing tiles for a bath, you need to pay special attention to the markings on product packaging. What exactly do you need to know?
- The “T” marking indicates that the tiles are resistant to high temperatures.
- The designation “R” indicates whether the tile in front of you is glossy or matte. Next to the letter there will be a certain number, and the higher it is, the less slippery the tile is. For example, glazed tiles will be designated R9, R10, but matte tiles will be designated R11, R12, etc. Also, if the product is slip-resistant, you can see on the packaging an image of a foot stepping on the tile.
- Frost resistance and resistance to temperature changes are also important. The first criterion is indicated by a snowflake (sometimes two), and the second by a sun icon. It is also possible to indicate additional information, which is indicated by the letters “A” and “B”: the mark A I and B I indicates the possibility of using the tile even for the exterior cladding of a building, that is, it has high frost resistance. The A II and B II marks indicate average frost resistance, but tiles with the A III and B III marks can only be laid indoors.
- It is also worth paying attention to the abrasion resistance of the tiles - this criterion is indicated by the letters PEI and the image of a saw blade. If there is a number next to such a mark, it will be easier to determine whether the tile is suitable for you: 1 indicates the possibility of use in a bathroom, toilet (not suitable for a bathhouse), 2 – for use in corridors, a dressing room, 3 is suitable for any room in a bathhouse, and 4 and 5 can be found less frequently, since these are industrial options.
Markings that can be seen on tile packages
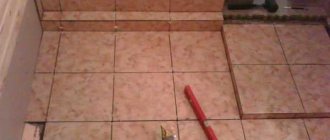
Creating a tiled floor
In Russian bathhouse traditions, it is not customary to use tiles to cover the floors in bathhouses. Despite this, lovers of steam baths still opt for a ceramic floor. When creating it, craftsmen take into account the type of floor base (concrete or wood) and its slope towards the drain. Let's consider creating varieties of tile floors.
Flat floor
Before laying ceramic tiles, preliminary preparation of the floor base in the bathhouse should be carried out. The next step is marking the floor. It is done if you plan to lay out a tile pattern on the floor.
If the installation is made of single-color tiles, then markings will not be required. In this case, the floor is laid with tiles, starting from the front corner of the room. The adhesive used should be diluted in water according to the instructions for use on the package. To mix and obtain a homogeneous composition without clots, use a construction mixer or drill with a special attachment.
First, the adhesive is applied to the area of the floor required to lay 4-6 tiles. To apply it, use a medium-width spatula or trowel. Then the applied layer is spread with a toothed spatula.
The adhesive is also applied to the back side of the tile using the same spatulas (flat, then serrated).
With drain
Laying tiled floors in a bathhouse requires a slope towards the drain. For guidance, craftsmen use either a building level, a fishing line, or a block with the desired slope. It is placed on the tile, and then measured on top of it with a building level. The tiles are cut with a special tool - a tile cutter; the holes for the drain are cut using a drill with a core drill.
If the drain in the bathhouse is located in the middle of the room, then laying the floor with tiles begins from the central part (from the place of the drain). In this case, the required finishing slope is formed. First, the tiles are laid out without glue to more accurately measure the required slope.
On the concrete floor
First of all, the entire area that is planned to be tiled is cleared of debris and dirt. You can use a vacuum cleaner for this purpose. After cleaning, you should seal the cracks, crevices and flaws in the base of the floor and at the junctions of the walls and floor with sealant. When the sealant has dried, remove any excess. Then a ready-made liquid primer is applied to the base of the floor. The required height of the primer layer is 20 cm (measured along the wall).
After the soil has dried, the floor should be waterproofed. For such purposes, it is practical to use rubber or so-called liquid glass. These waterproofing compounds are applied to the base of the floor using a wide brush in two or three layers. Then you need to let them dry. The tiles are laid on the floor prepared in this way according to the usual pattern.
On a wooden floor
The wooden base boards must be of good quality and condition, not rotten. If there are damaged boards, they should be replaced. The best option is to completely disassemble the base, lay down insulation, remove varnish and paint from old boards, and treat the floorboards with an antiseptic. Gaps of 3–5 mm should be left between the floorboards. Fill these holes with foam.
Then you need to fill all the holes, apply latex impregnation or heated drying oil to the boards. This will be the first layer of waterproofing for the wood floor. The second layer is performed using fluid or bulk components or roofing felt or other rolled materials.
The next stage is the screed. A metal mesh is installed around the perimeter of the bathhouse, which contributes to the stability of the screed. Filling is carried out taking into account the slope towards the drain. Laying tiles on a wooden floor is done in the usual way. Of course, taking into account the slope towards the drain.
Tile is a practical solution for finishing a bath. It is durable, wear-resistant, aesthetically pleasing, easy to clean, and most importantly, it fits perfectly into a “water” room such as a bathhouse or sauna. And it is quite possible to lay tiles with your own hands on any floor: both wooden and concrete. And even the presence of a drain in the bathhouse will not be a hindrance - you will get a perfectly flat plane.
Required Tools
Before starting any work, you must prepare all the necessary tools in advance. You need to work concentratedly and measuredly, and not rush around headlong in search of missing equipment. What you will need for this job:
- Crowbar, nail puller, heavy hammer, hacksaw for dismantling the old floor or its fragments for subsequent replacement.
- Rule, level and tape measure for arranging a new coating and marking it.
- Glass cutter, tile cutter and grinder with discs for cutting ceramics.
- A drill with a mixer attachment and a container of sufficient volume for stirring assembly mixtures.
- Roller or brushes for priming.
- Convenient spatulas, trowel and comb for applying adhesive.
- Rubber hammer for shrinking and leveling tiles during installation.
- A set of rubber spatulas and rags for working with grout.
When selecting a comb, remember that for tile sizes from 5x5 to 15x15 cm, the tooth width should be 3-6 mm. For squares with a side of 25 centimeters, the tooth will be 8, and for 30 - 10 millimeters. If you need anything else, think about it in advance and put the tool so that it is always at hand.
Nuances of the right choice
Before starting construction of a bathhouse, it is important to carefully study all the features of the flooring arrangement and the criteria for its compliance. Before making a floor in a bathhouse, the owner will have to choose a method of water drainage and a material for constructing the floor structure
His decisions are determined by individual preferences and financial capabilities. In most country bath buildings, a concrete screed is poured or a floorboard is laid on prepared logs.
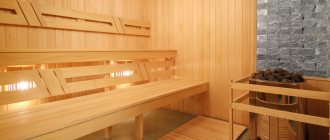
Features of wood flooring
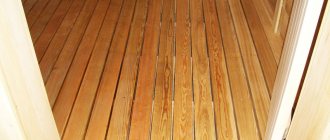
To ensure that the wooden floor in the bathhouse does not lose its aesthetics and technical properties for a long time, experts recommend choosing larch boards. Pine, birch, alder or fir are also suitable. Sometimes wood species can be combined: the final finishing is made from expensive material, and the rough finishing is made from cheaper materials.
Wooden floor in a bathhouseSource ad-cd.net
The raw materials for the finishing coating are prepared in advance and certainly dried. When this condition is not met, the wooden floor quickly deforms. Especially from solid wood. It takes longer to dry, but the possibility of avoiding deformation is not excluded. To prevent such problems, thin beams are laid. This material is designed for lighter loads, but this is compensated by transverse joists. Boards up to 2.5 cm thick are the least likely to deform, so they are considered the best solution for laying joists. But the best option is a board 4 cm thick.
Floors made of wood materials are laid in stages:
- The base is covered with several layers of roofing felt.
- Massive beams are laid at a certain distance along the perimeter of the foundation; they cover the entire space of the future floor.
- The bars (cranial) are attached.
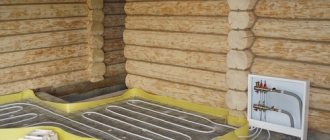
- Logs are laid on the beams (they are cut in certain places to create a slope towards the drain). This is how rough structures are created before insulating the floor in the bathhouse.
- A moisture-proof membrane is fixed to the joists (leaving the ends up to 0.3 m free for attaching them to the wall waterproofing).
- A layer of insulation is laid between the subfloor boards. The optimal solution would be to combine protection from climate influences. For this, it is best to use mineralized wool.
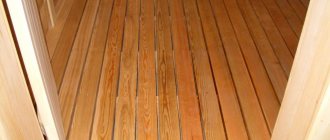
- The finishing coating is arranged using tongue-and-groove boards.
Finishing of wooden floors in a bathhouseSource pol-inform.ru
The arrangement of high-quality floors depends on the material used and the reliability of its fastening. Structural elements have the following connection options:
- The beams are attached to the foundation with anchor bolts (from 14 cm).
- Fastening is carried out using a surface or through method. In the latter case, the anchor can be taken shorter. There are four such bolts per beam.
- The beams are attached to the support posts with self-tapping screws or screws using metal corners.
- The logs are fastened with beams, also using corners. If the logs are not solid, the connecting points are also secured with moisture holders.
- The board with tongues is inserted into different areas (the screws are “sunk” deep into the wood so that they do not interfere with fastening).
The main condition for installing wooden floors in bathhouses is the presence of ventilation holes in the foundation. They are needed so that the wood gets rid of accumulated moisture. Properly made non-leaking floors last up to 10 years.
Pouring a concrete floorSource ad-cd.net
Features of pouring concrete floors
In order to concrete the floors in the bathhouse, steam room and sink, you need to perform the following steps step by step:
- make a sand cushion on a soil base, set up plank formwork;
- prepare the base for the concrete mixture (mix cement with sand and gravel and add water until a liquid, homogeneous mass is obtained;
- pour concrete in an even layer of more than five centimeters;
- place a stiffening frame on the created base;
- reinforce the space in the formwork;
- fill the formwork with the rest of the concrete mass to the top (to give uniformity, the concrete can be compacted using a vibrator;
- The concrete must be thoroughly dried for several weeks.