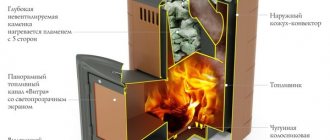
Brick oven
The brick kiln is still in demand by people. Some populated areas are not gasified and a stove in a residential building is necessary. Sometimes it is an additional source of heat in order to save gas or electric heating.
In a country house you can not only spend the summer, but also celebrate New Year, Christmas and other holidays - romantic, unusual and healthy. A simple stove or fireplace will create comfort in the house; you will want to be at the dacha on weekends, sitting comfortably in the warmth.
When installing the stove, a number of conditions must be observed. In addition to choosing the correct design, installation location, components and materials, you need to understand what stoves are coated with so that they do not crack or crumble. A responsible attitude to the work at the construction stage of the building itself and the use of appropriate quality materials does not lead to cracks in bricks and finishing materials.
Video description
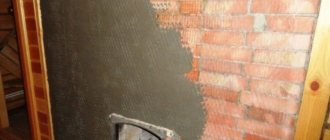
Plastering a brick oven with your own hands.
Special oven glue is not diluted in large quantities as it tends to harden quickly. After this, it cannot be used a second time, since repeated dilution will cause the composition to lose its strong qualities.
Using special oven glue to seal joints between brick joints in a home oven Source waysi.ru
Exterior finishing of stoves
You can increase heat transfer, hide minor deformations and give the stove a more aesthetic appearance by plastering or tiling.
Plastering is the most common; it is possible after settling and complete drying of the masonry.
Important! The walls of the oven intended for plastering should not be dirty and smooth; the solution will not have the necessary adhesion to them. The plastered surface will have defects after drying.
Tiling gives an elegant look and protects the room from the penetration of flue gases when small cracks appear in the masonry.
The best heat-resistant sealants for stoves and fireplaces
Experts recommend buying heat-resistant sealants from those manufacturers who have earned a name for themselves with decent quality. It is better to avoid buying cheap options that do not have detailed instructions, as there is a risk of purchasing a fake.
TYTAN Professional
TYTAN Professional
Fireproof silicate sealant. Suitable for minor repairs of stoves and fireplaces, chimneys. It contains an admixture of fiberglass, which forms a dense smoke- and gas-proof layer. Has good adhesion to metal, concrete and brick.
Advantages:
- Relatively low cost.
- Operating temperature up to +1500°C.
- The composition does not contain asbestos.
- Can be stored in a tube at sub-zero temperatures.
- Can be used to seal cracks in any parts of fireplaces and stoves.
Flaws:
- Complete drying takes at least 24 hours.
The average cost for a tube weighing 300 g is 250 rubles. After use, the sealant is closed using a threaded cap. It can be stored for quite a long time, maintaining its qualities.
Ognez 1600
Ognez 1600
The sealant allows you to effectively seal cracks and glue surfaces together. A distinctive feature is the need to wet the treated surface with water, which improves adhesion.
Advantages:
- Bonds concrete, glass, brick, stone, ceramics.
- Waterproof, suitable for external chimney sealing work.
- The highest operating temperatures, which allows it to be used in all parts of the heating device.
- Easy to apply with a spatula, convenient to work with.
- Can be painted using varnishes and paints with natural composition.
- High level of environmental friendliness.
Flaws:
- Not identified.
The cost of a domestic product is about 240 rubles. When stored correctly, it is not afraid of freezing and defrosting cycles.
MASTERTEKS PM
MASTERTEKS PM
Polish silicate sealant, black. It is easily applied to the surface without requiring preliminary preparation. Suitable for filling various cracks and sealing joints. Dries relatively quickly.
Advantages:
- A convenient screw cap on the spout prevents air from getting inside the tube during storage.
- Dries quickly if the recommended layer thickness is observed.
- Does not crack when the surface cools.
- Excellent adhesion
Flaws:
- Not identified.
The sealant is good in every sense and is literally ideal when working with a chimney.
What causes cracks
When malfunctions of the furnace equipment are discovered during use, the first thought that arises is: the furnace is cracking, what should I do? To begin with, it doesn’t hurt to figure out what led to this.
The following factors may be the reasons:
- donkey foundation or structure itself;
- unscrupulous craftsmen and unprofessional work;
- low quality material or unsuitable mortar for masonry or plastering was used;
- the drying process of the masonry is disrupted;
- long heating breaks, sudden temperature changes;
- the technology was not followed when applying each layer during plastering;
- The ventilation system is faulty, condensation.
Note!
Chipboard: what is it? Types, application features, photos, sizes, thickness, explanation, manufacturers
DIY houses made from shipping containers step by step: instructions, diagrams, pros and cons, photos, design
Working pressure in the heating system in a private house: what it should be, how to create it, instructions for adjusting it yourself
Tips and tricks
Experienced experts recommend the following:
- Never use sealant for purposes other than its intended purpose. If it is not intended for repairing combustion chambers, then there is no point in using it there. Saving a penny - a large-scale loss, plus harm to health and danger to life.
- Carry out repairs after stopping the combustion process, taking into account the operating temperature of the sealant, as indicated on the packaging.
- Remember that sealants must dry thoroughly. Give them the time recommended by the manufacturer.
- To improve adhesion between surfaces, they should first be sanded well. A rough surface will improve the adhesion of metal and brick.
- Remove excess thermo-compositions before they harden, otherwise it will be extremely problematic to do this later.
- Do not buy products from dubious brands that do not contain instructions for use.
- Always follow the precautions stated by the manufacturer.
Remember that repairing cracks and insulating individual sections of stoves and fireplaces is a responsible job. If you don’t have the skill, then it’s better to entrust it to professionals.
Is it possible to use a stove with cracks?
There is only one answer to this question: it is prohibited. Do not use a stove with cracks and endanger people’s lives. If there are no structural defects, it is necessary to begin troubleshooting as soon as possible.
Important! Fires in most cases result in death due to carbon monoxide released, not fire.
Causes of cracks
Do not delay sealing cracks in the stove; carbon monoxide may enter the room. It is necessary to find out the factors that contributed to the destruction of the masonry so that this does not happen again. If the brick itself is cracked, then partially replace the masonry. Shallow cracks in the seams are easy to repair; you just need to choose the composition and find out why this happened.
The main causes of cracks in the stove:
- they immediately began heating the newly built stove;
- the stove was installed and built incorrectly;
- the fireplace was not used for a long time in winter, temperature changes;
- the mortar for laying bricks was made incorrectly;
- the seams between the masonry are thick or thin, cracks will appear on them;
- the new building has experienced shrinkage;
- increased humidity in the room, condensation, moisture caused destruction;
- the use of fuel that strongly heats the masonry.
If the stove is made of ceramic bricks, and the laying composition is made of fireclay clay, then cracking will occur, since the materials have different coefficients of thermal expansion. The best material for laying a brick stove is the composition from which the brick itself is made. Fireclay mixtures are used for fireclay, and red clay and sand are used for red brick.
Important!
Damage can be repaired if the cause is only due to improper operation of the oven. But, if design flaws or problems with the foundation have been identified, then minor repairs will not save you from further deformation of the walls.
Diagnosis of problems
The diagnostics of all surfaces will answer the question why a brick stove is cracking. The worst option would be widening through brick cracks. You can’t do this without the help of a specialist; you may need to re-lay the furnace.
Small cracks in bricks caused by high heat allow you to carry out the work yourself. The cracks need to be filled and the surface re-plastered.
Repairing a brick stove yourself: useful tips
Due to regular temperature changes of large amplitude, the operation of the furnace sooner or later fails. Any owner can repair a brick stove with his own hands, having basic technical knowledge and skillful hands.
The main thing is to do this in a timely manner, then you will avoid troubles and fires.
Typically, repair work is divided into three types:
- troubleshooting minor problems
- Medium troubleshooting
- elimination of serious defects (overhaul).
Troubleshooting minor problems
We advise you to remember that regular inspection of the stove before the heating season and routine repairs are a way to prevent possible serious damage to the structure in the future.
What minor problems can you encounter while operating your oven and how can you fix them?
Impossibility of kindling due to lack of draft
This problem may occur due to the following reasons:
- the stove had not been used for a long time, and cold air had accumulated inside the chimney;
- there is no air flow to support combustion;
- exposure to strong wind from the street;
- soot clogged the chimneys.
Solution: we light the stove not with paper, but with a piece of rubber or dry fuel.
Attention! The use of kerosene or other flammable liquids is prohibited.
In case of a clogged chimney, the following measures must be taken:
- light the stove;
- pour coarse salt into the firebox (about a handful);
- close the damper immediately;
- the soot will fly out in pieces into the chimney pipe.
If this method does not help, then you need to clean the pipe yourself by opening a special door or taking out knockout bricks. Experienced stove craftsmen will always leave the doors or knockout bricks behind for cleaning.
To determine where these same bricks are located , do the following:
- carry out an external inspection of the furnace; especially in places where smoke ducts pass;
- knockout brick is usually offset slightly outward, in contrast to the main masonry;
- clean out the old mortar and remove the brick. This will make the smoke channel accessible and you can clean it;
- then reinstall the knockout brick and coat it with clay mortar.
The seams of the brickwork are leaking,
As a result, the stove began to smoke.
In addition, her appearance is ruined.
How can this defect be easily recognized?
Fire up the stove and you will notice cracks that will have to be covered by hand.
Sequencing:
- soak the seams and then clear them by 2 - 3 cm;
- brush the walls using clean water;
- prepare the solution by mixing clay, sand, asbestos fiber and salt (at the rate of 100 grams per 3 liters of mixture); an indicator of a quality solution is average viscosity. You can purchase ready-made mortar at a hardware store;
- fill the seams with a clay mixture, compact it, wiping out all the voids;
- if necessary, plaster the walls, whitewash or tile.
A brick fell out or burned out
It needs to be replaced with a new one.
Sequencing:
- clean clay and dust from the place where the old brick lay;
- moisten the area with water and place a clay cake on it;
- wet the new brick, coat its top and sides with a clay mixture (we prepare it first in the same way as for filling cracks);
- lay it instead of damaged old brick.
Troubleshooting Medium Problems
Sometimes, if the oven is damaged to a moderate degree, it is impossible to do without independently repairing and strengthening some parts.
Gaps around the firebox door
Mechanical stress and temperature changes can lead to the formation of cracks around the firebox door or hob. As a result, dangerous gases penetrate outside.
These places need compaction.
Sequencing:
- clean the surface, remove the old solution;
- rinse and prime it with heat-resistant glue diluted with the same volume of liquid;
- secure an asbestos or ceramic cord around the door or hob to prevent the clay from cracking.
- rub the necessary areas with the repair mixture;
- dry for at least a day.
Tip: to check whether the fire cord has been tampered with, light it right at the cash register.
You can eliminate cracks around the hob using the same algorithm. Before removing the stove, heat the oven. Then pry up the metal using an axe. It is permissible to replace asbestos cord with basalt wool or felt. If the old stove is completely worn out, replace it with a new one .
Strengthening the frame
This becomes necessary if gaps and cracks are located around the entire perimeter of the stove . In this case, it is best to re-arrange the masonry, but if there is not enough time, you can resort to screeding the frame using metal wire.
Sequencing:
- we dig special channels in the oven with a depth of 15 to 20 millimeters strictly horizontally;
- we lay wire in the grooves so that it provides a tie to the frame;
- we stretch the wire, twisting it with a beard or a thick nail so that it does not break;
- Plaster the stove.
Replacing the grate
When replacing the grate, keep in mind that there must be a gap between the masonry and the grate. It must be covered with sand. The new grate should be exactly the same size as the old one.
Replacing pre-furnace sheets
This manipulation should only be performed when the sheets become perforated or rusty. Sequencing:
- removing the old sheet;
- removing nails;
- laying a piece of felt that was previously soaked in a clay solution;
- nailing a new sheet.
Elimination of serious defects
Sometimes the damage to a brick kiln is so serious that it is necessary to restore it to full functionality, replace or improve the broken parts.
Replace the lining
Lining is nothing more than protecting the surface of the furnace from various mechanical and thermal damage. In our case, this is the use of fireclay bricks.
If the firebox lining is damaged, it must be replaced.
Important! For old and new masonry, use uniform bricks so that the coefficient of thermal expansion does not change.
Simple work can be done through the firebox door. To do this, it is enough to restore the damaged areas with a clay mortar or a factory-made fireproof mixture.
Partial replacement of bricks is carried out in the following sequence:
- prepare the mortar that was used during construction;
- soak and clear the old mortar in the required area;
- remove an element that has been damaged;
- insert a new brick into the empty space and cover it well.
For these manipulations, a ready-made refractory mortar can also be used - Chamotte Mortar, which consists of chamotte and refractory clay. Then the seams of the furnace will be able to withstand more than 1700 degrees.
Complete replacement of the lining is carried out only after dismantling the wall. The main masonry should not be affected.
Sequencing:
- disassemble the wall from the hearth to the ash hole; do not touch the oven ribs;
- remove remaining crushed stone;
- lay out a new lining of fireclay bricks so that it does not tie with the material of the stove body. Maintain a seam thickness of no more than two millimeters.
- if the oven is large, lay the brick flat. If small or medium - on the edge.
Repairing the chimney
This may require plastering the masonry or even rebuilding it in case of destruction.
Converting the stove to a different type of fuel
The basic method is to line the firebox walls with fireclay bricks using fireproof mortar. Install slopes on the sides of the firebox. During the heating process, hot coals will fall down along them and close the grate.
It is important to use only high-quality bricks.
Oven adhesive
In building materials retail outlets there is a dry adhesive special mixture, as well as a ready-made solution of fireclay clay and cement. This glue is durable and fire-resistant. It is convenient to fill the voids of bricks with ready-made plastic material.
The dry composition is not difficult to dilute in accordance with the instructions. It is recommended to work with a small amount of material, as it dries quite quickly. Along with the advantages, ready-made glue has the disadvantage of being quite expensive.
How to cover up cracks to make it secure
To eliminate all kinds of holes that have formed during regular operation of the furnace, they try to use reliable compounds that cope with the problem the first time. In this section we will look at some of these tools.
Fireclay clay
Ready-made fireclay clay provides reliable sealing of joints that do not deform under constant exposure to high temperatures. The dried composition is characterized by a high level of vapor permeability and endurance when exposed to wet steam under high pressure.
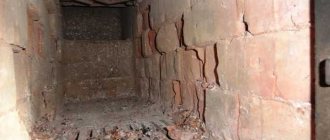
Deep cracks on a brick wall from a home stove Source pechdoc.ru
The material is also considered environmentally friendly, since it does not emit toxic fumes when heated, and accordingly is harmless to people and animals. In order to prepare such a solution, you will need:
- one part of cement (grade “500”);
- two parts of fireclay clay (can be purchased at a special store);
- seven parts of river sand.
Clay-sand mixture
Affordable economy class material. To prepare the proper quality solution, only high-quality clay and river sand are used. The clay is poured with water in a convenient container and diluted to the state of milk, then rubbed through a fine sieve.
When the clay and water settle, the liquid top layer is drained. Sand, sifted twice, is added to the clay mixture, ratio 1:2. The liquid composition is diluted from the clay mixture to a creamy consistency and mixed thoroughly.
Note!
Three-way valve in a heating system: instructions on how to choose and install correctly in a private home
Why the bottom of the battery is cold and the top is hot - let's look at the reasons. Review of recommendations on what to do and how to fix it
How to insulate a dog house for the winter with your own hands and inexpensively - step-by-step instructions with photos and descriptions of all stages
It’s easy to check whether the solution is ready. If small pieces of the mixture remain stuck to the stirrer, then the solution is ready, and if large enough pieces remain, then by diluting with water the mixture is brought to the required condition.
A solution containing clay is more likely to lead to defects. There are no exact instructions for preparing the solution; it is prepared based on the experience of the master. There are not many professional craftsmen, so such a solution is not often in demand.
Sand-clay mortar for repairs
- The composition consists of sand, water and clay.
- When preparing the solution, much attention is paid to the quality of the water. It must be free of silt and mineral salts.
- The sand is sifted through a sieve. Through this process, the sand is cleared of various debris and becomes clean.
- Before making a sand-clay solution, you need to let the clay lie in water for half a day.
Fireclay clay
One of the best materials to cover the stove so it doesn’t fall off. Affordable, sold in stores, packaged in 20 kilograms. Resistant to moisture and temperature. Also intended for plastering surfaces.
The finished solution is obtained as follows: fireclay clay is mixed with cement and sand, the ratio of the components is 2: 1: 7, respectively, water is added. For better pliability of the material, you can initially fill the clay with water, then wipe out the lumps, add cement and sand. The thickness of the mixture depends on what type of work is being carried out, and skill experience also plays a role.
Guide to oven coating: technology to follow
If the question arises of how to coat the stove with clay or any other means to eliminate cracks, it is recommended to follow the algorithm below. It will make it possible to do all the work efficiently the first time and without additional modifications. The process consists of the following steps:
- In the resulting gap, remove any remaining old plaster and all dust. Next, deepen this crack by 1 cm. This way you increase the repair space, which makes the sealing process more convenient. Re-dispose of all waste.
- Coat all prepared areas with water and primer, and then heat the oven so that all the liquid evaporates. Put out the fire, when all the steam has completely disappeared, it should be emanating from the surface of the oven.
- While the walls of the structure are still hot, coat the prepared areas with a clay solution. At this point, it is important not to overdo it and apply a thin layer of oven caulk.
- Afterwards, take a reinforcing mesh or burlap and secure it with small self-tapping screws to the damage so that they completely overlap.
- Next, prepare the grout solution and carefully apply two layers to the defective areas using a spatula.
Leave the structure until completely dry. Remember that lighting a fire in it immediately after caulking in order to dry the seams faster is strictly prohibited. Trying to speed up the process will result in even more cracking. At this stage, the question of how to accurately coat the outside of the stove has been resolved.
Repairing a brick kiln against cracks in the seams Source sdelai-lestnicu.ru
Oven grout
To eliminate defects that occur in the oven, ready-made heat-resistant grout is sold. Because of its high cost, home craftsmen prefer to make such a solution themselves.
The clay is prepared as for a clay-sand mixture. The soaked clay slurry is combined with sifted sand and while mixing, chopped straw is added, the component ratio is 1:4:5. 1 kg of coarse salt is added to the finished solution, which makes the composition more plastic and resistant to cracking.
Grout perfectly fills voids. You can also use it to plaster the stove surface with the first rough layer.
How to seal cracks in a metal stove
You may also need to decide how to cover the cracks in a metal stove, because it gradually burns out, and it is not always easy to allocate funds for repairs. Clay grout can be used as a restoration product. It is important to make a thick enough layer that will prevent combustion products from escaping from the firebox. The clay should be diluted in the traditional way, you can add a small amount of ash from the same oven and mix thoroughly until smooth.
Repairing a metal furnace by welding exfoliated metal fragments Source ipk-rotor.ru
If a hole or crack in the metal appears in the area where the chimney meets the stove chamber itself, then you need to take a small plate of metal, coat it with stove glue and fasten it to the deformed area. Seal the space on top with the same composition. To solve this issue, a reinforcing mesh is also used, which is subsequently plastered.
Covering stove cracks
The material for the upcoming work has been selected, and another question arises: how to properly seal the stove?
You can start working only after cleaning the brick from decorative finishing and plaster. Using a suitable tool, the gaps between the masonry with cracks are widened to fill an area of about 10 mm with adhesive.
When using ready-made adhesive solutions, it is advisable to adhere to some rules:
- prepare the working solution in a limited volume due to the drying speed;
- Wet all cracks with water;
- tightly fill the gaps with adhesive;
- Lubricate the top of the oven with the prepared solid mixture;
- wait for it to dry completely and start plastering.
An unheated stove is a bad option for carrying out repair work with materials containing clay. It is recommended to heat it slightly; this will help you see imperfections and eliminate defects before the putty dries.
The sequence of work will be slightly different:
- Before sealing the cracks, stir the mixture again until smooth (the contents have different densities);
- make sure the material is of high quality. To do this, you can manually make a spherical object, and if cracks appear on it, add a little water;
- wet all the cracks with water and fill tightly with glue (it’s safer to use your hands);
- Plaster also after final drying. Next you can use whitewash.
Rules for choosing heat-resistant sealant for stoves and fireplaces
In order for the purchase to be successful and the repairs to be of the highest quality, when choosing a sealant it is important to determine the following nuances:
- Operating temperature – you need to evaluate in which part of the oven the sealant will be used. If this is a chimney and external cladding, where the temperature is in the range of +300°C, then a silicone-based paste is suitable. Silicate sealants have a much higher operating temperature and are suitable for treating combustion chambers.
- Contact with open flames and gases - the sealant must be fire resistant if it is to be used inside a fireplace or stove. For exterior repairs, the usual composition is suitable.
- Degree of environmental friendliness - sealants should not contain components that, when heated, provoke the formation of toxic compounds. Otherwise, when inhaling such vapors, there is a risk of intoxication.
Naturally, pay attention to the brand and price. Unknown brands at suspiciously cheap (2-3 times lower) prices are a reason to think about possible risks.
Oven overheating
Having installed a new stove, or repaired damage to the old one, you should not test its strength by heating it to its fullest.
The first fire must be carried out with a small amount of firewood, increasing the amount each time. And then there will be no need to get rid of the next problems again.
Frequently asked questions and answers
It is not always possible to find complete information in the instructions on how to properly use the sealant. This leads to a number of errors and problems in the future, which in no way depends on the quality of the thermal paste itself.
Is it possible to seal the joint between the chimney and the roof when it is frosty outside?
It is better to carry out all work with sealant in the dry and warm season, then its adhesion will be as strong as possible. Look for sealants that work in cold temperatures, but be aware that they will take a long time to dry. If it is -2°C, then most likely the process will be successful. If we are talking about severe frosts, then it is better to wait for a thaw, since the mixture will not be able to polymerize correctly.
Experts use a trick, forcing the sealant to work using heat guns. The latter are located in close proximity to the processing site, increasing the temperature by 10-15°C.
The sealant is not drying well, what can I do to help?
This picture occurs if the ambient temperature approaches zero. Accordingly, to solve the problem, the surface and air should be slightly warmed up. But the best adhesion of the two surfaces occurs when all the work is completed in the summer.
Can the sealant cause a spark?
If we talk about those sealants that are used for combustion chambers, then they do not contain any elements that can somehow influence the combustion process. But such a sealant must be marked “fire resistant”. This means that it can be used in areas of active combustion.
In conclusion, it is worth noting that heat-resistant sealants have different compositions and can be used for different purposes. Before purchasing, it is important to evaluate at what temperatures it will be used in order to determine the desired composition. Please ensure that the sealant does not contain hazardous components that can release toxic substances when heated.
What kind of putty should I use?
Clay and sand
Covering cracks with a clay mixture is the most economical and easiest way to restore a stove structure. You can use any clay
It is important that it contains a minimum amount of impurities. If the raw material is of high quality, then after soaking it should have an oily, homogeneous and, most importantly, plastic structure
At the same time, the quality of restoration is no worse if the stove was repaired using expensive modern means. Before you start covering with clay, you should understand the features of preparing the solution.
How to make clay putty yourself
The preparation of the mixture is done in stages.
- Before mixing the components, the clay must first be kept (soaked) in warm water for 12 hours.
- Knead the softened clay until smooth so that there are no lumps left in it.
- To obtain a mixture for putty, you need to take clay and sand in a ratio of 4:2, respectively. The last component should be pre-sifted. The amount of liquid is taken depending on the moisture level of the components.
- If you want the stove to be white, add lime to the putty and knead everything thoroughly until a homogeneous consistency is obtained. The prepared mixture is covered with polyethylene and kept for 12 hours.
- The settled compound is kneaded a second time. Roll a piece of putty into a ball in your palms and squeeze it. If it starts to crack, you need to add water to the mixture.
- Lightly heat the oven, spray water into the cracks, and then start caulking.
- To prevent new defects from appearing, straw is added to the clay. A more reliable method is to use a plaster mesh. If the solution is applied to a surface covered with this material, you will forget about cracks for a long time.
Fireclay clay
Fire clay is often used to repair old stoves. The material has increased fire resistance. Furnace structures finished with it are durable. This material is sold in all construction stores and markets in 20 kg bags. It's inexpensive. The working mixture is prepared strictly according to the accompanying instructions placed on the packaging.
Grout
As a putty for brick stoves, you can use grout designed specifically for this purpose. Various similar formulations are sold in stores. They are expensive, but they are the best option for lining brick stoves, as well as fireplaces. If you are on a budget, prepare this remedy yourself. To do this you will need clay, sand, water, straw and salt. The clay should be thoroughly kneaded and filled with warm water. After 12 hours, add sand four times less than the first component to the mixture and knead, gradually adding finely chopped straw, not forgetting the salt. For four buckets of clay mixture, take 50 kg of chopped straw and a package of salt. The resulting composition can withstand temperatures exceeding 1000 degrees. Celsius.
Furnace glue
To prevent the formation of cracks in the stove structure, heat-resistant glue is used. This is a ready-made building material used for lining fireplaces. Sold in all construction stores and markets. Its main properties are heat resistance and durability. The adhesive composition consists of fireclay flour and cement with fire-resistant qualities. Glue for stoves can be soft or hard. The plastic product is used to seal cracks. The second is for plastering the surfaces of the stove. The main advantage of the glue is its almost instant drying. Therefore, it needs to be mixed in small quantities.
How can you plaster a stove to prevent it from cracking: types and types
Plaster for stoves and fireplaces should be chosen carefully. Finishing the surface with typical building materials is unwise. Due to the variability of temperatures and their increased coefficient, heat-resistant brick oven plaster is selected. Elasticity indicators are also important in order to prevent cracking and crumbling of the walls during the firing of furnace equipment.
To plaster the structure, it is advised to buy a ready-made mixture for plastering stoves. An important component is clay of medium fat content, without the introduction of sand and extrusion.
How to plaster the stove to prevent it from cracking? There are different types of primer raw materials.
Heat-resistant type - has a general purpose to plaster the stove. The composition is selected for a temperature of 200 degrees. Finishing can be carried out by covering the entire heating area, not including the cooking zone and oven. A Russian stove, an English fireplace, or a bathhouse can also be completely plastered using a heat-resistant solution. Fireproof mixture - can withstand contact with open fire for a certain period of time, about 20 minutes. Fire-resistant plaster can also withstand indefinitely
When purchasing, these names are often confused, but this does not matter for the material, since the firebox and chimney are not plastered. The front part of the structure with an open firebox is coated with a refractory compound.
Heat-resistant composition - can withstand temperatures of more than 800 degrees, in contact and without contact with the flame. Heat-resistant material is used to finish the cooking area, which has a very strong heating system and difficult braking dynamics. It is useful to partially cover with heat-resistant plaster for stoves and fireplaces, 20-30 cm away from the exit of metal parts that can heat up to 400 degrees.
Simple DIY mixtures
It may be the case that for lower costs it is better to purchase elements of the material. Then you buy quicklime and extinguish it yourself; the fluff-lime material becomes covered with cracks within a year. The composition for plastering the oven in dry form must be sifted, the lime dough, milk must be kneaded well so that no unslaked curds remain.
Samples of solutions for plastering a stove with your own hands.
- Clay with sand and asbestos - ratio 1:2:0.1.
- Clay with lime, sand, asbestos – 1:1:2:0.1.
- Lime with gypsum, sand, asbestos – 2:1:1:0.2.
- Clay with cement, sand, asbestos – 1:1:2:0.1.
The purpose of the compositions is as follows:
- as an initial layer or main primer;
- second coating for priming or for the chimney;
- finishing layer for painting, whitewashing. It is possible to introduce pigments based on silicone into such a mixture. The clay is taken white or gray. The raw material is prepared in batches and is produced in 3-5 minutes, since the gypsum present instantly hardens. Therefore, the kneading is only mechanical, no more than 5 minutes;
- high strength composition for covering under decorative printed plaster.
Is it possible to prepare heat-resistant plaster yourself? To save time, it is possible to prepare raw materials yourself, following technological processes and mixing proportions. A simple heat-resistant mixture is kneaded as follows:
- sand is sifted;
- then it is combined with clay;
- raw materials are poured into containers;
- fluid is injected;
- The mass is stirred with a mixer until it reaches the consistency of sour cream.
The amount of sand and clay to plaster the walls of the fireplace at home will depend on the fat content of the clay. Add 3-4 measures of sand to fatty raw materials. To determine the fat content, the clay is placed in a bucket, water is added and kneaded until the consistency of sour cream. Then a little of the mixture is scooped up with a plate. When the clay covers the board by 1 mm, then it does not have a greasy structure. A thick coating indicates the fat content of the raw material.
Decorative compositions
Plastering the stove with decorative materials is quite possible to do yourself, as well as finishing it with brickwork and stone. For finishing, compositions without polymer pigments are applied. They are used instead of a covering, if there is a finishing surface, or as a second coating of the primer when plastering under brick or stone.
Putty materials
Inventive people are ready to give advice on any matter, including the choice of materials for repairing stoves. Recommendations must be taken carefully, separating the wheat from the chaff.
A mixture of clay and sand
There are well-known putty compositions that have been tested many times over. You can use them without any doubt.