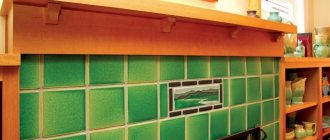
Mosaic is a way of creating patterns and ornaments from pieces of glass, tiles and other materials. This art has its roots in ancient times, but this type of decoration has not lost its relevance in our time. Mosaic tiles are used to decorate bathrooms, changing rooms for swimming pools and other rooms. On the websites of manufacturers and companies involved in interior design, you can see how a mosaic for a toilet looks in the interior and find ideas for your own home.
Preparing the foundation
Laying a mosaic (made from special tiles or individual elements) is a creative and challenging activity. Here you need to show more diligence and accuracy than when laying ordinary tiles. Increased demands are placed on almost everything.
Tools for installation
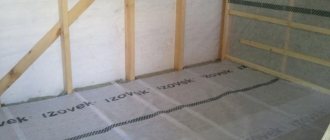
So, when laying mosaics, you need to be more responsible in preparing the base. If, when installing a tile covering, you can slightly adjust the location of the tiles using the thickness of the adhesive mass, then this will not work here. Any bump or depression will be immediately visible. Moreover, this requirement applies to any plane. Whether you are laying mosaics on the ceiling, floor or wall, the quality of the surface must be ideal. In popular parlance, it’s like “under the wallpaper.”
When preparing the surface, pay special attention to plumbness and horizontality. If the error is more than 1-2 mm for every three meters, then unsightly areas may form at the ends. This requirement especially applies to laying mosaics from small tiles, where all the irregularities will be especially noticeable.
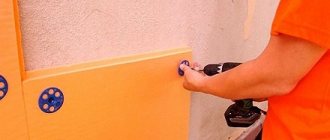
Primer of walls
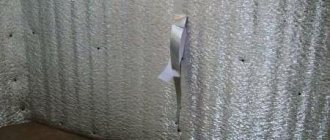
To improve adhesion and reduce porosity of the base, the entire surface must be primed. It is advisable to do this in several layers. If you use transparent tiles in your “picture”, then it is worth covering the surface with tinting. Otherwise, the heterogeneity of the base will be visible through the transparent elements.
Styling tools
The necessary tools will have to be used:
- Bulgarian. It is used to level curved surfaces;
- Level. To eliminate errors in alignment;
- Pencil, cord and tape measure. They are used to make markings;
- Forceps. The sharpening angle should be obtuse;
- A knife, preferably a construction knife. It removes the base;
- Spatula (notched) or comb;
- Spatula (rubber). The seams are rubbed;
- A small plastic container for water, a paint brush, a stiff brush, a sponge.
If the walls are smooth, then laying mosaics is the most enjoyable and entertaining job in renovation.
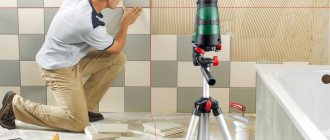
We carry out the markings
Marking
Before you start laying the mosaic, you need to carry out preliminary markings. This is especially important if you are carrying out such work for the first time. First, make a sketch. In this case, you should pay attention to some nuances:
- if the room has external corners (boxes or slopes), then the drawing should start from them;
- if there is any decorative element on the wall (mirror or panel), then it also becomes a priority;
- try to remove all possible trimming in inconspicuous corners (for example, the corner of the front door).
After the paper sketch is ready, it is transferred to the wall. If the mosaic is laid on the floor, then it is advisable to make a “dry” layout.
Features of laying mosaic tiles on rounded surfaces and corners
Due to its own design, mosaics are ideally placed on walls with curves. When gluing elements onto rounded surfaces, you have to perform a small number of different actions compared to installing products on flat areas. The nuance lies in the smoothness of the bend itself. The smoother it is, the more attractive the tile looks.
It is possible to lay elements on a structure with a significant bend from the outside, but as a result the surface will become ribbed. If there is excessive internal twist in the tile layer, the distance between the products is violated. When creating the shapes of walls and other structures, it is necessary to take this into account and exclude sharp bends, the absence of which will make it easier to install the cladding in the future.
Laying mosaics in the corners is done in the same way as when using ordinary tiles. For external and internal corner connections, the elements must be cut along the seam. If it does not correspond to the angle, then there is a need to cut the material using a tool suitable for this task.
Apply glue
Mosaic glue
Now let's figure out how to glue. The adhesive mass must be selected carefully. As a rule, special glue is produced for mosaics. It can be either tinted or white. Here the choice will depend on the tile used (transparent or not). Also pay attention to the base material.
When installing, it is worth remembering that the glue hardens quite quickly. After just twenty minutes, a film forms on its surface. Therefore, do not apply a large amount at once. It is better to go through no more than one square at a time.
Applying glue
The glue is applied using a smooth spatula. The layer should not exceed four millimeters. Then they pass over the surface of the adhesive mass with a notched spatula (tooth height no more than 3 mm).
Some professionals apply a thin layer to the tile itself. This ensures a more reliable connection. But such a layer should be minimal so that the mosaic looks even.
Step-by-step installation algorithm
There are several stages for laying mosaic tiles. First: you need to prepare the wall surface. Sanding and thorough cleaning of dust and construction debris. Second: mark and outline the laying area. At least three sheets are measured, taking into account the space between sheets, all measurements are applied to the surface vertically and simultaneously horizontally. The entire drawn sector should be 9 sheets. Third: the actual styling. The solution is selected depending on the type of mosaic, applied with a spatula within the lined 9 sheets. Use the teeth of a spatula to remove excess and level the solution. A nuance: the gaps between the sheets are checked extremely accurately, with a paper or mesh base on top of the laid tiles. For uniformity, apply with a spatula (rubber only!). Having finished with one sector, proceed to the next, also starting with marking. Having laid the second sector, they return to the first - moisten the paper with a sponge and remove it. You must work with extreme caution, since the glue has not yet dried and the tile may “crawl.” After removing the paper, the gaps are smoothed out and excess glue is removed; the process must be carried out until the glue dries completely. This is how the entire planned surface of the wall is processed. Fourth, no earlier than a day later, the joints are grouted. The area covered with grouting material is no more than 2 square meters. m, it dries in about 20 minutes (depending on the room temperature). The excess is washed off with a wet sponge. If you use a product with acids, wash it off with plenty of water.
We produce grout
Grouting the mosaic
Grouting of the joints should begin a day after installation. For this work, a rubber spatula is used. Before grouting, inspect all seams. Remove any protruding adhesive residue and debris from them. The grouting itself is done with strokes in different directions. The last pass must be perpendicular to the previous one.
Master class on making
Many craftsmen make mosaics with their own hands, using a rubber mat with square cells, wood glue, paints and plaster.
To prepare a mixture for tiles at home, perform the following steps: dilute 15 ml of wood glue in 55 ml of water, pour acrylic paint into the solution, then add dry plaster and mix everything thoroughly until a uniform consistency is formed. If the mixture is too thick, you can add a little water. The resulting solution is poured onto the mat and leveled with a rubber scraper, after which time is allowed to dry, usually it takes no more than 36 hours. The finished tile is removed from the cells and can be used to decorate any covering.
In addition, it is possible to make a mosaic from other materials that are at hand. The most affordable option is to make it from broken tiles, which are easy to chip and have a wide selection of colors and textures.
A mosaic made from broken dishes will also be an original solution; it will look unusual and bright in the decor. Exquisite masterpieces can also be made from wood, eggshells, pebbles, glass and shells.
If the interior of the room has a modern style, then compositions laid out with a mosaic of CD discs are suitable for it. Everyone in their home has plastic covers and collections of old badges; you shouldn’t rush to throw them away - using maximum imagination, they will turn into a beautiful wall decoration. At the same time, mosaics made by yourself can be combined in decoration with various materials.
Photo
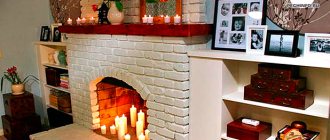
Bathroom design using mosaics
Mosaic tile design
Interior design with mosaic tiles
Contrasting kitchen apron
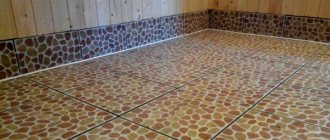
Mosaic floor
Mosaic panel in the kitchen
Panel on the kitchen apron
Wall decoration in the bathroom
Dark mosaic apron in the kitchen
Vertical mosaic
Yellow mosaic
Did this article help you?
Mosaic as a material for creating a decorative surface
Natural and artificial materials can be used to make mosaic coverings. This is how glass, ceramics, pebbles, metal and other elements are used. Which are small in size, only similar particles are selected. Due to the size of the fractions, it turns out to create a variety of images, which helps to achieve the desired design.
You can lay mosaics in any type of room, in the bathroom, corridor, toilet, kitchen, so the material is considered universal.
Due to the size of the fractions, it turns out to create a variety of images, which helps to achieve the desired design.
Advantages and disadvantages of use, scope of application
The demand for mosaic wall coverings is justified by a number of positive properties of the product. To make the right choice, you need to understand the advantages of this type of finish:
- The decorative properties of the material are unusual and beautiful;
- High level of resistance to mechanical loads, durability;
- Easy to maintain finish;
- A wide range of mosaics, you can find an option for any type of design;
- Convenient installation of mosaics on the wall.
But before deciding whether to lay a mosaic covering in a room, you should also study the disadvantages of the process:
- The cost is higher than tiles;
- To get a unique image, you will have to adjust the elements for a long time;
- The parts must be glued to a special adhesive solution;
- If the details have iridescence, then looking at them for a long time causes ripples in the eyes.
It is possible to make a mosaic with your own hands, then the finishing will require less expenditure of money.
The material has a high level of resistance to mechanical loads and durability.
Description of the material and its varieties
The material can be glued to walls, floors and ceilings. There are several types of mosaics. The classification is based on the materials from which fine fractions are obtained. The following types can be distinguished:
- Tiles are made from ceramics, which can be of various colors; one tile can be multi-colored. The texture is heterogeneous, glazed and mesh;
- From a mirror, a panel is created from mirror particles, helps to expand the space, and can hide flaws in the base;
- From smalt. The material consists of elements of glass exposed to high temperatures. They are characterized by wear resistance, strength, and resistance to low temperatures;
- Made of Venetian glass, it stands out for its durability and strength, with a wide range of colors;
- Made from natural stone, a variety of types can be used;
- Made from artificial granite. A long service life, reliable and shimmering coating is obtained from this material.
There is a more expensive version of mosaic covering; precious stones and elements of expensive wood are used as the basis.
The material can be glued to walls, floors and ceilings.