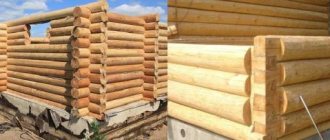
A brick stove is the main functional element of any Russian steam room, which is traditionally made of heat-resistant red brick. The construction market offers a wide range of ready-made stove designs, but bathhouse owners decide to build a Russian stove with their own hands.
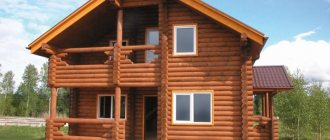
A classic brick stove for a bathhouse with a heater, built with one’s own hands, makes it possible to safely heat the room, maintain optimal temperature conditions, produce clean and thick steam, and is a decorative interior element.
Sauna stoves: features and characteristics
The bathhouse helps to get rid of negative emotions and is often associated with healthy relaxation, good spirits and a cozy atmosphere. The stove is the heart of the sauna; Comfort, steam quality and safety depend on its characteristics. Choosing the main bath attribute is not so easy; there are too many selection criteria and requirements for it. And if the owner decides to build a bathhouse, he will have to deal with several issues: decide on the material and design of the stove, consider its size and type of fuel.
Today, few people other than professional stove makers know that the method of construction and the principle of operation of a sauna stove differs from the functioning of the stove on which food is prepared. The brick sauna stove is a continuation of the traditions of our ancestors, having the following features:
- Construction . The main parts are: a firebox, a chimney, a grate (a place for fuel) and an ash pan (a chamber where ash accumulates).
Sauna stove with original design Source pinterest.com
- Characteristic . Kamenka, a container for stones, which can be closed or open. The stones are used as a heat accumulator, increasing the time of bathing procedures.
- Weight . Can reach 1000-1200 kg (depending on the size of the stove). For such a massive structure, a reliable foundation is built.
- Fuel . Firewood is used for the firebox, but the stove can operate on both electricity and gas.
Brick sauna stoves are determined by two main parameters:
- Dimensions . The size depends on the area of the premises that are planned to be heated. Most often, there are stoves with a base area of 3.5x4 bricks (890x1020 mm) or 4x5 bricks (1020x1290 mm). If you do not take into account the chimney pipe, the height of the structure is 1680 mm (or 2100 mm if the steam room ceiling is high).
- Construction . Owners prefer to install a model with a water circuit, which serves as a tank for heating water. The tank can have an upper (next to the chimney) or lower (near the firebox) location.
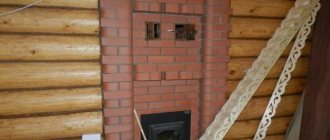
The heater was left in the steam room, the firebox was moved to the dressing room Source sdelaikamin.ru
Design Features
A brick oven is a structure consisting of several elements:
Firebox
This is the main unit of the furnace, made in the form of a chamber for burning fuel;
Chimney
This is a pipe for removing gases and particles formed during the combustion process;
grate
This is a cast iron or brick platform on which fuel is placed;
Ash pan
A chamber located under the firebox and connected to it by narrow slots for the flow of ash from burnt fuel.
Only required elements are listed.
However, most furnaces are equipped with additional components:
Kamenka
This is a pile of stones collected in the immediate vicinity of the firebox, used to create the necessary microclimate in the steam room;
Water tank
This element is found in most stoves, as it allows you to solve the problem of supplying hot water when heating the room.
This is a fairly general structure; in practice there are quite complex structures. In addition, there are special rules and requirements that ensure the efficiency, safety and durability of the structure.
However, if desired, you can build a brick stove for a bathhouse yourself. To assemble the stove, special ordering diagrams are used, which describe in detail the process of laying each row. Referring to this diagram, it is not difficult to build a stove with your own hands, even without experience.
Advantages and disadvantages of a brick kiln
No matter how profitable and easy to use metal stoves are, owners with worldly experience prefer proven brick structures. A brick sauna stove has the following advantages:
- Heat capacity . The stove is capable of retaining heat for 6-8 hours and heating several rooms (depending on location).
- Energy independence . A wood-burning stove is an ideal option if there is no gas supply and there are power outages.
- Savings during operation . There is no need to install a gas pipe or run wiring and then pay bills. Firewood will cost much less (especially if you prepare it yourself).
- Comfort . Such stoves produce rich, but not scalding (light) steam and soft heat. The atmosphere of the steam room does not make breathing difficult and is ideal for those who like to steam frequently and tastefully.
Compact brick structure Source tproekt.com
- Environmental friendliness . Both the brick from which the stove is made and the firewood are environmentally friendly materials that are safe for health.
- Design . There are real masterpieces of stove art with stunning architecture and design.
- Fire safety . Provided with design features that fully comply with SP 7.13130-2013.
Brick kilns are inferior to other designs due to disadvantages:
- Difficulties in execution . The masonry process has nuances, and it is not easy to find a competent stove maker.
- Size . A large stove eats up precious steam room space.
- Price . The pleasure of making bricks is not cheap: you need to build a foundation, purchase high-quality bricks and pay for the services of a craftsman.
- Time . The stove heats up, and the steam room takes a long time to heat up.
- Care . Systematic cleaning of the ash pan and periodic cleaning of the chimney are required.
A brick stove emits soft heat that is as comfortable as possible for a person. Source tutknow.ru
See also: Catalog of companies that specialize in the installation of fireplaces and stoves.
Advantages and disadvantages
When giving preference to brick kilns, you must remember that they have both certain advantages and disadvantages. Among the advantages are the following:
- attractive appearance and the ability to fit into any interior of a bathhouse: both made of wood and brick;
- such a stove will please the owner much longer than an iron one: unlike metal, brick is a material that will not be spoiled by small defects;
- there is no need to carry out additional finishing work;
- the resulting steam has a beneficial effect on human health;
- a heated brick will not begin to release hazardous chemicals into the air;
- a brick stove better maintains high temperature throughout the entire bathhouse;
- for kindling, fuel is used, which is sold on any construction market, as well as simple raw materials that you don’t even have to buy: sticks, branches, newspapers, dry moss and others;
- In a room with a periodic heater, you can steam for 2-3 days, and it will not cool down;
- if after bath procedures you simply do not close the door in the steam room, then the stove will dry the bath itself;
- the chimney does not require monthly cleaning, unlike a metal firebox.
However, there are some disadvantages:
- the stove structure itself is quite large, you will either need to initially build a large bathhouse, or you will have to sacrifice some square meters;
- if errors are made during the assembly process, the oven will not hold the temperature well, and the room will quickly cool down;
- brick is a rather expensive material;
- the services of a professional stove maker are also highly expensive;
- due to the large weight of the stove, a solid foundation will be required, the depth of which should be below the freezing point of the soil, and also the foundation for the stove should not be tied to the foundation for the structure of the sauna house itself;
- building a heater is a long-term and labor-intensive task;
- To completely melt a sauna with a brick stove, it will take a lot of time, up to 6 hours.
Project security
A brick sauna stove needs proper insulation from wooden surfaces - a rule, the violation of which sometimes ends in a fire. For bath procedures to be safe, several conditions must be met:
- Foundation . A reliable foundation is needed, which is arranged according to certain rules.
- Chimney . The pipe passes through the ceiling, ceiling elements and roof. When installing a chimney, it is necessary not only to protect adjacent surfaces from heat, but also to maintain the tightness of the steam room. The pipe is separated from all elements of the building by a gap filled with a layer of fire-resistant material.
- Furnace location . The general rule is that wooden walls should be protected from heat. Therefore, there are minimum permitted distances: between the side surfaces of the stove and the walls - 50 cm, between the combustion door and the opposite wall - 150 cm.
- Isolation . The wall behind the stove is protected by brickwork and metal sheets. A metal sheet (10 mm thick) is placed on the floor in front of the firebox as a protective measure against embers flying out of the flame.
The floor in front of the firebox is insulated with a layer of brick Source kvartal-club.com.ua
With or without a blower?
Now about the blower. If a brick stove is being built for a bathhouse, is there a need for a vent in it? Let us first explain what a blower . This is a kind of channel that supplies air under the grate , and through it into the firebox, supplying the fuel with the oxygen necessary for its combustion. A door is used to regulate the intensity of air flow (draft).
The draft exists when there are two openings - at the bottom of the stove and at the top of the chimney . Therefore, their sizes are related to each other . In addition, there is a certain relationship between the volume of the firebox and the draft - if the draft is too strong, the wood will burn quickly and at a higher temperature.
When installing a brick stove for a bathhouse, you can abandon the ash pan and lay out a blank floor. This doesn't mean you won't have any cravings at all. It will be due to the slightly open fire door. In principle, the stove will work, but the dimensions of the combustion door are large enough to allow fine adjustment of the air supply. At the same time, the efficiency of the stove becomes lower than it could be.
But this is not the only argument against a blind hearth. A big punishment for the owners will be the danger of burning coals falling out when the door is open , as well as the need to frequently work with a poker , because the firewood never burns out completely. Upon completion of the combustion process, you will still need to pull out the firebrands and immediately extinguish them in a bucket of water.
If we talk about the sufficient dimensions of the grate and the cross-section of the chimney pipe, then both can be approximately equal to the area of one standard brick . This is enough for normal traction.
A separate publication is devoted to tips on choosing the size of the oven.
By the way! The draft will be better if the blower is located low. For example, you can start laying it out from the second row.
Materials for the stove: what and how much
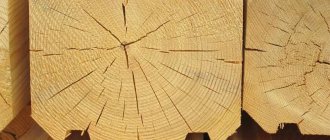
Bricks that can withstand repeated temperature changes are suitable for masonry. There are two fairly strong, fire-resistant bricks:
- Fireclay brick . Heat-resistant material of a creamy-yellowish color that can withstand heating up to 1400°C without loss of strength. Such a brick accumulates heat without harm to itself and at the same time has high thermal inertia (slowly heats up and cools down). The parameters are superior to other varieties, but they are also more expensive, which is why they are used mainly for laying out the firebox (20-30 pieces are required).
- Solid red brick marked M (not less than M150). The body, chimney and decorative elements are laid out of it. For a modest structure, 250-280 bricks may be enough; for a large project, 800 (or even 1000) ceramic bricks will be needed.
This fireclay brick will withstand application temperatures up to 1350°C (marking ШБ) Source nsk.zoon.ru
In addition to brick, other materials and tools will be needed:
- Masonry mortar . Consists only of clay and sand. It does not use cement, which crumbles when heated and causes destruction of the masonry over time.
- Furnace casting . Cast iron doors, steel containers for water and stones, a grate (grid), and a view (oven damper) are used.
- Thermal insulator . Any material that can withstand temperatures up to 1200°C is suitable - for example, basalt wool in thin sheets.
- Tools . You will need trowels, a tape measure and a building level.
Tools
If you decide to make a stove for a sauna with a tank with your own hands from brick, then you will need several standard stove-maker tools:
- pick hammer,
- special trowel,
- mallet,
- level,
- roulette,
- construction cord,
- plumb line
Innovative technologies are gradually coming to the area of stove laying. Some builders use laser levels and a sander. To make a tank you will need a welding machine, electrodes, and a sheet bender. Making a sealed stainless steel container with your own hands is quite a difficult task for a novice welder. Therefore, it is better to buy the material and turn to professionals for help.
Kamenka - a feature of the stove for a Russian bath
The main attribute of a bathhouse is often classified according to the heating method:
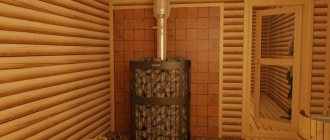
- The first to appear were stoves that were heated black . They did not have a chimney, and while the logs were burning, the smoke accumulated in the room and stained the walls with soot. Afterwards, the smoke was released through the window, and in order to take a steam bath, you had to wait until the firewood burned completely. Heat and steam were obtained from heated stones lying in the hearth, a prototype of the heater.
- Stoves that burn gray or white have a chimney and a heater in their design. A gray sauna (with an open heater) warms up faster, but soot also accumulates on the stones, and this means that you have to wait until the wood burns out completely.
- In the white sauna, the stove is equipped with a closed heater. It does not pollute the walls of the steam room, does not burn oxygen and carefully preserves heat for a long time. If the steam coming out of an open heater is hard and scalding, here it remains comfortable and soft, even if the thermometer shows 100°C.
Black-style bathhouse, with an open heater Source pechnoy.guru
See also: Catalog of bathhouse projects presented at the “Low-Rise Country” exhibition.
In addition to bricks, other materials and tools will be needed:
- Masonry mortar . Consists only of clay and sand. It does not use cement, which crumbles when heated and causes destruction of the masonry over time.
- Furnace casting . Cast iron doors, steel containers for water and stones, a grate (grid), and a view (oven damper) are used.
- Thermal insulator . Any material that can withstand temperatures up to 1200°C is suitable - for example, basalt wool in thin sheets.
- Tools . You will need trowels, a tape measure and a building level.
Photo
The most popular models combine the functions of a sauna stove, equipped with a heater and water tank, and the function of a fireplace. In this case, you can light the fireplace and stove at the same time.
The facade of the Kuznetsov stove for the bath is shown in the photo
In addition to the main function of heating the bath room, the stove is equipped with additional structural elements that help organize the most comfortable temperature and humidity conditions in the steam room.
The photo shows a view of a brick stove from the side of the steam room (on the left is a stove with a built-in heater, on the right is a stove with a built-in steam generator)
Kuznetsov’s bell-type stove for a bathhouse, thanks to its unique device for movement and removal of gases, warms up the room most efficiently and quickly, and also retains heat for a long time.
The picture shows a version of a brick kiln designed by Kuznetsov
Kamenka - a feature of the stove for a Russian bath
The main attribute of a bathhouse is often classified according to the heating method:
- The first to appear were stoves that were heated black . They did not have a chimney, and while the logs were burning, the smoke accumulated in the room and stained the walls with soot. Afterwards, the smoke was released through the window, and in order to take a steam bath, you had to wait until the firewood burned completely. Heat and steam were obtained from heated stones lying in the hearth, a prototype of the heater.
- Stoves that burn gray or white have a chimney and a heater in their design. A gray sauna (with an open heater) warms up faster, but soot also accumulates on the stones, and this means that you have to wait until the wood burns out completely.
- In the white sauna, the stove is equipped with a closed heater. It does not pollute the walls of the steam room, does not burn oxygen and carefully preserves heat for a long time. If the steam coming out of an open heater is hard and scalding, here it remains comfortable and soft, even if the thermometer shows 100°C.
Black sauna, with an open heater Source pechnoy.guru
It is convenient to divide sauna stoves according to the heating method:
- Periodic action . Here the stones are on the grate above the flame and have maximum contact with it. Water can only be poured onto the stones after the wood has burned out (otherwise you risk dousing the fire). The stove has to be lit periodically.
- Constant (continuous) action . The stones are in a closed heater (an insulated metal container), which is heated by fire. Heat transfer suffers a little, but you can pour water and heat all the time (constantly), and the soot remains inside and does not pollute the steam room. The stove is lit when there are people in the room; its design prevents combustion products from entering the steam room.
The design of the stove is responsible for generating that famous “light steam”, optimal temperature (70°C) and humidity (60%). Stoves with a closed (internal) heater cope best with this task.
How to do it yourself?
Scheme
It is difficult to derive a specific ideal drawing for a future furnace. The diagram of a brick stove for a bathhouse with a firebox from a dressing room of a more classic version may look like this:
- Side view:
- End view:
This photo of a stove with a firebox in the dressing room schematically shows us what the design should be and what elements it has. Knowing what is in what place, we can easily navigate further work.
Foundation
A stove is a very heavy thing. And if you want it to stand level and strong, then you should think about the foundation. The foundation is the foundation on which the entire structure will stand. If you make a mistake there, you can call into question the entire structure.
Instructions:
- First, you should dig a hole where the stove will be installed. It is also important to know that the pit should be slightly wider than the oven itself.
- Next, fill the bottom of the hole with sand and wet it. This will make the sand compacted and durable.
- Next, a 15 cm layer of gravel is poured. Then you need to install formwork (a certain frame) and place a metal frame on the base of the future furnace.
- Then everything is simple: you need to make a mixture (cement mortar) and fill the hole, leveling it around the entire perimeter. At the end, when the cement has already hardened, the formwork is removed.
- You need to achieve a perfect surface, so check the result many times using a level.
- If you see small pits, try adding another small layer of solution. But it is very important not to overdo it with its quantity.
Thermal insulation of walls and ceilings
You cannot begin installing a stove that is surrounded by bare wood. This is life-threatening due to the fact that the tree can instantly catch fire under the influence of temperature. You should always remember about thermal insulation.
A sheet of thermal insulation made of metal or cement is suitable for this. Install either one or two such sheets. This material should touch the ceiling and floor, but not directly to the wall. You need to leave a gap of 3 centimeters.
Preparing mortar for masonry
It is worth preparing the solution in advance. This is a rather lengthy process. A brick sauna stove with a firebox made from a dressing room will firmly adhere to its structure precisely on the clay mortar.
At least two days in advance, you need to soak the clay in water and leave it there. Next, you need to mix this material using a construction mixer. At the end, add sand so that it matches the original amount of clay before mixing.
Stir it all again. Determine the amount of masonry mortar needed. It is best to take it with a reserve to take into account unforeseen situations and cover all the necessary brick balls.
Masonry process
After the foundation and thermal insulation, you can proceed to laying the brick itself. At this stage, special precision and coordination of actions are required.
Here are 2 examples of arrangements with an open and closed heater. In these examples, you need to place the firebox towards the dressing room:
The first rows of bricks are very important. All subsequent rows will depend on their quality. Therefore, the laying of a brick sauna stove with a firebox from the dressing room must be perfectly level in the early stages. As the first ones go, this is how the work will look further.
- First you need to lay the first row, not forgetting about the 5-6 cm indentation. Start with the edging and then fill in the empty spaces inside.
- Next, the second row is laid so that the seams of the second overlap the seams of the previous row. Under no circumstances should they coincide. Leaving space for the blower, you can design the third and fourth rows in the same way. It is important to understand the exact location of all elements in order to leave room for them during laying.
- After the fourth row, in the spaces left, you need to insert the doors. Only after installing them correctly can you proceed to the fifth row.
Next, the firebox is laid out. Its size must be determined in advance. An important component in the manufacture of the firebox is the lining; this is an internal screen above the firebox that will protect the walls of the furnace from overheating. This item needs to be installed. Next you need to insert another door and grille. It needs to be secured with wire, in triple pieces. After this, you can confidently lay layers of brick according to the already familiar pattern to the desired height, not forgetting about the chamber for storing stones.
Photo examples of installing a remote firebox for a brick kiln:
At the final stage, you need to move on to laying the chimney:
- To do this, you need to make a hole in the ceiling, the distance from the chimney to the beam and the end was approximately 24 cm (a little more can be done). Next you need a protective steel box that bends.
- Its corners should be fastened, the box should be inserted into the hole so that it does not fit into the steam room, even a little. Basalt cardboard is usually installed between the walls. And at the bottom of this box a moisture-resistant plasterboard sheet is installed.
- Next you need to install it all in place and cover it with brick. This option is quite easy to install and will function well in this type of oven.
- The upper hole requires a special silicone rubber sleeve that can withstand extreme temperatures. But you can make your own insulated box. Remember that the pipe must rise 85 centimeters or more from the roof
Lastly, a storage tank for liquid is installed. It is connected to the stove using metal-plastic pipes.
Also, a brick stove in a bathhouse with a firebox from the dressing room requires care, so carefully check all stages of the work so as not to make a mistake. Don't forget to check all the insides of the oven.
Video description
About the stove with a water tank in the following video:
Of course, a stove with a pile of stones on top looks much more impressive and produces excellent steam. In fact, an open heater is more suitable for a Finnish sauna, with its high temperature and dry air (Finns pour little water). High temperatures and high humidity can cause heart problems in an unprepared person. The main benefit of an open heater (as well as a metal stove) is the rapid heating of the room.
Rules for caring for your heater
Both types of equipment require regular inspection and checking of the stones. High temperatures lead to cracking and crumbling of cobblestones, so damaged specimens should be removed and replaced with new ones.
During operation, the furnace walls expand and contract again, which leads to gradual destruction of the masonry. Therefore, it is imperative to check it for cracks and crevices. Detected defects are covered with clay mortar. If you ignore this work, harmful carbon monoxide may enter the steam room.
Construction of a brick sauna stove: sequence of work
Each brick sauna stove is a piece production product. Regardless of which configuration is chosen, the stove is built according to the established order, from the foundation to the chimney and finishing. The main task is to ensure that it does not smoke and effectively heats the steam room.
Planning
The stove design (size and configuration features) is selected in advance, simultaneously with the preparation of the bathhouse design. After choosing a project, an order is drawn up - a plan that shows the layout of bricks separately for each layer (row).
An example of the arrangement (diagram) of a brick oven with a bottom placement of the water tank Source banya-expert.com
Test firing of the furnace
Test firing of the sauna stove from the dressing room is very important. It is at this stage that the results of your work and all the miscalculations that could come out are immediately visible.
For a test fire, you need to light the stove at full load for 2 hours. Then it is worth checking individual elements of the structure for heat resistance.
The following standards should be adhered to:
- all elements should not overheat, much less glow;
- the traction must be strong;
- the stove should not smoke much;
- The oven should heat up evenly.
If everything went well and you did not notice any failures, you can safely use the oven for its intended purpose.
Video description
About the detailed process of laying a heater in the following video:
Masonry
When the clay mortar is ready, start laying. It is recommended to start with the construction of a brick wall that protects the adjacent wall from critical heating. The laying of bath stoves is carried out in compliance with the following rules:
- Before starting work, stock up on a printed order .
- The bricks are laid according to plan ; Castings are inserted as needed.
- Experienced stove makers prefer to lay each row first “dry” , without mortar. This preliminary fitting significantly improves the process and allows you to avoid difficult mistakes. The method makes it possible to accurately select bricks and try on castings.
- Formation of the first row . An important stage on which the geometry of the furnace depends. At the end of the row, check the corners.
- Laying out the body . The second row (and subsequent ones) are laid offset so that each seam falls in the middle of the brick from the previous row. This staggered arrangement ensures the reliability of the design.
Fireclay bricks are used for laying the firebox Source tproekt.com
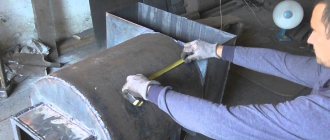
Stage one. Preparing the container
First, we determine the dimensions of the container that will be used to heat the water. To do this, you need to find out what the maximum number of people will take a steam bath at the same time. And the calculation should be as follows: per person there should be about 8-10 liters of heated water.
Note! It is preferable to use an open type container for this. This involves slight evaporation of the liquid, but we get several advantages:
This involves slight evaporation of the liquid, but we get several advantages:
- freedom of access;
- the ability to remove residual water in winter and maintain the internal surface;
- In addition, we will be able to clean the inside of the container from scale and dry it.
Such a boiler can be purchased at a specialized store, or you can make it yourself. Well, let's start building!
About Kuznetsov's sauna stove
The team led by Igor Viktorovich Kuznetsov developed a fundamentally new design of a furnace with a two-tier bell - a chamber in which heating occurs (in the lower bell) and separation of the movement of hot and cold gases (in the upper bell). Hot gases are retained in the furnace, which significantly increases the heat transfer of the structure.
Kuznetsov’s brick stove can maintain a suitable temperature not only in the steam room, but also in the washing room and in the rest room. High efficiency, economical fuel consumption and a minimal amount of soot during combustion contribute to the popularity of the design.
Fragment of brick oven masonry Source bazar.bg
Device and installation
The design and installation of any furnace begins with the preparation of a diagram or drawing. Before you start laying a brick stove, it is necessary, in addition to the drawing of the sauna stove, to prepare a diagram of the order of the brickwork. Instructions on how to make wiring in a bathhouse are here: https://banya-gid.ru/stroitelstvo/osveshhenie/instrukciya-kak-sdelat-provodku-v-bane.html.
The figure shows a drawing of one of the options for Kuznetsov’s sauna stoves.
Scheme of the order of brickwork during the construction of a Kuznetsov stove for a permanent bath in the figure
Features of installation of the Kuznetsov furnace:
- laying a solid foundation is carried out with a reinforced mesh (the size of the foundation should be 10 - 15 cm wider than the expected dimensions of the future furnace, keep in mind that the furnace foundation should not be tied to the main foundation); it is imperative that a waterproofing layer is installed on top of the foundation, for roofing material is quite suitable for this; the first and second rows of the stove structure are laid out with refractory bricks; as a rule, the height of one row is 7 cm, based on a brick thickness of 6.5 cm and a seam thickness of 0.5 cm; the horizontality of the rows must be verified using a building level ;it is recommended to use solid brick of grade M150 for external masonry; between the external masonry and the internal one, made of refractory fireclay bricks, it is necessary to leave a gap of 5 mm (the gap can be filled with basalt cardboard); the container for stones is made of heat-resistant steel; when installing a brick kiln, The main thing is not to deviate from the order scheme. Read the instructions on how to insulate a wooden bath..
Read the instructions on how to choose a stove for a sauna.
Brick oven: cladding features
Brick stoves are suitable for cladding like no other, since brick and cladding have approximately the same coefficient of thermal expansion, which cannot be said about a metal structure. The brick oven heats up gradually, and the lining has time to warm up evenly. The most popular facing materials are:
- Clinker tiles . Clinker is characterized by high refractoriness and heat capacity; it does not deform over time and gives a cozy appearance to the steam room. During production, dyes and fireclay clay are mixed into clinker.
- Terracotta . Pressed unglazed clay that has been fired. The tile has a characteristic red-brown color and excellent strength indicators.
The fashion for tiles spread in the 17th and 18th centuries and has remained in demand to this day Source forumhouse.ru
- Majolica . Tile material obtained by pressing; an improved version of terracotta. A colored design is applied to the tiles and covered with glaze.
- Tile (a type of tile). Special box-shaped tiles, often handmade, decorated with a sophisticated pattern and filled with glaze, were originally invented for lining stoves. The tiles have a special design on the back side and are fastened with special metal pins into the seams, simultaneously with the stove masonry.
About the chimney
The heating device can have a completely brick chimney or pipe. Usually they use a combined version: a brick goes up to the ceiling, and then an asbestos pipe. Laying a brick chimney begins with laying out a row covering the firebox area. At first there are two air channels, but later they converge into one. The exhaust area gradually narrows and moves to the side. One or two valves regulate the width of the chimney and the speed of hot air exit.
When doing the work yourself, it is important to make the chimney without cracks and correctly calculate the cross-section of the exhaust pipe. Violation of these parameters will lead to condensation accumulation and excessive cooling of the oven during operation. You can immediately feel the poor quality of the assembly by the soot on the walls of the bathhouse.
The removal of the pipe from the bath can be done in two directions:
- up, through roofing sheets;
- towards the wall.
For the external version, the horizontal section of the pipe should not be longer than a meter, otherwise the draft will be very weak. The chimney pipe at the bathhouse should be removed from other structures that can ignite by at least half a meter. It is not advisable to secure the pipe rigidly to the roof. Among other things, it should be noted that there should be no joints in the ceiling area for fire safety reasons.
How to set the fat content of a clay mixture
In order to determine the degree of fat content of clay, you can resort to one of the simple methods available to beginners in the construction business. And since precise digital values are used, they can be considered quite reliable.
For the dough, you need to take 500 g of clay, mix it with water and knead it by hand until you obtain a homogeneous mass without lumps that does not stick to your hands.
Note that the correct clay solution should be of medium fat content.
Method 1
You need to take a little mixture and roll it into a ball the size of a small apple. They place it on a flat surface and begin to slowly press it down with a plank until cracks begin to appear.
The quality of the solution can be judged by the size of the cracks:
- if the ball falls apart completely without cracks, then the clay is non-greasy;
- the appearance of a crack on the ball half its diameter indicates that the solution is too greasy;
- if the ball is cracked by only 0.2 diameters, then the solution is best suited for masonry.
Method 2
Two balls are formed from the clay mixture, one of which is rolled into a layer. These two blanks are placed in a dark place for 4-5 days to dry. If defects or cracks appear on the workpieces, it means the solution is too greasy. But if they remain in their original condition and are not damaged, then such clay can be safely used. You can also throw the ball from a small height - if it doesn’t break, it means the solution is good.
Preparatory work
Selecting a water tank
One of the main components of a heating device is a tank or container for water. The volume of the tank should be selected before all construction work begins.
It depends on the number of people and the visit to the bathhouse: the more people who want to take a steam bath, the larger the volume of the tank needs to be used. One liter of water is usually consumed per person.
It is best to use an open tank as a tank. It will be more convenient to fill such a container with water. During operation, scale may appear on the tank. It is easier to eliminate it if the container is open.
If you do not use the sauna in winter, it is better to remove all liquid from the container. This way you prevent the water from freezing and damaging or deforming the tank itself.
Foundation of the future furnace
One of the most important components of any furnace is its foundation. A brick stove with a closed heater for a Russian bath made by yourself must be on a high-quality foundation.
The foundation depth should be below the soil freezing level by an average of half a meter. The area of the foundation should be larger than the furnace by a few centimeters around the perimeter.
Stages of building a foundation:
- you need to dig a hole to install the formwork.
- Cover the bottom with sand (about 15 cm) and fill it with water to compact it. Small stones are placed on the surface, after which they are compacted.
- The formwork is made from boards. The internal size of the formwork must be identical to the size of the foundation. It is important to use a level to build.
- The formwork is fixed in the pit, and strong reinforcement is inserted inside.
- After this, all that remains is to concrete the area and leave it for several days. The wooden frame is removed, and the gaps between the ground and concrete are filled with sand or gravel. The structure is covered with film and left for about seven days.
What brick should I use?
It is appropriate to use ceramic refractory bricks in the bathhouse.
It is red in color and is durable and resistant to high temperatures. How to choose quality brick? Before purchasing a whole batch of bricks, check its quality. To do this, purchase several bricks and break them. If you have a few large pieces left over, this is a great material.
If it crumbles into small parts, it is a bad material. It is not the size of the brick itself that is important, but the identical parameters of each individual rectangle.
There is another type of brick that is used only in the fuel zone of the furnace. It is called fireclay. This material is resistant to heat. Fireclay has a larger size compared to others. But it can be easily filed and made to the desired size.
Preparation of the solution
A do-it-yourself sauna stove is made using two types of solution:
- for external masonry
- for the firebox and chimney.
The first one is quite easy to do. The main attention in this process should be paid to the components: sand and clay. Before cooking, the sand is sifted.
It should be small and uniform. And it is best to choose clay that has overwintered in open areas. It should also be ground through a sieve, after wetting it with water.
The proportions of the components may vary. It depends on how high quality clay is used. But usually this ratio is 1 to 2 (1 part clay and 2 sand), water should be approximately 1/4 of the amount of clay.
To strengthen the fireclay brick (for laying the firebox), use a solution of heat-resistant clay (it is white). When exposed to high temperatures, it compresses tightly and forms reliable protection against heat. All solutions must be mixed gradually until the consistency of liquid sour cream.
Tools
No special tools are required to build a heater. All you need is a level, a trowel, and a container for mixing the solution. Every owner has them, so you don’t have to spend money on work equipment. If the masonry you choose requires cutting the brick, use a grinder and a hammer.
Selection of materials for construction
There are several types of bricks and deciding which one to use is easy if you know some details. The fact is that each type is intended for specific work:
- red solid - suitable for laying the stove body and chimney. If desired, you can use it for decoration;
- fireclay - it is usually used for laying the firebox, since it is impervious to even the highest temperatures.
Fireclay bricks can also be used for laying other elements of the furnace. But it has a high cost. Therefore, many people refuse this option.
Requirements for heaters
A stove installed in a bathhouse is subject to a number of requirements that it must meet. Only in this case will no unnecessary problems arise during its operation:
- no smoke or gas should enter the room in which the heater is installed during lighting;
- you need to purchase a brick screen for the sauna stove in advance and take care of its correct installation;
- heat must be maintained for a long time to maintain the temperature at a certain level;
- the oven should be small in size so as not to take up too much space;
- The volume of heated water depends on how many people will be in the bathhouse at the same time. According to the rules, there must be at least 15 liters per person.
An important characteristic is the heating rate. The faster the oven heats up, the better. Because less firewood will be needed for kindling.