Plastering surfaces is required to make them look smooth and the room to look neat. The work is greatly facilitated by auxiliary material such as plaster beacons. This is a long strip attached to the wall. The top edge of the product sets the level of alignment.
Installing plastering beacons provides a number of benefits for the worker:
- A smooth surface for finishing that cannot be obtained by other means.
- Reducing work time.
- Plastering using beacons can be performed by people with little or no relevant experience.
- Reduced material consumption and reduced work costs.
What are beacons needed for?
First of all, beacons are needed to plaster the wall evenly. They help maintain a clear line of plaster. When leveling a wall, they do not allow the tool to lean against the surface more than necessary.
Builders also use beacons to cut through excess mixture. Thus, you can quickly and efficiently remove unnecessary plaster and leave a smooth surface.
What influences the correct installation of beacons
In order to correctly position the beacon, you need to adhere to a certain plan and algorithm.
- the correct geometry of the slats and profiles that are used to install beacons. Various bends and defects will not allow you to create a straight line;
- the solution hardens too quickly or takes too long. It's simple: if the solution hardens slowly, it can easily slide and create unevenness; if it hardens too quickly, installing the beacon will be problematic;
- incorrect assessment of the geometry of the leveled surface;
- inaccuracy of the plumb line, or its incorrect use.
Important! If the beacon is installed incorrectly, it will not be possible to make smooth walls, since the basic parameters will not be observed.
It is very important to install the structure correctly, because the quality of the work done and the appearance of the walls depend on it. How to correctly perform the procedure for installing a beacon followed by leveling the walls?
Useful video
Below we have selected several videos with master classes on installing beacons and plastering walls.
Quick installation using a laser level.
The next video shows the technology for plastering walls using beacons with your own hands. Leveling is carried out with gypsum mortar on brick without mesh reinforcement.
We hope that the article was useful to you. Ask questions and share your experience in the comments.
Previous
Tool Angle for plaster: types and installation rules
Next
Tools Construction floats: types and features
Preparing the base for installing a lighthouse
Preparing the base is the main stage in installing a lighthouse. It is very important to do everything according to the instructions.
- To begin with, the builder inspects and evaluates the entire surface to be treated. It is necessary to thoroughly dismantle the old coating, as well as the primary plaster layer. If you ignore this operation, the new plaster coating will not adhere well.
Important! What is required is to expose the base; you cannot even leave pieces of the old plaster coating.
At this stage, greasy and dirty stains, areas of mold, and metal parts are removed.
- If, when assessing the surface, the builder notices cracks and chips, they must be covered in a timely manner with a new layer of plaster. If a crack occurs under the main plaster, this can lead to disastrous consequences. If the base is a smooth surface, then you need to make several notches, which will increase the level of adhesion.
Advice! If the holes and cracks are small, you can use putty. If the dimensions are too large, then using a special device you need to patch the crack from the inside.
- It is also important to remove dust and dirt from the walls, which could interfere with the plastering process. After this, the walls are covered with a primer mixture.
Preparatory work
First of all, the wall is thoroughly dusted and primed.
You can apply a rule with a built-in level. You will also need a plumb line - a cord with a weight at the end, a cord or thick thread and screws with a dowel.
Determination of wall deflection
The main task of measurements is to determine the most and least protruding points of the walls. Beacons are usually installed in increments of about one and a half meters, since it is inconvenient to work with a longer rule. A novice plasterer may need to install beacons more frequently. It should be noted that it is the marking stage that is the most critical. If the marking is done poorly, with a violation of verticality, the wall surface will not be able to be properly leveled, which will entail an increase in putty consumption and an increase in the cost of further types of work.
Types of plaster beacons
Builders distinguish between several main types of plaster beacons.
It depends on the materials from which the lighthouse structure is made:
- mortar _ Lighthouses are some kind of paths, the upper part is a guide for the rules;
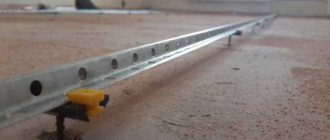
- metal _ The most popular type of lighthouse structures, which is made of aluminum or galvanized steel;
Important! Before use, such profiles are cut to size.
- plastic _ Not the most common material for a lighthouse, since it tends to bend strongly and often;
- wooden _ An even rarer lighthouse design, fixed with nails;
- strings.
Each design has its own characteristics, as well as pros and cons. Each builder chooses a material that is more convenient to use. For example, plastic beams tend to bend. Due to the material they are made of, it is very difficult to install them evenly.
Metal and wooden beacons, after use, must be removed from the wall after the solution has set and hardened. If this is not done, then metal beams will form rust spots, while wooden beams will begin to swell and spoil the overall appearance of the structure.
Materials and tools
Having understood the main advantages and types of lighthouse structures, it is worth talking about what equipment the builder will need to carry out installation work.
List of required materials:
- slats or profile for beacons. It is important that the dimensions of these materials correspond to the dimensions of the walls;
- plaster mortar for installation work;
Important! Builders advise using cement or cement-sand mortar for rough work. This is due to the cost of the material, as well as ease of use.
- primer. A necessary element to increase adhesion between the base and cement mortar;
- container for diluting the solution;
- level, it is better to use a laser level;
- rule;
- Master OK;
- grater;
- fishing line or wire;
- drill and screws;
- cleaning equipment (lye, brooms);
- protective equipment for the builder.
After the plasterer has stocked up on these elements, you can begin equipping the lighthouse system, followed by leveling the walls.
Wall marking
After preparing all the equipment, you can proceed to the next stage - marking the walls. For the classic version of marking, the builder will need a level, as well as a nylon thread. The builder needs to create a perfectly flat, vertical surface.
Sequential algorithm for the work performed:
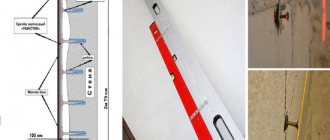
- At the first stage, you need to retreat a sufficient distance from the ceiling and walls. The distance from the ceiling should be 15-20 cm, while from the corner - 10 cm. Self-tapping screws are installed at the measured points, which should protrude 3-5 cm from the wall;
- Using nylon thread, you need to tie a plumb line to the first screw. Two additional points are marked under the thread. The first point should be 15 cm from the floor, and the second between the previously marked points. They do the same on the other side, and screw self-tapping screws into the marked points;
- This stage involves aligning the screw heads. To do this, stretch a nylon thread, which serves as a level for leveling;
- There should be a fishing line between the screws located opposite each other, which will indicate the evenness of the line;
Important! You need to tie the fishing line under the caps of the screws.
- The following points are outlined, which should be at an equal distance between opposite points. The approximate length is 10 cm. The screws are again screwed into this point;
- For all subsequent screws, the previous algorithm of actions is repeated;
- As a result, the builder receives a plane with which he can identify the highest point on the wall along which alignment will be carried out;
This is the simplest algorithm that determines the highest point. In the future, this will allow you to establish the exact height of the lighthouse structure.
Important! If clips are used to install the beacon system, then the builder needs to take into account the width of the building material.
Installing a beacon system in various ways
As a rule, there are several ways to install a beacon system. We propose to understand the most common of them.
Installation of a beacon system on plaster mortar
It is believed that this is the most common method of installing a beacon system. The beacon is installed from the highest point. Before installing the beacon, the builder measures 50 cm from the corner, after which he mixes a thick solution of cement mixture or adhesive.
Next, identical pancakes are placed at an equal distance from each other. Next, a metal beam (or another profile) is applied. It must be pressed to the highest point.
Then, using a level, the evenness of the beacon being installed is determined. If everything is as it should be, then the beacon is fixed with cement mortar, pressing into the surface until bubbles appear. The cement base around is smoothed out, and further work is carried out following the example of this design.
Important! The distance between the beacons must be at least 50 centimeters.
Installation of a beacon system without the use of mortar
If the builder is not satisfied with the option of installing beacons using mortar, then you can resort to a simpler option - installing a beacon system without mortar.
Sequencing:
- 6 holes are drilled at equal distances from each other;
- Self-tapping screws are screwed into these holes;
Advice! To compare the level, use a nylon thread.
- fastenings for the beacon profile are installed on the heads of the screws;
- The beacon is being installed.
A very quick way to install a beacon system, suitable for beginners.
Lighthouses from solution
The main condition of this method is a minimum layer of solution.
Important! Suitable for gypsum plaster only.
Marking is carried out along a vertical line, and 6 holes are drilled along it. Self-tapping screws are installed in them at one level. A thick layer of solution is applied along the intended line.
Next, take a sheet of drywall and press it tightly against the screw heads. The excess is removed, and the structure stands until it partially hardens.
Beacons on self-tapping screws are installed in a similar way. But, instead of drywall, 3 vertical threads are stretched between 2 screws. The remaining screws are mounted at the same level with these threads, after which they are filled with mortar.
After the solution has completely set, the beacon is ready.
Installation of beacons on the Kremmer latch
One of the easiest installation methods.
- The beacon profile is fixed in level with at least two fastenings;
- The space under the profile is filled with building mixture;
- Excess material is squeezed out;
- Excess construction mixture is removed using a tool.
In addition to using the Kremmer, there is another way to fix the beacon.
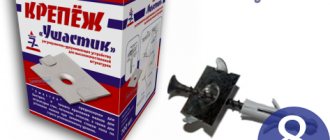
Installation of beacons on Ushastik
Algorithm of actions:
- Using a level, set the attachment points;
- The first “ear” is installed 10 cm below the ceiling and 20 cm from the wall;
- A vertical line is drawn;
- Installation of the remaining “Ushastik” located from each other: 50 cm vertically, 100-150 cm horizontally.
This is how the fastening is installed.
Expert advice
It is recommended to follow these recommendations to learn how to properly install beacons for plaster:
- Before starting work, the surface must be completely dry.
- Old coatings and dirt should be removed in order to work directly on the wall.
- Before installing the beacons, it is necessary to prime the surface.
- After the plaster has set, it is better to remove the beacon profile to eliminate the possibility of oxidation.
After the plaster has set, it is necessary to remove the beacons
Rules for plastering lighthouses
As for the basic rules:
- The number of lines depends on the tool pulling the mixture - rules;
- The building material should not be denser than the base;
- Before work, you need to carefully prepare the surface;
- When placing beacons you need to ensure accuracy;
- The solution is applied evenly;
- You need to pull the rule with light pressure;
- The profile is dismantled until the plaster has completely hardened.
In order to properly level the walls in a room, you need to use beacons. They will greatly facilitate the process of plastering walls and will help even beginners cope with such work with a bang.
Sealing corners
It is important to remember: correct plastering of corners is quite complex, but it is precisely this that determines the convenience of further finishing of the room. The accuracy of joining of skirting boards and ceiling cornices, ease of installation and integration of furniture and appliances, laying of communications, cladding or finishing of walls depend on how smooth the corners of the room are.
It is not enough to install the beacons correctly and quickly on the wall; it is necessary to maintain the verticality of the joint between the walls, walls and/or ceiling, floor. To strengthen the plaster composition, a reinforcing mesh or perforated corner is used.
The correct geometry is ensured by using a special trowel.
In this case, the sealing of parts of the wall adjacent to the corner can be carried out using a rule using a square and mandatory support on two or more beacons.