Strip foundations are often used in low-rise construction - they are easy to make, and they are universal, suitable for all types of buildings and almost all soils. Let's look at the strip foundation for a house from all sides: what it should be like according to construction science and standards, and how this theory is embodied by the hands of FORUMHOUSE users.
Design features Shallow strip foundation MZLF Fully buried strip foundation Tape: calculation algorithm How to build a strip foundation with your own hands Example: MZLF 11*14 m Example: foundation made of FBS 10x10 To help the strip builder
Design Features
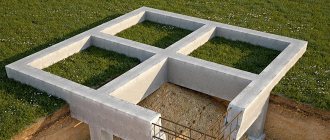
A strip foundation is a closed loop of reinforced concrete beams laid around the perimeter of the building and under the load-bearing walls, and transfers the load of the building to the underlying soil. Both light garden houses and frame houses, as well as heavy monolithic “castles” and stone cottages are built on it: the load-bearing capacity depends on the width and height of the tape. Even twelve-story apartment buildings are built on solid soils on strip foundations. Also, this type of foundation is used for houses with basements and basements - the tape is considered as a basement wall.
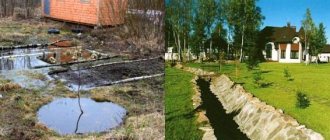
Almost all types of soil are suitable for such a design, except for unstable peaty soils - therefore, on weak-bearing and waterlogged lands of the Leningrad region, houses are built on complex and expensive foundations, but in Moscow such structures would be a waste of money.
A strip foundation is usually installed on a bed of medium-fraction sand with vibration compaction every 100 mm. The depth of the structure is calculated taking into account the characteristics of the site:
- presence or absence of basements;
- soil depth;
- weight and other characteristics of the building.
al185MODERATOR FORUMHOUSE
The foundation should be built not according to wishes and fanatically beautiful ideas, but according to calculation. The foundation in individual housing construction is calculated based on the design resistance of the base soil and the load of the object, with mandatory consideration of possible unfavorable factors: hydrogeological, frost heaving forces, heterogeneity of the base, subsidence and swelling soils.
All deformed houses with skewed openings are built on an incorrect foundation, calculated and built without taking into account the characteristics of the soil, groundwater level, weight of the house, etc.
Depending on the design features and depth of installation, there are several types of strip foundations.
By design:
| Type | Design Features |
| Monolithic | One-piece reinforced concrete casting with high strength and maximum load-bearing capacity. It is poured in one go. The reinforcement must be of high quality, of appropriate cross-section - this provides resistance to bending loads. |
| Made | Consists of factory foundation blocks (FBS). It is somewhat inferior to monolithic tape in terms of performance properties; it is often used in low-rise construction. To increase the stability and durability of such strip foundations, a sand cushion is made, specialized FL reinforced concrete soles are placed on it, and FBS is placed on top of them on a cement-sand mortar. This structure can be topped off with an armored belt for strength and even distribution of loads. |
By depth
| Type | On what soils is it used? |
| Non-buried | Only on rocks and completely motionless soils, so it is done extremely rarely and not for houses, but for outbuildings. Such a strip foundation is made only monolithic. |
| Shallow | On strong soils that are not susceptible to frost heaving. They are laid to a depth less than the freezing level of the soil. |
| Fully recessed. | Suitable for almost all soils and hydrogeological conditions, deepened below the calculated freezing depth (but not on hard clays and sandy soils with low groundwater level). Performed in trenches and pits with backfill. |
Such a number of varieties of strip foundations, both monolithic and made of blocks, allows you to make the right choice for the conditions of a particular site and get a good result. The strip foundation has one big drawback (not counting the abundance of excavation work and the time it takes for the concrete to mature after pouring) - it can be expensive, so if we are talking about light buildings, it is better not to choose another option. But still, the strip foundation has obvious advantages, these are:
- long service life;
- high load-bearing capacity;
- the loads of the house are evenly distributed on the soil foundation;
- The construction technology is quite simple.
Pouring directly into the ground, or the so-called “Kuban version” of a strip foundation, is a violation of technology; FORUMHOUSE warns against this.
RNikonovForumHouse Member
I consider the construction of a strip foundation with pouring “into the ground” unacceptable. It is almost impossible to make a tape “in the ground” with high quality.
Methods for reducing depth
The depth of the strip foundation directly affects construction costs. To build a one-story house, a deep foundation is not required, therefore, the costs will be low. However, for heavier and more massive buildings, considerable costs will be required, which owners are trying to reduce by reducing the depth.
One of these methods is soil replacement - first, they dig a pit much larger than required and replace the heaving soil with non-heaving soil. This method is quite complex and difficult, as it involves large-scale work.
Another option is to use blind areas - concrete platforms to lower the GPP and prevent it from becoming waterlogged. The blind areas must have a slope of up to 10 degrees, and their width is determined based on the properties and type of soil.
It is possible to lower the boundary of the passage of groundwater passing under the object due to ditches equipped with outlets for liquid. Such designs are very effective and eliminate excess liquid in spring or rainy weather.
Shallow strip foundation MZLF
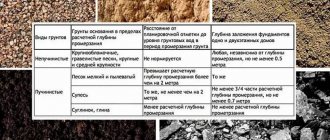
According to SP 22.13330.2011 “SNiP 2.02.01-83*. Foundations of buildings and structures,” the type of MZLF depends on the degree of heaving of the soil.
RolandspbFORUMHOUSE Member
There are restrictions on the type of foundation for different types of soil heaving. Loam with different fluidity indicators can be classified into any group according to the degree of heaving; therefore, with more fluid loam, according to the joint venture, it is necessary to make a monolith.
Thus, it is recommended to make MZLF made of monolithic reinforced concrete on heaving soils with a groundwater level no higher than 1 meter from the ground surface.
It is laid above the freezing level, at a depth of 200-500 mm from the surface. With a low manufacturing cost, these foundations are characterized by high reliability; they last 15-20 years without repair.
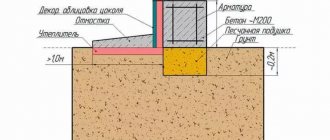
The only thing: MZLF needs high-quality insulation - both the tape and the blind area - to reduce the impact of frost heaving. According to their design, MZLFs are divided into two types: classic rectangular section and T-shaped.
The MZLF sole with a T-shaped section makes the support area larger and works on bending, and the upper rib receives vertical loads from the structures above.
Heavy stone buildings are built on shallow strip foundations with a sole, while rectangular ones are suitable for frames and wooden buildings.
On slightly heaving and non-heaving soils, you can make a shallow tape of FBS.
How to calculate how much to deepen?
The need for preliminary calculations of the foundation depth is explained by the following reasons:
The lower the reinforced concrete pad is lowered, the higher the load-bearing capacity of the solid bottom underneath it.- For areas with a high clay content, trenches are laid below the frost line or measures are taken to minimize the heaving factor.
- The soil at the construction site must be strong enough to support the weight of the building.
- The physical and chemical composition of the earth under the base of the house should not change much due to temperature changes in the environment.
To calculate the underground part of the tape you need to know:
- freezing depth (Dfn);
- a correction factor that takes into account the thermal conditions in the house (K).
As mentioned above, the degree of freezing is determined by the climatic conditions in the region. The value of this indicator can be taken from reference literature.
The freezing depth for some Russian regions is given in the table (the predominant soil types are taken into account):
| City | Freezing line, m | City | Freezing line, m |
| Arkhangelsk | 1,75 | Moscow | 1,30 |
| Vladivostok | 1,80 | Nizhny Novgorod | 1,55 |
| Ekaterinburg | 1,90 | Eagle | 1,30 |
| Kazan | 1,75 | Ryazan | 1,30 |
| Krasnoyarsk | 2,00 | Saint Petersburg | 1,20 |
| Kursk | 1,30 | Chelyabinsk | 2,15 |
Coefficient K is a reference value that reflects the average daily temperature in the room adjacent to the foundation. For clarity, below is a table from which you can take the coefficient for calculations:
| Temperature in the building, oC | Correction factor K | |||
| ground floor | floor on joists | insulated basement floor | basement | |
| 0 | 0,90 | 1,00 | 1,00 | 0,80 |
| 5 | 0,80 | 0,90 | 1,00 | 0,70 |
| 10 | 0,70 | 0,80 | 0,90 | 0,60 |
| 15 | 0,60 | 0,70 | 0,80 | 0,50 |
| 20 and above | 0,50 | 0,60 | 0,70 | 0,4 |
So, how deep should you dig? Using the available data, you can calculate the depth of the sole (Df) using the formula: Df = (Dfn * K) .
As a clear example, you can choose a house with an unheated basement in Yekaterinburg, where the temperature in the basement itself is kept at 10 ° C during the day. By substituting the tabular data into the formula, you can easily obtain the estimated foundation depth: Df = (1.9 * 0.6) = 1.14 m.
Let us assume that in the selected area the groundwater passes above the freezing line. Then you need to add 15 - 20 cm to the obtained value for the stability of the base. At what depth should the foundation be laid? The calculation shows that the reinforced concrete strip must be laid to a depth of at least 1.29 m.
Fully recessed strip foundation
This type of tape is suitable for any buildings, except frames and houses made of SIP panels - for them its load-bearing capacity is excessive. It is made from FBS, monolithic reinforced concrete, and solid brick.
This type of foundation requires careful calculation - it is necessary to take into account the ground level, geological features (this type of foundation must rest on dense layers of soil with high bearing capacity); if basements are planned, their height is taken into account.
Such foundations are made 150-200 mm below the soil freezing depth. The groundwater level should be no higher than 500 mm from the bottom of the sand cushion, but it can be higher if you make very good waterproofing and drainage. Just like MZLF, a recessed tape can be rectangular and with a sole, but the second option is used in the construction of high-rise buildings; for low-rise construction this may be redundant.
The recessed strip base is made either monolithic or prefabricated from FBS blocks. A monolithic strip foundation is inferior to a block foundation on soft and crumbly soils - masonry joints make the structure flexible enough so that cracks do not form on it.
Melnich23 Member of FORUMHOUSE
A foundation made of FBS significantly speeds up the construction process, all reinforcement and other parameters have long been calculated by the designers, assemble it yourself calmly. With a monolith, only when tying the reinforcement you will curse everything, and there’s also the formwork and pouring!
Hardening times and finishing work
It is necessary to keep the base until it hardens completely. The surface is covered with polyethylene to protect from sunlight. For the first 3-4 days, the flooded tape is watered with water every 4 hours . Moisture allows you to remove the load and level the inner layers of the material. Afterwards, watering is done every 8 hours for a week .
The formwork is removed after 10 days , and further work is carried out after 28-30 days.
There is no need to rush and shorten the exposure time. The foundation is the most important element in construction, so breaking the rules is highly discouraged.
As soon as the base has completely hardened, the final stage of arrangement is carried out. First , fill the sinuses with clean river sand. This way you can remove excess moisture through the drainage system. Backfilling is carried out from the outside and inside to protect the foundation from leakage of groundwater.
Pouring the blind area is another final stage in the construction of a strip-type base. It allows you to protect the trench from water flowing down the walls. The concrete strip carries moisture to the adjacent soil and is drained into a drainage tray. Backfilling and pouring should not be neglected, since these procedures are as important as the other stages of foundation construction.
Waterproofing and insulation
Experts do not recommend abandoning the installation of waterproofing, since moisture gets not only onto the concrete, but also onto the reinforcing frame, negatively affecting the rods. There are two types:
- Horizontal. It consists of two layers of roofing material, between which there is bitumen mastic. The tape is insulated from below before installing reinforcing rods, and from above - after the hardening process.
- Vertical. Special materials are applied to the sides of the tapes to protect the concrete from water ingress. These can be various impregnations, coatings, and pasting solutions. The most effective are those that completely eliminate the penetration of moisture.
To avoid the formation of condensation and keep the inner layers of the tape dry, install insulation. It is especially important to carry out this procedure in rooms where the construction of a basement is planned. Penofol, foamed polyethylene, and pegopolyurethane are used as external and internal insulation of the tape.
Tape: calculation algorithm
This issue is given great importance at FORUMHOUSE.
al185MODERATOR FORUMHOUSE
I beg you not to prescribe a foundation design based on “people’s experience” and the advice of various advisors who “have always built this way.”
A member of our portal with the nickname MaximGvozdev created the LentaOnline v calculator. 1.0, which will help with the construction of this type of foundation. The tool can calculate the resistance of the foundation soil, the width and length of the designed tape, reinforcement and concrete, concrete composition, and the number of concrete batches in a concrete mixer.
For beginners, the FORUMHOUSE moderator with the nickname al185 recommends first deciding on the soil conditions (soil composition, groundwater level, topography) to design a strip foundation and resort to the following methods:
- Ideally, order a project from an adequate designer who can get good recommendations on FORUMHOUSE.
- You can borrow an already calculated analogue foundation design for similar soil conditions and a similar building.
- Master design for amateurs: an algorithm for designing a strip foundation for dummies.
Next, you need to compare the cost of the options received and choose the appropriate one.
Frost-resistant soils under the foundation
On unstable soil, it makes sense to replace its top layer with coarse rocks that do not support the capillary supply of water, do not heave and do not destroy the foundation.
Experts advise installing a sand and crushed stone cushion, sometimes mixed with old soil, not only under the tape monolith, but also around it.
The listed methods can be combined to achieve better geological conditions and reduce the depth of the base.
How to build a strip foundation with your own hands
To build the ribbon you will need the following materials:
- For formwork: edged board 15-20 mm thick;
- For waterproofing formwork - waterproofing material;
- For the reinforcing frame - corrugated reinforcement with a diameter of 14-20 mm; to twist the reinforcement you will need knitting wire;
- For the pillow - sand and crushed stone;
- For pouring formwork in low-rise construction, concrete grade M200-M300 is used - this is more than enough.
bobik123FORUMHOUSE Member
Read the forum... they want to use the M500 for the fund. Your houses must be registered with the military registration and enlistment office in order to be transferred to bunkers in wartime. And the forum will be renamed “How to build a fortification structure to survive a nuclear strike.”
RemstroygarantFORUMHOUSE Member
I’ve been building country houses for ten years, and I use concrete M200 - M300, and not M150, in the foundations, just so that the customer’s soul is at peace.
You should also take into account that the strip base is poured in one go, so it is recommended to buy ready-made concrete.
These instructions for building a strip foundation with your own hands provide that all soil research work has been completed, all calculations have been made, the optimal type of strip has been selected and its parameters have been calculated, and all this has been done professionally and competently. The construction site is cleared of anything that could interfere with the work . The construction of the tape consists of the following stages:
- Marking;
- Excavation;
- Drainage device;
- Pillow device;
- Placing formwork;
- Reinforcement;
- Pouring concrete mixture.
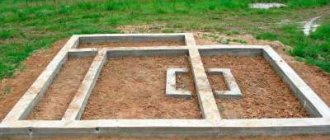
The construction of the tape begins with markings - the straightness of the foundation and its technical and operational properties depend on how correctly it is done.
How to markup:
- Remove the top layer of soil by 20-20 cm over the entire area of the future house;
- Mark the contours of the tape using wooden pegs and cords.
- Drive in stakes with a slight indentation from the axes of the walls;
- Pull the cords, check the difference in diagonals - the permissible maximum deviation is 20 mm.
The trench can be dug manually: equipment is used to prepare wide trenches. The bottom of the trench is leveled and a drainage system is made with a general slope of 3-4° away from the house. Its structure is clear from the diagram below.
EvanFORUMHOUSE Member
The deviation from the protrusion of the foundation to the axis of the drain is equal to half the width of the fractional filter (usually a two-layer) drainage pipe + the excess of the base of the foundation above the bottom of the drainage trench, divided by the tangent of the angle of internal friction of the soil. Typically from 1.6 to 2.8 m.
Drainage pipes are laid in recesses filled with crushed stone (with compaction), the bottom of which is covered with geotextiles, and are filled with crushed stone to the level of the beginning of the tape.
Drainage is not a necessary step, especially if the house does not have a basement, and many instructions for making a strip foundation with your own hands skip it.
gmu9765 FORUMHOUSE Member
In a humid environment, concrete only gains strength over time, sometimes even higher than that specified by the project.
The next stage is creating a pillow. For a pillow, you can only use coarse or medium sand; fine sand inevitably shrinks. At least 150-200 mm of sand is poured onto the bottom of the trench, wetted with water and compacted, and the same amount of gravel or crushed stone of a fraction of 20-40 mm, the stones are compacted layer by layer.
Experienced FORUMHOUSE Member
Crushed stone compacted into sand reduces the flow of capillary moisture into the foundation body.
In practice, many people make a pillow only from sand, saving on crushed stone.
al185MODERATOR FORUMHOUSE
P/e film placed in the formwork and left on the concrete makes the difference forever.
Next, the formwork is placed:
- non-removable, for MZLF, made from sheets of polystyrene foam;
- removable, for all types of tape, assembled from edged boards.
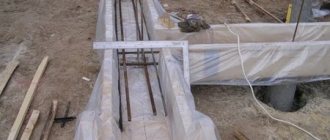
So that the concrete does not dry out, but gains hardness, and the cement laitance does not leak out of the structure, the wooden formwork is covered from the inside with either waterproofing, or, if the waterproofing will be done after concreting, with ordinary polyethylene film.
Reinforcing frames are installed in the prepared formwork, which are made from corrugated reinforcement.
- The cross-section of the longitudinal rods should be 14-20 mm;
- The cross-section of the transverse rods is 8-12 mm.
- The wider the tape, the more rows of longitudinal reinforcement there should be. Between the formwork and the reinforcing frame on all four sides, gaps must be left for a concrete layer that will protect the reinforcement from corrosion.
- Welding of reinforcement is not allowed, it negatively affects the strength of the rods, so only knitting wire.
The last stage is filling the tape.
The strip foundation is poured in one step; in extreme cases, breaks of 1-2 hours are allowed. What subtleties should you pay attention to:
- For high-quality pouring, it is important not to distribute the entire volume of concrete from one place, but to supply it to several different places so that the properties of the concrete do not deteriorate during distillation.
- The horizontal plane of the foundation must be below the sides of the formwork.
- The maximum height of concrete discharge should not exceed 2 m.
- After pouring, the concrete must be compacted with an internal vibrator. This is a mandatory stage and cannot be neglected.
After pouring, the concrete should be covered with a film to prevent unnecessary evaporation of moisture, and the foundation itself will have to be moistened regularly throughout the week. They begin to water the tape 8-12 hours after pouring, in hot weather - every 2-3 hours, in cool and cloudy weather every 4-5 hours. The foundation is not watered if the outside temperature is below +5 degrees.
The concrete must harden correctly, then the structure will not crack and will be strong. It will take a long time to gain hardness, but it will be possible to continue working with the tape within a week: there is a rule of seven days and twenty degrees that concrete needs for this.
Either coating waterproofing is applied to the finished tape, or it is covered with a special GI pasting. It is important to treat all surfaces, both vertical and horizontal, to avoid capillary suction of moisture from wall materials.
The last stage of work is backfilling. Here, too, careful compaction is required. Then a blind area is made around the entire perimeter of the house.
Installation stages
The corners of the trench are cleaned and sand is poured onto the bottom . It must be clean, free of debris and clay. The sand layer is thoroughly compacted, sometimes watered. Then add fine gravel or crushed stone , which is also compacted as much as possible. on top and the drainage pad is covered with geotextile . Concrete base is poured onto it or several layers of roofing material are laid out.
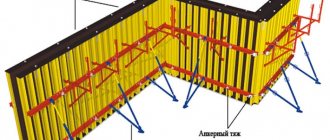
Formwork
The formwork for the strip foundation is assembled only from even boards slightly wider than the height of the strip itself . It is necessary to avoid the appearance of cracks that are immediately clogged with slats or filled with tow.
The created shields are assembled into a solid system already in the trench, aligned along the axes and adjusted to size. They are fixed with crossbars from the inside and stops from the outside, which will keep the formwork motionless.
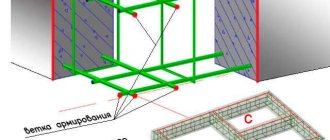
Reinforcement
Concrete is considered an extremely pressure-resistant material. But it doesn't respond well to stretching. To strengthen the tape, a reinforcement frame made of metal or fiberglass rods .
It consists of working horizontal rods that take on external loads. Vertical elements support the working rods in the required position.
The frame is assembled by knitting with wire . It is bent in half and brought under the joint, grasping the joint. Then use a hook to twist it several turns, firmly connecting the rods.
Valera
The voice of the construction guru
Ask a Question
In some cases, welding is used instead of knitting, but wire fastening is much simpler and cheaper. In addition, loads may occur during pouring. The connected rods are movable, which avoids pressure. Welding cannot withstand such conditions and breaks.
Fill
This stage of work requires preliminary preparation. The entire filling procedure is performed immediately, without interruptions . If you allow a gap to break within a day, you will have to wait for the concrete to completely harden, and if you continue pouring, a solid structure will no longer be possible. Previously hardened areas will not combine with fresh pouring, so you need to stock up on ready-made concrete in the required quantity.
You need to start pouring from the inner parts of the tape , gradually moving to the outer perimeter. The formwork is filled from different areas, evenly distributed over the entire area.
You cannot pour concrete in one place, as it will not be distributed evenly without outside intervention.
To ensure that the material lies as tightly and evenly as possible, use a tray that can be moved along the formwork. So the tape at any point will be filled with quality and integrity.
Example: MZLF 11*14 m
When building a foundation, future homeowners use different materials and offer their own solutions. Let's look at a few examples of tapes made by members of our portal. The work of our user with the nickname Alexey_$ received good reviews.
Alexey_$ FORUMHOUSE user
The height was 90 cm, they were buried 60 cm, of which in the end there was 30 cm of sand cushion and 30 cm of tape underground. The width varies and is indicated in the foundation design.
The trench was dug with a tractor according to markings made with white spray paint directly on the grass. While digging, Alexey “shot the level so as not to over-dig or under-dig.”
Small errors were eliminated with a shovel. High-density waterproofing material was laid in the trench.
The foundation design provided for a 30 cm sand cushion; pouring and compaction with a vibrating plate was done every 10 cm.
Alexey_$FORUMHOUSE Member
After all the manipulations, the error in level was within a centimeter over the entire area.
Ruberoid was laid out on the pillow in two layers
and set up the formwork: longitudinal boards 150x40 mm, every 60 cm - 100*50 mm. The inside of the formwork was lined with polyethylene and reinforced with 8-diameter studs.
12 mm reinforcement was knitted in 2-4 rows depending on the thickness of the tape (400 - 650 mm). The protective layer on the bottom was 5 cm, on the other sides 3-4 cm. Every 40 cm there were vertical jumpers with 8 mm reinforcement.
Alexey_$FORUMHOUSE Member
Spliced at least 50 cm, mating, where necessary, was carried out in a run.
Pouring concrete:
The foundation was covered with polyethylene. A little more than a week passed, the inside of the formwork was dismantled and waterproofing was done.
Backfilling: 10 cm of sand along the tape, the rest is sulinka - 5 cm below the level of the upper edge of the tape.
To reduce heat loss into the ground, the voids were insulated with EPS. This is part of the complex insulation of the sub-foundation space: voids + tape outside + blind area.
Alexey_$FORUMHOUSE Member
The house will have to spend the winter without heating for a couple of years and the influence of frost heaving forces will be reduced.
Optimal distance for various buildings
You cannot rely only on the size or purpose of buildings, since in addition to the weight of the house, the type of soil plays an important role.
The denser the underlying layers, the smaller the width of the tape can be made during construction.
For auxiliary and utility buildings, the width of the tape is allowed:
- Dense (rocky) soil, clay - 25 cm.
- Loam - 30 cm.
- Sand, sandy loam - 35 cm.
- Soft compacted sand - 40 cm.
- Very soft sand - 45 cm.
For one-story light houses (dacha, frame house):
- Dense (rocky) soil, clay - 30 cm.
- Loam - 35 cm.
- Sand, sandy loam - 40 cm.
- Soft compacted sand - 45 cm.
- Very soft sand - 50 cm.
For two-story cottages:
- Dense soil - 50 cm.
- Loam - 60 cm.
- Other types of soils do not have average indicators and require separate specialized calculations.
It must be borne in mind that average values are rarely suitable for specific situations, since there are always a lot of additional factors not taken into account in the tables.
The impact of these factors can radically change operating conditions and require a separate calculation, sometimes made using a completely different methodology.
Example: foundation made of FBS 10x10
For his house, a user of our portal with the nickname Zheka888 built a foundation from gas silicate blocks - a strip of FBS. The soil in his area is heaving, the freezing depth is 1-1.2 meters.
Scheme of work:
- We dug a pit 1 meter deep;
- We made a tape without a sand cushion using six bars of reinforcement No. 14. The structure is built on dense continental soil. Width 500mm, height 400mm. The sole is not rated - Zheka was criticized for this on the forum;
- We installed three rows of FBS 400mm wide (height 1800mm);
- Two layers of waterproofing were applied on the outside;
- Covered with 20 mm EPPS;
- The sinuses were filled with clay. Additionally, they compacted it with a bulldozer;
- We made an armored belt with a height of 200-250mm using four bars of reinforcement No. 16;
- We poured a lintel over the basement gate, length 2800mm;
- Covered with floor slabs.
FBS is inferior to a monolithic strip foundation due to the large number of seams, they are also cold bridges. According to the well-known saying, “water will find a hole” - you need to take a particularly responsible approach to the issue of waterproofing.
And here is a foundation similar in design, made by FORUMHOUSE user with the nickname MartynovD: reinforced sole 500x500 - three rows of FBS - armored belt 400x300-PB-74. The slab above the door lies on an armored belt, reinforced in two layers of three D12 rods, B20 concrete.
MartynovD FORUMHOUSE user
When I was building it, a lot of different people walked by. And everyone said: “Where is such a margin of safety on the sole, on the armored belt, etc.” But I did it in accordance with the project.
To help the tape builder
Anyone can build a strip foundation for a house, provided all calculations are completed and all work is carried out responsibly. Our users, without much construction experience, made their monolithic strip foundations and structures from FBS, literally following the technology and strictly observing SNiPs. The materials on our portal will help you achieve a successful result.
On FORUMHOUSE you can get all the necessary theory, documents, constructs, reports, find step-by-step instructions for making a strip foundation with your own hands, study the strip design algorithm, read articles with arguments against carrying out geotechnical surveys and finally decide for yourself the main question: is it true? you need a sand cushion under the tape.
Our video talks about how to independently build a reliable foundation on problematic soils.
Subscribe to our Telegram channelExclusive posts every week