Autonomous heating, be it a multi-story house or a small bathhouse, requires a properly installed chimney pipe. The safety and efficiency of the entire heating system depends on how correctly it is installed.
One of the most important components of a complex smoke exhaust design is the chimney box. You can install it yourself when the roof is ready or provide for this possibility at the construction stage.
What is it and why is it needed?
Any chimney is designed to discharge combustion products to the street. Naturally, they pass through it in a hot state, so in areas of ceilings (ceilings, attics, roofs) a hot stove or fireplace pipe will be a fire hazard.
For fire protection, thermal insulation of the chimney is provided, in particular through the so-called cutting. This is where the construction of a box around the chimney plays an invaluable role. The cutting material is placed in a casing, which is made of non-flammable material and can be of different heights.
Its second important function is the decorative decoration of the pipe protruding on the roof, especially if the pipe does not fit into the overall design.
Terms of Use
Elastic rubber penetration Master Flash is the best option for waterproofing the gap where the chimney passes through the roof. However, it is not suitable for all cases. Professional roofers and manufacturers recommend using this device for DIY installation on the following types of smoke exhaust ducts:
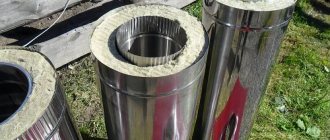
- Sandwich chimneys. Between the two galvanized steel contours of these pipes there is a thermal insulating layer of basalt fiber. The insulation retains heat in the inner pipe, so the outer surface of the chimney remains cool. Rubber models are used to waterproof sandwich pipes.
- Stainless steel chimneys. Stainless steel chimneys that remove combustion products from solid fuel stoves are heated to high temperatures. Therefore, heat-resistant silicone penetrations are used to seal the target between the roof and the pipe. The use of conventional rubber models is possible if the chimney is connected to a condensing-type gas boiler.
Note! If you want to insulate the outlet of a bare pipe with Master Flash, you can use a special sleeve. A section of 50-100 cm is cut out of a pipe whose diameter is larger than that of the chimney. The section of the chimney passing through the roof is tightly wrapped with fireproof material, and then the sleeve is put on and secured with a steel clamp.
Advantages and disadvantages
The construction of the duct creates the following advantages for chimney owners:
- the chimney will be protected from the destructive effects of natural forces - wind, rain, snow;
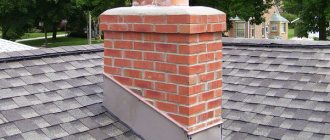
- protects brick chimneys from the formation of condensation and its destructive effects;
- by insulating the pipe, it ensures normal traction;
- pipes with a beautiful finish look aesthetically pleasing on the roof;
- a correctly constructed element reliably protects the building from fire.
The disadvantages include:
- additional expenses.
Make it yourself or buy it
It is quite easy to construct the device, but this will require free time and tools; with this solution, all dimensions can be perfectly adjusted on site. Finished products are also in demand, so the choice is entirely individual.
I advise you to do it yourself, because confidence in the high-quality assembly and components will allow you to completely rely on the casing and be maximally protected from various troubles associated with destruction and fire.
By doing the production work with your own hands, you can significantly save the family budget without losing the practicality of the product, which is an important factor for most owners.
Types and designs of boxes
The boxes are:
- stoves;
- for roofing;
- for ventilation;
- decorative.
Usually the boxes are made of metal. They are painted in a suitable color and last a long time.
Stainless steel products are used for decorative elements on the roof and indoors.
Galvanized devices complete with plastic elements are cheaper, so they are used more often.
Boxes in the form of a wooden frame are installed only for lining brick chimneys. In addition, they must be additionally covered with a metal casing.
Boxes made of fireproof plasterboard are installed indoors for decorative purposes, in attics; they cover channels embedded in the wall.
The smoke exhaust area on the roof is protected by a metal decorative casing with an umbrella.
Why do you need a pipe casing?
The chimney pipe on the roof is a very important part of the chimney structure. Its location, the material from which it is made, as well as additional devices on the chimney - all this affects the draft performance in the system. This part of the chimney structure is located outside the building, so it is affected year-round by various destructive environmental factors: precipitation, wind, temperature changes.
Regardless of what material the chimney is made of, these factors gradually destroy it, which inevitably leads to a deterioration in draft performance in the system. And as you know, traction is the main indicator that determines the performance characteristics of the system as a whole . Therefore, installing a protective casing on a chimney pipe not only provides its protection, but also extends the service life of the chimney structure.
Let's look at the main functions performed by the box covering the part of the chimney located above the roof:
- such cases protect the chimney from mechanical damage and pipe destruction under the influence of environmental factors;
- covers create an additional margin of safety (this function is especially useful for regions where the wind load exceeds the permissible level);
- thermal insulation of the chimney. Boxes installed on chimneys reduce heat loss, which has a positive effect on draft in the system.
The casing can be used to protect chimneys made of different materials; this element is placed on an already finished pipe
Note! The chimney cover is also a decorative element that can be used to hide an unpresentable structure.
The installation of such casings, as a rule, is carried out after installing the chimney structure, however, this measure is also relevant for old buildings, since it allows you to protect the old chimney from destruction.
Tips and tricks for choosing
The choice of duct is determined by the type and size of the chimney. The main selection criterion is the diameter for the passage of the pipe.
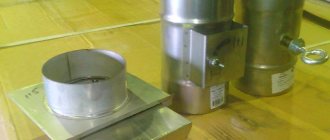
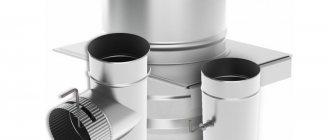
For the passage unit in the ceiling, a product is selected that consists of a stainless steel plate and a neck, the diameter of which is slightly larger than the chimney.
The design of the stainless steel platform is quite suitable for mounting on the ceiling of the house.
The photo shows the main configurations of manufactured boxes:
The roof box shown in the bottom photo can be purchased according to predetermined dimensions or ordered to be manufactured.
The cost of finished products varies from 550 to 1900 rubles and more.
Chimney insulation in a bathhouse
When solving the problem of how to insulate a metal chimney pipe in a bathhouse, the safety of people must be given priority.
The main threat in this room is the presence of live fire. In this case, it is necessary to isolate. Without proper protection, the ceiling easily catches fire.
Most often, a bathhouse is built from wood, and as you know, this material is highly flammable. Many people mistakenly believe that covering the ceiling with sheets of metal will provide excellent protection, and that there is no need to insulate it further.
But this protection heats up and this will not save you from fire. You can insulate the pipe with red brick, but not every bathhouse design is suitable for this.
The market for modern building materials to insulate the chimney provides several products:
- Folgoizol. A sauna with this finish is similar to the design of a thermos. Heat is not lost, the room warms up quickly and cools down for a long time.
- Thermal insulation. They can be wrapped around the chimney pipe and secured with wire or special metallized tape.
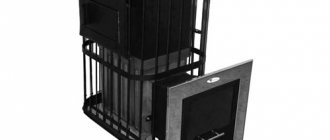
A godsend for a bathhouse is called a sandwich - pipes that are characterized by high safety. With them you don't have to worry about isolation. This structure is constructed of several sections that are easily inserted into one another. This is suitable even for a bathhouse with a metal stove.
Red brick is used for the construction of a traditional Russian bathhouse. It is not exposed to high temperatures and retains heat for a long time.
Such a building must fit correctly. Because the duration of use of the structure depends on the quality of the masonry.
It is not recommended to save on such a construction, because the cost of repairs can be much higher.
Making and installing a box with your own hands
If you want to save money, you can make the casing yourself. At the preparatory stage, the location of its installation is determined, the required dimensions are taken, the material is purchased, and the tool is prepared.
Required tools and materials
You will need:
- metal scissors;
- riveter;
- hammer;
- pliers.
Materials you will need:
- galvanized sheets
- rivets.
The approximate price of materials will be about 500 rubles.
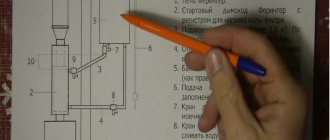
Drawings and diagrams
Box for ceiling cutting:
Scheme of the casing of the ceiling-passage device:
Installation of the box in the ceiling:
Exiting the chimney through a ceiling duct:
Ceiling trim installation diagram:
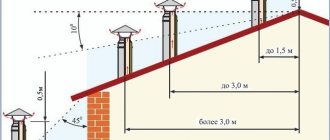
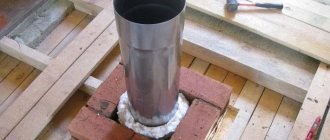
Passage to the roof:
Size calculation
The size of the box is determined by SNiP standards based on the cutting dimensions of 500 mm for wooden floors. When the floors are protected with a reinforced layer of plaster of 25 mm, or iron with an asbestos lining underneath of at least 8 mm thickness, the size is reduced to 380 mm.
On the roof, there must be at least 130 mm (13 cm) from the outer surface of the pipe to the border of combustible structures.
The thickness of the cut should overlap the thickness of the ceiling (ceiling) by at least 7 cm.
The diameter of the hole in the box should be made approximately 0.5 mm larger than the outer diameter of the pipe, so that the pipe can freely fit into the hole.
The perimeter sides of the casing base must be cut 5 cm larger than the cutting size so that they can be attached to the ceiling.
Work progress
A homemade box is made from galvanized sheets, cut to size:
- the center is found in the bottom through the drawn diagonals;
- punch a hole with a nail, draw a circle;
- Through the hole, use scissors to cut a hole to fit the diameter of the pipe.
The sidewalls are made of 4 sheets, fastened with a riveter, no less than 4 rivets per seam.
First, the lower parts are bent to a width of 5 cm and the resulting structure is riveted to the base through them.
Installation stages
The box is installed in a pre-drilled hole in the ceiling.
At rafter connections, supports are made of a wooden frame or metal profiles.
The finished casing is installed on these supports.
A segment of the chimney pipe is inserted into it through the hole and secured with the previous element.
The free space in the box is filled with mineral wool and expanded clay.
The roof cutout for “sandwiches” is made in the form of an iron cone located at a certain angle on the plate. The pipe structure is inserted into the cone. Sealing is done using a sealant. Part of the apron is inserted under the overlying sheet of roofing.
Roof trims can also be of a different type, for example, made of polymer materials on a metal base.
Decorative finishing of chimneys is carried out by cladding a material suitable for the style of the roof over a frame made of metal profiles.
Installation stages
Installation of the chimney box begins from the bottom, before the pipe itself is laid. The process is divided into stages:
- A frame is created for the opening in the ceiling. To do this, U-shaped elements are installed alternately on opposite walls. The rectangular halves are overlapped, forming a continuous metal insulation. Then screw the bottom to the ceiling with self-tapping screws.
- After this part of the casing is assembled, the chimney is passed into it and fixed on 4 clamps bent in the central part of the rectangle.
- The upper parts are installed and secured, thereby reaching the top of the pipe.
- At the end, the empty space is filled with expanded clay, dry earth or other insulating material. The end is covered with a metal lid.
Before installing the facing covering on the roof, the place where the chimney comes into contact with the passages must be insulated with roofing felt or plastic film. Install it overlapping the casing and the overlap plane. To prevent the waterproofing from being visible, it is covered with a decorative corner around the entire perimeter.
Frequent errors and problems during installation
Violation of the standard dimensions for the placement of the duct and smoke ducts in the ceiling opening, which leads to conflict situations with the fire service.
An umbrella that is too large and installed on the top can cause brown streaks on the roof. Condensation formed on its cold surfaces all winter. The area of the umbrella must be reduced.
The same situation can arise with a metal box on the roof that immediately covers the smoke and exhaust ducts. Expanded clay poured to the edges of the channels in this casing will help.
A wide gap between the pipe and the penetration - as a result, the laid fine expanded clay falls down.
Using penetration without backfilling with thermal insulation material. There is practically no protection.
If the roof is insulated...
Very often the problem arises - how to remove the pipe through an insulated roof? Ensuring the correct connection of the roof to the chimney is not very simple, because the complex design of such a roof will require fire protection over its entire area. In accordance with the rules of SNiP, flammable materials must be removed from chimneys at a distance of 13 -25 cm, depending on their types.
The optimal solution to the problem in this situation would be to separate the area adjacent to the roof from the pipe.
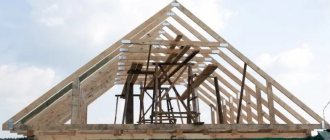
- Lay the rafter legs on the sides of the pipe.
- Attach cross beams below and above the thickness of the rafters. That is, you need to make a box of wood that separates the chimney pipe from the roofing pie, and place the chimney in it. The distance between the walls of the pipe and the box will need to be filled with a heat-insulating element, possibly with basalt wool.
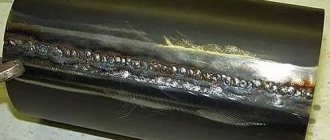
How to wrap a metal chimney
How to wrap a metal chimney pipe is not difficult to decide. The building materials market offers many products for this.
Potbelly stove 2 Installation and insulation of the chimney
IMPORTANT! The most important thing you need to know when performing insulation is that you cannot use a coating that contains flammable substances.
It is better to insulate with a good quality product that complies with fire and building regulations. This will create additional security conditions.
The most commonly used options are:
- Fibrous building material;
- Mineral wool;
- Glass wool.