December 4, 2016 Stroyexpert Home page » Foundation » By construction project
The process of attaching joists to the foundation
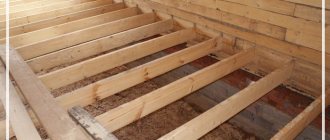
Having completed the installation of the foundation of a house of one type or another, you can begin installing the floors of the first floor. They are based on wooden beams or rounded logs laid horizontally directly on the base of the house. It is possible to do such work with your own hands only after carefully studying all the features of the process.
How to attach joists to the foundation
The process of attaching the logs to the foundation
Having installed the foundation of a house of one type or another, you can begin installing the floors of the first floor. They are based on wooden beams or rounded logs laid horizontally directly on the base of the house. It is possible to do such work with your own hands only after carefully studying all the features of the process.
- Beams as they are
- Attaching joists to the base of the house
- Attaching beams to strip foundations
- Installing joists on a slab base
- Installation of joists on the floor
Secrets of each type of fastening
Sometimes metal corners are used for fastening, but they are not fastened as shown. Shown is a corner that can be attached to the vertical surface of the foundation, and logs can be placed and secured on the horizontal part of the corner. The image shows a stiffening rib, which makes the corner’s resistance to bending force on the horizontal plane more reliable.
For fastening to the foundation, the corner has a sufficient number of holes of different diameters. Fastening in this way will be reliable if the total cross-section of all fastening elements (dowels, screws, nails, etc.) can ensure their shear strength. After all, these elements will be subject to transverse force, and not a single specialist can tell by eye how many fastening elements will ensure reliability.
Before using this method of fastening, you should calculate the load acting from the corner along the wall on the fastening elements. This will be the shear load. Then it is necessary to determine the total cross-sectional area based on the permissible shear load that the metal of the fastening element (for example, a dowel) can withstand. Knowing the diameters of the dowels, we determine the cross-sectional area of one element and then their required number.
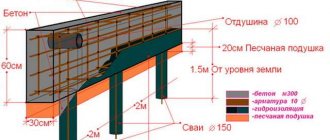
A columnar foundation is shown, and image 6 shows one of its elements in the form of a drilled pile. It consists of an asbestos-cement pipe (1), in which reinforcement (2) is walled up in concrete (3). The pipe itself is located in the well (4).
The latest versions of columnar foundations consist of columns that are directly screwed into the ground like a drill. If beams are supposed to be placed on the posts, then metal plates are placed on them. For fastening plates in pipes, you can use, for example, anchor bolts. In this way, you can connect the pipes with wooden beams, to which you can then easily attach logs.
Shown is another possible option for a columnar foundation. The columns (1) are connected by reinforced strapping (2). If the columns are connected in this way along the perimeter and inside it, for example, along the width of the structure, then nodes can be attached to them in the same way as to the strip type.
Each type of beam fastening must correspond to the type of foundation so that the foundation is a reliable and durable support for the entire building structure.
ATTACHING THE JAW TO THE BASE OF THE HOUSE
An important point is the correct fastening of the logs to the foundation of the house. At the same time, the abundance of base options requires certain installation features for each of them. Let's consider each specific case separately.
ATTACHING BEAMS TO A STRIP FOUNDATION
A fairly common type is a strip reinforced concrete foundation. It is a base up to half a meter wide, raised above the soil by 0.4 - 1 meter. Not all novice builders know how to attach joists to this type of foundation. There are two main ways:
- The first of them involves installing the timber directly onto the base of the house. In this case, the installation of joists is combined with the installation of the side walls of the house. Depending on the frame material used, the logs can be laid by cutting them into a beam or log, covering them with bricks or blocks, making preliminary recesses in them according to the size of the floor parts. This option is convenient as it requires minimal additional preparation.
- The second method involves preliminary installation of strapping beams on a strip foundation along the entire perimeter of the base of the house. In this case, even before pouring the foundation or directly during the process, anchor foundation bolts are installed in the concrete, protruding 150 mm above the surface. After the mixture has hardened and hardened, holes are marked on the strapping bars and holes are drilled at the locations of the heads of the threaded rods. After laying, the wooden parts are pulled to the base of the house with nuts and washers, sinking them into the wood. After this, the logs can be laid on the foundation, step-by-step instructions for which will be located below.
Regardless of the chosen option for laying floor beams, it must be carried out in compliance with a number of mandatory requirements, which should be discussed in more detail.
Before laying logs on the foundation, it is necessary to correctly calculate the required number of beams. They are installed in increments determined based on the expected thickness of the boards used for flooring. Thus, in the case of designing lumber for finishing covering with a section of 20x100, 20x150, the distance at which the logs are installed on the foundation is only 0.3 meters.
Assuming a floor covering made from a standard tongue-and-groove floor board with a thickness of 30-35 mm, the timber installation step can be increased to 0.5-0.6 meters. If you choose 50x150 lumber for the floor, you can safely lay the logs at a distance of 1 meter from each other.
Before laying logs on the foundation of a house made of foam blocks, bricks, or wood, it would be a good idea to determine the geometric parameters of the floor beams. For their calculation, the determining value is the width of the overlapped span, that is, the width of the room. So, with a distance from one wall to another of 2 meters, you can use lumber with a section of 110x60, 3 meters - 150x80, 4 meters - 180x100, 5 meters - 150x200, and 6 meters - 180x220 mm.
INSTALLATION OF LAYERS ON A PLATE BASE
If the base of the house is made in the form of a reinforced concrete flat slab, which is recommended on particularly mobile soils, the lags can be attached to the foundation in a way different from those described above, but in compliance with the specified installation parameters. It consists of using dowel nails installed through the timber into pre-drilled holes in the concrete.
The process technology is not complicated and is accessible even to novice builders. To install joists with your own hands on such a concrete floor, you can use a hammer drill or a drill with an impact mechanism. Pre-drill holes in the timber using a wood drill. Then the parts are laid at the installation site and recesses in the concrete of sufficient depth and diameter are made through them.
Fastening joists to a slab base
Dowel-nails with a diameter of at least 12 mm are installed in place and pressed with a half-sledgehammer or a hammer with a striker weighing at least 1 kg flush with the surface of the wooden beams. As a rule, with the correct selection of fastener parameters, installing joists on the foundation in this way ensures high quality of their fastening.
This method is applicable when using logs with a cross-section of at least 150x150 mm. This allows you to lay a sufficient amount of backfill or slab insulation made of mineral wool under the subfloor, since it is impossible to lay the floor on a foundation without high-quality thermal insulation.
Beams as they are
Floor beams are currently represented by a fairly large list of different products. The simplest option is a timber beam of regular rectangular cross-section, determined based on specific construction conditions.
A more complex type of floor joist, which requires a lengthy manufacturing process, is I-beams with a cross-section in the form of the letter H, placed on one of the sides. They are made from high-quality dried and planed wooden blocks and strips of OSB or high-quality moisture-resistant premium plywood.
The operating principle of I-beams in the form of floor joists involves the distribution of the main forces in the form of bending loads along flat stiffeners. Thanks to this, with a small mass, they are able to withstand very heavy loads. In addition, manufacturing technology and strength make it possible to produce I-beams for openings with a width significantly exceeding the standard 6 meters.
Floor beams
Laying logs on the foundation is carried out according to certain rules, which will be discussed later. Immediately before installing lumber, it is necessary to properly prepare it for further use. You should choose high-quality bars made of oak, aspen or coniferous wood. The main requirements for them are as follows:
- The humidity of the lag should be in the range of 14-18%. This is achieved by simple atmospheric or better chamber drying. It is strictly prohibited to use damp, freshly sawn wood, since it will not be possible to correctly lay the logs on the foundation due to subsequent warping when they dry.
- The logs must have the correct geometry in length and cross-section. Before placing the logs on the foundation, they are subjected to additional mechanical processing in the form of planing with electric planers. High quality beams can be achieved by using pre-glued parts.
- In order to avoid subsequent destruction of lag wood under the influence of moisture, they must be carefully protected using protective compounds. This is done by spraying or using paint rollers in two layers with intermediate drying. A cheaper treatment method is to coat the floor joists with used machine oil. If used, treatment must be carried out a week before installation to remove the characteristic odor.
Briefly about lags
At all times, wood was considered the most valuable building material, because it has a number of unique qualities and characteristics. Currently, there are many alternative materials made, including from wood waste. Similar analogues have proven themselves well for the construction and repair of walls and interior partitions, but for creating floors, wood is best suited.
In essence, joists are large pieces of edged timber that are laid on a cement screed and covered with a finishing floor covering on top. As a rule, a layer of insulation is laid in the cells between the joists, and wires and communication pipes are also hidden in them. The floor of this design is quite warm and very reliable.
You can list the following advantages of lag:
- Floors on joists have unique thermal insulation properties, since the insulation placed between the joists does not let cold air into the room. This is a good option for insulating floors in multi-storey and private houses.
- The noise-insulating properties of the floor are achieved by laying an additional layer between the joists.
- The load experienced by the foundation can be distributed evenly thanks to the floor on the joists. This way you can significantly increase the service life of the foundation of the house, because the impact of the foundation on the ground will be uniform.
- Leveling function. Laying floor joists allows you to very quickly create a perfectly flat base for subsequent tiling or laminate.
- The strength of the logs allows them to carry loads of up to 5 tons per 1 m2.
- Laying joists on a concrete floor does not present any significant difficulties.
- It is much cheaper to build a wooden floor on joists than to install a system of warm or self-leveling polymer floors. However, the result of the work will not be any worse.
Floating screed technology
The traditional screed is poured in strict adherence to the sequence of laying each layer - this will be the key to a reliable and durable structure.
Base Layers
Stage 1: preparation
At the preparatory stage, the fertile layer, which is unsuitable for compaction, is removed. The roots of plants located inside the perimeter of the strip foundation are also removed.
The soil is removed to a depth in accordance with calculations. Then the base is compacted, on which a cushion of sand and crushed stone will be formed. Their high-quality compaction guarantees a stable base geometry and no shrinkage of the future structure.
Thickness of fertile soil layer
First, a layer of sand 10 to 15 cm thick is laid and compacted using a vibrating plate. Then the soil is spilled from a hose with a sprayer and compacted again, changing the direction of movement of the vibrating plate.
Backfilling and compacting the sand layer
To compact the base, sand and crushed stone layers, you can use a homemade device: a beam with a cross-section of 20 x 20 cm and a height of 1.5 meters or a metal pipe with a piece of channel 20 x 30 cm at the bottom, welded in a T-shape. Sand is poured inside the pipe to make the device heavier.
Homemade device for compacting sand and crushed stone
After the compacted base has dried, the next day, the sand layer is backfilled and compacted. It is advisable to step on the prepared base as little as possible. The sand is compacted thoroughly.
Stage 2: footing
Before pouring the main volume of mortar, it is advisable to make a footing. There are several options for its manufacture - it can be compacted crushed stone, spilled with bitumen or a rough screed. Waterproofing material can be laid on crushed stone, forming a kind of trough. In any case, regardless of the chosen material, the essence of the concrete base does not change.
Manufacturing of concrete footings
The purpose of this layer is as follows:
- Economical consumption of the solution is achieved due to its uniform distribution over the leveled base.
- It’s more convenient to work on a level surface - to apply markings, install beacons, assemble various structures.
- The footing creates a waterproofing layer that prevents the loss of moisture from the solution. This ensures uniform drying of the screed and prevents the formation of cracks on its surface.
- If groundwater is close, the footing does not allow moisture to pass upward into the main layers of the floor structure.
Unlike traditional and semi-dry screed, this method does not require time for the coating to dry and gain strength. The decorative coating can be laid the very next day.
Preparation is carried out as described above and consists of a cushion, a rough screed and a layer of waterproofing. Then technology changes.
Table 2. Dry screed installation technology
| Illustration | Description |
| Beacons-guides made of metal profiles are fixed on the floor surface. | |
| Expanded clay or a special thermal insulation backfill is poured between the beacons and distributed evenly using a rule. | |
| Gypsum fiber sheets are laid on top in two layers using an adhesive solution. | |
| The sheets are laid with seams staggered and additionally secured with self-tapping screws. |
Basic methods of attaching joists to a concrete floor
Several methods of fixing the floor structure are used. There are mainly 3 mounting options used.
Fasteners for floor joists are selected based on the following factors:
- unevenness of the base;
- load level;
- floor height;
- moisture content of concrete.
Note! Poor quality materials and incorrectly selected fasteners will lead to swelling or sagging of the floor. When drilling wood, a drill bit smaller than the diameter of the screw is used.
Self-tapping screws
The simplest and most economical way. Not suitable for every occasion.
- Holes are made in concrete and wooden beams in increments of 0.4-0.8 m.
- The dowel is driven in with a hammer, then a self-tapping screw is screwed into it.
A small gap is needed between the floor and the beams. This will ensure reliable installation.
Important! For better fastening to the base, self-tapping screws are used, in which the thread does not reach the head slightly.
Fastening with anchors
This method ensures reliability and durability of installation. The anchor attracts the tree to the concrete base and restrains deformation. It is advisable to use it for beams with a large cross-section, which increase the load on the fasteners.
- Wooden elements are drilled through in increments of 0.8-1.0 m.
- Holes are made in the concrete floor opposite.
- The anchor is tightened with a key.
Bolt length 45-200, diameter 10 mm. When installed, they must go right through the tree and go 6 cm into the base.
Note! To avoid subsidence of the floor covering during installation using anchors, spacers should be installed as often as possible.
Fastening the log to a metal corner
In the case when the height of the beams is more than 10 cm, perforated corners are used, one side of which is fixed to the concrete floor with dowel nails, the other - with self-tapping screws to the wood. This type of fastening fixes the position of the log, distributing the load on the gaskets.
For flooring, a tongue and groove board is used, which is connected with self-tapping screws.
Note! The self-tapping screw is screwed into wooden elements at a slight angle. This ensures the strength of the connection.
Fasteners
You can fasten the timber to the concrete with dowels or regular pins. If the concrete is strong and dense, concrete pins or dowels will also work. If the concrete is not very reliable, it is better to use dowels. Pins are a good thing, but they have a hex head, and to tighten them you need to have a special tool with the right size heads.
If you attach the logs with anchors, you need to drill a hole deeper - right up to the middle of the thickness of the beam, because nothing should stick out above the beam
General rule for choosing fasteners by size:
- The length of the fasteners is selected according to this principle: no less than the length that “sits” in the beam should go into the base, or better yet, twice as much. If you have 10 cm in the timber, then at least 10, and preferably 15 or 20 cm, should go into the concrete. This, by the way, is another reason why it is better not to attach it to the floor slab of a high-rise building. The end of the selected fastener can look out from the ceiling of the neighbors below.
- The hairpin or dowel-nail must be “with a neck”. That is, the thread should start not from the cap itself, but below. Due to the presence of a section without threads, the beam is attracted to the base.
- The diameter is chosen according to the principle - as long as it is not small. In general, after selecting the length, there are not many options left.
Regardless of what type of fastener you choose, you shouldn’t skimp on it. The thread must be cut clearly, the metal must be strong and not overheated.
Anchor nails can be used to attach wooden beams or joists
There is also a quick-fixing nail anchor. This is also a steel fastener. It, like a dowel, is installed in a pre-drilled hole. But there is no need for a plug here. It already exists. There is a metal shell around the rod that expands. when a nail is driven in. Due to the bursting force, it holds the logs, beams or something else.
Fastening the beam to the foundation with rigid fixation
If there is no confidence in the reliability of the overhead installation, use rigid fixation to secure the beam.
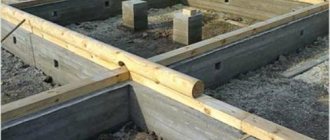
How to attach timber to a strip foundation
If the foundation is strip or slab, you need to make a decision in advance, because in this case, special bolts (studs for attaching the timber) must be poured into the grillage, and the crown will subsequently be attached to them.
Holes are made in the beams according to the location of the bolts. The foundation is covered with waterproofing. All unevenness in the concrete must be eliminated in advance. Then a wooden structure is placed on top so that the studs fall into the prepared holes and secured with locknuts.
Attaching timber to piles
To install the crown on a pile foundation, U-shaped brackets are used. First, the timber is cut and laid on piles to determine the size of the brackets. For accuracy, the latter are welded from corners and installed on the pile heads.
Waterproofing is laid, and a wooden crown is placed on top. It is worth taking a responsible approach to the issue of connecting corners. The staples are connected to the wood using self-tapping screws. Then you can proceed to the construction of walls.
The essence of the problem: I bought a plot with a ready-made foundation on piles with a grillage. Last year I installed a box - 1st floor brick, 2nd beam under the brick. The inside walls are flush with the foundation. The question has arisen: how to secure the logs? It is advised to put support posts on the posts - it turns out 64 posts from 70cm to 120cm in height (with a depth of 50 cm). But I’m afraid that the floor, separate from the house, will move. They also advise that the ends of the logs be secured to the foundation, but they don’t know how. That's the problem.
You're wasting your time with wooden beams, pour a monolithic floor, you'll need posts of course, the number depends on the size of the perimeter.
1. foundation 2. brick wall 3. support angle (for example, 100) 4. anchor 5. joists
Types of foundations and their features
What are the features of the two types of foundations, strip and columnar? Screw types differ from columnar ones only in the method of fastening their elements in the ground.
Image 2 shows a fragment of a tape type for a separate room. It is possible that some walls of the room are load-bearing, and the width of the foundation for them will be slightly larger than for non-load-bearing walls. For the reliability of the entire floor structure, with a significant width of the room, supports in the form of columns are installed under the beams or joists, which are shown in image 3. Everything that is required for such a brick support is clear from the image. We will indicate only some sizes. The pit for the support is a cube 40x40x40 cm, at the bottom of which there is a compacted layer of sand (10 cm), a compacted layer of crushed stone (10 cm) and then the base for the brick is filled with mortar so that the beams rest securely on the brick.
Connection diagram of horizontal and vertical waterproofing.
Materials for fastening floorboards are not particularly demanding on the quality of wood. Pine, spruce or fir will do. In addition to table No. 2, it should be noted that the height of the rectangular section of the log should be 1.5-2 times the width. But special attention should be paid to the moisture content of the wood. It should not exceed 20%.
In addition to what was said above about the distance between the lags, it should be added that it can be determined by the size of the insulation package if it is laid on a subfloor.
Image 2 shows an option for attaching the frame and joist to the foundation, on which floorboards can be laid. This option is called fastening to anchors, which are pre-embedded in the base. This is the simplest option, since the joists do not require special fastening strength. However, it should be borne in mind that, taking into account possible thermal expansion, the distance from the ends of the beams to the walls should be at least 2-3 cm, and to protect the wood from moisture, roofing felt should be placed on the foundation. It doesn’t hurt to put roofing felt in two rows.
Floor joist insert
When laying the lower crown of the house, you should immediately take care of installing the floor joists. The boards can be laid either on the corners, or using the cutting method and on arranged pedestals.
The first method involves the use of metal fasteners, which is undesirable for wood and does not ensure long life for the floor. Over time, you will have to redo the floors in the house. The most commonly used method is the insertion of logs. To do this, even at the stage of laying the lower crown, you need to decide for yourself the spacing of the floor joists and make the appropriate cuts in the timber. If the future floor covering is thick enough, then the log pitch is 60-70 cm. If the floorboard is thinner, then the logs are placed in increments of 40-50 cm. The logs are placed in the formed cuts, leaving a technical gap of 1-1.5 cm on natural expansion of wood under the influence of temperature changes and humidity. In this case, it is advisable to waterproof the edges of the logs laid in the cuts.
It is necessary to make supporting pedestals under the installed logs. As a rule, they are either poured from concrete mortar into the formwork to a depth of 40-50 cm, or laid out of brick to the same depth and always on a sand cushion. The top of the cabinets under the joists must be waterproofed.
And remember, the ideal evenness of the lower crown of the house and the floor joists make it possible to obtain a strong and reliable structure for many years.
Features of carrier tape
The principle of constructing a strip foundation is to manufacture a horizontal rigid frame, the purpose of which is to distribute uneven deformations of the base.
Table 1. Method of creating a strip foundation
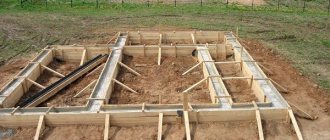
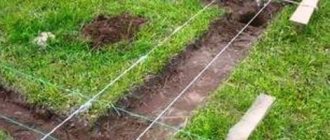
| Illustration | Description |
| In accordance with the building plan, on a cleared and marked site, a trench of the required depth is dug along the contour of the load-bearing walls. Sand and gravel are poured and compacted into the bottom of the trench, forming a cushion. | |
| The formwork is being placed. A thick polyethylene film is laid inside the structure to protect the cushion and formwork boards from liquid mortar. | |
| Reinforcement is laid inside the formwork. | |
| Concrete solution is poured. |
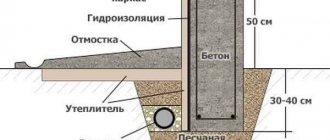
In the future, the foundation walls must be insulated, especially if the house is built of brick or aerated concrete. The soil around the house will not freeze if extruded polystyrene foam is laid under the blind area 1.5 m wide. If we compare a prefabricated strip foundation made of reinforced concrete blocks and a monolithic one, then the second option is much more resistant to loads and deformations due to soil mobility.
Prefabricated structure
One thing that can be said in favor of a prefabricated strip foundation is that its assembly is much faster than pouring a monolith. Reinforcement and cement mortar are used to connect the blocks. If the soil is sandy and the building is one-story, then cushion blocks do not need to be laid. Another advantage is that such a foundation can be built at any time of the year.
Insulation of the blind area and internal space
The advantages of a floor on the ground with a strip foundation include the following:
- High-quality backfill and waterproofing reliably protect the premises from the penetration of subsoil gas.
- The absence of an underground floor does not require work to organize ventilation.
- The concrete slab and soil can accumulate heat. This is especially true if the house is built using frame technology and has a small wall thickness.
- Concrete screed allows you to install a “warm floor” system.
- Communications laid in such a floor require minimal insulation.
Tools
To carry out the work you will need the following tools:
- roulette,
- square,
- pencil,
- electric saw (circular or reciprocating) or jigsaw for sawing and cutting the coating;
- hammer drill for attaching joists to the ceiling,
- screwdriver,
- grinder when mounted on studs,
- chisel,
- construction knife,
- level,
- broom,
- brush.
Some benefits
Lag installation diagram.
Laying the floor on joists has the following technical features:
- Thanks to the free space that forms the log, communication can be carried out.
- It is possible to raise the floors to the required level or level them.
- The floor finished with lag is distinguished by its structural strength. The beams can withstand up to 5 tons of weight.
- Installation does not require any special skills in the construction industry. You only need tools and accessories.
- Logs are characterized by their low cost. If you plan to do the installation yourself, you will save money.
What is lag? These are beams made of wood or polymer that are laid on a finishing surface. The versatility of such a beam is determined by the fact that it can be mounted on a wooden, reinforced concrete and earthen base.
What are the joists made of? The log is a beam that is made of metal, wood, plastic, reinforced concrete. However, wooden ones are especially popular.
Materials and tools
The material for laying the subfloor is coniferous and deciduous wood. The most popular varieties are spruce and pine.
For the manufacture of logs, grade 2 wood is used, having a thickness of 50-60 mm and a residual moisture content of 12-18%. The moisture level of lumber is checked using a special device - a moisture meter. The construction timber must not contain falling knots, chips, holes or surfaces damaged by mold.
Fiberboard sheets or cork pads are used as underlying material.
You may also need:
- fastening parts;
- antiseptic;
- waterproofing material (polyethylene, water barrier, etc.);
- floor primer;
- sound and heat insulation products.
Fasteners
To attach the beams to the base, use:
- dowel nail;
- anchors;
- self-tapping screws;
- metal corners;
- brackets;
- stand bolts.
Tools for attaching joists.
The choice of fasteners depends on the following factors:
- Uneven floor in the apartment. Such work conditions require the use of adjustable fastening. The use of post bolts ensures that all laid logs will be in the same horizontal plane.
- Mechanical load level.
- Projected floor height.
- Humidity of the concrete base (presence of natural ventilation).
Tips for choosing lags
When choosing wood for the floor, the following material characteristics must be taken into account:
- wood type;
- humidity level;
- compliance of product quality with specified operating conditions;
- profile thickness and height.
For timber, you need to use unplaned boards of the second or third grade from deciduous and coniferous wood, except poplar and linden.
Defects in lumber that preclude their use in the construction of a wooden floor base:
- Pores with a diameter of 1-2 mm indicate a bark beetle infestation.
- Knots, chips, cracks or bark remains are a low-grade product.
- The surface is covered with spots of different colors - a sign of fungus and mold.
- Curvature is a sign of a violation of wood drying technology.
Joists on a concrete base.
The choice of joist width depends on the area of the room, the type of finishing coating and the expected load on the base. The larger the volume of the room, the wider the profile is needed.
Installing joists on a concrete base: to fasten or not
The logs are placed on a concrete base to lay plywood (other sheet material) or boards on top. Moreover, sometimes the timber must be rigidly attached to the concrete, and sometimes it is better to do without a rigid connection. It depends on what is under the concrete foundation.
If there are neighbors below, it is better to do without fasteners. Because the presence of a rigid connection will violate sound insulation. It’s not very good in multi-storey buildings anyway. Therefore, in high-rise buildings, vibration-damping rubber pads are placed under the joists. With their help, the logs are leveled and set to the required level. They are also laid between the ends of the beams and the walls. This way, your neighbors won't complain about you stomping too loudly.
Whether or not to attach the logs to the concrete floor of a high-rise building is up to everyone to decide for themselves.
If the joists are not secured, will the floor be reliable? Will. In the rooms, clamped with rubber gaskets, it is secured sufficiently. Any type of flooring—boards, plywood, OSB, or any other sheet material—will hold the entire structure together. Finally, he is loaded with furniture. This design has served for decades without any problems. There is just one point: the timber must be dry and chamber drying is better. That is, it will not lead during operation. When using damp wood, it is still better to secure it, since if the logs “lead”, the loose beam may rise.
To ensure that the timber does not move, you can make it composite. That is, take two or three boards, which in total give the required cross-section and connect them into a beam. They are connected with nails or self-tapping screws, which are driven in on both sides in a checkerboard pattern. When laying out the boards, you need to make sure that the annual rings of the wood are directed towards each other. A timber spliced in this way will definitely not move. This is also a real chance to save money, since three 50*25 mm boards will cost less than 50*75 mm timber. But it’s still better to buy a dry board.
In what cases are logs attached to a concrete base? Usually in private houses in which the floor is screeded. Most often, this is a rough screed on the ground, which is designed to cut off nearby groundwater. At a normal groundwater level, a screed on the ground as a basis for laying lags is simply unnecessary. In this case, it is much easier to simply lay down columns of stone or brick and support the logs on them.
Residents of the first floor can attach the logs to the concrete floor slab. Soundproofing in the basement is not necessary; no one will complain there. But this is absolutely not necessary. It is worth paying more attention to waterproofing and insulation.
Location
If the thickness of the board is at least 50 mm, in this case the logs are laid at a distance of one meter from each other. However, in private housing construction, 40 mm boards are more often used; in this case, the logs are placed in increments of 70 cm. Many people are interested in the question of how to make the structure reliable and the loads accurately distributed? Here it is important to maintain the exact distance between the lags. The first board is laid no further than 25-35 cm from the wall.
Distance
The main rule that must be followed if you want to perform correct installation is location. The logs are laid perpendicular to the floor boards. If boards in two layers are used to create a structure, then the top one is laid “cross” to the bottom one.
Installation of logs in different rooms is carried out differently. If the installation is carried out in the living room, then the floor boards are installed in the direction of sunlight. In this case, the logs themselves are mounted in a transverse position. But for rooms where there is a lot of traffic, floor boards are laid in the direction of movement.
Distance table
Technical characteristics of logs and requirements for their installation
Logs are distinguished from beams by their smaller size and mobility. If beams cannot be moved after installation, and repairs are very long and labor-intensive, then logs are a mobile architectural element. They are much easier to install and, if necessary, repairs are carried out faster.
Distance between joists
Optimal section proportions
Before you start building a floor, you need to study the requirements of regulatory documents for the size of the joists and the distance between them, taking into account the thickness of the floorboards.
Table of lag sections at a pitch of 70 cm
Distance between joist supportsLinear dimensions of joists200 cm110×660 mm300 cm150×80 mm400 cm180×100 mm500 cm200×150 mm600 cm220×180 mm
Table of distance between joists depending on the thickness of the board
Thickness of pine floorboard, mm Distance between adjacent joists, cm203025403050356040704580
In order to learn how to independently make calculations based on tables, it will be useful to consider a simple example. Initial data: the length of the room is 10 m, take a floorboard 30 mm thick.
Batten
Calculation method
According to the table, with such a thickness of the board, the distance between the logs is 50 cm; with a room length of 10 m, 20 logs will be needed. The distance between the logs and the walls cannot exceed 30 cm. This means that we will have to increase their number by one piece, the distance between the others will decrease to 45 centimeters.
There is no need to calculate dimensions and distances accurate to the millimeter; no one takes such measurements. By the way, during construction, the vast majority of architectural elements and structures are measured in centimeters, the greatest accuracy is half a centimeter. Millimeters are almost never used during measurements.
Floor joists
A wooden beam of rectangular cross-section can be used as a log
Attaching wooden joists to the foundation. How to attach joists to the foundation
The process of attaching joists to the foundation
Having completed the installation of the foundation of a house of one type or another, you can begin installing the floors of the first floor. They are based on wooden beams or rounded logs laid horizontally directly on the base of the house. It is possible to do such work with your own hands only after carefully studying all the features of the process.
Laying and processing
Before purchasing, be sure to measure the dimensions of the room and compare them with the maximum possible length of the joists and boards. It is ideal when the materials are laid in one piece, without joints. If you still have to splice them, then do it with an offset (the connection should be made alternately from left to right in each row). Be sure to lay the seam on the post. Buy materials with a reserve of at least 15 percent.
Before installation, treat the logs with special chemicals that will protect them from mold, pests and fungus. It is possible to treat the logs with old machine oil - it is perfectly absorbed into the wood and protects the material from rotting. It is also mandatory to treat the bottom layer of boards with various antiseptics. It is recommended to impregnate all load-bearing parts at least twice, waiting until the previous layer has completely dried. Additionally, all wooden surfaces can be treated with fire retardants, which protect the material from open fire.
How to lay a floor step by step instructions
To make your own floors with joists, you need to develop a plan. In the plan, you can indicate the parameters of the beams, all kinds of preparatory work and devices that will be useful during the installation process.
Tools required for work: hammer drill, drill, wrench, hammer, jigsaw, axe.
You will need:
- Axe.
- Rule (or level).
- Hammer.
- Jigsaw (or saw).
- Drill.
- Screwdriver.
- Claw hammer.
- Wrench (size: 13-14).
- Board.
- Logs (dimensions: 50×50 mm).
- Insulation.
- Anchor bolts 1 cm.
- Self-tapping screws 5 cm.
- Nails 7 cm.
The beams are laid at a pre-calculated interval between them for sound insulation. A level should be used to ensure the surface is as level as possible. If the surface is concrete, then anchor-type bolts are used to fasten the logs. If the base is made of any other material, then dowels are used.
What are the advantages of wooden joists?
The log does not require any additional care. In addition, floors on joists have a presentable appearance.
The advantages of lag include:
- no effort is required to make the floor level;
- the beams have thermal insulation properties;
- installation is done quickly, in several stages;
- excellent sound insulation;
- possibility of locating communications.
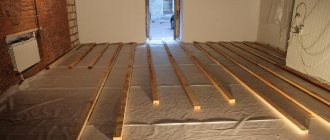
Laying thermal insulation
As described earlier, logs are mounted with a certain step. Insulation (super-thin basalt fiber or expanded polystyrene) is placed in the remaining gaps. You can use roll insulation for these purposes. In addition, expanded clay can be used for the insulating layer.
Clear flooring
Laying boards on joists.
Laying the wooden beam begins from the corner part of the room. The first row is positioned tongue-and-groove relative to the wall, while the gap between the wall and the joist should be no more than 1 cm, since deformation of the wood is possible under the influence of the environment.
Next, a row of lags is laid offset relative to the first row by approximately several beams. In order for the boards to be firmly attached to the base, you need to lightly tap the wood with a construction hammer, which is adjacent to the end of the beam.
You attach the boards along the wall and secure them with screws. They may be on the surface, but no one will see these details - the baseboards will hide all the imperfections.
Thus, all deformed boards are covered with this decorative element. Irregularities will also not be visible. However, this does not mean that you do not need to follow the instructions; over time, if installed incorrectly, the structure will collapse.
Do-it-yourself floor leveling
Chipboard floor on joists.
Surely you have encountered a similar problem. It is especially often observed in old houses, where the height can exceed the level of evenness by up to 20 cm. Concrete screed is not always the solution: the structure may not withstand such a load. Here it would be wise to use adjustable lags. The installation process is carried out according to the following scheme:
- Special bolts are screwed into the drilled holes in the joists. There should be 5 such holes for every 2 meters of the beam.
- Plan the gap you want to make between the joists, lay them out and secure them.
- For dowels, drill small holes. This must be done so that the drill reaches the depth of the rack bolts.
- Next, you should check the surface for evenness. Cut off the excess parts of the post bolts. After this, hammer in the nails.
- Lay the floor on joists. This is the final stage of work.
Finishing work
Do-it-yourself subfloor on joists.
Now that the main work is done, you can begin to complete the installation of the joists. Your task is to get rid of irregularities on the surface, as well as eliminate roughness. A scraper or grinder is ideal for such work. You start the process with sandpaper, which will effectively and quickly remove all excess. Then you should take sandpaper, which will polish the surface of the base.
To increase the service life and wear resistance of such a floor, you need to cover it with one of 3 types of impregnations:
- Oil impregnation.
- Varnish intended for parquet.
- Mastic (preferably wax).
You have familiarized yourself with the material on laying lag, all that remains is to get to work. Such floors will delight you with thermal insulation properties, durability and long service life. You can achieve a good result if you strictly follow the installation diagram. Despite the simplicity of the work, installation has its own characteristics and nuances. Today, craftsmen prefer to lay floors with joists, and for good reason - they will create a more impeccable appearance in your home.
Wood selection
Unplaned boards or timber made of deciduous or coniferous trees can be used under the logs.
Coniferous trees are cheaper, the most affordable are spruce and pine.
Coniferous timber
This material has sufficient strength, but is more susceptible to the destructive effects of a humid environment than hardwood. It would be justified to use pine needle material in heated, dry rooms.
Hardwood flooring is more expensive due to the higher price of the material. But a structure made from such wood has good biostability and is much better resistant to rotting processes.
The main disadvantage of this material is its low bending strength, so it is necessary to use logs made of deciduous trees with caution when large loads on the floor are planned. It is not recommended to use soft-leaved trees - linden and poplar.
Siberian larch combines all the beneficial properties for lags. This coniferous tree is not afraid of moisture and has good strength, which only increases over time. Even when building materials from Siberian larch are used in a bathhouse, the structure will last for several decades without loss of performance.
Siberian larch timber
Higher costs for such material are paid off due to its durability.
Wood moisture content
An important parameter of wood used in construction is humidity. It should not exceed 20%, the optimal value is within 12%.
There are several ways to determine the degree of saturation of wood fibers with water.
Visual method
The simplest, but not accurate, methods for determining the moisture content of a material can be:
Knowing the type of wood, experienced carvers can determine the degree of its saturation with moisture by color, weight or transverse and longitudinal cracks.
Defective timber with high humidity
Calculation method
This method is based on weighing a test section of timber, before and after drying. The algorithm is as follows:
Next, the absolute humidity of the material under study is calculated using the formula:
where m and m are the mass of the test section before and after complete drying, respectively.
Using an electronic device
For instrumental, most accurate determination of wood moisture content, electronic moisture meters are used.
They can take measurements of any type of wood in various conditions. The principle is based on the dependence of the electrical conductivity of the material on the degree of saturation with moisture.
Needle moisture meter for wood
In the first version, the needles of the device are inserted into the wood and the moisture content is measured at this point, the readings are displayed on the indicator. Using the temperature correction table, updated wood moisture content results are determined.
self-leveling floor thermal conductivity coefficient
Non-contact moisture meters analyze the dielectric constant of wood, based on which the percentage of moisture it contains is determined. The readings of these devices are not affected by the temperature of the wood and the surrounding air, so temperature correction is not required.
Using in practice knowledge about the moisture content of the timber from which the base for the floor is mounted is very important. Wood dried to normal values has significantly higher performance qualities:
Structures made from damp wood create a greater likelihood of subsequent deformation, which can lead to damage to the flooring.
Floor deformation on wet timber
Plywood subfloor
A plywood floor will serve reliably for a long time. It has high strength. Plywood can even be used for the final floor covering, since if it is carefully sanded and varnished, it will look quite noble. However, it is more often used as a base for covering laminate, parquet and linoleum.
Plywood can be laid:
- On a cement base, but it is necessary to ensure that the base is even and horizontal, or to use adjusting posts.
- Fastening on logs. Here the difficulty is in placing the joists to ensure that the joints of the sheets fall on them. The logs must be positioned so that their upper surface provides one horizontal plane. Utility lines are hidden in the joists, insulation and sound insulation are installed.