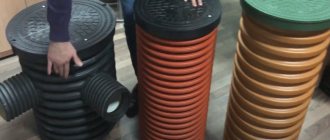
Upon completion of the main work associated with the construction of the box, it is necessary to solve the problem of arranging a wastewater disposal system. In order to make a drain in a bathhouse with your own hands effective and, most importantly, reliably working, you will need to think in advance about its structure and the layout of the sewer pipes, otherwise you will have to regularly dismantle the floor and modify the system.
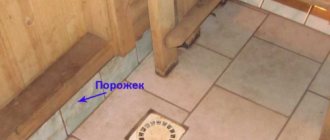
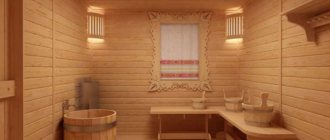
Classic bathhouse washing area with benches and pouring floor
Bath drainage device
In different rooms of the bathhouse, it is customary to make drainage devices that differ in design and operating principle. There are three options for constructing a drain in a bathhouse:
- Raised floors with sheer floorboards. Often used in a steam room, where there must be a warm wooden floor to ensure a comfortable stay in high temperature conditions. Whereas the wash compartment traditionally uses tiles with a slope and a shower drain;
- Leak-proof floors. All liquid and dirty water remains on the floor and is washed off from the surface through a standard drain with a bellows into a septic tank or collection container;
- A combined version, used only in small baths or in full-fledged washing departments of baths. In modern projects, baths are used to a limited extent, as they do not comply with sanitary standards.
The choice of a specific scheme depends on the structure of the foundation, the method of insulation and the arrangement of the water seal. For small steam rooms and washing sections of the bathhouse, a double floor system is used, this is convenient, especially when the building is installed on a pile foundation. If you plan to build a bathhouse box as an extension to the house, then the most suitable option would be a non-leakage floor with a drain through a drain. This will simplify the connection of the bathhouse sewerage system to the general wastewater disposal system of the building.
Leaking floors
Similar options for draining a bathhouse with a wooden floor were also called pour-over drains. The essence of the design was that the upper part of the floor consisted of boards laid with a gap of up to 10 mm, so most of the water simply flows through the cracks and collects on the lower tier or is absorbed into the ground. At the same time, the floorboards themselves, as a rule, were made with a slight rounding of the surface, which ensured normal water drainage and its discharge to the lower level in the subfloor. One of the options for draining water in a bathhouse with wooden floors is shown in the diagram below.
The gap between the floorboards helps to dry the floor
The advantages of such a device for collecting and draining water include:
- Simple room cleaning;
- No puddles or residual water on the surface of wooden floorboards;
- Durability of joists, insulation and wooden parts of the floor and drainage system.
Important! Despite the fact that the lower tier, on which moisture and dirt accumulated, actually remains closed with finished wooden floors, the entire water drainage system from the bathhouse is well suited for ventilation and drying of the subfloor.
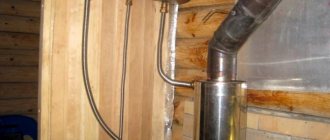
As a rule, ventilation ducts from the stove, located either in the steam room or in the dressing room, go to the lower tier. Upon completion of the bathing procedures, the channels were opened, the ventilation windows in the steam room itself or in the washing compartment were uncorked, and the warm air from the stove quickly dried and removed traces of water, if it was not removed through the drain system.
Non-leakage floor
It is clear that the manufacture of pouring or deck floors requires quite significant costs associated with the manufacture of two levels of water collection, installation of a drainage system and connection of a sewer pipe leading to a pit or septic tank.
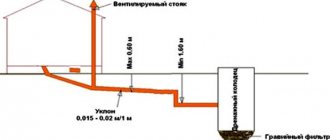
It is much easier during the construction process to make classic concrete floors in the bathhouse with a slight slope towards the drain. The concrete screed must be insulated with foam plastic or extruded polystyrene foam. To ensure water flow through the system, a classic version with an elbow and a corrugated pipe is used, or a more modern shower drain can be installed.
Scheme for a drain with a heated floor for a bathhouse - an extension to a house
At the same time, the floor of the bathhouse does not have to be covered with tiles; the surface can quite realistically be covered with wooden floorboards. This solution is most often used for steam rooms. The amount of water discharged through the drain system is relatively small, so you can get by with a small drain pipe installed in the corner of the room.
Combined water drainage scheme for a bath
This option for organizing water drainage is traditionally used for large bathhouses with an insulated base and a concrete strip foundation.
The essence of the drainage system is that water is collected in the center of the room in a special gutter or pit. The channel is covered with a protective grating, and the drain surfaces are usually covered with gratings.
A drainage channel or gutter usually has an additional slope along which water flows directly into the ground or into a septic tank located in the underground bathhouse. The design is quite simple, so it is often used for summer cottages of steam rooms and bathhouses built with one’s own hands.
Tips for use
If you have done everything correctly, ensured the slope and evenness of the pipe run, if the pipe is laid below the freezing point of the soil and has a sufficient diameter, and the hole is deep and has enough drainage, then operation will be problem-free. But if they arise, then there are ways to solve them.
Dirt in the drain
Hair, some dirt, and residues from bath procedures may go down the drain. Everything is easy and simple here: the pre-designed floor boards are removed, the ladder is removed and cleaned. If the blockage is in the pipe, then it is not long at all, and the blockage can be removed with an ordinary brush on a pipe cleaning wire. It is not advisable to use chemical cleaning agents - nevertheless, this water will somehow end up on your site.
The pipe freezes in winter
When the drain pipe lies with too little slope or wave, water remains in any bend and freezes. This prevents free flow, and the pipe freezes along its entire length. In addition, water may stop flowing and freeze even with a normal blockage. Ice in pipes has a larger volume than water and can rupture them. Therefore, if the pipes are frozen, you need to defrost them urgently.
- With the drain removed, boiling water is poured into the pipe with an Esmarch mug (in common parlance - an enema).
The enema defrosting method is the simplest, and the tool is always at hand
- A steam generator is a luxurious tool: we insert the hose of the device into the pipe, and high-pressure steam very quickly defrosts all the ice plugs.
A steam generator is the fastest way to defrost pipes
- As soon as the pipe has thawed, you need to dig it out as quickly as possible and insulate it with insulation products.
Draining water from the bathhouse
Traditionally, three main schemes are used to drain water from a bath:
- Discharge of dirty water into the ground directly into the subfloor of the bathhouse
- Drainage into a tank or septic tank installed next to the bathhouse;
- Use of a sewer system with complete removal and recycling of wastewater.
The first option can be considered the most common, since it is used in most cases in the construction of small steam baths 2x3 m and 3x3 m. In this case, there are practically no sewer pipes, dirty water almost always flows onto the sand cushion of the columnar foundation.
For a small bathhouse on a strip foundation and a sand bed, the drain is made into the ground without a septic tank
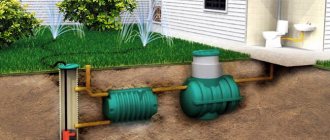
For full-fledged warm bathhouse buildings, it is more convenient to equip the water drain into a nearby septic tank. The sewer pipe must be insulated and discharged either through the ground or through the wall of the bathhouse. This helps prevent the drain system from freezing.
Drain from the bathhouse directly into the septic tank
To cut off odors in the steam room or in the washing department, a water elbow or drain ladder is usually used. The latter option is considered more preferable, since most models have the function of closing the drain hole with a built-in valve.
Installation of external sewerage - choosing a place for a septic tank
Bath drains are made in the same way as for a residential building. If possible, it can be connected to the existing network, and if a local wastewater treatment system is installed on the site, then to it.
First of all, the nature of the soil under the septic tank matters - clay, sand or crushed stone. If the soil consists predominantly of clay, which has low water permeability, then filtration will not occur.
Watch the video
Laying pipes for external sewerage in a private house
A filter well as part of such a septic tank will only pollute the surrounding space, and it will have to be used as a simple cesspool.
If the aquifer reaches a depth of 2.5 meters during the period of maximum level rise, a septic tank cannot be installed in such a place; the thickness of the filter layer will not be enough.
Construction of a local treatment plant
The main components of such a device are the following components:
Storage septic tank - serves to receive wastewater and its primary processing with bacterial agents. Live cultures of anaerobic and aerobic bacteria are sold in specialized stores in construction markets.
In the process of bacterial treatment, the volume of the contents of the septic tank noticeably decreases, and the emission of odor is significantly reduced.
The contents are partially purified, since some of the contents are in the form of solid fractions.
- In the next section of the septic tank, which is most often a filter well, additional wastewater treatment is carried out by filtration as it passes through the ground. The filter layer consists of blast furnace slag, gravel and broken brick, which is an excellent adsorbent.
- Another method of wastewater treatment is aeration. It is produced by purging the contents of the septic tank with air, during which the oxidation of previously undecomposed particles of contaminants occurs.
- As a result, the water is further purified and becomes suitable for use for technical purposes - watering the garden or washing a car. At the same time, the yield of garden crops increases noticeably.
- Filter fields are used in places where the underlying soil base is clay. In this case, pre-purified water enters the drainage pipe system and is distributed dropwise over a large area.
Preparing the trench and laying pipes
How to install external sewer pipes with your own hands?
- They are placed in specially opened ditches. The depth of the trenches always depended on the depth of freezing of the ground.
- But today's laying technologies can significantly reduce the amount of excavation work by installing heating on pipes and insulating them, as mentioned above.
- The quality of the lining for the pipes at the bottom of the trench is of great importance. Since it is located in the freezing zone, it is important to prevent the presence of water in the pipe support substrate. For this purpose, a drainage layer of gravel and sand is arranged.
- Gravel is poured in a layer of about 30 centimeters and thoroughly compacted. Then you need to pour a layer of river sand 15-20 centimeters thick and spill it with water for better compaction.
- A construction cord is attached to the wall of the trench and stretched along it with a slope of 2-3 millimeters per meter of length.
- Then the pipeline itself is lowered into the trench and installed along the cord with slope control.
- After this, the pipe is carefully sprinkled with sand, which is carefully compacted. And only after this is the final backfilling of the trench with previously removed soil and soil.
Selection of sewer pipes
To equip the drainage system, standard plastic sewer pipes with a diameter of 50-100 mm are used. Gray polypropylene pipes can be used inside the bathhouse. Channels of 50 mm are usually laid from each water collection point to the outlet.
Two types of pipes for internal and external communications
For external communications, orange PVC pipes will be required; they are used to equip sewer systems laid directly into the ground, without insulation and the use of concrete trays. The outlet pipe is selected with a diameter of at least 100 mm.
The drain for water from the steam room or other compartments in the bathhouse will be connected to the general sewer system, as a result, a 50-100 mm adapter will be required, and in addition, a groove will be made for the pipe space ventilation equipment. If you plan to use the bathhouse in winter, then the communications will, at a minimum, need to be insulated in the area from the wall to the multi-chamber septic tank and equipped with a cable heating system.
Arrangement of a simple drainage pit
This method of organizing drainage is simpler than the first one due to the elimination of several stages of filtration. It involves all the stages of organizing drainage in the bathhouse itself and digging a hole, but in this case only a septic tank without filters will be used. The method is used if there is no desire to bother with replacing the filtration material and it is possible to use a sewage machine to pump out wastewater.
But in this case, you should think about approaching the pit within reach of the car’s arm. The second way to clean a simplified pit system is to use special bacteria to process rotting residues in the septic tank. Its effectiveness is, of course, several times lower than complete waste removal or natural filtration, but it also has its place.
How to properly drain a bathhouse
If you are building a system for draining wastewater from a capital bathhouse, then perhaps the best option would be pouring floors with a connection of the lower tier gutter to the drain, and then with the removal of liquid through sewer pipes.
Why this solution is convenient:
- On pourable floors, water drains without delay, all wooden parts dry perfectly, do not rot and are not subject to excessive moisture;
- The drainage channel in the center of the room serves the purpose of a preliminary storage tank, in which small things that fall on the floor remain;
- It is convenient to walk on such a floor without experiencing discomfort, as is the case with a slope; in the center or in the corner you can make a removable lid through which to block the drain hole leading to the sewer and septic tank for the winter.
The design turns out to be much warmer than direct drainage into the underground floor of the room; accordingly, there is no risk of the appearance of moss, fungus, the spread of pathogenic bacteria and freezing of the bathhouse foundation.
Drawings and diagrams
The simplest version of the drain is shown in the sketch below. Directly in the center of the bathhouse foundation you will need to dig a pit, line it with bricks, and fill it with sand and gravel. The walls must be insulated and waterproofed from soil moisture.
A drainage gutter on the subfloor is connected to the drain in the center of the bathhouse.
A sewer pipe will follow through the trench leading to the septic tank. The entrance to the sewer will be insulated, and the drainage systems from the steam room of the shower cabin and washing compartment will be connected to the tee-splitter.
Selection and calculation of material
To manufacture a drainage system and connect it to a sewer pipe on site you will need:
- One bellows with an elbow or drain ladder for each bathhouse room;
- Waterproofing film or thin galvanized metal;
- Corrugated pipe 50 mm;
- Gray polypropylene pipe 50 mm – 1.5-2 m;
- Polypropylene corners, straight and with an angle of 60° - two for each drain;
- Adapter 50-100 mm for connecting an external sewer pipe and draining into a septic tank.
The above list is indicative; for each specific case, you will need to specify the number of elements and parts to build a drainage system in the bathhouse. If wastewater discharge is planned to be ensured only through an internal collection gutter, then the number of parts will be reduced by an order of magnitude, but the quality of the drain will clearly deteriorate. In addition, the gutter will freeze in winter, which means it can only be used indoors in the summer.
Required Tools
First of all, you will need carpentry tools, metal scissors, a grinder and a measure. The easiest way to cut plastic sewer pipes is with a hand hacksaw.
If the trays for collecting water in the underground are made of galvanized steel sheet, then you will additionally need metalworking tools for cutting and bending the edges.
Pipes and flanges for collecting and draining water are installed using silicone sealant.
Step-by-step instruction
First of all, you will need to dig a trench and a pit inside the bathhouse. The dimensions are arbitrary, the main thing is that after strengthening and insulating the walls, there is enough space left to assemble the drain parts and connect it to the sewer pipe.
The second stage is to cut out and lay the joists and pouring floor boards. The floorboards are not fastened, but only tried on and adjusted to size. The logs are treated with a mixture of drying oil and transformer oil, and the floorboards cut to size are treated with silicone impregnation.
Important! At the same time, for preliminary fitting, you will need to lay the drain outlet from the steam room and the sewer intake pipe with all tees and adapters.
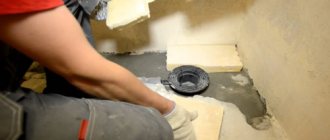
Before laying the floor, all drain parts are assembled and leveled
This is done in order to adjust the level of bedding under the outlet pipe and transitions in the bathhouse subfloor. This is the only way to ensure a drain slope of 5°. Otherwise, water will accumulate in the gutter and rot.
How to drain a bathhouse under the floor
The easiest way to assemble a prefabricated gutter is from bent galvanized metal. To prevent the channel from deforming under load, it must be laid between two joists, as in the photo.
Drainage gutters can also be made from metal; this is easier than sewing up the lower planes with a slab, insulating them and gluing a film.
Each such gutter will need to be made according to the size of the span between the beams. The side edges are bent upward vertically by 3-5 cm, after which the sheet is nailed to the sides of the logs.
The bottom edge of the tray should overlap the central drainage channel.
Advice! Before nailing the floorboards, check the functionality of the drain; to do this, it is enough to spill a few liters of water on each tray. The liquid should go to the wall without any residue.
In the center or at the end of the collection gutter, depending on how the water flow is organized, a drain is cut in, a corrugation is connected to its outlet pipe, and then a drainage system is assembled from sewer pipes.
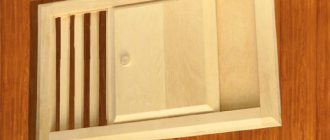
At the installation site of the ladder, a hatch is cut out through which you can control the operation of the entire drainage system in the bathhouse.
Through the hatch it is convenient to close the drain valve for the winter
Ground filtration method
In this method, the main thing is the organization of a pipe system through which the liquid will be supplied to the sewer. The system will be distributed over the entire area of the site so that the water has time to go through several stages of filtration before draining.
Filtration is carried out according to the principle of drainage: the first stage is to install a grate on the pipe (in the initial section) to catch large waste. Then, in the future, the water flows through a section of pipes covered with large filter material. The last stage is a fine filter, that is, coarse sand.
Thus, the water from the drains will be filtered throughout the entire site while simultaneously creating an additional source of irrigation . This method is suitable only in case of low groundwater, since the location of the pipes must be more than 0.5 meters above the water level.
Features of the in-house system
Internal sewerage must provide drainage in all bathhouses where there are sources of water, and drainage of liquid to the outside
Particular attention is paid to ensuring drainage from the floor of the steam room and shower, drainage from sinks and sinks, and removal of sewage from the toilet. Further, all drains of individual premises can be combined into one outlet or have individual connections
The internal part of the sewer system ends at the point of connection to the external drainage system. You can run the sewer system under the foundation or lead it outside through holes in the basement or foundation. The first option is preferable because it does not damage the structure and helps to bypass the freezing zone. However, this is only possible if the groundwater level is sufficiently deep.
How to remove moisture in a steam room
The most important room in the bathhouse is the steam room. Here, water spills on the floor when pouring over the body and steam condensation accumulates. The task is to collect and remove all moisture, preventing it from accumulating on the surface or underground.
To solve the drainage problem, the following options are used:
| Methods | Arrangement | pros |
| Drip floor. | The top floor covering is made of boards fixed with a gap through which water easily flows down. A concrete screed with a channel (tray) is made under the flooring to collect and drain liquid. The surface of the screed is sloped towards the channel, and the screed itself is sloped towards the outlet pipe. | This is one of the simplest options for organizing a drain. |
| A more complex method involves draining through a hole. | In this case, the concrete surface is made with a slope in the direction of the drain. A drain with a water seal is installed in it. Under the concrete screed, an inclined sewer pipe is laid, connected to an external drainage system. A water seal helps protect the room from sewer odors. The entire system is installed to ensure gravity flow of the liquid. | This scheme allows you to completely eliminate the possibility of water accumulation in the underground and avoid unpleasant odors. |
Drains play an important role in the internal sewerage system. It is best to use standard, ready-made devices that can have dry or wet type valves. A grill is installed on top of them, preventing debris from entering the pipe and creating an attractive appearance.
Arrangement of other premises
The washing (shower) room is different in that here the water flows in streams, and therefore the floor, as a rule, has a waterproof coating (tile, concrete). The water collection system is similar to the design considered, when the floor is sloped in the direction of the drain hole in which a drain with a shutter is installed. The sewer outlet of the toilet and sinks (sinks) is based on a standard design, similar to that used in a house (apartment). A siphon is installed on the outlet pipe, providing a water seal to protect against odors from the sewer.
To equip the internal sewer system, standard metal or plastic pipes are used. A pipe with a diameter of 50 mm is usually used for one drain, and a pipe with a diameter of 110 mm is used for a general drain under the floor. Adapters 50 by 110 mm and tee couplings for lateral outlets allow them to be connected to each other.
Specifics of installation of internal sewerage
The underground drainage system inside the building is carried out at the stage of erecting the bathhouse foundation. It is possible to install pipes with outlets on drainage drains.
Installation is carried out in the following order.
- Preparing a trench for a pipe with digging under the foundation strip.
- Backfilling the cushion with sand and crushed stone at least 20 cm thick to form the required slope.
- Installation and connection of pipes leading outside under the foundation. If a pipe is intended to pass through it, then a corresponding hole is formed in the concrete in advance.
- Insulation of pipes and backfilling with soil, securely fixing them in the desired position.
- Pouring a concrete screed to form a slope towards the drain.
- Installation of a drain with a water seal. The drain grate must be installed strictly at the level of the floor covering. No steps allowed.
Let's start with a plan
For most owners of private houses, building their own bathhouse is an impossible dream.
And the main reason is lack of knowledge. Where to begin? But here everything is simple, just like “the theater begins with a hanger,” and construction begins with the foundation of the entire building. But when building a steam room, you should consider a system for draining water from the room, so the foundation for a bathhouse with a drain should be made simultaneously with the drainage system. Before starting construction, a rough list of questions is drawn up, for example:
- what is the area of the building;
- type of soil on the site;
- how many people will the steam room be for?
- frequency of use of the bath;
- will a bathroom be installed?
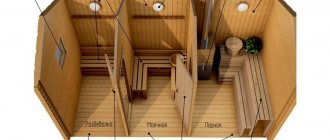
- what type of steam room and washing room to choose, combined or separate;
- is there a central sewerage system and how far is it located?
- how to organize drainage in a bathhouse in the correct way.
Having given answers to the questions posed, it will be easier to choose the option for laying communications that are provided in the article.
Construction of a pouring floor
When installing a drain, it is not necessary for the floors to be warm. This means that they do not require laying a thermal insulation layer inside the structure. Installation of flooring boards consists of fastening them around the perimeter using additional cranial bars. The created structure can, if necessary, be easily dismantled and taken outside for ventilation and drying, which will extend its service life.
Lags
Before you start laying the logs with your own hands, you need to prepare a place for them. Be sure to put a double layer of waterproofing
Particular attention should be paid to the installation technology: these elements must be installed strictly horizontally with a slight slope towards the waste water collection site. The slope is made by cutting down the logs, gradually reducing their height by 2-3 mm in the direction of the wastewater collection point
Ultimately, the required floor slope should be obtained, which should not exceed 10°.
When laying floorboards on leaking floors, there is no need to use fasteners. To properly carry out this work, it is necessary to take into account a number of important points, which are determined by the specifics of pouring floors:
- It is unacceptable to begin laying boards of a leaking floor until a water receiver has been installed.
- The flooring used simultaneously serves as a waterproofing material for the bottom floor of the bathhouse.
- When laying boards, it is imperative to maintain a gap size, which should be at least 5 mm. This will be enough so that water can naturally drain down even if the flooring swells significantly.
- It is mandatory to wrap the support posts for the logs with a double layer of waterproofing.
Support posts
For the manufacture of lag support columns, 250 x 250 mm bricks are used. These supporting elements are installed on a sand or concrete pad, maintaining a step of 0.8-1 m between them. Upon completion of installation, they must be plastered, and the ground between them covered with roofing material.
If everything is done correctly, then the distance between the lowest point of the surface of the leaking floor and the roofing felt laid below will be at least 300 mm. This requirement can be met due to the logs, which are laid on support posts.