The main areas in the bathhouse and the features of using the floors in them
The bathhouse is divided into several thematic areas:
- Steam room.
- Washing room.
- Waiting room.
- Rest room.
There can be even more zones, for example, sometimes a shower and sauna are added. Conversely, some sectors can be combined and reduced to two - an area for direct procedures and a locker room/rest room. Therefore, the whole question of how to cover the floor in a steam room of a bathhouse comes down, first of all, to the degree of exposure to harmful factors in a particular place.
The most extreme conditions for the floor are created in areas of high humidity and temperature, as well as from exposure to detergents. At the same time, in the waiting room these destructive factors are practically excluded. However, the proximity to the bathhouse and the street always carries excess moisture. Therefore, even here it is necessary to use special processing tools.
The main factors of material destruction are:
- Heat.
- High humidity.
- Water.
- Formation of mold and mildew.
- Detergents.
- Temperature changes during the cold season.
Destruction of a wooden floor in a bathhouse by rot Source ytimg.com
Important! When choosing a treatment product, it is first necessary to take into account the likely harm to human health, and only then the degree of protection of the materials.
Bathhouse, steam room, washing room
Premises in direct contact with water and heat are exposed to the most destructive factors. Therefore, first of all, you need to know how to cover the floor in the bathhouse and steam room. As a rule, there is a special antiseptic for this. However, the effectiveness of the products used depends not only on the composition, but also on the structure and material of the floor surface.
In the steam room and washing area, the floor is made of wood or concrete. The first option has two varieties:
- Torrential . It is lined with boards located at a short distance from each other. Water naturally drains down into the gaps that form during bathing procedures.
- Solid . It also has a wood base, but unlike the version described above, water does not pass through the surface, but goes into the sewer system through specially equipped drains.
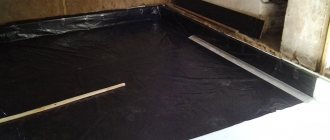
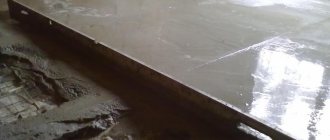
Water-filled floor in the bathhouse Source ytimg.com
The concrete floor in the bathhouse is continuous and sloped to facilitate water removal. A wooden sheathing is usually placed on top of the screed. A metal flat bowl for catchment can be additionally installed at the bottom of it. In addition, tiles made from natural or artificial materials are often laid at the final stage of finishing.
Important! The use of a wooden or concrete floor in a bathhouse in winter requires insulation. This is only possible with proper hydro- and vapor barrier. At the same time, all structural elements must be treated with an antiseptic to eliminate the processes of rotting, mold and mildew.
Dressing room, rest room
The steam room and washing room are only half of the bathhouse, because in many ways the effect of the procedures depends on the correct subsequent rest. Therefore, it is also important to know what the floor in the dressing room should be like - what is best to make it from in order to provide all the necessary conditions for the relaxation room and locker room.
Insulation of the floor in the dressing room with expanded clay Source banyabest.ru
See also: Catalog of companies that specialize in the construction and repair of baths and houses
The floor in the dressing room is made based on how the bathhouse itself is used. If it is fully used all year round, then the floor surface must be insulated. The peculiarities of the operation of this room are that steam, splashes, dampness, and temperature contrast will also be constantly present in it. They are protected by a properly selected coating and a well-assembled structure - double flooring, insulation, hydro- and vapor barrier.
Advice! For comfortable use of a bathhouse at any time of the year, it is important to know not so much how to make a floor in a dressing room, but how to properly insulate it. When leaving the steam room to relax, a person can easily become hypothermic from contact with a cold floor covering. The optimal modern solution is the installation of heated floors. As a technical solution, heating can occur through pipes with water heated from a sauna stove.
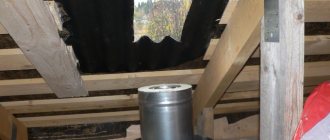
Modern heated floors in the bathhouse Source pikabu.ru
The most common causes and solution to the problem
Let's look at the most common options that cause the floor to rot:
Option #1. The products don't do their job
There are too few vents in the house, up to 6, and they are located low to the ground. This makes airflow almost impossible and the environment becomes too humid over time. The joists and floors are rotting.
What to do: instead of insulation in the floor pie, lay a moisture-proof membrane that will control the movement of water. Next, organize a ventilation gap using counter slats across the beams. There should be a gap and ventilation slots on the ventilated baseboard. This way any possible moisture will be dried out. And, if the vents are not working enough, there should be some other ventilation under the floor. Usually this is a metal corner in the floor with holes - that's enough.
Option #2. The ground is too close
The wooden floor is laid on logs, and underneath there is earth, at a distance of up to 20 cm. Such a floor will deteriorate very quickly. And it’s precisely these kind of constructions that would-be builders often make in private homes – quickly and angrily, as they say. Sometimes, however, instead of earth you can find wet clay there, and the result is the same.
What to do: definitely redo the floor: waterproof it into a pie, raise the floor itself higher to regulate moisture, and protect it well from dampness. Another option is to put geofabric on this soil, and sand with good compaction on it. It will not conduct water upward, even if there were no geofabric (this is prevention) - just like the sand on the seashore is dry, but if you dig deeper, it is wet.
Here is an example of the joists being close to the ground, and they were raised during the process of replacing the floor:
Option #3. Hopelessly damp basement
It will be difficult to remove moisture from it, and it will still (even with good ventilation) reach the floor boards. High groundwater is especially dangerous for floors.
What to do: in this case, it is better to abandon it completely, foam the vents and completely cover it with clean river sand. Water each layer generously and compact it well. Lay plastic film and insulation on top of the sand cushion, then plywood, and then the floor itself. And, most importantly, remove the water as much as possible from the house itself - using external drainage. Usually, even pipes around the house are enough, but sometimes ordinary people build small groundwater storage tanks nearby - deep holes. It’s not even difficult to pump water out of there.
Option number 4. Vapor barrier installed incorrectly
It often happens that a certain material is laid the way the floor was designed, and then the boards suddenly rot. This happens because the person laying the floor did not study the instructions for the vapor barrier itself - different manufacturers have very different requirements for its installation. So, materials of one brand should fit tightly to the insulation, while others should have a ventilation gap between them.
What, when and with what to start processing
Before you start looking for a solution to the question of how to cover the floor in the bathhouse vestibule, you need to find out which places to treat first and which ones secondarily. You need to start with the structural elements located at the very bottom - the floor beams. This is done at the stage of construction of the log house. It is advisable to pre-process and dry them - even before placing them in the lower crowns.
You need to use special antiseptics for baths for this purpose. The number of layers depends on the instructions, manufacturer and component composition. However, in most cases it is recommended to impregnate the beams at least 2-3 times, after each complete drying of the previous layer.
Here it should be taken into account that this structural element will not be accessible during operation and will be subject to maximum exposure to destructive factors. In addition, the durability of the flooring will depend on its preservation.
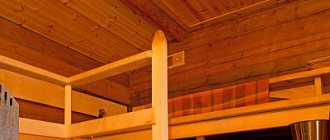
Creating a double sex in a bathhouse Source blog-potolok.ru
How to make: instructions
These instructions depend on what type of foundation you have. If you are making a poured floor, it will be attached to the foundation.
Let's assume that you have a strip foundation. Then there are two options: either lay the logs directly on the tape, or first place the strapping beam on the tape, and the logs are attached to it. But to lay the strapping beam, you must first provide for the installation of anchors directly into the concrete of the strip that has not yet hardened. The timber is placed on anchors and tightened with bolts.
If the foundation is piled or columnar, then it is connected by a grillage, which can be wooden or metal. In both cases, the logs will be attached to the grillage in approximately the same way (taking into account the grillage material) in the previous option.
ADVICE! It is clear that boards are placed on the joists with a gap of, say, 1 cm. But do not forget that you need to leave a gap between the boards and the wall, and its value is 1-1.5 cm.
How to make a concrete screed and drain. You will have to start by creating a drainage system or digging a trench through which water will be discharged either into a septic tank or into a drainage field.
The drainage system under the floor is a sand bed, on top of which gravel is poured. However, on clay soils this will not help much.
If the water is to be drained, then you first need to completely remove the soil layer from the ground, pour 10 cm of sand, then gravel.
Under the future drain you need to make a pit - a concrete tank into which used water will flow and leave through the pipe.
The simplest drainage scheme with a pouring floor
The sand and gravel cushion is covered with a layer of waterproofing (roofing felt, for example). Then there is a layer of insulation (often polystyrene foam), on which a reinforcing mesh is laid. Everything is filled with concrete.
A slope is made on top of the rough screed, which converges towards the pit.
This option is suitable for owners of bathhouses with a strip or columnar foundation.
The technology does not change if you decide to make a waterproofed (dry) floor covered with ceramic tiles.
Choice of impregnation
In order to reliably protect the floor structure from rot, fungus and other destructive factors, you need to know exactly how to cover a wooden floor in a bathhouse - namely, what types of impregnation exist for this. Today on the market you can buy compositions of the following 4 modifications:
- Water soluble . Suitable for rooms where direct exposure to water is excluded - dressing room, rest room, locker room.
- Organic solvent based . Ideal for use in steam rooms, washing rooms, showers - where there is maximum surface contact with water.
- Oil solution . Limited in use - suitable for areas with slight differences in humidity and heat.
- Combined . It has a universal set of properties - water resistance, antiseptic, fire protection.
Recommendation! Before applying impregnation, a long-painted, whitewashed or varnished surface should be cleaned down to the wood layer, carefully sweep away the shavings and sawdust and dry.
Colored impregnations for wood Source instrumentgid.ru
A brief overview of moisture-resistant varnishes, all the pros and cons
After the floor has been treated with an antiseptic, it can be varnished. It is this material that allows you to highlight the color and texture of the wood. But, in addition to beauty, it is important to ensure the safety of the coating.
Tip #2. Note! Conventional varnishes cannot be used for the steam room and washing room! When heated, they release toxic substances. They also have high thermal conductivity, which can lead to burns.
For baths, steam rooms and garbage disposals, only special varnishes are used. These include:
| Brand name | Advantages | Price |
| Neomid Sauna | Thanks to the acrylic base, it has high elasticity and breathability. This does not create cracks when heated and cooled. Protects the floor from biological interference. | From 400 rub. for 1 l. |
| "Eskaro Sauna Lac" | A distinctive feature is the deep impregnation of the material. This provides reliable protection against unfavorable microorganisms, high humidity and temperature. | From 1500 rub. for 2.4 l |
| "Atom Color" | Acrylic varnish for all bath surfaces. It is applied at a temperature not lower than + 100. You can heat the bathhouse for the first time only after the varnish has completely dried. | From 335 rub. for 1 l. |
Varnishes protect wood from destruction and complement the decorative properties of the material.
Selecting a Finish
Knowing how to cover the floor in the dressing room or the bathhouse itself will not only give the finish a modern, stylish look, but also preserve the surface from premature destruction. Varnishes and paints are used for finishing.
Varnish coating
The floors in the bathhouse are varnished at the final stage - after the previously applied impregnation has dried. In this case, you need to select either a composition specially designed for bath rooms, or one that does not include toxic substances and does not release their dangerous derivatives when heated.
Positive effects of varnishing the floor in a bathhouse:
- Protection of the flooring from mechanical damage (abrasion, drying out, cracking).
- Increasing the resistance of wood to physical and chemical factors - temperature changes, moisture, detergents.
- Giving the material antiseptic properties - which will provide it with protection from insects, microorganisms and fungi.
Impregnating the floor with varnish Source nadoremont.com
Apply varnish to the surface only after it has been thoroughly cleaned and dried. For even distribution it is better to use a roller or brush.
Painting
It is permissible to paint bath floors only using special paint. It should not contain harmful substances, including their release under the influence of hot water, air and radiation from heating devices.
When choosing paint, you need to take into account both the operating conditions of the room and the type of wood. For example, for coniferous species it is extremely undesirable to use compounds that form a dense, hard surface layer after drying. This can only worsen the situation with the formation of rot.
Advice! Oil paints are well suited for painting wooden bath floors. Among other advantages, they are distinguished by a wide range of colors, form a durable surface layer after drying and keep the natural texture of the boards visible.
Protective materials used
A hydrophobic coating for concrete can increase the strength of the material and protect it from moisture and other negative factors. Today the most popular means of protection are:
- Impregnation for concrete against moisture;
- Paint that creates a protective film.
Impregnation can be of organic or inorganic type; it increases the strength of concrete and makes its surface resistant to temperature changes and aggressive environments. The advantage of this technique is that such a solution creates a waterproof surface. The only negative is the short service life of the coating, as it gradually dissolves under the influence of alkaline elements.
Related article: Ways to combat fungus and mold in cellars and basements
You can create a water-repellent layer using silicone enamel or resin. However, such protective coatings delaminate when exposed to steam. Water-repellent paint for concrete helps reduce wetting. The material of this group is sold in any hardware store.
In the video: water repellent - protecting paving slabs from water and ice.
How to paint depending on the room
Well, we have already partially begun to cover this question above, but now it’s time to more clearly distinguish what kind of room we are talking about.
In the dressing room and rest room
We see no reason to distinguish these two rooms. The fact is that most owners of country baths have a dressing room size (if they have one at all) that is quite modest. And purchasing separate materials so that you have something to paint the floor in the bathhouse waiting room is somehow redundant, or what?
Unless there is some kind of different covering than in the rest room.
Wooden floor in the dressing room
We strongly doubt that anyone would want to leave a concrete floor in the rest room and dressing room. And there are not many options. The only alternative is wooden. So let's talk about it.
Here is a complete list of “candidates” for painting a wooden floor in a bathhouse vestibule:
- varnish;
- acrylic paint;
- alkyd;
- oil;
- enamel.
IMPORTANT! Pay attention to the labels - façade paints cannot be used indoors. Some of them are very toxic, and dyeing is only possible in the open air
Is it necessary to paint the floor in the steam room and washing room?
We do not consider this point particularly controversial - it all depends on the quality of the coating. There is no point in taking special care of a spilled floor in a summer shed. But the more money you have invested in the arrangement, the more powerful the desire to take care of what you have achieved becomes.
We did not write above, but now it is appropriate to mention that the Finns (Tikkurila, in particular) offer a special type of oil designed specifically for impregnating the floor in the steam room and washing room. First reaction: but he will slide! The Finns think differently and actively promote their sauna product.
It is assumed that this impregnation will be done on freshly planed or freshly cleaned boards - then it will be well absorbed and the wood will stop absorbing moisture and dirt. The layer itself will be invisible and will not cause slipping.
But still, let's return to the two types of floors that are made in the steam room and washing room: dry and wet.
Dry floor paint
The top layer is often made of tongue-and-groove boards that fit well together. This is an almost monolithic coating that practically does not absorb water and does not allow it to pass down at all. What happens next depends on the wood - there are species that do not rot from moisture, for example, larch or oak. Conifers resist well - due to the presence of resins in them, which serve as a natural antiseptic.
In addition to protection from rotting, there is a second argument: the wood darkens, looks untidy, and those who don’t like it look for ways to preserve its beauty. As an option, varnish coating is practiced, for example, “Unika Super” from the same “Tikkurila” or a similar composition from other manufacturers.
By the way, poor-quality floor installation or poor-quality painting can lead to such a problem as in the video below.
In general, use either specialized products for sauna floors or varnish at your own risk.
Paint for pouring floors
A flood floor is a board with gaps through which water flows either into the subfloor or is collected and discharged into the sewer. Usually, good ventilation is needed here, which goes well with a summer bath. Although... plugs are placed on the ventilation holes in the foundation, so the process is regulated. This means that ventilation dries the floor and prevents it from rotting. She should be enough. But you can also protect it further.
But here it’s up to the owner to decide whether his poured floors are worth buying for them, not so much as cheap sauna oil or varnish. For some, even without this, 15 years pass before repairs.
BY THE WAY! If we are going to cover it with some kind of compound, then it should be so that both the gaps themselves and the bottom are coated, otherwise what is the point of covering only the top if the floor is torrential?
We have other materials that talk about: all interior paints, all facade paints, as well as coatings for walls and stoves.
Preparing the base
Before pouring concrete on the bathhouse floor, it is necessary to properly prepare the base. Otherwise, the floor will have low strength and reliability characteristics, will last much less and is unlikely to provide adequate comfort.
Alignment
Before starting work, remove a layer of soil from the base along with any remaining organic matter. Usually 40-50 centimeters is enough. Then the surface is leveled, making sure to make a pit in the center of the room where the water from the bathhouse will go.
Drainage from the pit is carried out beyond the foundation and is realized through a drainage pipe with a cross-section of 10-20 centimeters dug in the corner under a slope. Thanks to this design, it will be possible to ensure maximum comfort in the operation of the bath and avoid the accumulation of large volumes of water.
Seal
Both layers must be thoroughly compacted. They will protect the concrete floor in the bathhouse from rising moisture from the soil and other troubles.
Before building a bathhouse and making a concrete floor in it with your own hands, you should prepare the necessary tools and materials:
- gravel;
- Styrofoam;
- roofing felt;
- slag;
- cement;
- mineral wool;
- sand;
- expanded polystyrene;
- reinforcing mesh;
- roulette;
- self-tapping screws;
- screwdriver;
- drill;
- putty knife;
- roller;
- building level.
Types of bath paints
We have already said more than once that, with the exception of the steam room in the bathhouse, all other rooms are quite comparable to similar rooms in a residential building. Therefore, everything that is applicable in a residential building can also be used in a bathhouse.
Recreation room with wood varnish
IMPORTANT! Do not use only exterior paint compounds on interiors and vice versa.
The chemistry of paints is a complex thing. Nowadays, manufacturers are fighting to ensure that their products are better, which means they last longer, do not lose color, and are ready for various loads
Therefore, hybrids appear - for example, the addition of polyurethane makes the composition more durable and wear-resistant, which is important for the same sex
The main directions still exist, but their boundaries are significantly blurred by “hybrids”.
INTERESTING! Paints based on organic solvents are gradually becoming obsolete. But this is not just a tribute to fashion; they are outdated due to their toxicity to humans and the environment.
Alkyd enamels and their subtypes, nitro enamels, as well as oil paints - all this can be called “last century”. However, they are still produced by the paint industry and are in demand, but the main reason to purchase them is budget constraints.
Because with sufficient financial freedom, water-based paints are purchased - they are the most environmentally friendly, have a low odor that is not comparable to previous dyes, they are convenient to use and the result is decent.
However, today you can find the following types of water-based paints:
- acrylic;
- mineral (with the addition of cement or slaked lime);
- silicate (based on liquid glass);
- silicone.
Here we will go over the most optimal dyes for baths. Mineral ones, for example, last too long and are therefore doomed to lose demand.
Acrylic
It is successfully used to create coatings both inside and outside of various buildings. As a paint for baths and saunas, it can be used to cover any surface, including floors. Only in this case you need a special, wear-resistant variety, because walking on the floor erases the paint.
BY THE WAY! An important advantage of acrylic paints is their fire safety. This is compared to the “outdated” ones, which are completely flammable.
Acrylic bath paint can be successfully used for painting both wood and concrete surfaces. However, all this is stated on the labels. There are varieties suitable for painting walls and ceilings, there are special types for floors, and there are facade paints. In general, acrylic is applicable everywhere.
Acrylic varnish for baths, manufacturer “Yaroslavl paints”
Silicate
Silicon based dyes
They are used mainly outside, for facade work on brick or concrete. This creates a coating that will last 20 years - good news, right?
But brick baths are less common than wooden or wood-clad ones, so we’ll be brief here. Of course, it is suitable if it matches the type of surface.
Silicone
An expensive option, but suitable for finishing the same shower. Silicone dyes “breathe”; in addition, they are elastic, therefore the wood underneath will also “breathe”, and the elasticity will not allow the coating to suffer when the volume of the wood changes.
Silicone, for Elcon lining
Both silicone and acrylic dyes have a lot of advantages. They are durable, heat-resistant, fireproof, environmentally friendly and so on. However, they are not cheap yet. Nevertheless, we recommend them. (Latex ones are no less good - this is a type of acrylic with the addition of latex).
Latex paint Dali
Silicone enamel
Paint for an iron stove in a bathhouse
First of all, it is a durable coating that is least afraid of temperatures. That is, the pigments may turn out to be unstable and change color, say, at 150 degrees, but the coating will not lose its shape or change at all.
Actually, when we mentioned silicate paints above, this was silicone paint for facades. But now it is separated into a separate category, because there is a reason to use heat-resistant enamels in the bathhouse - this is painting a homemade metal stove.
Acrylate varnish
An alternative to covering wooden walls and ceilings in bath rooms, with the exception of the steam room, can be a water-based varnish that contains acrylates.
However, those who want to varnish wood floors of this type should take into account the fact that without special additives, scuba tanks are prone to abrasion. Of the additives that will increase its wear resistance, first of all it is worth mentioning polyurethane
Of the additives that will increase its wear resistance, polyurethane should be mentioned first.
Method of application of anti-putrefactive agents
Before applying the product, the surface of the wood must be sanded.
So that the floor in the sauna does not rot over time and is not subsequently subjected to biological attack, you need to use protective compounds. But to achieve the best effect, you need to know how to apply them correctly.
What points should you pay attention to when treating floors with your own hands?
- Before using the product, you should read the instructions provided by the manufacturer on the packaging;
- Before applying impregnation to logs and other wooden coverings, their surface must be dried and, if possible, sanded;
- Regardless of whether the floor covering is processed in a sink or a rest room, it must be applied in several layers;
- Materials are processed at temperatures above 5-7 degrees.
If traces of rotting have already appeared on the surface of the wood, you cannot do without special chemical treatment of the room. For these purposes, aggressive antiseptic agents are used that kill pathogenic flora.
Installation features
There are questions that arise in everyone who takes on making shelves on their own for the first time. We will answer a couple of them in this article.
Gap distance between boards
First, let’s explain why it’s impossible to do without gaps. Yes, they are really very important for drying the shelves after the procedures, but they also have an equally important function during the procedures - it is the presence of the distance between the boards of the shelf in the bathhouse that allows this section of the steam room to participate in the general convection of warm and cold air flows.
Pay attention to the gaps between the boards
It is especially good when there is an vent with a damper under the shelves - look at the ventilation diagrams that we showed in this article. From them it is clear that thanks to the gaps, the shelves do not become an obstacle to air flow.
So, in connection with the above, you can vary the gap between the boards of the shelf in the bathhouse from 5 to 20 mm, but the optimal value is still 10 mm.
You can do less when the boards are narrow, more when they are wide.
How to attach
It is best to attach the boards to the shelves in the bathhouse from the back side of the shelf. This is optimal, but not entirely convenient for the master. If fastening is done from the inside, then you can use self-tapping screws and a screwdriver without worrying about recessing the caps.
Fastening with screws from below
Watch the video in which the fastening procedure is extended over a day so that the boards have time to lose tension and associated deformations:
From the inside, you can fasten crossbars and boards not only directly, through a block into a board, but also using corners. This method is clearly demonstrated in the following video:
However, fastening from the inside may seem too complicated to some. Or there will be a section where it is really inconvenient. Therefore, you can secure part or all of the shelf boards to the outside. But in order to prevent the metal from burning in the future, the caps should be recessed, or even better, the recessed caps should be covered with wooden plugs.
There is another option, but we cannot say how good it is - this is when wood is used instead of metal fasteners. You drill a hole for a dowel or dowel in the board and crossbar, slightly smaller than the diameter of the wooden fastener, and then hammer it in tightly. Afterwards everything is sanded.
Types of paints
Before choosing what to paint bath floors with, you should study what types of paint compositions there are.
Paint and varnish mixtures according to the method of painting are divided into:
- Construction and household
. They are ready-made compositions. Working with them is quite simple. The price of such paints is lower compared to professional ones, however, the quality is much worse. - Professional
. These materials are difficult to use, they cannot be prepared if you do not know the technological maps for paint and varnish products. The composition of professional paint includes emulsions that increase the service life of the protective layer.
Let's figure out whether it is possible to cover the floor in a bathhouse with regular paint. Some paints and varnishes contain formaldehyde. At high temperatures, these substances evaporate from the surface of the coating. The only room in the bathhouse where you can paint the floor with this paint is the rest room.
Types of anti-putrefactive agents
The fewest requirements are for compositions that will be used in the rest room and dressing room
You can protect new wooden coverings from damage with your own hands if you purchase high-quality compounds. What types of funds can be used for these purposes?
- Lucky. Special varnishes contain antiseptic components that prevent the development of bacteria even in damp wood. They are used as a decorative finish, which at the same time prevents the materials from rotting;
- Impregnations. Impregnation is a colorless composition that contains phytoncides. These components protect joists and floor boards from the effects of biological agents - mold, bacteria, etc.;
- Antiseptics. Fungicide-based solutions are toxic. Therefore, they can be applied to walls, floors, joists and other wooden structures only if they are intended to be painted later.
Painting the stove
In addition to deciding what is the best way to paint the inside of the bathhouse, you should also take care of the design of the stove. As a result, this element of the steam room will not only provide warmth, but also serve as a beautiful interior detail.
Of course, the best option would be to use special enamels that can withstand temperatures up to + 600 o C. If this option does not suit you for aesthetic or economic reasons, the stove can be decorated in the old Russian style - whitewashed with chalk or lime.
Regardless of the material chosen, the surface must be prepared accordingly. The surface should be thoroughly plastered, getting rid of minor defects, irregularities and potholes. As a last resort, treat the seams between the bricks with a special clay mortar.
The stove in the bathhouse can be whitened with chalk or lime
Whitewashing with chalk
To do this you need to prepare a special solution:
- Place pieces of chalk in a bucket, fill them with water and leave for an hour.
- In a separate container, mix animal glue and water in proportions of 25:1.
- Combine both solutions and mix until a homogeneous composition is obtained.
To make the surface look more aesthetically pleasing, you can apply two layers. The next one is applied only after the previous one has completely dried.
Lime whitewash
You can prepare a solution from 1 kg of lime (slaked) mixed with 1.5 liters of water. You can add one teaspoon of drying oil, 25 grams of blue and a pinch of salt. This will give the whitewash an attractive bluish tint.
Installation of wooden floors
What material should I use to make a warm wooden floor in a steam room? Wooden floors are highly hygroscopic, which accelerates the process of warping and rotting. However, larch is one of the materials that have minimal water absorption. The structure of larch contains many resins and phytoncides that prevent the wood from getting wet and decomposing under the influence of fungus.
- Preparing the base:
- First of all, larch logs are installed, after which the board will be laid on the wooden sheathing;
- Skull bars are attached to the bottom of the beams;
- Then the rough boards are laid.
- Hydro- and thermal insulation:
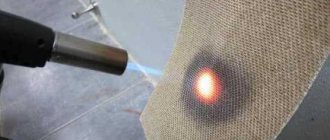
- A waterproofing agent (glassine or roofing felt) is laid on top of the boards;
- The joints between the sheets of waterproofing are coated with a mask for better sealing;
- To insulate the base, lay a layer of thermal insulation (foam plastic, polystyrene).
- Installation of tongue and groove boards:
- A leak-proof floor is made in the steam room, so tongue-and-groove boards with a locking system are laid without any gaps;
- A technological gap of 3 cm is left between the boards and the walls;
- The flooring material is attached to the joists with self-tapping screws;
- After this, the wooden floor is varnished in several layers.