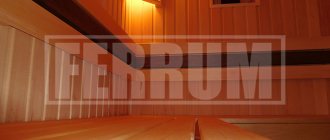
wooden sauna inside
There are quite a lot of questions regarding the ceiling in the bathhouse. Some of them are covered in other articles on our site; they will be referenced in the text. We will try to reveal some of it here. Where there is already detailed material answering this or that question, just follow the links. Only things that have not yet been touched upon will be discussed in detail.
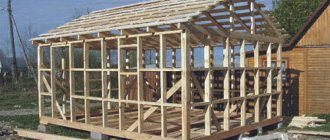
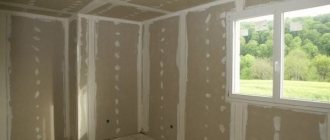
Ceiling in the bathhouse: device
In principle, there is no difference between a house or a bathhouse - the types of ceilings themselves are the same for any construction, and do not take into account the purpose of the building. Therefore, you can easily watch videos and read specialized literature on construction, which talk about the construction of houses.
However, we will always not be talking about multi-apartment buildings, there are slab ceilings, and in the bathhouse only three types are possible:
- grazing;
- hemmed;
- panel.
Flooring differs from hemming in the support points - in the first they are only on the walls, in the second - on the ceiling beams. As a result, there are various possibilities for maintaining weight: both your own and additional.
The panel ceiling is a simplification and a semi-hybrid of the previous two, and it still has more of a floor ceiling than a hemmed one.
IMPORTANT! You make the decision about what the ceiling will be during the period when the bathhouse is just being designed.
However, the decision itself is quite simple: you just need to decide for yourself
what kind of attic you want - a cold one, where no one is going to climb except cats, or a warm storage attic where you can walk around and put things there. Another option is an attic. So, the flooring is suitable exclusively for a cold attic; in all other cases, the choice is the hemming. The panel one will be closer to the hemmed one only if the beams used are of considerable thickness.
As for the device, the correct ceiling in a bathhouse consists of: boards, vapor barrier, insulation, waterproofing and, possibly, boards again . This is a standard scheme that applies to all varieties. The nuances regarding the ceiling in a bathhouse with a cold roof can be read here.
As for the ceiling height, it (as usual in a bathhouse) is a subject of fierce debate. However, rational arguments also exist. All of them are discussed in this article.
The ceiling in the bathhouse inside the steam room
For more information on using foil, see this page.
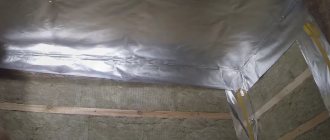
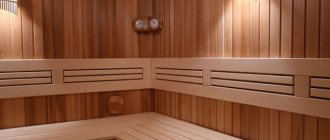
The steam room is the only place that has no analogue in a residential building. This is a combination of high temperature and humidity that affects all the materials inside. Therefore, the ceiling in the bathhouse inside the steam room may have some differences from other rooms.
The main difference between the steam room will be two layers of vapor barrier , which is done most often. Ceiling boards and beams on the attic side are usually covered with any suitable material - kraft paper, polymer film (capable of withstanding high temperatures).
However, at the same time they are exposed to steam from inside the steam room. And if it’s not difficult to change the boards, then you definitely need to spare the beams. So, partly out of pity, partly out of a desire to prevent the heat from evaporating outside the steam room, people line the steam room with foil. It shields IR radiation and is a reliable vapor barrier, so it is quite suitable for covering the ceiling in a bathhouse.
You can read about how the ceiling structure in the steam room works here.
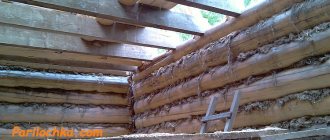
The first stage of insulation: arrangement of the floor
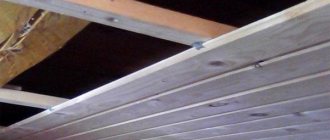
Now let's proceed to the direct insulation of the bathhouse ceiling. You need to start with arranging the top floor:
- Fix wooden beams, pre-treated with antiseptics, onto the crowns of the logs or beams of the steam room roof. Especially carefully it is necessary to treat the areas where beams meet roofing materials with excellent technical properties.
- Sew boards to the beams, forming roll-up panels. They should be two strictly perpendicular rows of boards. Use self-tapping screws to secure the panels. Make sure that the lower planes of the boards exactly coincide with the corresponding planes of the beams.
Advice. Before arranging the ramp, draw a diagram of the location of the shields, indicating their numbers and dimensions - this way you will not get confused during the installation process. Keep in mind that there must be a gap of at least 5 cm between the beams and cladding boards, and 20-25 cm between the panels and the chimney.
- After installing the rolls, protect the boards from fungus - treat them with special antiseptic compounds.
The right ceiling in the bathhouse: choosing which one is better
What is the best material to make a bathhouse ceiling from? The wording itself suggests that we are talking about a material that would be preferable to use for this purpose.
Resin leaks from heat
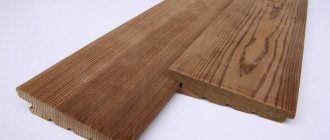
There is a certain set of wood that are usually recommended for interior decoration of a bathhouse. These are mainly deciduous species; among conifers, which are unpleasant due to the release of resin (we will discuss this below), only larch and cedar are recommended.
Of the deciduous trees linden and are most often used for finishing . One of the reasons is that it is a fairly budget option.
As for the structures, it is impossible to say which ceilings in the bathhouse are better - hemmed or floored. It all depends on other factors - the construction budget, the purpose of the attic space. If money is short, the bathhouse is one-story with a cold attic, then it would be better to make a floor option.
If the construction is thorough, the attic space is of sufficient size to serve as a warehouse or room, then in this case the best ceiling for a bathhouse is definitely a false ceiling.
Those who do it themselves and are not used to working under the ceiling or at heights may find the panel option the most preferable.
Bathroom ceiling: what is best to make it from?
As already mentioned, the components of the ceiling are boards, beams, insulation and insulation.
We personally consider the following to be the best insulation options:
- vermiculite;
- expanded clay;
- ecowool;
- mineral wool for saunas.
Do not consider this list as a rating, although , to be honest, we like mineral wool the least, because it is an aging material that turns into dust over time, and it is too sensitive to the presence of moisture between the fibers. If we name the abstract properties of the best insulation for baths, it would be:
- health safety;
- non-flammability;
- tolerance of high temperatures without melting, etc.
- high thermal insulation properties;
- ease of installation;
- durability.
Styrofoam and fiberglass are not suitable. However, we have described everything about insulation for bath ceilings in this article.
As for the types of vapor barriers, among them there are also those that are more or less suitable for use in baths. What types of vapor barrier materials there are, which of them are suitable for our purposes, and which are better not to use, is discussed here.
It remains to be said about the boards for the bathhouse ceiling. What kind of wood is the most on the market? The correct answer is coniferous. That's why it's cheaper. This means that nothing prevents us from purchasing cheaper beams made from coniferous wood.
beams will be sewn up, the temperature, of course, will reach them in any case, but this is not so significant, because the main temperature is in the steam room, and there everything is not only sewn up with boards, but also with an additional vapor barrier made of foil. So there should be no resin dripping from the beams.
So, beams can also be made of coniferous wood. The lining of at least the steam room should be from the species that we mentioned above. In the remaining rooms of the bathhouse, you can hem the ceiling with anything.
The second stage of insulation: laying thermal insulation
As soon as the top floor is ready, you can proceed to the installation of thermal insulation material. Whatever insulation you choose, the operating technology is approximately the same.
Thermal insulation material should be installed in all spaces between beams. Lightly compact it so that the insulation fits tightly to the surface. The thicker the thermal insulation material, the higher the effect of its action - in a regular bathhouse, 100 mm of insulation will be sufficient. Check several times to ensure that there are no gaps left in the ceiling structure.
Separately, it should be said about the mandatory insulation of the chimney. There may be several options:
- “packaging” the chimney in a special pipe made of non-galvanized steel, treated from the inside with a layer of expanded clay;
- insulation of the area around the chimney with expanded clay composition.
The process of insulating a bathhouse with an attic will look a little different. First, the boards are coated with a thick layer of clay. Then all existing cracks in the attic are filled with wooden chips, which are pre-moistened in concrete mortar. And then the thermal insulation material is laid. Better in two or three layers.
After completion of the work, the material must be sheathed with wooden boards. Place them perpendicular to the beams. It is not necessary to use a long board - it can be replaced with a short board, homemade boards with sawdust or fiberboard. The top surface of the bathhouse is treated with a fire retardant. It is advisable to cover all wooden boards in the chimney area with asbestos sheets.
Do not forget that without high-quality ceiling insulation, not a single bathhouse will be able to fully fulfill its tasks and guarantee a healthy microclimate. Therefore, if you want to get a truly comfortable steam room, once again evaluate the thermal insulation materials described above, choose the appropriate option and get to work, following the installation rules.
The ceiling in the bathhouse inside and out
Of course, the best guide is one that talks about the subject “inside and out.” For those who are going to do everything themselves, we have prepared material just about creating a ceiling with your own hands .
However, the matter is not limited to the ceiling in the bathhouse inside, and an important issue from the point of view of the future fate of the building will be the issue of driving through the ceiling with a chimney pipe. It must be done with knowledge of fire safety rules, understanding which materials are suitable and why. We have collected all the necessary information on this issue in this article.
We also thought it was important to pay more attention to the issue of insulation, and we posted answers to the most frequently asked questions in the article located here.
What to cover, what to finish, what to hem the ceiling in a bathhouse: advice from professionals
Well, if we’re talking about advice from professionals regarding how to decorate the ceiling in a bathhouse, then you need to give the floor to them themselves. We bring to your attention the videos that caused a completely respectful reaction from us.
Let the first video be from RusPar. Correctly, professionally, within the framework of the stated topic, you will be told how to do everything correctly:
Those who are worried about thermal protection will find this video useful, which tells a lot, in tedious detail, about what materials are suitable for protecting the ceiling and walls in the area of the stove:
Speaking about professionals, we cannot ignore the opinion of Alexey Bely, representing Teplodar. You don't have to agree, but it's still worth listening:
Well, we found a video from ForumHouse - this is a fairly authoritative forum that has been making videos about finished projects or various stages of construction work for a long time. Among them there was a video about lining - it will certainly be of interest to those of our readers who are planning to decorate the insides of their bathhouse with this material. Look, remember, maybe it will come in handy:
Well, for our part, we will consider it possible to recommend you an article about decorating a steam room, which will also contain useful information.
Vapor barrier
Is it possible to do without a vapor barrier in a bathhouse? Of course not, if the tree is pathetic. If you don’t tend to spend money on wind and rot and your bathhouse is expensive, insulation of the ceiling, vapor barrier is something you can’t do without. Another thing is that there is a lot of debate about whether to use foil as a vapor barrier. But this is already a matter of faith. In fact, those who cope with similar work themselves can find their own answer - by steaming with and without foil. By the way, its advantages include high heat resistance, which means that if you install something else for vapor protection, then it will be with a temperature range corresponding to a specific bathhouse - Russian or Finnish.
Now that it is already clear why a ceiling without insulation is a waste of heat, all that remains is to wish every owner that in any weather his bathhouse will warm up properly and keep warm for the second day.
Why does the ceiling drip or sweat in the bathhouse: reasons for condensation
First, a little about the nature of condensate. This is the reaction when warm air collides with a cold object. Warm air can hold more water vapor than cold air. Therefore, if the air saturated with vapor cools (and this is what happens when it collides with a cold object), then the water vapor will pass from the gaseous to the liquid phase. And this will happen at the intersection of environments.
From here it is clear that if the ceiling is dripping or sweating somewhere in the bathhouse, then this is a cold place . Basically, warm air is forced to rise because it is lighter than cold air. At the top he encounters an obstacle in the form of a ceiling. If it is cold, then moisture condenses immediately.
The bathhouse is a room with periodic heating, which means that during the time it is not used, it cools down to ambient temperature. Therefore, the occurrence of condensation should be considered inevitable.
BUT! Proper heating gradually removes the condensation that initially forms. The entire structure warms up, the moisture turns into gaseous form.
What to do? The colder the room before starting the fire, the less you should rush to warm it up . Tune in for 4 hours of light, gradual treading. Or even set aside the day before the bath procedures to thoroughly dry the bath (in the cold season).
The appearance of condensation in a bathhouse on the ceiling in the initial stage is expected, but is it correct when it does not disappear in due time? No, that's not right. This means only one thing: you have some problems with the insulation of the ceiling.
This can be anything: from the possibility that the thickness of the insulation layer is insufficient, to the fact that the rules of ventilation and thermal insulation are violated, for example, the structure of the insulating pie.
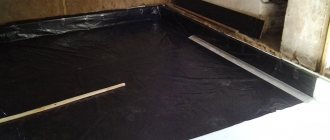
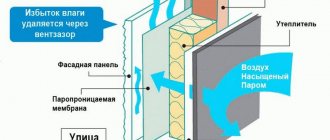
Diagram of a false ceiling pie (explanation in the article about insulation)
CHECK: vapor barrier, which does not allow water vapor to pass through, is installed first, separating the insulation from moisture coming from the room; The waterproofing is placed second and outside the insulation, closer to the “street”. A ventilation gap of several centimeters is required between the vapor barrier and the lining.
Chronic formation of condensation will not be without sad consequences - bacteria and fungi actively multiply on damp wood, the wood rots and becomes moldy.
treating wood with antiseptics everywhere except the steam room. But this will not save you from searching for the reason why the condensate does not evaporate on its own. Perhaps these are ventilation flaws. If it turns out to be insufficient, you can connect a forced one.
Features of microclimate and wall material
When choosing interior cladding for walls, ceilings and floors in a bathhouse, several issues need to be resolved. To begin with, is cladding actually necessary? In a wooden bathhouse built from logs, the walls can be left “as is.” If timber or some other material is chosen as the construction material (aerated concrete, brick, frame construction technology), then you can choose lining - it will create the necessary atmosphere of a wooden bathhouse, form a healthy microclimate, and fill it with the aroma of fresh wood.
The lining can be mounted not only vertically, but also in other directions - horizontally or in a herringbone pattern.
The sheathing material is selected taking into account the wall material. A stone, brick, foam or aerated concrete bathhouse necessarily requires internal lining. This will ensure high-quality insulation, prevent heat loss and give the necessary “bath” flavor to the interior. Lining is suitable for these purposes - it has different profiles and can be mounted not only vertically, but also horizontally, in the form of masonry, or in a herringbone pattern. You can use a block house or imitation log. The cladding made of wooden boards looks original. To make the right choice, you need to familiarize yourself with the requirements for interior decoration in a bathhouse.
How to remove resin from the ceiling in a bathhouse
Resin is an integral part of coniferous wood. It is contained in capillary vessels called resin ducts. An increase in temperature usually causes the resin to protrude onto the surface of the wood product.
Resin leaks on coniferous wood
If you made a ceiling from coniferous wood, you will definitely encounter resin. It can concentrate around knots, “eyes,” or in so-called “resin pockets,” which are formed when the cambium of a living tree is damaged.
The best option is if you use coniferous wood, then only for the main boards and beams of the ceiling , and then sew everything up with foil, stuff the sheathing, and then install hardwood lining on top of it. In this case, nothing will leak out.
For those whose coniferous wood is not covered with anything, we can advise you to try the method we read on one forum: use a blowtorch to walk through the wood from which resin is flowing in order to burn out the resin and clog the channels. However, we have not tested it ourselves.
Periodic cleaning would be less drastic , but you will have to remove resin from the ceiling in a bathhouse many times. It can be removed either mechanically or by dissolution. (Or combining both.)
Dissolution is achieved with the following compositions:
- Mix pure acetone with water in the following proportion: 1 part acetone to 3 parts water;
- dissolve soda ash in water at a ratio of 5 grams of soda to 95 grams of water;
- a mixture of the described solutions.
Solutions should be heated or diluted with hot water. Then use a brush to apply and rub in the solution.
***
We ask our readers: write in the comments on this page what topics about the bathhouse interest you, but you did not find them on the pages of our website.
Ceiling · 03/26/2019 · 0