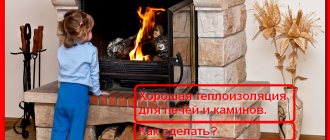
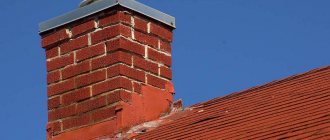
The placement of stoves or fireplaces in the house creates pleasant warmth in the required quantity. The owners heat the house when they want and as much as they want; are not subject to the whims of district heating suppliers. Comfort is possible if safety rules are followed.
Peace of mind is guaranteed by the fire-resistant sheet materials enclosing the stove. The most intense combustion of fuel will not cause overheating of adjacent structures. The fireplace will warm the premises without causing fires.
Is thermal insulation always necessary?
The need for shielding does not always arise. Spacious baths allow you to install heat sources according to standards. A certain distance between the stove and the walls/occupants makes additional protection unnecessary. But in small family steam rooms, following the norms makes the bath idea impractical - every piece of space is important here.
Figure 2. Examples of furnace locations and the distance between them and insulation
The illustrations show the recommended distance between thermal units and sauna walls. Whatever material the stove is made of, a distance to the opposite wall of at least 1 m is considered safe. But the parameters are “ready” to shrink, provided that a thermal screen is created.
Shielding walls near which stoves are installed
Usually the decoration of bath walls is wooden. It is susceptible to fire and charring. Various heat-resistant materials are used as thermal insulation lining.
Reliable layered cladding with a slight aesthetic effect
If the aesthetics of the cladding is of secondary importance, you can save money and use a combination of metal and heat insulator. First, an insulator is attached to the walls, and a metal sheet is mounted on top. As a starting layer you can use:
- mineralite slabs are fire-resistant panels designed specifically for creating protective screens in saunas and baths;
- basalt cardboard - retaining heat and protecting from fire, it also plays the role of a sound insulator;
- basalt wool is a material characterized by a high degree of fire resistance and hygroscopicity.
Alternatively, you can use asbestos sheets. But they are not environmentally friendly - when heated, they release substances hazardous to health.
Figure 3. Simple thermal lining
The next layer is a sheet of metal. It is better to use stainless steel. An alternative is galvanizing. It is desirable that the sheets are smooth and shiny. The mirror surface reflects infrared rays from the walls. The latter return to the steam room, but having lost their “rigidity” and becoming noticeably safer for humans.
An example of such a protective finish:
- ventilation gap – up to 3 cm;
- heat insulator – up to 2 cm;
- a metal sheet.
In this case, the distance between the insulated wall and the stove is at least 40 cm. To ensure thermal gaps, the insulation is mounted using ceramic bushings.
Figure 4. Layout of thermal insulation elements
Recommendation! If the distance between the heat source and the wall is close to the standard minimum, it is better to make double-layer thermal insulation. In this case, the gaps between layers of wool, mineralite or alternative material are similar - up to 3 cm.
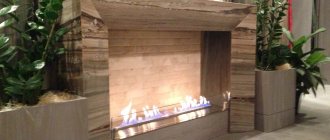
Decorative protective cladding
The use of a combination of thermal insulation and metal meets functional needs, but not aesthetic ones. In an expensive bath interior, such a combination is unacceptable. In this case, the role of the crowning layer is played by heat-resistant ceramic tiles.
Suitable ceramics for finishing:
- porcelain stoneware; the most durable and dense option; the material is also called artificial stone - there are many types that can imitate wood, stone, metal, etc.;
- clinker; a popular oven option, characterized by high density and a variety of shades;
- terracotta tiles; similar to clinker, but less durable; Available in both matte and enameled formats;
- tiles; ceramics, which in the past were most often used to decorate stoves by wealthy bathhouse owners; the main feature of the tile is the box-shaped back part, due to which high heat transfer is formed;
- soapchlorite; rock slabs; characterized by greenish and grayish tints.
Figure 5. Ceramic thermal protection
Heat-resistant ceramics are laid on heat-resistant tile adhesive. But even here you can’t do without insulation. If you cover a wooden wall directly with slabs, the latter will receive a significant “portion” of heat, and this is fraught with, at a minimum, charring. Therefore, ceramics is the final layer, under which any of the already known thermal materials are mounted. To the insulators described above, you can add fireproof plasterboard and glass-magnesium sheet. Both options protect well from the negative effects of high temperatures, and LSU is also moisture resistant.
Fireproof materials and methods of their use
Asbestos sheet
Asbestos is a common fireproof material that can withstand prolonged heating up to 450-500 °C. At the same time, it almost does not lose its strength. Asbestos is a material that conducts heat poorly.
It is produced in different forms, including in the form of sheets. Widely used where furnaces are used, for thermal insulation of objects prone to fire, for the construction of fire-resistant walls and ceilings, etc.
Sheet steel
Steel is widely used in furnace production . It is used in different forms (angle, channel, wire, etc.). You can’t do without sheet steel either. Thus, elements of furnaces are made from it, sheets of metal are laid in front of the furnace doors, and it is also used for ovens. In the latter case, the steel must be clean, absolutely free from rust.
Furnace shielding
You can also provide protection from heat radiation with a screen around or near the stove. Insulation can be brick or metal.
Brick shielding
Bricks can be used to protect either one of the stove sides or all three - the sides and the back. In the latter case, essentially a brick casing is formed.
Bricks are placed maintaining a distance between the stove walls. Recommended distance is 5-10 cm. Approximate diagram of the protection device:
- ventilation gap – 5-10 cm;
- brick – 6-12 cm (depending on the format of the masonry);
- ventilation gap – 5-10 cm;
- bake.
Figure 6. Brick screening
Fireclay bricks are usually used as a screen. It is distinguished by optimal thermal characteristics. It is advisable to lay it in half a brick (12 cm), but if you increase the intervals between the walls and the stove, laying it in a quarter of a brick is allowed. Fireclay is placed on clay (or cement-clay) mortar or on a special heat-resistant masonry mixture.
Convection holes are formed at the bottom of the screen. Sometimes they are made in other areas of the shielding wall. To regulate air circulation, holes are made with doors.
Important! The brick must vertically overlap the stove by at least 20-30 cm
Metal shielding
This is the most popular option, characterized by availability and fast execution. There is a need for metal if factory furnaces are not initially equipped with thermal protection.
Most often, cast iron or steel sheets play the role of insulation in bathhouses. They are mounted around the hearth, maintaining a distance of 1-5 cm. If there is no thermal insulation of the factory stove in the bathhouse, the fireplace is equipped with either front or side sheets. The type of screen depends on the location and design of the furnace.
Figure 7. Metal furnace screen
Such shielding makes it possible to reduce the temperature of the stove surface to 100 degrees and below. This, in turn, makes it possible to reduce the standard distance between the heat source and the opposite wall by half - to half a meter.
Do not forget! The floor also needs protection. The larger the oven, the stronger the foundation should be. And if the floor is wooden, it is thermally insulated in the same way - using a heat insulator and an outer layer (metal, brick, tile)
Methods of protection and features of their arrangement
To protect walls in a bathhouse from fire, they try to adhere to several interesting methods that create a fairly high degree of fire safety. Let's take a closer look at what exists in this section.
Insulating a stove in a bathhouse from the walls with asbestos sheets Source Pinterest
Metal protective screen
These products are manufactured specifically for the purpose of reliable insulation of walls from hot contact with stoves and tiles. They are made from stainless steel or cast iron. It is important to make the right choice depending on the location of the stove. That is, for corner options and just wall ones, different types of screens will be required.
When is protection needed at all?
The need to install protective casings and screens does not always arise. If a fire-safe distance is maintained between the stove and the nearest flammable surface, additional protection is not needed. At this distance, the IR rays are scattered, weakened, and the amount of them that the wooden wall receives can no longer lead to damage.
It is believed that the safe distance from the wall to the brick stove (quarter-brick laying) is at least 0.32 m, from the wall to the metal stove (not lined) - at least 1 m. For a metal stove lined from the inside with brick or fireclay, the distance decreases to 0.7 m.
Thus, maintaining fire safety distances is more possible in large baths, where the issue of saving space is not relevant. In family steam rooms, where every centimeter of space counts, installing a stove 0.3-1 m from the nearest walls is impractical. In this case, the safety distances established by the standards must be reduced using screens and casings.
And the article https://stroy-banya.com/delaem_pech/kak-sdelat-fundament-pod-pech.html will tell you how to make a foundation for a stove
Is asbestos sheet harmful?
Many builders or those who plan to build their own home have repeatedly thought about whether it is worth using asbestos sheets for laying the roof. The service life of such material is not long - up to 20, in some cases up to 35 years. Sheets are characterized by heavy weight and fragility. Many people believe that without additional painting, the surface of the sheets can be toxic and hazardous to the environment.
But you should not lose sight of the advantages of using the material - resistance to ultraviolet radiation, low level of electrical conductivity and fire resistance. There are no traces of corrosion on the surface; the products can be used as an additional noise-insulating material. In addition, these types of sheets are budget-friendly, and usually there are no problems or difficulties in their installation and maintenance.
Protective screens near (around) the stove
Protective screens are insulation panels that cover the side surfaces of the furnace and reduce the intensity of thermal radiation. Screens can be metal or brick. As a rule, they are used for metal furnaces.
Method #1 - metal screens
The most common protective screens are factory-made steel or cast iron sheets. They are installed around the stove, at a distance of 1-5 cm from the walls of the firebox. Depending on the need to insulate one side or another of the furnace, you can purchase side or front (front) screens. Many metal furnaces are initially manufactured with protective screens in the form of a protective casing.
Protective screens make it possible to reduce the temperature of external metal surfaces to 80-100°C and, accordingly, reduce the fireproof distance to 50 cm. The total distance from the firebox to the wall (including a gap of 1-5 cm) will be 51-55 cm.
Installing protective screens is not difficult. Thanks to the presence of legs, metal panels are easily bolted to the floor.
Method #2 - brick screens
A brick screen can cover all the side surfaces of a metal furnace, representing its outer cladding. Then the stove will be in a casing made of brickwork. In another case, a brick screen is a wall separating the stove and the flammable surface.
You can learn how to lay bricks correctly and make perfect seams here: https://stroy-banya.com/video/kirpich_block/kak-pravilno-klast-kirpich-i-sdelat-idealnye-shvy.html
To lay the protective screen, solid fireclay bricks are used. The binder is cement or clay mortar. It is recommended to use half a brick (thickness 120 mm). But, if there is a lack of material, it is possible to make a wall of a quarter of a brick (60 mm thick), although in this case the thermal insulation properties of the screen will be reduced by half.
Small openings (sometimes with fire doors) are left at the bottom of the shield for air convection between the brick wall and the stove.
The brick walls of the screen must end at least 20 cm above the top surface of the oven. Sometimes the masonry goes all the way to the ceiling.
The brick screen is not installed flush against the walls of the stove, the optimal distance is 5-15 cm. The acceptable distance from the brickwork to the flammable wall is 5-15 cm. Thus, the use of a brick screen allows you to reduce the distance from the stove to the wooden wall to 22-42 cm (stove - ventilation gap 5-15 cm - brick 12 cm - ventilation gap 5-15 cm - wall).
If you are interested in learning how to line a metal stove with bricks, we recommend reading the article https://stroy-banya.com/delaem_pech/kak-oblozhit-metallicheskuyu-pech-kirpichom.html
Protective non-combustible wall coverings
Walls adjacent to the hot furnace walls are susceptible to spontaneous combustion. To prevent their overheating, special casings consisting of heat-insulating and non-combustible materials are used.
Option #1 - reflective trim
Sheathing consisting of a combination of non-combustible insulation and metal sheets is effective. In this case, thermal insulation is attached to the wooden surface, which is covered with a stainless steel sheet on top. Some use galvanizing for these purposes, but, according to some data, when heated, it can release harmful substances. It’s better not to risk it and buy a stainless steel sheet.
For greater efficiency, the metal sheet of the screen must be well polished. The mirror surface helps to reflect heat rays from the wooden surface and, accordingly, prevents its heating. In addition, a stainless steel sheet, directing IR rays back into the steam room, transforms hard radiation into softer radiation, better perceived by humans.
The following can be fixed under stainless steel as thermal insulation:
- Basalt wool - it has high thermal insulation properties and is absolutely safe when used in a bathhouse. It has increased hygroscopicity and does not burn.
- Basalt cardboard is thin sheets of basalt fiber. Used as a fireproof, sound and heat insulating material.
- Asbestos cardboard is a sheet fire-resistant heat insulator. It has high strength and durability, protects flammable surfaces from ignition.
- Minerite is a non-flammable sheet (plate) specially manufactured for shielding stoves, fireplaces, and easily flammable surfaces in baths and saunas.
A popular example of cladding using a metal sheet is this “pie”: wall – ventilation gap (2-3 cm) – insulation (1-2 cm) – stainless steel sheet. The distance from the wooden wall to the stove is at least 38 cm (SNiP 41-01-2003).
Ceramic bushings are used to attach the sheathing to the wall. They do not heat up and allow the formation of ventilation gaps between the thermal insulation and the wall.
If the distance between the wooden wall and the stove is minimal, then the cladding is made of two layers of fire-resistant insulation, for example, mineralite. In this case, the sheets are fixed through ceramic bushings, maintaining a gap of 2-3 cm. The top sheet is covered with stainless steel.
Option #2 - sheathing with cladding
Of course, protective cladding with stainless steel perfectly protects wooden walls from heat and fire. But it can spoil the impression of the most expensive finish. Therefore, if the steam room is designed in a decorative style, the fire-resistant lining is masked with heat-resistant tiles. The tiles are laid on heat-resistant adhesive, for example, produced by Terracotta.
The best materials for cladding walls near the stove:
- Terracotta tiles are made from baked clay. It is characterized by strength, heat resistance, durability. Terracotta tiles can be matte or glazed (majolica), and the color varies from pastel yellow to brick red.
- Clinker tiles are also made of clay and look similar to facing bricks. Unlike terracotta, clinker tiles are denser. The color range covers almost all colors, ranging from white to black, including green and blue tones, unusual for clay.
- Tiles are a type of ceramic tile. It usually has embossing on the front surface in the form of a design or ornament.
- Porcelain tiles are heat-resistant, durable tiles. Depending on the method of processing the front surface, tiles can imitate natural stone, brick, or wood. The color range includes all natural shades, from white to black.
- Soapstone is a rock of grayish or greenish color. It is fireproof, waterproof and durable.
Attaching fire-resistant tiles directly to walls will not have any thermal insulation effect. The wall will still heat up, which can lead to spontaneous combustion. Therefore, tiles are used only as an element of a protective “pie” of the following design: wall – ventilation gap (2-3 cm) – fire-resistant sheet material – tiles. It is recommended to maintain a minimum distance of 15-20 cm from the tiles to the walls of the oven.
Any material from this list can be used as a fire-resistant element in the cladding:
- Fire-resistant drywall (GKLO) is drywall supplemented with fiberglass fibers. Resists thermal effects without structural deformation.
- Minerite is a cement-fiber board, absolutely non-flammable. Minerite slabs are moisture resistant, do not rot, and do not decompose.
- Glass-magnesium sheet (FMS) is a material in the form of plates made on the basis of magnesium binder and fiberglass. It has heat and sound insulating properties and is not destroyed by water and temperature changes.
The protective cladding, which must comply with the ventilation gap, has a very low heat absorption coefficient, so the wall underneath it practically does not heat up. In addition, the use of cladding allows you to disguise the protective “pie” and maintain the finishing of the steam room in the same style.
stroy-banya.com
Cons of asbestos slabs
- Acid resistance of amphibole asbestos . It is not destroyed by the acidic environment of the body; phagocytes cannot cope with it. This is the fundamental difference between this asbestos variety compared, for example, with the Russian one.
- Composition of amphibole fibers . Contain molecules of heavy metals.
- Additional expenses . In the interiors of premises, SanPiN allows the use of asbestos cement only if it is covered with 2 or 3 layers of paint. If the slabs in an apartment, residential building or industrial premises begin to crumble, then they need to be painted or covered with wallpaper.
- Fragility . Loading, unloading and storage require care. You need to walk not on the slate, but on the boards laid on it. It is better to secure the sheet not with nails, but with hardware through silicone or rubber washers, having previously drilled holes.
- The appearance of moss at high humidity. To prevent this, the sheets are treated with primers.
- Recycling . You cannot save on disposal and fill up holes and areas near houses with asbestos production waste. Dust can gradually accumulate, which in 15-30 years will result in the occurrence of chronic bronchitis, asbestosis (scarring of the lungs) or cancer of the pleura and lungs.
When bathhouse walls need to be protected from fire
The distance between the stove and the nearby wall should be safe, that is, it should be enough so that infrared rays have less of an impact on the surface and a fire does not break out in the bathhouse.
SNiP III-G.11-62. Heating stoves, smoke and ventilation ducts of residential and public buildings. Rules for production and acceptance of work. File for download
SNiP III-G.11-62
The safe distance between the sauna stove and the walls is determined on the basis of fire safety standards SNiP III-G.11-62 for the operation of stoves installed in rooms with walls or ceilings exposed to fire:
- for stoves laid in 1 brick and walls protected with lime or lime-cement plaster, a layer of 25 mm, or brick cladding on asbestos or clay 40 mm thick - no less than 13 cm;
- for stoves lined with half brick and walls protected with lime-gypsum plaster, a layer of 25 mm or asbestos-vermiculite slabs with a thickness of 40 mm - no less than 320 mm;
- for metal stoves protected by a heat-resistant, fire-resistant, fireproof coating and walls protected by 25 mm lime-gypsum plaster - no less than 700 mm;
- for metal stoves that do not have heat-resistant, fire-resistant, fireproof coatings and walls protected with 25 mm lime-gypsum plaster - no less than 1000 mm.
SNiP 2.04.05-91. Heating. Ventilation and air conditioning. File for download
SNiP 2.04.05-91
Based on SNIP 2.04.05-91, a safe distance is established from the top of the stove to the ceiling:
- with a ceiling that is protected by a steel sheet 10 mm thick, laid on asbestos cardboard or plaster laid on a steel mesh and covering the stove with 3 rows of brick - no less than 250 mm,
- with a protected ceiling and a thermally insulated ceiling of the top of the metal stove, no less than 800 mm,
- with an unprotected ceiling and a stove with an overlap of 2 rows of bricks - no less than 1 m.
- with an unprotected ceiling and non-thermally insulated ceiling - no less than 1.2 m.
It is clear that a safe distance of 1 m between the stove and the wall can only be ensured in bathhouses with a large area. In private baths with a small area, every centimeter of usable space is saved, so the stoves are placed at a short distance from the walls, and to protect against heat, a brick screen is built or metal sheets are used as cladding, as well as other non-combustible materials that significantly reduce the permissible safe distance.
Flat asbestos sheet – price in Leroy Merlin
These types of asbestos sheets are not offered in the store catalog, but as an alternative you can purchase glass-magnesium sheets. In the catalog they are presented in slabs of the same size – 2440×1220×10 mm. Product brand – Magelan, series – Premium. Cost – 1,408 rubles.
The product is used for covering walls and other indoor spaces. Can also be used to create a decorative surface (design type). Perlite and magnesium binder were used as the main manufacturing materials. The product is distinguished by its density and uniformity, fire and heat resistance. Only environmentally friendly materials are used for production. The sheets are not difficult to cut into slabs of the desired size. Made in China. The sheets are not recommended for installation in rooms with high humidity.
Protective screens
Bath walls are usually protected from thermal infrared radiation by protective screens. Brickwork or metal shields together with insulating materials are used as such screens. The protection is installed on the side surfaces of sauna heaters and/or on nearby surfaces.
Metal protective screen
Most often, in private baths, to protect interior partitions from high temperature and fire, an ordinary barrier is installed, constructed from metal sheets that are installed near the stove (a five-centimeter gap is left between the surfaces of the casing and the stove). Metal screens are mainly available on the side or front. A protective screen made of any metal significantly reduces the thermal impact of the stove on the surface of the walls. Thanks to such metal protection, the temperature near the wall decreases, thereby significantly reducing the safe distance.
Metal screens can be installed on legs using anchor bolts to secure the structure to the floor. Commercially available metal reflective screens are already equipped with mounting frames for vertical fixation.
Wall cladding with sheet fire-resistant material
To ensure the fireproof condition of the room, you need to wisely select the material for covering the walls near which the heating structure is located.
And vermiculite panels are ranked among the most effective OLM. Moreover, such slabs are used to ensure fire safety in various premises, including enterprises in the nuclear and oil refining industries.
Among the advantages of fire-resistant vermiculite boards are:
Vermiculite boards
- environmental friendliness;
- fire resistance;
- thermal insulation;
- sound insulation;
- aesthetic appearance, which allows them to be used in prominent places.
Where are they used?
Vermiculite panels, due to their excellent performance qualities, can be used in many areas.
Scheme of thermal protection of a wall and fireplace lining with a vermiculite slab
- For thermal insulation of fireplaces and stoves.
- For fire protection of structures made of different materials.
- To ensure that various objects can withstand fire hazards.
- For guaranteed fire resistance of various indoor items, including stoves and fireplaces.
Vermiculite boards, as representatives of OLM, are installed simply and quickly and do not require professional training. Processing them on all sides of a stove or fireplace ensures protection of the room from the effects of fire and high temperatures, and therefore such fire-resistant sheet materials are optimal in solving the problem associated with the fire safety of the room.
All samples of fire-resistant sheet materials for stoves and fireplaces are modern, high-quality products. In addition to fire protection, they provide heating devices with resistance to various types of damage, including mechanical and chemical.
[ads-pc-2][ads-mob-2]
Protective screen made of red stove brick
Brick barriers often cover the side surfaces of the stove, making the outer skin like a casing. In this way, the separation of combustible surfaces and the hot heating device is carried out.
Since ancient times, there has been a tradition of building stoves from brick or stone. This design took a long time to heat up, but at the same time radiated soft heat, and subsequently cooled down for a long time. Modern metal stoves heat up quickly, emit hard infrared radiation, and the red-hot walls of the stove burn out the oxygen in the bathhouse. In addition, a metal stove is more fire hazardous. In view of these aspects, we can conclude that it is advisable to combine stone or brickwork with steel structures.
Solid fireclay bricks are well suited for constructing a protective casing. A mixture of cement or mixed with refractory clay will serve as a good binder for it. The masonry-screen made of fireclay bricks, according to the value of the safe distance, is made with a thickness of about 12 cm (0.5 bricks) or 6.5 cm (0.25, respectively). However, expensive fireclay bricks are very rarely used in private baths to protect wooden walls; most often, preference is given to red stove bricks.
Before finishing (lining) a metal stove with red stove bricks, the base is first built.
It is imperative to take into account: if the stove is located not far from the load-bearing wall, then there must be a distance of at least 5 cm between the foundation of the stove and the foundation of the building. To ensure that these two foundations are not connected in any way and the heat from the steam room is not lost, thermal insulation material is laid between them .
The foundation surface should be 15-20 cm below the level of the finished floor of the bathhouse. After installing the foundation (it needs to be allowed to dry for 30 days), moisture-proofing material - roofing felt or roofing felt - is laid on it in 2 layers. Then, bricks are laid on the clay-cement mortar in 2 rows, shifting the bricks among themselves so that the seams of the masonry are covered by the brick lying on top.
At this point, the work on arranging the foundation is completed.
A heat-protective base should be made on top of the foundation, consisting of:
- a sheet of metal fixed on top of a layer of heat-insulating material;
- two rows of bricks laid on a wooden floor;
- heat-resistant ceramic tiles.
Before covering an iron stove with bricks, you need to prepare the required mortar for laying. The best option for brickwork around a metal stove would be a simple clay mortar (raw materials should be mined at a depth of more than two meters) with sand. The kneading process is not complicated. The clay is first soaked, then the already soaked clay is thoroughly rubbed through a sieve. The sand is sifted and mixed with soaked clay. The viscosity and plasticity of the mortar must be such that it does not squeeze out of the seams during laying. You can add 5-10% cement to the solution for strength.
The foundation of the protective screen can be made in a quarter of a brick, be sure to leave small holes in its lower part and in the middle part - special windows that create air circulation between the brick screen and the installed stove (sometimes they are equipped with combustion doors). In this case, the bath will heat up very quickly.
It is best to line the stove with half a brick. If the screen is made of brick, it will take a very long time to warm up.
Attention! It is very important to take into account the fire safety requirement - the distance between the walls of the metal stove and the brickwork should be 3 - 10 cm. To make the brick screen more durable, reinforcing mesh must be laid across the row, or possibly in each row. The verticality of the corners should be checked with a plumb line, and the laying of the rows with a building level should be checked for horizontalness.
The brick screen can be laid all the way to the ceiling. The main condition is that its height must be at least 20 cm greater than the height of the stove.
To more reliably protect wooden walls from high temperatures, an acceptable distance has been established between the wall and the constructed brick screen. It should be less than 15 cm, but more than 5 cm, while the distance from the stove to any of the walls can be 20 - 40 cm.
Non-combustible lining
To protect walls from a hot stove, sheathing consisting of various special thermal insulation materials is often used.
Stainless reflective lining
Special non-flammable thermal insulation or protective sheathing consists of stainless steel sheets that perfectly protect the wooden surface of walls in private baths from fires. To construct such a simple screen, first a heat-insulating material is attached to the wall, and only then a stainless steel sheet is attached on top.
To increase the efficiency of the cladding, it is advisable to polish the stainless metal sheet well to a mirror shine. The mirror surface of stainless steel significantly improves the reflection of heat rays emanating from the stove, preventing the wooden walls from heating up. In addition, by redirecting hard infrared rays back, the mirror stainless metal will turn them into soft and safe for people to perceive.
Cladding with cladding
Mirror stainless steel cladding looks beautiful and perfectly protects the walls from fire, however, in some cases it may not be appropriate in a bathhouse and over time the mirror surface will become matte, will not be able to reflect the rays efficiently and will not look as beautiful as it originally did. Heat-resistant cladding will help solve the design problem in the bathhouse for many years; heat-resistant adhesive is used to lay it on the brick lining.
For cladding walls located next to the stove, you can use the following heat-resistant materials:
- clinker tiles, similar to facing bricks, but denser in structure;
- embossed ceramic tiles with ornaments or designs on its upper part;
- porcelain stoneware – tiles with high strength and heat resistance;
- soapstone - a natural mountain fireproof, waterproof, durable stone;
- strong, durable terracotta tiles made from special kaolin clay, fired in ovens at temperatures above 1300 degrees.
Attention! Any tile that is used for wall cladding will not be able to provide complete thermal insulation; it is only one of the components in a protective structure consisting of a fire-resistant material and a small (2-3 cm) ventilation gap between this fire-resistant material and the wall.
As a fire-resistant material, you can also use a board made of fire-resistant plasterboard, or from fiberglass, which will not be deformed under the influence of heat, from a fireproof cement-fiber board - mineralite, or from a special tile material - glass-magnesium sheet.
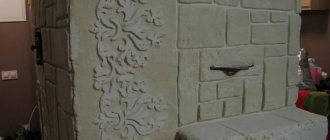
Of course, the best option for cladding wooden walls is brick cladding. With such protection of the walls from high temperatures, the stove can be placed almost close to the wall. However, it is not always possible to use new, even bricks for masonry and lay beautiful masonry around the stove. Sometimes a previously used brick is chosen for a protective screen in order to further refine it with a beautiful material.
Fireproof asbestos sheet for furnaces
Sheets for stoves with fire-resistant qualities (asbestos type) are not presented in the Leroy Merlin catalog. For furnaces, you can choose other types of refractory material:
- Minerite slab. Offered in sheets whose parameters are 63×120 cm. The cost of the element is 1,573 rubles.
The product is manufactured in Finland and is used for arranging enclosing structures in rooms where it is necessary to protect areas with elevated temperatures. To make the material, components such as water, cellulose fibers and cement mass were used. This composition made it possible to make the product durable, with high strength and wear resistance. The surface is not deformable. The product is environmentally friendly, it does not form fungus or traces of mold.
- Fire-resistant fiber cement board . Cost – 1,454 rubles.
The main advantages of the material are its fire resistance, impact resistance and moisture resistance. Most often used for interior decoration. Additionally, the product can be processed or cut to obtain sheets of the required parameters.
Cladding a brick screen - step-by-step instructions
You can refine and make the appearance of any brickwork more aesthetically pleasing with the help of a fire-resistant and durable natural material.
Terracotta tiles, also abbreviated as terracotta, are highly heat-resistant ceramic products made from kaolin clay fired at about 1,000 degrees. This wonderful material is absolutely non-flammable, it does not change its properties even from high (up to 1300 degrees) and low (up to -25 degrees) temperatures, and does not change its beautiful appearance from the action of water or sunlight.
To finish a brick protective fence, you will need heat-resistant Terracotta materials: glue, paste, as well as finishing grout, which will fill the seams.
You will also need a sheet of drywall (choose 9.5 mm gypsum board) to space the slabs, which must first be cut into small squares.
Tools. We stock the following accessories:
- bucket. The components of the binder mixture will be mixed in this container. It is better to take a plastic container;
- a special electric drill. You will additionally need a mixer (attachment);
- to fill the seams you need a gun (model with a tube);
- Bulgarian Purchase a diamond cutting disc for the tool;
- spatulas, 2 pcs.;
- three-meter measuring tape;
- bubble or laser level.
In advance, you need to dilute it with water in a bucket and mix it with a mixer with a convenient and very reliable in terms of fire safety reinforced adhesive mixture “Terracotta”.
Initially, bricks for the screen are laid around the stove in a classic dressing, carefully removing excess mortar.
Attention! After finishing laying the rough wall, you must wait 24 hours for the masonry to dry and gain primary strength.
Terracotta flagstone “Classic” is a stone amazing in its unique beauty. It looks very rich and massive.
It can be easily sawed with a diamond wheel or split with a hammer and then, after spreading a thick layer of Terracotta mastic on it, stick it on the brickwork. Terracotta flagstone is heavier than terracotta tiles, but much lighter than natural stone.
When facing with flagstone, cut squares of plasterboard are used as the distance between the tiles and to stop the movement of the tiles. The rough chipped edge of the flagstone will not allow a 10 mm gap to be maintained everywhere, and this will further give the stone cladding a feeling of naturalness.
Having brought the process of stylizing the wall under wild stone to perfection, you can move on to tiling. You need to lay rectangular terracotta tiles on brick, starting with the laying of corner elements, thanks to which the decorative cladding will look like classic stove masonry.
Corner elements must be glued from bottom to top, while the horizontal corners must be aligned only by level.
Attention! For gluing and setting of Terracotta mastic, at least 10 hours or more must pass.
After the mastic has dried, you need to remove the plasterboard squares inserted as fasteners and begin first filling and then opening the seams between the slabs.
For this work, you will need a heat-resistant wide-joint grout, which is a unique white composition designed for filling the joints between slabs of different decorative surfaces that may be subject to severe exposure to elevated temperatures.
The grout must be filled with water and stirred with a mixer to obtain a homogeneous solution, similar in consistency to thick sour cream.
Attention! The time to use the grout solution is about 1 hour.
It is necessary to fill the tile joints using a construction gun, the nozzle of which must be cut off obliquely so that an oblong hole is formed.
The gun tube is filled with the prepared grout solution using a narrow spatula.
Then, carefully inserting the nozzle, you should, smoothly and with low intensity, moving the construction gun along the length of the seams, squeeze out the grout and fill the seams so that the level of the filled grout is aligned with the level of the tiles. The joints between the slabs can be filled either vertically or horizontally.
Attention! Special grout for seams should not get on the front surface of the finish. If it happens that the mixture does get on the decorative cladding, then you should not immediately remove the composition, but wait at least 2 hours until it hardens a little and then the contaminating fragment can be easily removed. The dried mixture must not be removed from the slabs in a tangential direction or smeared.
After completing all the work on filling the joints, the grout will “ripen”, acquiring molded pliability or slight crumbling after 2 hours. After this time, you can confidently proceed to the final part - the process of distributing the frozen grout and leveling it in the tile joints - decorative jointing, the purpose of which is to give the surface being decorated an attractive appearance.
To begin with, from the seams, using a simple flat screwdriver, transversely recessed into the seam, it is necessary to remove the excess amount of grout, slowly maintaining a constant depth. To remove excess grout, you can also use a metal ring of small diameter, with which you can evenly remove the grout, like shavings.
The remaining grout in the joint can be carefully distributed with light pressure from a gloved finger, giving the grout the appearance of a smooth surface without depressions or roughness.
The work on lining the thermal barrier of the brick walls has been completed.
The first heating of the stove in the bathhouse can be started only 24 hours after all the necessary work has been carried out with grouting between the tiles.
Video - Heat-resistant screens for sauna stoves. Part 1
Video - Heat-resistant screens for sauna stoves. Part 2
Video - Installing a sauna stove with a protective screen
Video - Protecting bathhouse walls with terracotta tiles
banya-expert.com