Good day, dear readers!
Do you want to give your bathhouse a new charming “fur coat”? What's the matter? Head to the hardware store! The market is overflowing with all sorts of outfits that will favorably highlight all the “charms” of the design both inside and outside.
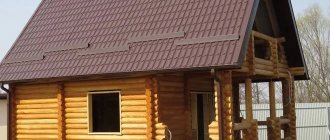
So, for example, the building will certainly please both the liking and the decoration created from the traditional material that has flooded the European market - a wooden block house. It pampers its followers not only with beauty, but also with excellent technical characteristics.
So, the topic of the article for today is block house: do-it-yourself installation. This material is famous not only for its wonderful aesthetic and technical characteristics, but also for its intoxicating aroma and life-giving power! However, first things first. I'll talk a little about the material, but the main emphasis will be on its installation. OK? Well, then let's begin!
Fragrant wooden block house: general information
Concept
A block house is a planed board similar to a lining, which on the front side is made in the form of a segment of a rounded log. It is intended for interior and exterior decoration of a particular structure.
Advantages
As I already said, facing material is known for many advantages. I will not list all the advantages, since this process requires a lot of time. But I’ll tell you about the main positive aspects.
Block house:
- especially harmonious in the interior;
- beautiful and fragrant;
- healing and environmentally friendly;
- non-toxic and safe;
- durable and wear-resistant;
- multifunctional;
- biologically passive;
- chemically inert;
- mechanically resistant;
- climate-resistant;
- thermally passive (when treated with special means);
- simple and quick to install.
In addition, the block house plays a minor role:
- thermal insulation material;
- waterproofing raw materials;
- vapor barrier material.
What more can be said? Block house is an ideal material not only for cladding a home, but also for cladding a steam room, where high temperature and humidity reign.
Inside with your own hands - choose the material
The task of upholstery material when finishing a log bathhouse inside is to preserve heat and reduce electrical heating.
When choosing a material, you must understand what you need. The material must be steam-resistant, non-flammable and harmless.
Unnatural materials in the form of polystyrene foam and plastic are not recommended - at high temperatures toxic substances are released into the air.
Today, suitable options for upholstering a bathhouse with your own hands are lining, blockhouse and imitation timber. Which is better to choose?
Block house
A block house is a budget-price-quality ratio that will save money and give the bathhouse an aesthetic appearance. The composition of the material is as close as possible to a log house; only an experienced eye can distinguish them from each other. Made from coniferous wood. The block house undergoes a special drying process, hardening it from cracks and deformation.
Block house classification
- “C” class is the simplest material, surface-treated and inexpensive. May be subject to deformation after a short service life. Not recommended for finishing a bathhouse with a block house inside;
- “B” class is a material of better quality, not particularly deformed or cracked. Also not recommended;
- “A” class - well-processed, dried and polished material without unevenness or deformation, 2 - 3 centimeters wide;
- “Extra” class is the best and most expensive option.
Imitation of timber
Imitation timber is suitable for finishing a steam room, washing room, and for finishing an attic in a bathhouse - the development of this material was so successful that it began to gradually replace lining.
The material consists of wide solid wood panels with recesses for fastening.
It's all about preserving the heat of the room with the material and low price. The walls look more natural and do not crack or deform even after a long time.
Laying electrical wiring is very convenient, and installation of imitation timber is as simple as possible.
Information: In a chopped bathhouse, the finish with imitation timber protects your wallet, and the material is not afraid of moisture, ultraviolet radiation, temperature changes and time!
Not wooden
If you don’t like the interior decoration of a bathhouse made by yourself with just wood, you can dilute the interior composition with other materials. The main thing is to take into account the constant high level of moisture in the room; the materials need to be selected accordingly. Best suited:
- Porcelain tiles;
- Facing brick;
- Natural stone finishing;
- Fiberglass wallpaper;
- Majolic.
The combination of natural stone and wood will look solid. The floor will be well covered with non-slip tiles. The tiles are suitable for the washing room, which will make cleaning the room quick and convenient.
Plastic panels
Plastic panels are the cheapest option for finishing the inside of a bathhouse; today the market is rich in many options for plastic linings of different thicknesses and designs.
Installation work is done quickly and easily - all you need is a staple gun. This material withstands moisture and temperature changes well. However, plastic has significant disadvantages - the material is short-lived and toxic - the unpleasant smell of plastic fills any room. Like any petroleum product, at high temperatures plastic releases toxic substances into the air, negating all the benefits of a Russian bath.
Attention! If you decide to line the inside of the bathhouse with plastic clapboard, do it in the locker room and other places least exposed to steam and moisture (veranda, attic). You will reduce health risks while ensuring your space looks beautiful.
Production
The production process consists of the following stages:
- logs are sawn according to the “Square in a circle” technology;
- the wood is dried in a special chamber (humidity up to 12%);
- dimensions are adjusted, grooves are cut, combs are made, grooves are created;
- the material is polished;
- raw materials are treated with antiseptic and antifungal compounds;
- product quality is checked;
- the goods are packaged.
Thus, a popular finishing material is born. Although some people prefer imitation timber. As they say: how many people - so many opinions...
Sheathing for block house
How to caulk timber
Regarding the question of how to insulate a bathhouse made of timber from the outside, the choice depends on the climatic characteristics of the region and the thickness of the walls. This work is carried out if the thickness of the timber for a given type of climate is not enough to effectively retain heat.
Warming occurs as follows:
- the sheathing is carried out using timber or metal guides, placing the elements in two planes - vertical and horizontal;
- install thermal insulation materials;
- arrange moisture and wind protection;
- they make counter lathing (this is not a mandatory stage of work, but there must be a gap between the protective film and the finishing material);
- perform finishing work.
The outside of the bathhouse is sheathed with clapboard, siding, edged boards, block house, metal profiles and other materials. After finishing, wood trim is necessarily coated with a varnish composition for exterior use; sometimes it is additionally painted before this, although many modern mixtures also have a slight tinting effect.
Since a hot and humid environment can contribute to the release of toxins from some of them, which will make the bath not only not healthy, but, on the contrary, harmful to the health of people who will take bath procedures.
Since the bathhouse is not huge in size. insulation for a bathhouse made of timber can easily be made using natural organic materials - environmentally friendly, non-toxic and with a sufficient thermal insulation coefficient.
1. Since ancient times, builders have used tow to insulate Russian baths and Finnish saunas made of wood. Such popularity is ensured by the fact that tow is a cheap and easy-to-handle material. As it turned out, I myself am able (without having special experience) to insulate the timber walls from the outside using improvised means.
Tow is sold in rolls, which further simplifies the installation process. In addition, they also sell improved tow with resin impregnation. It is more moisture resistant and has greater strength. The only drawback of the material is its short service life, so the insulation will have to be repaired from time to time.
2. You can also use moss, which is still used in Siberia. The lack of moss is a rather difficult installation process, which can take several days. In addition, moss that is not impregnated with special compounds can be destroyed by moths.
We suggest you read: Insulation of house walls with polystyrene foam
3. Experts consider the most profitable mixture of flax fibers with jute, called flax-jute felt. This is the most reliable insulation for timber walls. Among the advantages, we can emphasize the high density, which will allow quick and even organization of seams
Also, one cannot ignore the ease of processing; insects and mold and fungi do not touch it. Jute insulation has excellent heat resistance
Before insulation begins, the bath beams are thoroughly treated using fire-fighting agents and antiseptics. In addition, each of the inter-crown cracks is diligently caulked. The insulation material is often mineral wool, which is attached to anchors so that the joints of the layers overlap each other.
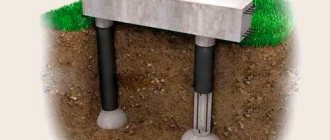
Insulating timber walls from the outside further consists of organizing vents in the foundation - ventilation holes through which steam is removed along with air flows so that moisture does not condense on the walls due to temperature changes.
After the bathhouse has been assembled back, beam by beam, the walls are waterproofed using a dense waterproofing film, which is installed as a rough layer on the mineral wool. This installation will allow excess moisture to be removed from the walls and mineral wool. The reverse (glossy) layer of the film prevents moisture from returning to the walls. After this, the bathhouse is lined with wooden clapboard.
Classification
Before you begin finishing work, you need to know what type of product to give preference to.
1.) Panel size. Sheathing raw materials come in different sizes, but the following parameters are considered common (thickness - width - length):
- 36x190x6000 mm;
- 36x190x2000 mm;
- 30x140x6000 mm;
- 30x140x2000 mm;
- 20x90x6000 mm;
- 20x90x2000 mm.
2.) Type of wood. Products are divided into the following classes:
- “Extra” – finishing raw materials that do not have any defects;
- “A” – facing material, characterized by the presence of one knot, two resin pockets, one non-through crack;
- “B” – sheathing panels showing the presence of four knots, two resin pockets, two blind cracks and one deep shade stain;
- “C” is a decorative raw material known for the presence of a number of defects - stripes, spots, knots, “pockets”, non-through cracks, mechanical defects.
3.) Breed. The block house is made from the following types of wood:
- graceful pine;
- elegant spruce;
- exquisite fir;
- noble cedar;
- majestic larch;
- refined linden;
- graceful aspen, etc.
There is plenty to choose from! Is not it?
Warm plaster
In brick saunas with a solid foundation, a mortar based on cement and sand is used for cladding.
It is used less frequently in wooden structures. In this case, you need to caulk all the cracks so that there are no holes or gaps left. Before cladding, the building is insulated. You should prepare a beam 3–5 cm in size, which will be used to create the sheathing. In addition, you will need dowels shaped like “umbrellas,” glue for polystyrene foam, polystyrene foam, a reinforcing mesh made of plastic, and a frame for creating “warm plaster.”
Installation must be carried out in strict sequence:
- Make a sheathing.
- Attach the insulation panel with dowels (strictly horizontally). When fastening, it is necessary to monitor the position of the seams. They should not be along the same line.
- Lay the second heat-insulating layer vertically. Secure it with glue capable of securing foamed polystyrene.
- Cover the structure with reinforcing mesh.
- Apply “warm plaster”.
The service life of “warm” cladding is several times longer than other cladding methods.
Step-by-step technology for installing a block house: internal cladding
Installation of the panels, as I already said, is extremely simple. Don't believe me? Well, in that case, I provide you with instructions for installing it. Let's first look at installing panels indoors without insulation, and then outside with wall insulation.
Tool
To keep the work in full swing, tools are prepared. So, we need:
- screwdriver and screws;
- saw or jigsaw;
- Sander;
- laser level;
- hammer;
- roulette;
- pencil.
Material
In order for a block house to serve faithfully for many, many years, you need:
- bring material;
- remove the panels from the packaging and carefully lay them out;
- inspect the material for any defects;
- treat raw materials with decorative impregnations.
Installation
How to fasten a block house
The technology is simple, but the work requires serious consideration. For this type of finishing, it is recommended to purchase a block house of “Extra” class or, in extreme cases, “A”.
The process consists of the following steps:
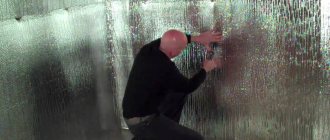
- the walls are covered with a waterproofing layer of film;
- the outermost bars of the sheathing are attached vertically;
- a fishing line is stretched between the bars to check the evenness of the walls;
- a sheathing is packed into the plane between the outer bars (the pitch of the posts is 50-60 cm);
- the first panel is attached with the tenon facing up and fixed with galvanized self-tapping screws or nails at an angle of 45° (by the way, you can use clamps or special galvanized staples);
- each subsequent plank is inserted with a tenon into the groove, tapped and fixed, for example, with a self-tapping screw;
- adjacent walls, as a rule, are sewn up with the boards offset by half the width relative to each other;
- corners and joints are sewn up with special strips;
- gaps are left from the floor of no more than 1 cm, and from the ceiling - no more than 0.5 cm (gaps are needed for ventilation);
- the ends of window and door openings are sealed using corner wooden overlays;
- the surface is processed with a grinding machine, and in hard-to-reach places it is sanded manually;
- stain, acrylic varnish or other decorative antiseptic composition is applied to the walls.
That's all! Do-it-yourself panel fastening is complete. Difficult? Well, of course not. Although, you also need to “fill up” your hand. Still, a lot of questions and confusion will arise.
Mount selection
There are several ways to attach a blockhouse:
- Self-tapping screws . The most labor-intensive installation method if you need to sheathe a wooden bathhouse. In this case, small recesses are drilled into the surface. Self-tapping screws are screwed in here and then closed with wooden plugs. Sometimes plugs are not used, but in this case the appearance of the coating suffers. And over time, the metal will begin to rust, changing the color of the wood around it. This method is also not suitable for a steam room: the hardware here will get very hot and can burn visitors.
- Nails . Typically, a hidden fastening method is used to install the board. In this case, the nails are driven into the groove. This is the simplest, but not the most reliable method of installing a block house.
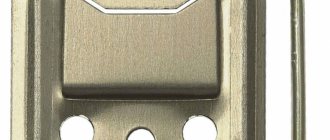
- Kleimers . Currently, clamps are very popular for interior decoration. They are used for hidden installation of linings and house blocks indoors. The main disadvantage of this method is the high complexity of installation. The kleimer can withstand light weight, which is why it is necessary to reduce the distance between adjacent fasteners.
There is another installation method that is gaining popularity. It consists of using the “Wave” mount. Unlike clamps, such fasteners can withstand loads of up to 50 kg (thanks to the curved profile). The zinc coating of the product provides protection against corrosion.
“Wave” is used not only for finishing block houses inside and out, but also for installing lining, plank and other types of lumber. Such fastening is invisible and can maintain zero gap between adjacent boards.
Exterior finishing of block house
Tool
For the work to go smoothly, you need to stock up on:
- screwdriver;
- saw or jigsaw;
- grinding machine;
- hydraulic level or laser analogue;
- hammer and wooden mallet;
- tape measure;
- pencil.
Material
To ensure that raw materials do not lose their characteristics during operation, it is necessary:
- bring home and unpack;
- lay out structures under a canopy for acclimatization;
- inspect for any defects;
- remove flaws, if any;
- treat with antiseptic and fire retardant substances.
Installation
The process consists of the following steps:
- a vapor barrier is fixed to the walls, for example, isospan A or its equivalent;
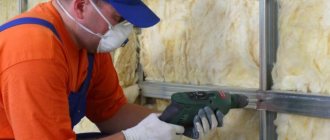
- a sheathing of 3×5 beams is vertically attached to the wall surface using self-tapping screws (step – 500-600 mm, depending on the selected insulation);
- heat-insulating raw materials are fixed in the space between the slats (usually mineral wool slabs are used);
- A windproof fabric is installed over the insulation overlapping and taped along the seam with special tape;
- Another sheathing of slats is carefully installed to recreate the ventilated area inside;
- the lower panel of the block house is attached strictly horizontally along the entire perimeter of the building using hardware or clamps;
- in this way “all the walls rise” along the entire perimeter at once;
- window and door slopes are finished, corner trims are installed in the corners;
- Corner trims are also installed on the corners of the house;
- the sheathed structure is treated with antiseptic compounds;
- a technical break is made - 48 hours;
- the surface is primed;
- a technical break is made - 48 hours;
- the impregnated and primed surface is varnished;
- a technical break is made - 72 hours;
For external finishing, the presence of insulation and counter battens is required. But for cladding the outside of the house, you can purchase a class “B” or “C” block house. By the way, how to paint the sheathed walls? Do you want to preserve the natural charm of wood? Give preference to clear varnish or glaze. Do you dream of standing out? Pay attention to tinted German or Finnish paints (this is my personal suggestion).
That's all the manipulation! You can enjoy the work done and its amazing result.
From the inside: walls of the steam room
The traditional way of finishing the walls of a steam room is lining with lumber:
- Profiled (including cladding boards - clapboard);
- Trimmed (2–4 cm thick).
Decorating a bathhouse with a block house inside is popular.
Lining with a profile in the shape of a cylinder segment is used to line frame partitions in an unsheathed log house (an option for a cobblestone bathhouse is “imitation timber”).
A gap is left between the wooden cladding and the wall (partition), communicating with the main volume of air at the top and bottom, so that the board does not rot.
The “Finnish sauna” is finished only with wood. Log and cobblestone walls create the most favorable conditions for “dry” soaring. 1.5–2 times less wood is used for the walls of a frame sauna - lightweight, non-shrinking.
The thermal conductivity of frame walls filled with mineral wool is 3 times higher than the thermal conductivity of wood. With a thermal insulation thickness of 10 cm, a frame wall loses heat almost 2 times less than a wall made of logs, and almost 4 times less than a brick wall.
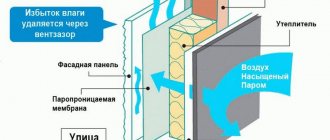
The main danger for frame walls is moisture inside the frame volume. Sources: snow, rain, atmospheric moisture, indoor steam. Vapor-tight material is laid without gaps, overlapping, between the inner lining and the insulation.
The outer skin is preceded by a windproofing membrane - a dense, vapor-permeable material that allows the insulation to dry out if moisture does get into it.
If the building is made of brick or artificial stone blocks, I protect the steam room inside from steam, line it with boards, and line it with tongue and groove boards. The thicker the lumber, the more comfortable it is to steam in a stone sauna.
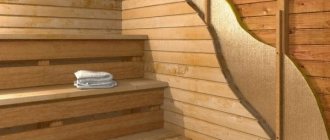
It would be good if the rough cladding in the steam room would be coniferous wood (pine, larch), which combines low thermal conductivity, porosity, and heat capacity.
Linden, alder, birch, and aspen are used to finish the steam room.
They hold heat well and do not warp over time.
A block house made of linden for a bathhouse is valued for the uniformity of this wood, emphasized by its rounded profile, beautiful shade, and resistance to cracking.
Before installation, lumber must be well dried.
Larch has proven itself well on the steam room floor.
Benches and shelves are made of aspen and birch.
An example of the interior decoration of a bathhouse made of timber in a washroom:
- Ceramic tiles over DSP cladding;
- Floor - tongue and groove floorboard;
- The ceiling is clapboard.
In a frame bath, it is permissible to begin interior finishing immediately after finishing the cladding work:
- The frame on the room side is covered with a vapor barrier membrane;
- Protected with lathing;
- Sew up GKVL or DSP;
- A fiberglass mesh is attached around the perimeter (for example, with a stapler), and primed;
- Cover with tiles using tile adhesive and rub the joints.
If heated floors maintain a positive temperature, glazed ceramic tiles are used to decorate the frame bath inside, without fear for its integrity when the temperature passes through zero.
There is no need to take risks in a cold bath: it is better to prefer porcelain stoneware tiles for interior wall cladding. (Through “weak spots” in the grout or on the other side of the wall, the ceramics will become saturated with moisture; at subzero temperatures, the glaze or the entire product will crack).
The walls of the log house are sheathed with plasterboard over a metal profile and tiled:
- Full height;
- Only the lower part of the wall (the upper part and the ceiling are covered with clapboard, tongue and groove boards, and moisture-resistant acrylic paint).
The washing room is lined with clapboard, block house (made of larch or linden) and the entire height of the walls.
Periodically (every few years) the finishing boards will have to be sanded, or even replaced.
Impregnation with linseed oil and wax coating will delay the need for repairs.
In the corners of the bathhouse, the block house can be replaced with plexiglass, plastic, tiles, and stone.
Timber and logs can remain uncoated. Then only the section of the wall near the shower is covered with aspen clapboard, treated with oil and wax.
Plastic panels
The lower part of the wall is forced to be protected with porcelain stoneware by the general cladding of polyvinyl chloride clapboard.
Moisture-resistant, lightweight, practical, breathable plastic panel is not resistant to mechanical damage.
PVC lining is attached to the sheathing, gypsum board (with screws, staples, nails).
The cladding of block or brickwork may be applied to the plaster rather than the sheathing. Then the walls are leveled:
- The wall is primed to improve adhesion;
- Straight, long, rigid slats are attached, for example, a special metal profile - beacons (on alabaster or special gaskets that allow you to adjust the position of the slats), strictly vertically, in one plane;
- Using a trowel, lay the plaster mixture between the beacons (for a bathhouse - cement-sand, possibly with porous aggregate), layer by layer, with laying a reinforcing metal mesh;
- Level the plaster using a rule - moving it along the guide beacons;
- Dry the wall, preferably with a heat gun;
- The beacons are removed, the “traces” are filled with plaster;
- After drying, apply a layer of finishing putty.
In order for the planes of the walls to be perpendicular to one another, a level, a plumb line and a square must be involved in the installation of beacons.
A wall that has been plastered and treated with an antiseptic can be painted with moisture-resistant paints that are safe when heated, for example, acrylic dispersion paints. Both log walls and siding are painted.
Steam and moisture protection
Finishing a wooden bathhouse is often impossible without insulating steam and moisture - these components provide a good microclimate, protecting the structure from moisture. To prevent the formation of fungus, mold, rot and other destructive factors, the structure is equipped with an insulation system from moisture and steam. From a design point of view, lining and other finishing materials make the room aesthetically pleasing, while moisture and steam tend to ruin all the beauty.
When starting interior decorating work, where to start is a simple question. After installing beacons on the walls and floor, think about vapor barrier and waterproofing.
An additional heat-protective space is formed between the wall of the log house and the lining of the lining, which prevents heat from escaping, but provokes the appearance of condensation.
In addition, wood has minimal thermal conductivity, which creates a large temperature difference between the wall and the lining - steam penetrates into the joints of the lining, and when it reaches the wall it condenses, remaining on the walls of the log house. Over time, mold grows in the building and the wood rots.
Today, many materials are used for waterproofing and finishing wooden bathhouses, but not all are environmentally friendly. First, treat the sheathing and walls on the inside with an antiseptic to prevent mold and rot.
Next, materials that can withstand high temperatures will come in handy - mineral and glass wool are better suited than others. You can also purchase a more modern option - a waterproofing film, but for finishing bathhouses with wood this is not the cheapest pleasure. Insulating the walls under the lining is the right solution for waterproofing a room.
Floor waterproofing
Wall cladding when finishing a log bathhouse inside is best done after waterproofing the entire structure. Combine floor waterproofing materials with similar ones on the walls, which will provide maximum protection from moisture and steam. If the concrete floor in the bathhouse was made a long time ago, check its condition - the surface should be smooth and the concrete dry.
Important! After pouring, it takes 4 weeks for the concrete to dry completely, after which the floor must be treated with an antifungal solution, primer and coating waterproofing!
When the initial procedures for waterproofing the floor are completed, the floor is covered with rolled material and filled with screed. This is necessary both when covering the floor with wood and when finishing the inside of the bathhouse with tiles. Next, antiseptic plywood, OSB or board is laid over the waterproofing, and roofing felt is placed on top. This system is applied to the walls, connected with sealant or special tape. The joints on the floor are treated with mastic or the same sealant and the floor is equipped with a reinforced mesh and filled with concrete - screed. All that remains is to lay the outer cladding as the finishing touch to the flooring of the log bathhouse.
Important! It is advisable to carry out such extensive work on the bathhouse floor no earlier than a year and a half after the construction of the structure - after the final shrinkage of the log house.
Beautiful examples for inspiration
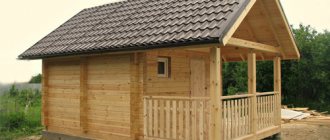
A simple rustic small bathhouse, where the washing room is combined with a steam room, will become a great place for bathing procedures and evening tea, if you attach a canopy with a terrace, place benches or wicker chairs on the veranda, easy-to-use plastic furniture is also suitable for this. In the clearing in front of the bathhouse, you can arrange a barbecue area or a small pond, which will greatly decorate your family vacation.
A Russian bathhouse, decorated in antique style, will be a win-win option. Squat buildings, traditional for cold climates, with a small steam room and sink for better heat retention, are wonderfully stylized using burnt wood, signs and relief compositions with a bath theme, and wood carvings. Equipment with wooden ladles, buckets and tubs will add national flavor.
Spectacular buildings are achieved through exterior decoration. The rectangular shape of a bathhouse with smooth walls without protrusions and an ordinary gable roof transforms from a boring structure into a stylish modern bathhouse after lining the walls with wooden slats in light colors and lining the central façade with decorative stone. The only complex elements are the unusually shaped windows, which break up the monotony of the facades.
The minimalism of design features does not require additional costs for decoration, but creates a unique design object using small means.
With sufficient funds and the help of professional designers and builders, you can become the owner of an architectural masterpiece, made and equipped with high technology. The main finishing materials are glass, metal, plastic, concrete. Primary colors – white, gray, metallic.
Spaciousness, comfort, futuristic interiors are the hallmarks of the high-tech style. The energetic and active generation will love a relaxation room in this style.
7 photos
See the next video for an interesting design project for a chopped bathhouse.
Lining
It is best to decorate the interior walls of a bathhouse with clapboard as it looks good, smells good and does not form condensation.
Finishing the steam room of a bathhouse photo of one of the clapboard cladding options
Before you start finishing the steam room with clapboard, you need to treat this clapboard with an antiseptic and a moisture-repellent solution, and you cannot cover it with stain or varnish, since high temperature and moisture will destroy them and, as a result, harmful and dangerous substances will be released that have a negative effect on the human body. The quality of clapboard finishing for baths and steam rooms depends on the quality of the finishing material, in this case the quality of the clapboard. Therefore, the interior decoration of the steam room should be done only with clapboard that is well dried and free of knots and nicks.
Finishing the bathhouse with a slab on the ceiling instead of lathingIt is best to finish a bathhouse with eurolining made from hardwood because such wood has lower thermal conductivity than other species and therefore less heat will reach the walls through them. There are different types of hardwood, for example, lining made by:
- From birch it charges a person with energy.
- Aspen makes a very durable lining if the wood is properly dried; this wood absorbs negative energy and helps get rid of headaches. Aspen is very moisture resistant and almost does not crack, and also almost does not rot and has antiseptic properties. It is best to make bath floors from aspen.
- It is better not to make it from birch as it dries out a lot due to its loose structure.
- It is also not recommended to make it from larch since it contains a lot of resin, and when heated, the resin will flow.
- Linden will make a beautiful white steam room, and since it is the lowest heat-conducting wood, it is best to finish the bathhouse with linden on the ceiling and walls located near the stove. Even in a humid environment, linden does not lose its properties and when heated it begins to emit a pleasant aroma, so it is recommended to decorate steam rooms with linden.
The finishing of both wooden and brick baths is done almost the same way. First of all, the floor is laid. The floors in the bathhouse should be made of wooden boards with a slight slope towards the drain. Since the temperature at floor level almost never rises above 35 degrees, almost any wood pre-treated with an antiseptic solution can be used for the floor.
Floors made of ceramic tiles need to be covered
Also, the floors in the bathhouse can be tiled, but on such a floor you can easily slip and therefore, for safety reasons, you must put a wooden flooring on the floor. When the floor is ready, begin finishing the walls. If the walls are smooth, then roll insulation with foil is attached to the wall, and when finishing the bathhouse with foil is finished, it is covered with clapboard. If the walls are not level, then a sheathing is first attached to the walls at a distance of 70 cm from each other, into which the insulation and waterproofing layer are laid, and then the lining is stuffed over the sheathing.