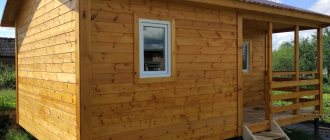
A reliable and strong foundation for a 4x6 m bathhouse will ensure its long-term use without problems, repairs or additional costs. Therefore, the base of the bathhouse must be equipped in accordance with all the rules of construction technology.
Each home master will be able to determine for himself which way is best to do this. The materials from this article will help you make the right choice and easily build a foundation for a 4x6 m bathhouse with your own hands. In the attached photos you can see everything clearly.
Determining the type of foundation
Based on the composition of the soil and its resistance to loads, the general recommendations look like this.
- On fluid and fluid-plastic soils (sandy loams, loams, clays flow down an inclined surface, do not roll out into a rope, stick) with a plasticity index JL from 0.75 to 1.0 or more: slab base.
- Tightly plastic and hard soils (sandy loams, loams, clays crumble upon impact or are difficult to knead). JL 0 – 0.5: strip, columnar foundation;
- On sandy soils - screw piles.
- On peat soil more than 3 m thick - driven or screw piles.
Where there is no soil and rocky, coarse rocks come to the surface, they themselves can serve as a foundation.
Engineering-geological surveys require financial costs; they are carried out infrequently for bathhouses specifically. They use the results of studies of their own and neighboring areas. If there is a gas pipeline, the operators have a survey report.
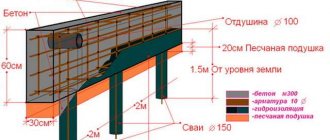
Before choosing, a preliminary calculation is carried out. The main quantities that are used are: the depth of the foundation for the bathhouse and the load.
Laying depth
Seasonal soil freezing is the main indicator that must be taken into account. Its dependence on the groundwater level and snow cover is standardized by SNIP 23-01-99 (Building climatology). Then the load, the depth of the foundation of the adjacent structure, and the location of utilities are considered.
| Depth of seasonal soil freezing, cm | |
| Omsk, Novosibirsk | 220 |
| Tobolsk, Petropavlovsk | 210 |
| Kurgan, Kusentai | 200 |
| Sverdlovsk, Chelyabinsk, Perm | 190 |
| Syktyvkar, Ufa, Aktyubinsk, Orenburg | 180 |
| Kirov, Izhevsk, Kazan, Ulyanovsk | 170 |
| Samara, Uralsk | 160 |
| Vologda, Kostroma, Penza, Saratov | 150 |
| Tver, Moscow | 140 |
| St. Petersburg, Voronezh, Volgograd, Guryev | 120 |
| Pskov, Smolensk, Kursk | 110 |
| Tallinn, Kharkov, Astrakhan | 100 |
| Minsk, Kyiv, Rostov on Don | 90 |
| Frunza, Almaty | 80 |
| Kaliningrad, Simferopol, Sevastopol | 70 |
A map and freezing tables for Russian cities will also help determine the required indicator, depending on the type of soil. Where frost heaving of the soil and its settlement during thawing is possible, to design the foundation one must be guided by Chapter 14 of SNIP 2.02.01-83. A bathhouse is a building with irregular heating. This must also be taken into account when making calculations: a shallow type with an insulated base and blind area will not help with heaving.
Loads
The prefabricated load consists of the weight of the base, the structure and its contents.
- The weight of a monolithic strip foundation is equal to the volume of reinforced concrete multiplied by its density: 2500 kg/m3.
- Weight of walls, partitions, plinth, stove, ceiling, roof, gables. Defined similarly.
- Temporary loads: people, water, snow on the roof. In areas with strong winds, this indicator should be added.
The resulting value is divided by the area of the foundation. This is R - the calculated resistance is 1.55 (conditionally) kgf/cm2, 15.5 tf/m2, 155 kN/m2, 155 kPa. It is multiplied by the reliability coefficient - 1.3.
Key Features
The columnar foundation, made for modern lightweight frame-type baths weighing up to 1000 kg/cubic m, is characterized by simplicity, accessibility and low cost of arrangement.
The support-column foundation has significant advantages that distinguish it favorably from other types of foundations:
- The design and calculation of a columnar foundation can be done on your own, without the use of additional equipment or the involvement of third parties;
- A foundation of this type can be installed on any soil with a low level of heaving and deep groundwater;
- Laying the foundation is possible in areas with significant differences at different points;
- The construction of a columnar foundation is carried out in a short time. Minimum period – 14 days;
- High strength and durability of the finished structure is ensured (the minimum service life of such a base is 50 years);
- Low cost of consumables and construction work.
Among the significant disadvantages are the following factors:
- The base is not suitable for the construction of heavy structures made of brick, concrete, cinder block;
- This type of foundation is not recommended for bathhouses equipped with basements;
- To protect against increased moisture, additional installation of a waterproofing layer is required.
Factors affecting the length of supports
The strength of the future structure depends on the correct determination of the length of the piles, and if these important elements of the foundation turn out to be short, the house may sag under its own weight after it is put into operation. The length of the piles is determined taking into account the analysis of the soil and landscape, namely:
- Soil density.
- The difference in height between different points on the site.
Soil density
Support immersion depth
Soil analysis is best carried out based on geological studies of the area. If studies of soil characteristics have not been carried out in a given area, then you can use a simplified method to determine its density.
So, you need to dig a shallow ditch (up to 1 m) at the lowest point of the site. If at such a depth you see a clay mass or sand, then it is better to make a choice in favor of piles, the length of which reaches 2.5 m. If you find low-density rocks (peat), quicksand or groundwater, you will have to continue deepening until you reach hard rocks. Piles are installed here, the length of which is equal to the length of the drill.
Here is a table of the density and bearing capacity of various soils.
Calculation of height above ground
The lifting height of piles depends on several conditions:
- The amount of snow cover in winter.
- Water level during floods or floods.
- Depth of groundwater.
Some values can be found in SNiP annexes, other values can be obtained from local geological exploration or meteorological organizations.
The main task is to ensure such a rise above ground level in order to minimize the consequences of various natural influences.
In most cases, the height of the bathhouse above the ground level is taken to be within 40-60 cm. To cut off the walls from contact with snow masses, this is usually enough, as in case of flooding.
No one can predict critical situations, and building a bathhouse that is too high is impractical.
This does not apply to buildings on slopes or uneven terrain, where the height is determined by the lowest value.
Installation of formwork
To create formwork with your own hands, edged boards with a thickness of 25-40 mm are used.
There are other materials, but wood is more accessible, cheaper and easier to work with. In addition, after completion of the work, the boards can be used for other purposes.
The thickness of the boards directly depends on the height of the tape.
The formwork is assembled in stages:
- Assembly of shields. The height is 5-10 cm greater than the height of the tape; the length of the boards is determined by the length of the walls or the size of the boards.
- Installation of shields in the trench. They are fastened together by support strips that determine the thickness of the future tape. On the outside, the shields are reinforced with supports that prevent the mass of concrete from pushing the walls of the formwork outward.
- If the boards are low (up to 20 cm), supports can be omitted, securing the walls from the outside with pegs.
NOTE! When assembling the boards, gaps between the boards should not be larger than 3 mm (ideally, there should be no gaps at all). If gaps appear, they are filled with tow or slats. The installed formwork is a structure whose internal space is the exact shape of a concrete strip
After assembly, all dimensions should be checked to eliminate the possibility of errors.
The installed formwork is a structure whose interior is the exact shape of a concrete strip. After assembly, all dimensions should be checked to eliminate the possibility of errors.
Nothing can be corrected subsequently, so the assembly process must be monitored with the utmost care.
Drain arrangement
When building a bathhouse, it is necessary to pay special attention to the arrangement of the drainage system. Ineffective moisture removal can cause premature rotting of the wooden floor, leading to the appearance of mold and unpleasant odors.
The best option is to install a sewer pipeline under the bathhouse, which removes water to a septic tank or cesspool.
Trenches for pipelines must be dug even before the frame is installed on the grillage . They must be brought to the building at those points where the drains in the washing room will be located, as well as sinks and toilets (if a separate bathroom will be installed in the bathhouse).
The trenches should have a slight slope so that the pipes are located at an angle and ensure the removal of moisture by gravity.
The video will show you how to install a drain in a bathhouse on screw piles:
Bathhouse foundation options
The main types of foundations for installing a bathhouse on them are shallowly buried strip, pile-screw and columnar. To give the building an original appearance, in some cases tree butts can be used as bollards, but this is the exception rather than the rule.
Which foundation is best for a bathhouse to choose depends primarily on the type of soil on which construction is planned. If the area is swampy or has complex terrain, the ideal option is to build a pile foundation for a bathhouse, and the grillage should be located above ground level.
This design securely holds the bathhouse frame. Another advantage of this type of foundation is its openness, due to which air flows passing under the floor of the bathhouse dry it well, thereby preventing damage from dampness. The disadvantage of the design is that in order for the floor in a washing room or steam room to be warm, it must be additionally insulated.
For areas where the soil is slightly heaving and sandy, shallow strip and columnar foundations are popular. A columnar foundation for a bathhouse is used to reduce construction costs, since installing a strip foundation is much more expensive.
The advantage of a strip foundation is minimal pressure on the soil, a closed underground space, as a result of which the floor in the bathhouse will be much warmer. In order for the underground space to dry out, vents are made in the strip foundation. If desired, this space can be covered with bulk insulation and waterproofing can be done on the floor side, which will increase the thermal characteristics of the bathhouse.
It is worth choosing a strip foundation for a bathhouse even in the case when the bathhouse is made not of wood, but of brick or foam blocks, due to the fact that such a structure will have much more weight compared to a wooden frame. Since the bathhouse is a small and not complicated building, you can make it yourself. Let's take a closer look at how to build a strip foundation for a 4x6 bathhouse on your own.
Additional recommendations
When building a foundation for a 4x6 sauna with your own hands, you often encounter common mistakes. This mainly concerns the incorrectly chosen type of foundation and its depth. Therefore, to assess the quality of the soil, it is better to contact specialists.
The most dangerous violations of technology:
- Welding reinforcement produces an unreliable connection. Only wire or clamps can be used.
- Use of cement below M150.
- Wintering an unloaded strip base. Without insulation or conservation, deformation will occur due to soil heaving in frosty weather.
Which foundation to choose
To avoid distortion of the building on heaving soil, it is recommended to make a thicker layer of sand cushion - 50 cm instead of 20. Thermal insulation of the base will reduce heating costs for both the structure and the floor, and will also increase the service life of the bathhouse.
Related video: Foundation for a bathhouse - where to start
Publications on the topic
How to build a strip monolithic foundation
Self-construction of a bathhouse from aerated blocks
Construction of a monolithic frame for a private house
How to install a bathhouse on a foundation?
- First you need to prepare the foundation. If the unevenness is more than a centimeter, they are leveled with cement mortar.
- Then they begin to waterproof the foundation - it is impregnated with bitumen mastic (you can use liquid glass instead). After impregnation, roofing material is laid on top in 2-3 layers, the pieces overlap, the overlaps of the first layer should not be directly under the overlaps of the second, it is better to do them with a shift. The roofing material should protrude beyond the edges of the top of the foundation by 1-2 cm.
- At the next stage, the lower crown is first impregnated with an antiseptic, and then with waterproofing (the same mastic or liquid glass).
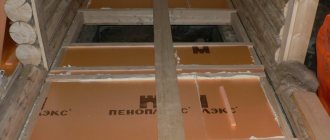
- Before laying the crown on the foundation, you can put a layer of boards, 40-50 millimeters, on top of the roofing material. It is easier to replace a rotten board than to change the crown of a log house.
- A layer of insulation - moss, hemp or tow (1-2 cm) is laid directly on these boards and roofing felt.
- Only after these preparations is the first lower crown placed on the foundation.
- At the corners, the strapping is connected by cutting down half the diameter of the log. If the bathhouse is built from timber, then it can be fastened with metal corners.
- To fasten the lower crown, tension bolts with nuts and washers are also used. The washers are installed to distribute the load more evenly.
- Further installation of the crowns is carried out according to their numbering and letter designations: N, S, W, E. The cardinal directions in this case indicate the specific walls of the bathhouse.
*** Well, now you have enough information to deal with the tasks facing you and decide which foundation is best for you for a log bathhouse. We can only wish you success and the speedy completion of the construction of a bathhouse on your site.
Additional materials from the section on foundations for baths:
- Types of foundations;
- Height and depth;
- How to do;
- With your own hands;
- Base for the stove;
- Which is better.
Pouring the base
To fill the foundation with concrete, prepare a mixture of cement, sand, gravel with the addition of water. The grade of cement should be no lower than M200, and if work is carried out in the cold season, then no less than M400. The mixture is poured into the frame, distributed evenly, and air bubbles are removed using special vibrators. Containing organic waste in concrete is not allowed.
Table of composition and proportions of concrete mixture made from different grades of cement
After the concrete has hardened (after 3–7 days), the box is dismantled. The cavities remaining from the shields are filled with crushed stone and soil. Along the perimeter of the foundation, drainage is installed from perforated asbestos or ceramic pipes to drain groundwater. Complete shrinkage of concrete lasts from 3 to 12 months. The base surface must be protected with a waterproofing coating. The easiest way is to apply bitumen mastic.
Detailed foundation pouring diagram
An experienced builder, having made a reliable foundation for a 4x6 bathhouse with his own hands, can then deliver the finished project on a turnkey basis within a month. Because the next stages of building a bathhouse (building walls, flooring, roofing, stove, etc.) occur faster than preparing the foundation.
Columnar foundation with grillage
When constructing a heavier bathhouse building (for example, made of brick) or if you want to equip a basement, you can mount a columnar foundation with a grillage. This is a monolithic reinforced concrete strip structure that connects the top points of all foundation elements buried in the ground.
To fill the grillage, you will need formwork material: edged board with a thickness of 20 to 40 millimeters, plywood, OSB or other similar building material. As well as reinforcement with a cross-section of 10-12 millimeters and concrete of at least grade 150. Most often, grade 200 concrete is used to fill the grillage, and if you make it yourself, you need to mix M400 cement, coarse sand and medium or fine crushed stone in a ratio of 1:2, 5:4,5.
Let's calculate the amount of lumber for formwork. It must be taken into account that the height of the grillage should be at least 0.3 meters, and its width should be 10 centimeters greater than the width of the manufactured columnar supports.
- We determine the immediate height of the grillage and add another 0.2 meters to it since the height of the formwork must be greater than the level of concrete poured into it.
- We fix the thickness of the formwork material in meters.
- We measure the total length of the future grillage.
- We multiply all the obtained parameters together and get the required amount of material for formwork in cubic meters.
From the prepared lumber we knock down the formwork box. In its lower part, holes should be cut for the previously made pillars, which should rise slightly above the lower part of the formwork.
Formwork assembly
Video - Installation of formwork
From reinforcement rods it is necessary to make frames with transverse square clamps, which can be bent from thinner smooth reinforcement or from wire Ø6-8 mm. They will give the necessary strength and reliability to the structure. Every 30-35 centimeters we connect clamps and reinforcement rods with knitting wire in an amount equal to the entire perimeter of the grillage. We calculate the size of the frame in such a way that there is 5-7 centimeters from it to the walls of the formwork.
If the finished foundation pillars are located at a considerable distance from each other, then for reliability you can strengthen the formwork with wooden supports, which must be installed strictly horizontally.
Before pouring concrete into the formwork box, we will install a reinforcing frame, fixing its lower part to the reinforcement protruding from the columns.
Video - Columnar foundation. Formwork, reinforcement, pouring
If pouring is done from a concrete mixer truck, then pour the entire concrete mixture at once, removing air with a construction vibrator, a reinforcement rod, or simply using a shovel.
Pouring the foundation
If you have to mix the concrete yourself and the pouring takes several days, then:
- at one time we fill in part of the grillage, divided vertically, not forgetting to remove the air;
- Before pouring the next part, the edge of the finished block with already hardened concrete is generously moistened with water.
Fill the formwork completely with concrete mixture, cover it with film and let it stand for several days. Then we carefully remove the wooden box and our hanging grillage is ready.
It is worth noting that regardless of the material used to construct the columnar foundation, this version of the foundation for a future bathhouse is more reliable than the traditional strip one, and at the same time is much cheaper (almost half).
Dismantling the formwork
Poured foundation with grillage
Site preparation and procurement of materials
The speed and quality of installation of pile-screw foundations largely depends on the preliminary preparation of the construction site.
Before starting construction, it is necessary to clear the area of weeds , bushes and trees that may interfere with the work.
If the installation of piles is carried out in winter, snow should also be removed from the area where the bathhouse will be built.
It is also necessary to take care of the supply of water and electricity in advance. Water will be needed to prepare the cement-sand mixture, electricity is required for lighting and operation of electrical equipment.
To build the foundation, you will need steel screw piles with a diameter of at least 89 cm . The optimal metal thickness is 3.5-4 mm. Supports with such parameters can withstand operating loads of up to 5 tons.
When filling the internal cavities of pile supports, you will need a sufficient amount of concrete mixture grade M300 or higher. To prepare it, you should purchase sand, cement and crushed stone in advance. If desired, special modifiers can be added to the solution to increase the frost resistance of concrete.
Wood boards, channels or a metal profiled pipe can be used to tie the pile-screw base . If wood is used, when purchasing materials it is also necessary to purchase special means for its antiseptic treatment.
For anti-corrosion protection of channels and profiled pipes, any metal paint that has the appropriate properties can be used.
The last item on the list of required materials is waterproofing. As such, you can use liquid rubber and hydrophobic paints.
How to markup
How to markup
They mark out the area for the foundation of the bathhouse after preparing this area. To do this, you need to remove the turf and level the area. To prevent flooding, the site is leveled with a slope in any direction except north.
Marking angle
Now you can start marking the foundation.
Step 1. First, prepare half-meter pegs, for example, from reinforcement. You will also need a rope that does not stretch, and a square.
Marking angle
Step 2. Drive the first peg into one of the corners.
Marking scheme
Step 3. The square is applied at a right angle to the peg, and, focusing on the legs, measure the sides and mark the adjacent corners of the foundation. The procedure is repeated until all 4 corners are marked. A rope is pulled between all the pegs. This is internal markup.
Step 4. Check the correctness of the markings by measuring the diagonals, the difference between the lengths of which should not exceed 20 mm.
Step 5. Place the cast-off at a distance of about one and a half meters from the pegs. It consists of vertically placed wooden blocks, to which a board is nailed on top at the height of the future floor. The boards must be parallel to the walls of the future bathhouse.
Step 6. The markings from the pegs are transferred to the cast-off. To do this, nails are driven into the board in places corresponding to the corners of the foundation and a rope is tied to them, which marks the internal walls.
Marking scheme
Step 7. On the cast-off, mark the outer surfaces of the foundation in the same way. The width of the base of the bathhouse can be 25 cm for wooden and 35 cm for brick buildings.
Marking scheme
Step 8. Measure the diagonals of the outer rectangle to check whether the outer sides of the foundation are laid evenly.
Marking
Now you can proceed directly to the construction of the foundation.
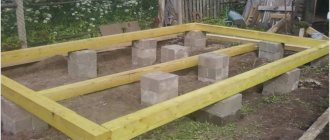
Columnar foundation
Columnar foundation
If you decide to build a wooden bathhouse and the soil allows it, then you can make a columnar foundation, which will significantly save money at this stage of construction.
The material for the columnar base of a bathhouse can be different: brick columns, logs, steel or asbestos pipes filled with concrete.
It is the last option, which is the most popular, that we will consider.
How to pour a columnar foundation
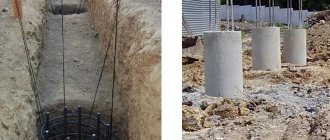
Step 1. In the designated corners, a one and a half meter tunnel is drilled using a garden drill, the diameter of which is usually 5-10 cm larger than the diameter of the asbestos pipe prepared for installation of the foundation.
Step 2. Pipes are inserted into the wells, which should rise 0.4 m above the ground. Most often, products with a diameter of 200 mm are used.
Step 3. Align the pipes, focusing on the spirit level.
Step 4. Backfill the soil around the pipes. During the filling process, the earth is compacted.
Step 5. Approximately half a meter of cement mortar is poured inside the pipe. There is no need to skimp on cement.
Step 6. Raise the pipe in the well slightly to allow the cement to flow a little to the bottom of the hole.
Step 7. Continue pouring cement, leaving 15 cm of the top of the pipe unfilled.
Columnar foundation
Step 8. While the cement in the pipe has not hardened, a reinforcing rod is immersed in it.
Step 9. Now you can pour cement to the edges of the pipes.
Columnar foundation
Step 10. Between the pillars make brickwork half a brick wide.
Step 11. The resulting base is leveled with cement and covered with roofing felt.
A simple and durable foundation for a wooden bath is ready.
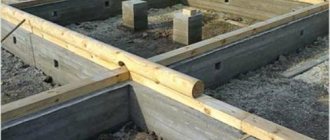
Strip foundation
Strip foundation, diagram
To build such a foundation, more labor and material resources will be required. But it is more universal. And the principle of its construction is quite simple.
Step 1. Within the markings, trenches are dug under the sides of the foundation. The depth of the ditches depends on the load on the foundation, the type of soil and the depth of soil freezing. Typically, the bottom of the ditch is 0.2 m below the freezing point of the soil. The trenches should be 10-20 cm wider than the foundation walls. In crumbling soils, ditches look like an inverted trapezoid. At the end of the digging, it is necessary to level and compact the bottom, remove collapsed soil from it
Shallow strip foundation - trench
Step 2. Make a cushion of sand and gravel in the trench. First, a ten-centimeter layer of sand, preferably of a fine fraction, is poured, then it is watered with water and covered with gravel, also with a layer of 10 cm. The procedure is repeated until the middle of the trench is reached. The last layer should be sand.
Installation of slab foundation formwork
Reinforcing frame
Strip foundation reinforcement
Assembly of the reinforcing frame
Formwork and reinforcement
Step 3. The pillow is covered with one brick layer on top, which will serve as support for the reinforcement and prevent it from sagging.
Step 4. Install the formwork. At this stage, it is necessary to take care of the outlet of the sewer pipes. To do this, inlet and outlet holes are made in the formwork and a piece of pipe is pulled through them.
Formwork
Step 5. Prepare a cement solution. To do this, first mix the required amount of sand and dry cement, then add gravel to this mixture and mix. Add water.
Step 6. Reinforcing bars are laid perpendicular to each other inside the formwork. The intersections of the rods are secured not by welding, but by wire binding. This will give strength and, at the same time, flexibility to the future foundation. There must be at least 50 mm from the edge of the rods to the reinforcement.
How to knit reinforcement
Step 7. Now you can pour the cement in portions. The height of each layer, which is carefully leveled and compacted, should not exceed 0.15 m.
Fill
It is better to pour cement during periods without precipitation. For another week, the foundation will need to be watered every four hours. Keeping the base moist for another 2-3 weeks, covering it with polyethylene. The formwork is removed after about a month. But in some cases it is saved for thermal insulation of the foundation.
Ready foundation for a bathhouse
The base for the bath is ready. For large baths, a columnar strip foundation is often built. In this case, a strip base is made for the external walls, and a column base for the internal ones.
Foundation
Final work
At the last stage of construction of the strip foundation, backfilling is performed. For this purpose, previously excavated soil is used. They fill the sinuses between the concrete base and the walls of the trench. The soil must be compacted.
At the end of all work, the blind area is installed. However, its creation is often postponed until the interior decoration begins. In many cases, this is the best option, because the integrity of the blind area can be damaged during the construction of the walls and roof of the bathhouse.