A properly designed and built bathhouse made of profiled timber without any pursuit of savings does not require finishing. If proper quality lumber was used to assemble the walls, the interior of the premises will be beautiful, atmospheric and self-sufficient. Correct calculation of the beam cross-section and proper assembly of the log house guarantees the high energy efficiency of a wooden bathhouse. The vulnerability of wooden walls to moisture can also be overcome by dispensing with finishing. Nevertheless, there is a point in lining a timber bathhouse from the inside, and in this article we will look at what it is and how it is achieved.
Should a steam room in a log house be lined with clapboard?
Hello!
Thanks for your advice. Now we have another question: is it worth clapboarding a rounded log in the steam room or leaving it like that? Banya is already 9 months old. We think so, make the frame independent, fill the lining without foil and cotton wool. And make the ceiling with foil and lining. Will we do the right thing or not? Will the log walls rot? The log house has not yet been caulked or sealed, they have only been sealed with jute and rope.
Olga, Kaliningrad.
Hello, Olga from Koenigsberg!
Of course, you can do anything. The old Russian baths did not have any lining on the logs inside the steam room at all and completely coped with their purpose. True, it should be noted right away that the logs were made of aspen, less often linden, and not pine needles. Because at high temperatures the needles release resin.
But at the same time, it is important that the crown seams inside the steam room do not have tow sticking out inside. Otherwise, it will absorb moisture from the steam, moisture will enter the space between the logs, with all the consequences, sometimes albeit slowly.
That is, you can hammer the tow as carefully as possible between the logs along all the internal surfaces of the walls of the steam room and limit yourself to this, without making clapboard cladding. But at the same time, you are not relieved of the obligation to insulate the walls on the outside so that the cold from the street does not penetrate inside the steam room, and into the rest of the rooms of the bathhouse.
In addition, unlike the old baths, now in steam rooms they install such stoves that the temperature of the steam room reaches more than a hundred degrees, and your rounded log is unlikely to be made of aspen wood.
If you make a frame and fill it with clapboard (from aspen or linden) in a steam room, then here too you have the right not to use insulation. Most insulation materials are hygroscopic, that is, they are able to absorb and accumulate moisture. But drying it will be problematic; after all, there will be closed volumes between the rounded logs and the clapboard.
There are no questions about the ceiling. Foil and lining are a completely normal option. The only thing to remember is that the ceiling is a very important element of the bathhouse. It must be insulated with a good layer of insulation. It is clear that your region is not the coldest in the country, however, if the ceiling is poorly insulated, then there is a high probability of condensation forming.
The purpose of the foil is to reflect the heat flow into the room, that is, if it is on the ceiling and along the walls, then in the steam room when the stove is operating it will be warmer than in the absence of foil. The temperature distribution along the height of the bathhouse is such that it is lowest near the floor and highest near the ceiling. Therefore, foil on the walls is desirable, but not always required, unlike the ceiling.
Unfortunately, I receive more letters than I physically can answer them, but in dozens of them, bathhouse owners complain about condensation on the ceiling, water dripping from it and blackening of its boards. And all this is due to insufficient insulation. Therefore, put a layer of insulation of at least 10 centimeters, or even 15, you can’t go wrong. This applies to modern insulation materials.
When insulation is done with natural materials, the insulation layer may be different.
I'll name for example:
1) A dry wood leaf, preferably oak, with a volumetric mass of 120 kilograms per cubic meter, a layer of 5 centimeters, will protect your bathhouse from temperature differences between any temperature inside and frost outside from 25 to 40 degrees.
2) Wood shavings (300 kg/m3) in a layer of 6 centimeters is recommended for an outdoor temperature of minus 15 degrees, for minus 40 - the layer should be twice as thick.
Summary - make a ceiling with a screen made of foil, a good layer of insulation, on the walls you can sew lining from aspen or linden on the frame without using foil and insulation. Although with foil it will be warmer even in the absence of insulation.
Padding of tow is required. Sealant is not always used, but if you think that it will be better than other impregnations used on tow, then you have the flag in your hands.
How to cover the outside of a bathhouse: lining, imitation timber, siding, block house
A bathhouse made of rounded logs or laminated veneer lumber looks attractive and does not require additional finishing of the facade. But what if the construction was framed or made of cinder blocks? It is necessary to finish the bath and give it an aesthetic appearance. There are a lot of finishing materials on the market, but making a choice on your own can be difficult. How to cover the outside of a bathhouse, what materials are suitable, their features, pros and cons, we will consider together with our readers.
What material is best to use for exterior finishing?
External finishing of a bathhouse is usually done with facade insulation. Since the bathhouse is small in size, it is more profitable to save internal space and install insulation on the outside. The simplest and most correct option is a ventilated facade. This way, moisture will not accumulate on the walls and the bathhouse will last longer.
For the ventilated facade of the bathhouse, the following materials are used:
- Siding (vinyl, metal).
- Fitting (plastic, wooden).
- Imitation of timber.
- Block house.
Each has its pros and cons. Let's take a closer look at them.
Siding for finishing the facade of a bathhouse
Siding is panels with a width of 20 cm and a length of 120 cm. Based on the material from which they are made, it is divided into: vinyl, iron.
The panels come in more than 15 colors, the most popular of which are: pistachio, sedge, cream, and chocolate. Manufactured by foreign and domestic companies. Imported ones are considered more durable, but their prices are higher. The price for material from a domestic manufacturer is from 120 rubles. Before finishing the bath, you need to calculate the required number of panels. The material is attached horizontally from bottom to top, moving 10-20 cm away from the base of the bathhouse onto a lathing made of wood or metal profiles. Self-tapping screws are used as fasteners, which are screwed into a special fastening part.
The main advantages of siding:
- Protects the facade of the bathhouse from snow, rain and wind.
- Tolerates temperature changes well.
- Does not fade over time.
- Resistance to mechanical and chemical influences.
- Made from non-toxic material.
- Permeates oxygen.
- Does not rot and is not afraid of rodents.
- Not hygroscopic.
- High fire resistance.
- Easy to install.
But the material has disadvantages that provoke negative reviews on numerous forums:
- The price of the panels is low, but the connecting panels: external and internal corners, joining are expensive.
- When finishing, the surface of the walls must be perfectly flat or the sheathing must be leveled. If there are slight distortions, the panels will lie unevenly and the facade will look untidy.
- If improperly fastened, the panels may become deformed.
- Although the panels are non-toxic, there is no point in talking about environmental friendliness.
- Dark-colored metal siding gets very hot in the sun.
By choosing this material for finishing the facade of a bathhouse, it is easy to do the work yourself. No special experience or skills are required when attaching panels. The only thing you need to do is start the installation from the bottom and fix the first panel as evenly as possible; the further type of cladding will depend on this.
Imitation of timber for finishing the facade of a bathhouse
Imitation timber completely copies the appearance of timber masonry. The material costs from 210 rubles, but is considered one of the best for lining a bathhouse outside and inside. If it is not possible to build an expensive all-wooden bathhouse, you can cheat and sheathe a structure, for example a frame one, with imitation. Only specialists can distinguish the bathhouse from the outside.
Imitation timber is a more modern wooden lining, with a width of 10 cm. For external decoration, it is better to take a width of more than 15 cm and a thickness of at least 1 cm. A smaller one will visually reduce the height of the wall and will look like ordinary lining. On the technical side, the imitation of propylene timber has a special groove that relieves tension in the wood and the material will last a long time.
They produce imitation timber from various types of wood. For exterior finishing it is better to use coniferous species, so the material will rot less.
The main advantages of imitation timber include:
- Environmentally friendly, as it is made of wood.
- Easy to install.
- High resistance to mechanical and chemical influences.
- Beautiful appearance.
- Large variety of sizes, both in length and width, thickness.
- Additional thermal insulation.
- With proper care it will last more than 20 years.
But even such modern material has disadvantages, which are discussed on numerous forums:
- It is necessary to constantly treat with water-repellent and antiseptic compounds.
- Wooden material burns well.
- Afraid of mold and insects.
- If you purchase a low-quality one with poor drying, the material will become deformed.
Before purchasing, you need to calculate the amount of material, this way you can avoid unnecessary costs. The outside of the bathhouse must be sheathed horizontally, with the tenon facing upwards. This way the fastener will be less susceptible to moisture penetrating into the lock. The finishing is done on a leveled wall using wood or metal lathing. Wooden sheathing must be coated with antiseptics before installation. The material is processed before installation; this can be done at the end of the work, but then the lock and the inside will not be processed. Before the finishing coating, the imitation is sanded with the finest nozzle. You can take a simpler route and purchase ready-made painted material. The price for this one is from 270 rubles.
Block house for finishing the facade of a bathhouse
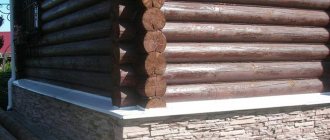
The block house came to us from Finland and Canada. This is another type of imitation timber, but with a rounded outer side. a bathhouse sheathed with material is similar to a building made of rounded logs.
Since it is difficult to dry a rounded log, cracks appear on the walls over time. They have to be additionally caulked, which means costs and loss of appearance. The problem can be solved using a block house. The panels are processed and dried in chambers at the enterprise. The standard humidity of a block house is not higher than 12%.
- Environmentally friendly, as it is made of wood.
- Beautiful appearance of the facade.
- It is economically profitable, since a bathhouse made of rounded logs is expensive.
- Easy to install.
- Convenient size.
There are few reviews about the disadvantages of a block house. The most popular ones are related to improper installation. If you create a non-ventilated façade and do not leave a gap under the material, condensation may accumulate.
Attach to the sheathing in increments of 70 cm from bottom to top. Additionally, it is sanded and coated with protective paints and varnishes. It is easier to fasten with self-tapping screws. To do this, drill a small hole with a diameter wider than the screw head. A self-tapping screw is screwed in there and the top is closed with plugs or covered with varnish and sawdust and sanded.
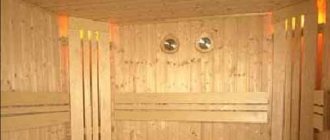
Finishing a bathhouse from a log house. Covering the walls of the steam room with clapboard
The interior decoration of the bathhouse, and the lining of the walls of the steam room in particular, is of great importance.
Without doing this, you cannot count on the durability of the structure itself. After all, heat loss, especially in a steam room, will not add to the pleasure of visiting it. Therefore, the presence of thermal insulation of the walls is a necessary condition when building a bathhouse with your own hands. All this fully applies to non-log buildings. But what to do if the bathhouse is a log house, the material of which is an excellent natural heat insulator? Let's try to figure this out together.
Is it necessary to sheathe a log bathhouse?
This question is asked by many log bathhouse owners. Ideally, there is no point in insulating such a bathhouse and sheathing it with clapboard. After all, wood itself is an irreplaceable natural heat insulator. In addition, it has been proven that a steam room with log walls has a beneficial effect on the human body - steam from the heater is reflected from them without a shock wave, creating a more favorable internal environment.
The useful area of the steam room is also important. Whether we like it or not, covering a room will inevitably entail a reduction in its area. And financial costs have a certain, and often primary, significance.
If, nevertheless, you decide to insulate and sheathe the steam room with clapboard, then it is recommended to take into account the following thermal insulation characteristics of log walls depending on its diameter:
- 200 mm or more - no insulation required;
- 150 mm – insulation can be omitted, but warming up the steam room will take considerable time;
- 100 mm – insulation is required.
Beginning of work
Installation begins with determining the amount of material required. When calculating the perimeter of a room, it is important to subtract doors and windows. Don't forget about the ceiling - it is also lined with clapboard. It is also necessary to account for a small percentage of defects: the boards can break and are easy to cut incorrectly.
Lathing
The lining will be attached to the sheathing - a frame that runs along all surfaces of the bathhouse. The sheathing is made of bars, the cross-section of which has the shape of a square or rectangle. You can use slats from any wood. Even if the frame is made of coniferous wood, the resin will not leak out.
Necessary tools and accessories
- Electric drill with a set of wood drills.
- Electric jigsaw.
- Wood saw.
- Set of wood rasps.
- Hammer.
- Hatchet.
- Mallet.
- Furniture stapler with a set of staples.
- A device for sawing bars at an angle.
- Level.
- Roulette.
- Yardstick.
- Carpenter's square.
- A ruler for drawing the outline of a log house.
- Plumb.
- Rope.
- Metal clamps for lining.
- Pencil.
Covering the walls of the steam room with clapboard
Choosing a cladding method
There are two types of lining arrangement - vertical and horizontal. In our example, the lining is positioned vertically. If desired, you can also orient it horizontally. In this case, there is no need to install horizontal slats (planks) on top of the vertical posts. In this case, the width of the racks must be taken in such a way that the thermal insulation wool is recessed by 20-30 mm relative to their longitudinal end. This will ensure ventilation of the air space between the insulation and the inner surface of the wall sheathing.
It is important to know that when viewed horizontally, the sheathing must be done from the bottom up, placing the tenon at the top. This will subsequently prevent water from getting inside the joint grooves when it flows down the walls of the steam room.
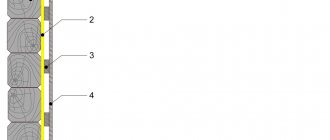
Laying the first moisture-proof layer and vertical posts
- First, we make markings for installing vertical posts, starting from the corners of the steam room with a step of 590 mm between their inner edges. These dimensions will allow you to tightly lay basalt wool with a thickness of 100 mm.
- The decoration of the walls of a bathhouse built from logs has its own characteristics. The fact is that fixing the sheathing slats strictly vertically is not so easy. To achieve this, it is necessary to process the vertical posts from the side where they contact the logs. For this purpose, a special copier is made, which is a thin ruler pointed on one side and holes drilled along it for a pencil. Having attached the stand to the log wall, the copier is passed along it and lines are drawn that repeat the profile of the log house. Further actions boil down to processing the racks along the drawn lines. It is enough to ensure a tight fit of the rack to the logs in several places with a step of 600 mm, maintaining a strictly vertical level. The length of the contact surface of 20-30 mm is quite sufficient. Don't forget to treat with an antiseptic.
- We lay the protective membrane from bottom to top. The top film is overlapped with the bottom film by 20-30 cm. We level and fasten the top edge to the protruding parts of the logs with staples using a stapler. We glue the overlap areas with self-adhesive Isofix tape.
- We align the protective film under the posts, which we install in the corners according to the previously made markings. Using a level or plumb line, set them strictly vertically. Fastening to logs is done with galvanized nails or screws. In order not to use long screws, we drill a blind hole in the rack 2-3 mm larger than the diameter of the screw head.
- We stretch the rope between the outer posts in two places: below and above. It will serve to base the internal racks.
- We install all internal racks according to the example in step 4.
- Align and carefully staple the protective film. Where necessary, additionally glue with self-adhesive Isofix tape. This operation should be performed with particular care. It is important to completely eliminate the possibility of air entering the area of open logs.
- Note: during the installation of corner posts, it is necessary to simultaneously lay thermal insulation wool in the corners.
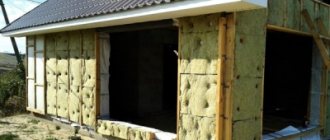
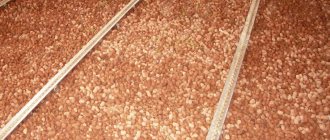
Installation of thermal insulation and vapor barrier film
- Before laying thermal insulation mats, you should provide yourself with personal protective equipment: work gloves, goggles, a respirator, a hat and appropriate clothing. Getting cotton wool on parts of the body or in the eyes will cause a lot of trouble. Inhaling air filled with volatile cotton wool particles will not improve your health.
- We carefully place the mats in the spaces between the racks in the direction from bottom to top and in the same plane with the outer longitudinal ends of the racks. We carefully press each upper mat to the lower one, avoiding gaps and cracks.
- We cut the top mats with a mounting knife
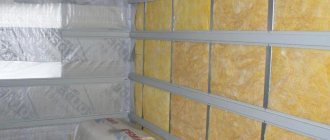
- We lay the vapor barrier foil in the same way as indicated in paragraph 3 of the above section. The only difference is that it is attached to vertical posts. Each strip should be connected with self-adhesive aluminum tape LAS. The new layer of tape must be glued overlapping with the previous one. You should also make releases of 70-100 mm foil both at the top and bottom of the wall.
Fastening horizontal slats (planks)
At this stage, we fasten the horizontal slats for mounting the clapboard sheathing on them. We nail or screw the slats over the vapor barrier at the bottom and top of the future sheathing.
The internal slats are spaced at 600 mm intervals. We use a level to give them a horizontal position.
Cladding walls with clapboard
- Before covering, you should make sure that the lining is dried and has lain in conditions close to the place of work for at least one day.
- We place the first board strictly vertically with its tenon in the very corner of the wall. At the same time, its groove should look at us. The quality of the entire cladding depends on how you secure it. After all, the first board is the main reference point for all the boards in the row. Using nails or screws from the edge, carefully secure it to each horizontal rail. It is important to ensure that the fastener caps are completely closed during subsequent lining with decorative corners. We place the clamps (clamps) into the protruding edge of the lining groove and carefully nail them to the slats.
- We carefully insert each subsequent board all the way into the groove of the fixed lining, tapping it with a mallet through a wooden block, which will protect it from unnecessary damage. We also secure it to the slats with clamps.
- The last piece may need to be trimmed and secured like the first board. We sheath all the remaining walls, attach the baseboards to the sheathing, and caulk all corners with decorative corners using copper-plated small-head finishing nails. Such nails are practically invisible and will not spoil the appearance of the steam room.
- Important: to ensure unobstructed ventilation in the space under the cladding, the lower end of the lining is installed with a gap of 10-15 mm from the floor. This scheme will also protect the lower ends of the lining from exposure to water during the operation of the steam room.
Mounting options
Next, you need to choose how the lining will be attached. The planks are connected to each other by grooves, but they must also be attached to the sheathing.
You can do this in 2 ways:
- Using a clamper. This is a mounting bracket with 2-3 holes. It is put on the lining and fixed with nails, screws or staples. Installation begins from the center of the wall. Its main advantage is that the kleimer does not damage the lining.
- Using self-tapping screws or nails: the first ones are screwed in at an angle, the second ones are driven in. To avoid rust, it is better to choose galvanized or copper nails. Unfortunately, the metal will begin to rust, and leaks may also appear at the fastening sites.
Claymer for liningSource mainavi.ru
You can easily see how to properly line a bathhouse with clapboard from the inside with your own hands. The lining can be mounted horizontally or vertically. The first method is more suitable for saunas, where the humidity is low, the second - for Russian baths, where there is high humidity.
Tips and tricks
- It should be taken into account that a bathhouse built from a log house has the peculiarity of settling during the first one and a half to two years. Therefore, it is better to do the cladding after this period, otherwise it may become deformed. And the cladding itself will interfere with the normal shrinkage of the log house.
- To attach the shelves, install strong additional bars under the sheathing where they are attached to the wall.
- All internal wooden structural elements must be dry and thoroughly treated with an appropriate antiseptic.
- And the last thing you should definitely pay attention to. Do not forget to lay electrical wiring with heat-resistant insulation under the wall cladding of the steam room. Of course, if it is provided.
- The above method of insulating a bathhouse is also suitable for thermal insulation of brick walls. The difference can only be in the materials used and their main characteristics. But this will be in subsequent articles.
- Below are the main sketches of the completed work:
Is external insulation required?
Before I say what is the best way to sheathe a bathhouse when carrying out external insulation, I will tell you whether this makes sense, and when such work is generally carried out.
If the bathhouse is built from timber or logs, then external finishing with insulators is rarely carried out. This is due to the fact that the material itself is warm and also has an attractive appearance. But a bathhouse lined with imitation timber is something completely different.
The key point is the thickness of the wood. If it is sufficient, then there is no need to additionally insulate the walls from the outside.
But when the building is located in a region with a harsh winter climate, when the temperature outside drops far beyond -15 degrees Celsius, then it makes sense to think about external insulation.
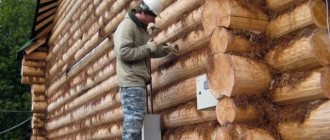
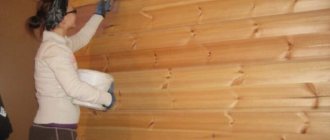
Here you will need to study the condition of the building, seal all the cracks and gaps. This is caulk. Moreover, a bathhouse built several years ago will require re-caulking. This is due to the fact that insulation wears out, shrinks, and also breaks down.
Do you need interior finishing for a log bath?
A wooden bathhouse has many advantages, the most important of which is the absence of the need to finish the bathhouse. Just look at the photo of a bathhouse made of timber, and it becomes obvious that even without it the premises look cozy and neat. But many still spend money, time and effort to cover the walls with finishing materials.
It is impossible to give a definite answer to the question of whether interior decoration is needed for a log bathhouse. A number of factors influence the decision.
For example, when choosing, you need to take into account the type of wood used to build a bathhouse. The steam room always has extreme conditions: high temperature, high humidity. The walls of the steam room should not heat up; it is unacceptable for resin to be released from them. If you are building a bathhouse from aspen or linden, then you don’t have to do any finishing, because these types of wood are distinguished by the fact that they do not heat up, so you won’t get burned when coming into contact with a wall made of these materials.
It’s a completely different matter if the bathhouse’s frame was built from coniferous trees. Pine and spruce do not tolerate high temperatures; they become very hot and can release resin, which can cause a burn on the skin.
The interior decoration of the bath also includes thermal insulation. Without it, it will be more difficult to bring the steam room to the required climatic conditions; more fuel and time will be required for heating. In addition, the lack of thermal insulation makes it difficult to go to the bathhouse on cool and cold days.
It is believed that if you used logs with a diameter of 200 mm or more to build a bathhouse, then insulation is not necessary. It is also permissible to refuse it when using logs with a diameter of 150 mm, but in this case, warming up the steam room will take longer. If you are building a bathhouse from logs with a diameter of 100 mm, then thermal insulation must be done.
Some people prefer to abandon the interior decoration, because in this case the costs of building a bathhouse increase. There is another reason, which is not so obvious to many: finishing increases the thickness of the walls, therefore, the usable area of the premises is slightly reduced. If in a large bathhouse this change is almost imperceptible, then in a small building, for example, in 2x2 and 2x3 bathhouses it can be noticeable.
Briefly about the main thing
Wooden lining for lining the inside of a bathhouse is an ideal finishing material. Deciduous trees are mainly used, since coniferous trees can begin to secrete resin.
Installation of the lining begins with determining the required amount of material and method of fastening. It is worth considering the small percentage of defects.
First, you need to attach a sheathing to the wall - a frame on which the lining will be supported. It is made from thick wooden slats.
Next, the insulation, waterproofing and vapor barrier are secured. When choosing materials, it is important that they are suitable for the bath and do not emit harmful substances when heated.
When installing the boards, they are fitted tightly to each other so that there are no gaps.
Read later
Interior decoration of a bathhouse made of timber: projects, photos
A standard bathhouse has the following rooms: steam room, washing room, relaxation room and hallway. Of course, there are projects with only two rooms (steam room and washing room), and there are options that have additional rooms: kitchens, toilets, bedrooms, etc.
Each of the premises differs in its functional purpose and conditions, therefore, the materials for their decoration may be different.
Interior decoration of the steam room: photos, tips
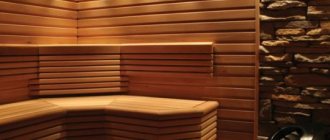
The main room in any bathhouse is, of course, the steam room. During steam procedures, difficult conditions are formed in it: high temperature and humidity, a large amount of steam. The highest demands on materials are placed specifically in the steam room, as they must withstand extreme conditions.
If you look at projects and photos of bathhouses made of timber, you will notice that wood is always used to decorate the steam room. Here you will not see plastic, acrylic and other artificial materials. The best option for finishing is bath lining. It has many advantages: environmental friendliness, ease of installation, reliability, durability, etc.
To finish a steam room, it is permissible to use lining only from those types of wood that have a low thermal conductivity coefficient, a high level of moisture resistance and do not emit resin when heated. It is permissible to place the lining vertically, horizontally and at an angle; by combining different methods of installing finishing materials, you can create an interesting and unusual interior. On the Internet you can easily find photos of bathhouses made of timber, where there are creative ideas on how to install lining to make the steam room look more original.
Additionally, you can decorate the steam room using brick and stone. Himalayan salt is also a good option; it will not only help create a beautiful interior, but will also help saturate the air with useful substances, thereby increasing the positive effect on the human body. All these materials are expensive, but this does not mean that you need to give them up. Walls decorated with small inserts of stone and salt will look great. For example, you can use them to line corners, part of one wall, or make inserts in the form of different geometric shapes.
As already mentioned, in the photo of the finishing of the bathhouse you will not find plastic inside - and this is not without reason. The use of plastic in a steam room is unacceptable, because when heated, it can melt and also release toxic substances.
Photo of the steam room in the bath:
Washing room (bath finishing): photos, ideas
The washing room is not exposed to high temperatures, as in the steam room, but this room has a high level of humidity. If you decide to use lining, it must be moisture resistant. For a washing room, cheap lining made of coniferous materials is suitable.
Materials
Many people wonder what material is best to decorate the interior of the bathhouse with. The most widely used lining is small panels used for cladding vertical surfaces. It is made from wood of different species. The main advantages of lining are as follows:
- prevents the formation of condensation;
- is a “breathable” material that does not interfere with air circulation;
- has an aesthetic decorative appearance;
- easy to install;
- has a relatively low price.
For finishing the interior of the bathhouse, finishing with unedged boards is allowed.
- African oak (abachi). It is lightweight, but at the same time strong and highly durable, lightweight, does not emit resin and contains virtually no knots. Abacha finishing materials do not burn the skin. However, this is a very expensive material, so not everyone can afford such cladding.
- Cedar. Ussuri and Altai species are most often used in decoration. They are resistant to high temperatures and excess humidity, and also provide an environment in which fungi do not multiply and mold does not appear. At the same time, the wood has an aesthetic appearance and exudes a pleasant aroma.
- Linden. Baths are often lined with linden slab. Its advantages include high strength and strength with relatively light weight. The tree of this variety tolerates temperature fluctuations and frequent exposure to moisture well, has an interesting texture and emits a healing aroma that has a healing effect on people suffering from diseases of the respiratory system.
- Alder. This is the optimal material for the interior decoration of a bathhouse; it is pleasant to the skin, and in addition, when heated, it changes color slightly, and after cooling, it returns to its original color. This interesting effect creates additional aesthetic pleasure and increases comfort when taking bath procedures. From a practical point of view, it is worth noting that alder does not emit resin and contains very few knots.
- Aspen. This material has a low cost, so it is one of the most budget options. The advantages include zero resinity and ease of processing, however, this coating is prone to a variety of fungal diseases.
- Birch. It has a uniform, strong structure and attractive appearance, but at elevated temperatures it can become slightly deformed. To prevent this from happening, when purchasing, you should give preference to thoroughly dried materials.
- Ash. This is a very beautiful type of wood with which you can achieve a stylish decorative effect.
Very good species for finishing baths are meranti, cedrella and ofram - these are expensive types of wood. Their main difference is that even when exposed to high temperatures, they maintain a temperature equal to that of the human body. Therefore they are very convenient to use. However, their cost is quite high.
Not all wood is good for interior cladding of bathhouses. For example, pine and spruce can only be used to decorate the shower room and recreation area. Using them in a steam room is not allowed, since the material releases resins at elevated temperatures, which can burn the skin upon contact.
Wood is used to cover not only the walls, but also the floors. However, to finish the latter, you can also use ceramic tiles, and the place where the firebox is installed is lined with brick. Perlite is used directly under the floor covering - this is sand with good thermal insulation properties. This material is very light, so it is optimal for use in enclosed spaces where there is no wind, otherwise it will blow up.
The materials used for lining the steam room should not contain any knots, protruding metal parts should not be installed - all handles and holders are made only of wood. Even the shelves are made without the use of nails, since any metal object becomes very hot at high temperatures and can cause burns. Some consumers decorate their baths with clay, brickwork, salt tiles, bast and stone.
Special attention should be paid to materials that cannot be used in finishing the bath, especially around the stove. Fiberboard and chipboard are flammable products that also absorb moisture well. The only place where their use is permissible is the locker room.
When is it not recommended to sheathe a bathhouse and why?
Traditionally, there are two types of baths, in which the wall mass to one degree or another influences the quality of health procedures:
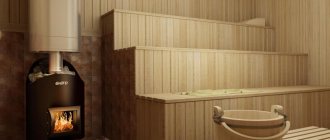
- A sauna is a dry steam room with a temperature of +100 +20 0 C with a humidity level of up to 20 +10%, in which the solid walls have virtually no effect on the quality of dry steam and the efficiency of steaming. In this case, indoor cladding may be a justified solution.
- A Russian bath is a wet steam room with a relatively low temperature (+40 +20 0 C) and high humidity (from 60 +20%), where wet brooms “manage” and water “flows in streams.” Here, the quality of steam and the efficiency of steaming depend on the condition of the wall array. The design must be hygroscopic and heat-intensive, so that it first intensively absorbs moisture and then releases it smoothly and gradually. The walls and ceiling are soaked and infused to produce a soft, pleasant steam. Therefore, lining the inside of a Russian bathhouse is extremely undesirable.
Features of a wet Russian bath
For a wet steam room, the best option would be massive walls (the thicker the better) made of wood in combination with an insulated ceiling and a brick stove. The window is not placed too high so that steam does not escape through it, and heat is stored above the shelves longer if it is open. A massive door is arranged in the same way.
For a real Russian steam bath, forced ventilation is not needed. Even with the most careful caulking, the wood “breathes.” For shelves with a width of 100 mm or more, it is better to choose massive linden boards with a thickness of 60–80 mm. This solution will make it possible to “create the condition” of a real traditional Russian bathhouse.
Despite the many advantages, a wet steam room has a drawback - it requires a significant consumption of resources and time to fully warm up. Therefore, to equip modern baths, they often use 10 mm clapboard cladding with preliminary installation of foil and insulation. Preparing such a steam room takes 30–40 minutes. However, it does not hold steam well and requires constant heating.
Do you need interior finishing for a log bath?
A wooden bathhouse has many advantages, the most important of which is the absence of the need to finish the bathhouse. Just look at the photo of a bathhouse made of timber, and it becomes obvious that even without it the premises look cozy and neat. But many still spend money, time and effort to cover the walls with finishing materials.
It is impossible to give a definite answer to the question of whether interior decoration is needed for a log bathhouse. A number of factors influence the decision.
For example, when choosing, you need to take into account the type of wood used to build a bathhouse. The steam room always has extreme conditions: high temperature, high humidity. The walls of the steam room should not heat up; it is unacceptable for resin to be released from them. If you are building a bathhouse from aspen or linden, then you don’t have to do any finishing, because these types of wood are distinguished by the fact that they do not heat up, so you won’t get burned when coming into contact with a wall made of these materials.
It’s a completely different matter if the bathhouse’s frame was built from coniferous trees. Pine and spruce do not tolerate high temperatures; they become very hot and can release resin, which can cause a burn on the skin.
The interior decoration of the bath also includes thermal insulation. Without it, it will be more difficult to bring the steam room to the required climatic conditions; more fuel and time will be required for heating. In addition, the lack of thermal insulation makes it difficult to go to the bathhouse on cool and cold days.
It is believed that if you used logs with a diameter of 200 mm or more to build a bathhouse, then insulation is not necessary. It is also permissible to refuse it when using logs with a diameter of 150 mm, but in this case, warming up the steam room will take longer. If you are building a bathhouse from logs with a diameter of 100 mm, then thermal insulation must be done.
Some people prefer to abandon the interior decoration, because in this case the costs of building a bathhouse increase. There is another reason, which is not so obvious to many: finishing increases the thickness of the walls, therefore, the usable area of the premises is slightly reduced. If in a large bathhouse this change is almost imperceptible, then in a small building, for example, in 2x2 and 2x3 bathhouses it can be noticeable.
Types of lining and classification
The lining is divided by type of wood:
- Pine . The most common wood for lining. It has a beautiful appearance and low cost. Over time, a pine product begins to darken.
- Spruce . Northern spruce is used to make the lining. It is more durable and has a beautiful appearance. Just like pine darkens over time.
- Canadian cedar is used to finish the bathhouse. It is not cheap, but has excellent technical characteristics and a beautiful appearance.
- Oak _ Beautiful and durable material, easy to process, expensive.
- Aspen . Beautiful light color. Has thermal insulation properties. Well suited for a bath.
- Linden . It is very suitable for finishing a bath, because the material does not heat up much and emits a pleasant aroma.
- Alder . In a room with high temperatures, the material does not heat up. It also hardly dries out or warps.
- Abash . African oak has high strength and softness. Such wood does not shrink, warp or heat up. Has a beautiful appearance. The cost of abasha is quite high.
Most often, the interior lining of a bathhouse with clapboard is made of hardwood. The temperature in the bathhouse is high and under its influence, coniferous wood releases resins . Hardwoods have virtually no resin compounds, so no resin is released.
The type of wood from which the lining is made is also of great importance. There are 4 main varieties:
- “Extra” is a product made from the highest grade wood without a core or flaw.
- “A” - one live knot, two resin pockets and two blind cracks are allowed per one and a half meters of the length of the product.
- “B” - the presence of four knots (up to 2 cm) is not prohibited, two of which must be captive. Two resin pockets are also possible, one and a half meters long for the product.
- “C” - lining classified in this class allows two captive knots with a diameter of 2.5 cm, non-through cracks of no more than 5% of the length, two resin pockets up to 5 cm long and up to 5 mm wide, mechanical damage up to 6% in diameter, a contrasting spot with a diameter up to 15 cm, as well as other spots and stripes totaling up to 5% of the entire surface of the product.
- Eurolining.
- Soft-line.
- Calm.
- Imitation of timber.
- Block house (imitation logs).
- Landhaus.
- American.
Also, the lining is divided by type of profile:
Interior decoration of a bathhouse made of timber: projects, photos
A standard bathhouse has the following rooms: steam room, washing room, relaxation room and hallway. Of course, there are projects with only two rooms (steam room and washing room), and there are options that have additional rooms: kitchens, toilets, bedrooms, etc.
Each of the premises differs in its functional purpose and conditions, therefore, the materials for their decoration may be different.
Interior decoration of the steam room: photos, tips
The main room in any bathhouse is, of course, the steam room. During steam procedures, difficult conditions are formed in it: high temperature and humidity, a large amount of steam. The highest demands on materials are placed specifically in the steam room, as they must withstand extreme conditions.
If you look at projects and photos of bathhouses made of timber, you will notice that wood is always used to decorate the steam room. Here you will not see plastic, acrylic and other artificial materials. The best option for finishing is bath lining. It has many advantages: environmental friendliness, ease of installation, reliability, durability, etc.
To finish a steam room, it is permissible to use lining only from those types of wood that have a low thermal conductivity coefficient, a high level of moisture resistance and do not emit resin when heated. It is permissible to place the lining vertically, horizontally and at an angle; by combining different methods of installing finishing materials, you can create an interesting and unusual interior. On the Internet you can easily find photos of bathhouses made of timber, where there are creative ideas on how to install lining to make the steam room look more original.
Additionally, you can decorate the steam room using brick and stone. Himalayan salt is also a good option; it will not only help create a beautiful interior, but will also help saturate the air with useful substances, thereby increasing the positive effect on the human body. All these materials are expensive, but this does not mean that you need to give them up. Walls decorated with small inserts of stone and salt will look great. For example, you can use them to line corners, part of one wall, or make inserts in the form of different geometric shapes.
As already mentioned, in the photo of the finishing of the bathhouse you will not find plastic inside - and this is not without reason. The use of plastic in a steam room is unacceptable, because when heated, it can melt and also release toxic substances.
Photo of the steam room in the bath:
Blog Wooden house construction
Finishing a bath includes a whole range of works. And in addition to the external finishing of the hand-cut bathhouse, there is also internal work. It must be said that working in a steam room has its own characteristics due to the specific climate in this room.
When finishing handmade baths, you need to think not only about external beauty, but also about safety. Practice has shown that it is better to prefer natural wood as a finishing material. This can be clapboard, although a regular board will also work.
Often, in order to save money, pine is chosen for baths , but this is a very bad choice, since this wood is very resinous. When heated, pine lumber releases resin from its resin pockets, which can cause severe burns if it comes in contact with the skin. In addition, when heated, the resin is released into the air, which is harmful to the respiratory tract.
It is for these reasons that it is strictly forbidden to use coniferous species when decorating a steam room. In rooms other than the steam room, in case of emergency, you can use pine, but only of good quality and without resin “pockets”. In particular, the dressing room can be decorated using pine boards.
The most preferable option for finishing the steam room and washing compartment is linden and larch lumber. Linden lining will always look chic, it will not become darker and will not crack. It is believed that linden releases beneficial phytoncides into the air, which have a beneficial effect on the mental state.
While larch from time immemorial has rightfully been considered very resistant to rot, it does not react to the effects of mold and mildew, and its service life is very long. The exclusive tree for the steam room is abashi or African oak. This is a very beautiful wood, durable and ideal for the steam room with its humid and hot “climate”.
The finishing of the bath takes place according to the following principle:
- Lathing that is installed on the floor and on the surface of log walls. It is necessary to lay a sealant and a vapor barrier layer between the sheathing elements.
- The lining or board is attached to the sheathing.
- Impregnation of finishing material.
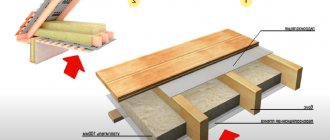
Ceiling
It is from the ceiling that finishing work in a log bathhouse begins. This is a long and labor-intensive process that requires knowledge and skill. Almost always, thin boards, two to three centimeters thick, are chosen for the ceiling. The boards are nailed to the ceiling beams, leaving no gaps between them. The length of the nail should be three times longer.
Floor finishing
The floor in a wooden bath can be made of planks or tiled. In this case, you need to choose a special tile that does not slip. By the way, tiles can also be placed on walls, but then you will lose the natural beauty of the logs and the unique microclimate.
It is advisable to install a special device on the tiled floor - a wooden bridge, which will prevent slipping. You can also put wooden grates, but you need to do it in such a way that after steaming they can be taken outside to dry.
If you decide to go with a wooden floor, then choose larch, which is in no way inferior in strength to tiles. But we must say right away that such finishing will cost you very much.
Remember that before you start laying any flooring, you need to insulate the floor. If the bathhouse has a concrete floor, then the sealant is placed between the layers of concrete. Crushed stone and expanded clay can be used as insulation.
It is very important to ensure good drainage of water from the room. By the way, it will be much easier to do this if you place the bathhouse on some elevation.
Shelves and benches
They are not difficult to install, although certain rules must be followed. The most important thing to remember when installing bathhouse equipment: between the floor and the bottom of the bench, you must leave a distance sufficient to clean the floor and ensure good air circulation in this gap.
Partitions
In order to sheathe partitions, you can use boards. Although in the rest room and washing room you can use not only wooden finishing, but also fibreboards. In the latter case, it is necessary to use insulation - polystyrene foam. But it is not recommended to choose artificial materials for the steam room, as they release harmful substances into the air when heated.