Experts in the bath business, through one, claim that the correct name for a stove of this type is “paravoz”, which means a whole load of steam, thus subtly hinting at the incredible productivity of such a stove. Other experts, and also through one, prove that the name, but already “steam locomotive,” was attached due to the striking external similarity of such a stove with a classic steam locomotive, from the time of the first five-year plans and the development of Magnitogorsk. It’s hard to judge which of them is right, and there’s no point. It is better to pay attention to the locomotive stove itself, its design and operating features. A truly worthy copy.
About the design
The Robinson rocket stove consists of the following elements:
- Firebox.
- Pipe for removing generated smoke.
The design feature is that the fuel bunker is located not only vertically, but also horizontally, at an angle. The method of placement depends on the desire of the person, the features of the structure in which the finished stove will be installed.
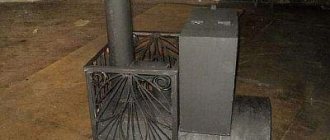
This is what a rocket stove made from a pipe looks like
An option can also be used in which the fuel bunker will be located between the chimney and two elements of a horizontal pipe section. This is done in order to lengthen the surface heated during fuel combustion, thereby increasing the efficiency and time of warming up the room.
Conventional schemes for creating furnaces have:
- A firebox located vertically and connected to the chimney by a piece of pipe (its length can be different). The area connecting the elements is used for cooking (hob).
- A firebox located directly next to the pipe (the diagram is used in the case when the stove must perform the function of a heating unit).
- A firebox fixed at an angle to the pipe (for ease of loading fuel into a special compartment).
The stove can have two fireboxes at once. A special feature is their location on the sides of the structure in a vertical position. Pipes must have a large cross-sectional size. The purpose of the oven is to heat a container with liquid, which is placed on a special stand (this option is used to supply hot water).
Design options
Construction of a locomotive-type furnace
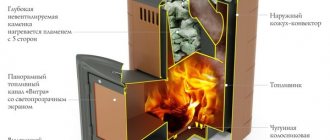
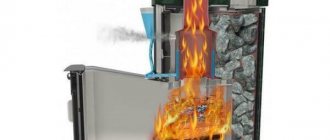
At a quick glance, a stove of this type really resembles a driver’s delight. And, first of all, because of the round cross-section of its profile, elongated in length, the vertical chimney pipe and a whole series of smaller screws - steam guns. So, from the main design elements we note:
- The firebox is also the fuel combustion chamber. Horizontally oriented cylindrical pipe, up to 1000 mm long, made of low-alloy structural steel, main body thickness 10 mm. The firebox rests on supports, which can be made in different functional solutions;
- Fuel tunnel. It is adjacent to the firebox from the front plane and is made with a length equal to the thickness of the partition wall separating the steam compartment from the room into which the firebox door directly leads;
- The fire door is made of cast iron. Based on aesthetic considerations, the front plane is removed with durable heat-resistant glass;
- Below it is the door of the ash drawer, which is also made of cast iron and in its plane has a set of slots for the passage of air, the cross-section of which is regulated by a valve;
- The ash box is made along the entire length of the structure, in its lower part and serves to collect fuel ash;
- An essential structural unit is the smoke circulation circuit, which is equipped with a technological hatch for cleaning, equipped with a door with slots of an adjustable cross-section;
- The smoke circulation rests on a massive metal pipe placed vertically on an edge—the pipe support;
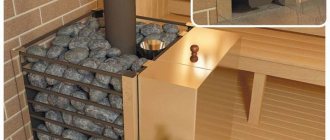
- A lattice structure is installed vertically to the firebox, at an angle of 75 - 80 degrees, holding the stone backfill;
- The final element is a pipe set, including a chimney and steam guns.
The total weight of such a metal structure can reach 280 - 320 kg, and this does not take into account the stone backfill, the volume of which can be 400 liters.
The massiveness of the furnace has its undoubted advantages:
- Due to the high heat capacity and heat transfer of the structure, intense heating of the stone backfill occurs, sometimes reaching values of 300 degrees Celsius.
- This also determines the quality of the steam, which should be light and translucent.
- Due to the special convection design of the firebox, the stove is quite economical for its size, heats up quickly, the generation of the first steam is possible within 25 minutes from the start of kindling, and the stove reaches its nominal operating mode within 50 - 70 minutes. Naturally, when using high-quality conditioned fuel.
- A stove of this design and volume is almost impossible to choke; even if it is overfilled, it quickly returns to nominal mode, and the hard heavy steam quickly settles and is replaced by high-quality generated light steam, so valued by true experts and lovers of the traditional Russian bath.
- The steam locomotive sauna stove is very inertial in terms of applied heat engineering, which, in fact, determines its high fuel efficiency.
Attention! A prerequisite for the normal operation of such a structure as a locomotive sauna stove is the creation of a stone cutoff around the perimeter of the stove. Firstly, it increases its inertial qualities, and secondly, it becomes an effective barrier to intense infrared radiation, which, due to the large mass of metal in a small steam room, makes staying in it uncomfortable. And one last thing. Such a fence protects steam room users from burns in case of accidental contact with hot metal. The fencing is made of solid oven bricks, laid in half.
Tips from stove makers on how to improve a stove in a pipe bath
Well, first of all, if you do not have experience in creating stoves, then get ready for the fact that the first stove may turn out to be just a prototype. This also applies to those who intend to order a stove according to their design from a master. The optimal ratio of the parts of the stove is always specific, that is, it is your steam room where the stove will operate that is taken into account. And that is why it is difficult to give universal advice.
It is especially important to choose the size of the heater and the number of stones in it. This is done experimentally
Particularly difficult, oddly enough, are open heaters, in which it is necessary to achieve exactly the area of contact between the stones and the body that will lead to the desired degree of heating of the stones. So you can’t make a horizontal oven without a prototype.
+++
Well, we hope you found some useful information for yourself. Otherwise, write comments, because the most popular questions will be the topic of our next article.
What you need to prepare: tools and materials
To assemble the stove for the steam room, we need to prepare - collect all the necessary tools and materials:
- A pipe cut with a cross-section of 50 cm and a length of 1.5 m;
- The second cut is smaller - with a cross-section of 30-35 cm and a length of half a meter;
- Metal sheet 1-1.2 cm thick;
- Steel rods (if you decide to make the grate bars yourself);
Purchased door (air vent) or steel sheet for its manufacture;
- Hinges for hanging the door (if you made it yourself and didn’t buy a ready-made one);
- Grinder with a new metal circle;
- Welding machine.
Healthy! If you want to save a lot, then you don’t need to buy ready-made pipes that are longer than we need. Buy pieces that can be found in almost every building materials store.
Instructions for making your own sauna stove
Once you have finally decided on the type of stove, prepared all the necessary tools, and selected the necessary materials, you can start creating a stove for a bathhouse from a pipe with your own hands. Below there will also be drawings and photos that will help you navigate the dimensions of your future stove.
Drawing
The initial stage of creating a bathhouse is the preparation and creation of all the necessary drawings. The stove design also indicates the locations of all the main structural elements, their sizes, and connections.
For example, a drawing of a horizontal stove:
And a drawing of the vertical project:
You can create such a drawing yourself (you just need to remember the school drawing curriculum), with the help of a specialist, or use a ready-made one. The last option is good because you don’t have to do anything or pay anyone. Fortunately, the Internet is full of various drawings of stoves, so you will definitely find among them something that will fully satisfy your needs.
You should not start work without having a drawing in hand, because in 99.9% of cases you will definitely make a mistake when installing the elements, as a result of which the equipment simply will not work, and you will have to start all over again. Moreover, an incorrectly made stove will negatively affect the health of people who often relax in the steam room.
Creating a horizontal oven step by step
The horizontal design is performed in the following sequence:
- A piece of pipe is cut off, corresponding in length to the drawing diagram. The optimal metal length is 70-90 cm. The cut must be carefully sanded so that it is not too sharp;
- A grate is installed at the bottom of the structure. If you have not purchased a ready-made version, or want to make it yourself, then use these instructions: 1. Cut a rectangle from a metal sheet to the size suitable for the pipe; 2. In this rectangle, make the middle so that there is room on each edge of the pipe for welding the structure; 3. Weld metal rods at a minimum distance from each other in a vertical or horizontal position:
A purchased or homemade grate is mounted in a pre-prepared pipe section.
After welding, the seams should be “hidden” inside the product, because the very first thing that will “suffer” from the negative influence of elevated temperatures is the seams.
Let's look at how you can mount a grate into a furnace structure:
- Welding to the back of the furnace. An oblong rectangular or square structure is cut out of sheet metal with dimensions slightly smaller than the diameter of the pipe. If there is a compartment for stones at the top of the stove, then the length of the sheet metal increases up to this compartment. This elongation is necessary to reduce the number of welds;
- Preparing metal for the stove facade. The sheet metal should have dimensions slightly larger than the dimensions of the stove;
- Cutting holes for the blower and combustion door. In the case when a ready-made door will be used, it is necessary to adjust the holes in the oven to its dimensions;
- Welding a façade sheet to the front of the oven;
- A slot at the top of the body has a hole measuring 15 by 15 cm for mounting the future chimney;
- Securing the door;
- Cleaning the structure with sandpaper to eliminate scale that appeared during the welding process and rust.
After this, the structure should be painted with paint that is “not afraid” of elevated temperatures, or lined with fire-resistant bricks around the perimeter.
If paint is chosen, then before sending the structure to its permanent location, it should be heated in the fresh air
This is extremely important, and it is necessary that excess paint burns off and does not cause harm to human health in the future.
Vertical steam room stove: step-by-step instructions
A vertical stove is made in the following sequence:
- A pipe of 70-90 cm in height is cut;
- The cut areas are cleaned;
- A piece of similar diameter is welded to the bottom of the pipe, which will play the role of the bottom;
- A door is mounted at the bottom of the structure - an ash pan;
- Grate bars made using the technology described above are installed or ready-made options are taken;
- A cutout is made above the grate for mounting the door. The combustion chamber will be located here:
- The heater compartment is made like this: 1. At a distance of 15 cm from the firebox, a rectangle is cut out in the pipe; 2. Another grate is mounted in it, where the stones will be located in the future; 3. The door is being installed. When it is open, you can pour water onto the stones to create even more steam.
- A purchased or home-made door is mounted on each hole;
- A circle is cut at the top for installing the chimney;
- The structure is sanded and painted.
Long-burning potbelly stove
The potbelly stove has become a real symbol of Russia since the times of the Revolution and Civil War.
This is the name given to the simplest iron stove of a cylindrical or cubic shape. Its advantage was that the smoke channel - an ordinary iron pipe - could be taken out anywhere - through a wall or roof, into a window.
Taking the simplicity and practicality of a potbelly stove, you can make a small stove that will embody some simple ideas that significantly increase its efficiency, safety and environmental friendliness.
Basic scheme
The classic potbelly stove has a cylindrical design. However, it is difficult to do this when making it yourself, so you need to take a cube or parallelepiped as a basis.
Contains the following structural elements:- Firebox. This is the chamber in which fuel combustion occurs, most often wood. The walls and bottom of the firebox must be thick, since they bear the main temperature load. There is a door in the front for storing firewood in the firebox; if desired, it can even be equipped with heat-resistant glass.
- Ash pit (ash pan). The compartment under the firebox is separated from it by a grate. The ash pan is also equipped with a door, only of a smaller size. It is used to remove ash and ash. which fall through the grate from burnt firewood. But this is not the only point of the ash pan - air is sucked in through the ash door and passes through the fuel layer from below, ensuring the best combustion.
- Smoke channel. To arrange it, a round hole is cut out in the upper part of the stove, a piece of steel pipe is inserted into it and scalded. In the future, you can attach other sections of the pipe here or use a factory sandwich chimney with special locks.
Expert opinion Dmitry Konstantinovich Levin
Some manufacturers of homemade stoves believe that the design with a blower and grate is not suitable for a sauna stove - it creates too much draft, which prevents complete combustion of the wood. Instead, it is proposed to lay the firewood directly on the bottom of the stove, and ensure air flow by drilling several round holes in the lower part of the combustion door and equipping them with a sliding damper.
How to make a door
The door is made of a thick sheet of metal. For fastening, you can use store-bought factory hinges or make your own. To seal the fit, an asbestos thread is used - it is wedged in a groove cut by a grinder.
If there is a suitable sheet of heat-resistant glass, it is inserted as follows: cut a window in the door and grind the cut area. Then they lay the glass, lay asbestos fiber around the perimeter, invisibly from the outside of the part, after which, using small steel tongues, I make tacks on each side.
The turning handle of the latch is easiest to make from the outside.
Homemade secondary gas afterburning system
The main disadvantage of a potbelly stove is its low efficiency. A stream of air passes quickly and strongly through the entire oven, carrying with it not only unburned food, but also heat. As a result, the case does not warm up sufficiently and gives off less heat. To solve this problem, a simple but ingenious modification was invented.
By placing two steel sheets above the firebox, the smoke passage channel can be significantly increased the length of the path that burnt gases travel before exiting through the chimney opening:
- The first horizontal sheet is welded directly above the firebox so that a channel remains for the passage of gases in the rear part of the stove.
- The next sheet is cooked higher, offset so that the passage is now at the front of the oven. It turns out that smoke, gases and heat, once in this labyrinth, snake through it all the way to the chimney. Along the way, they give off all the accumulated heat to the sheets, side walls and top plate of the oven.
If you drill several holes from the bottom from the back and cover them with a screen made of steel sheet, then at the top point, when fresh air, but already heated by the screen wall, meets unburned gases, the process of afterburning secondary gases will take place in the channel, which will lead to a significant increase in efficiency ovens.
Decorative finishing
A do-it-yourself sauna stove made from pipes, made according to the drawings of experienced craftsmen, in compliance with all welding rules, is not inferior in performance to factory analogues, but loses in decorative terms. To improve the appearance, it is recommended to cover the stove with fireproof paint (read: “How to paint a stove in a bathhouse - choosing the right paint”).
Another way to improve the appearance of a homemade stove is to line it with bricks. Brickwork will increase heat transfer, protect against hard infrared radiation that is emitted by hot metal, and extend the life of the stove (more details: “How to line a stove in a bathhouse with bricks - a guide to lining a stove”).
A homemade stove is not only a way to save money on purchasing a factory-made product, but also an opportunity to implement an optimal project in accordance with specific conditions: the area of the steam room, requirements for steam quality (dry or wet), and personal preferences.
What size is the heater and in what place is it better to place it?
The required volume of stones is determined by the size of the steam room and the quality of insulation. The value, as a rule, varies from 20 to 40 kg per 1 cubic meter of room. Naturally, the more there are, the easier it is to produce the required volume of steam.
Due to the fact that different stones differ in density, with the same mass they will occupy different volumes. It has been determined that for a steam room with a volume of 12-14 m3, it will be necessary to install a heater 30x40x30 cm. These dimensions can be slightly adjusted in different situations.
When making a sauna stove from metal with your own hands, you will need to select the individual volume of the heater based on the size of the stove. To avoid mistakes, it is better to start from ready-made drawings. When using an experimental approach, it is worth considering that the volume of the firebox should exceed that of the heater by approximately 30-50%.
Before building a stove in a bathhouse, it is worth calculating the best location of the heater in the firebox. From practice it became clear that it is best to place it on top, near the back wall, where the temperature is highest.
It is worth remembering that the heater will need to be maintained, and it should be equipped so that water can be supplied there. The hatch is best positioned so that you can easily reach the farthest edge with your hand, and so that water can be supplied without the possibility of getting burned.
Modern style in the interior of a Khrushchev living room: options and methods of implementation
What should the modern style of Khrushchev's living room be like? Design specialists are responsible for multifunctional, stylish, attractive, cozy and comfortable.
This can be achieved by following a few simple rules. Ceiling design rule - modern trends 2022 advise abandoning multi-level ceilings in favor of simple leveling with plaster or creating original patterns on the ceiling, for example, using suspended ceilings or plasterboard structures.
We decorate the ceiling
Here are some examples of how to decorate the ceiling in a Khrushchev-era living room:
- Laconic white coating;
- Smooth or glossy ceiling;
- Suspended structures;
- Decorating the ceiling with beams is a hit for 2022.
If the living room has low ceilings, you can use floor-length curtains or soft diffused lighting - this will visually increase the height of the ceilings.
Features: pros and cons
The starting material for a metal sauna stove can be not only a pipe or a cylinder; it also uses sheet steel.
Sheets are usually used to make a body in the form of a rectangular parallelepiped, but this shape has its own characteristics:
- the sheets must first be cut, cut and joined together with a welding machine;
- as a result, such a stove will cost more;
- a cylindrical firebox conducts heat better;
- based on the trajectory of flue gases, a circular cross-section is more preferable;
- flat walls are more susceptible to burning than pipes made of exactly the same material.
What are the advantages of metal stoves:
- the cylinder is only slightly inferior to the spherical shape in terms of thermal conductivity;
- the thickness of the walls of water or gas pipes makes it possible to achieve high thermal conductivity;
- the stove can be moved, it is durable;
- the cost of manufacturing such a furnace is very low, since pipe scraps are often sold at low prices;
- detailed manufacturing instructions indicating the sizes and diameters of pipes will reduce the labor intensity of the process and save time;
- many factory products of this kind are made from exactly the same pipes, in the image and likeness of which it is easy to recreate the product in a handicraft way;
- In addition, such devices are heat-resistant, corrosion-resistant, durable and can easily withstand temperature changes.
Finishing
The stove should not only be beautiful, but also aesthetically attractive. To do this, it is recommended to resort to:
- brick lining;
- bluing;
- coloring
How to brick
Examples of brick lining are presented in the plate.
| View | Description |
| Convector cladding (with vents) | The most suitable option. Can be used to decorate any unit. The area of the room does not matter. |
| Continuous cladding | Plays the role of decoration. Ultra-fast heat dissipation is provided. Against this background, the performance of the structure is reduced. |
| Heat shield | Miniature stone fence. Heat dissipation is optimal. A person who is close to the stove is provided with 100% comfort. |
Blueing
This is a chemical treatment. The method is intended to protect metal from rust.
Blueing
Instructions:
- Clean the surface well. A characteristic shine should appear.
- Dilute 150 g of phosphoric acid and 4 g of butyl alcohol in 1000 ml of water, remove the oxides.
- Dilute 50 g of household soap in 1 liter of water, rinse the surface, removing any remaining acid.
- Preheat the oven to 150 degrees.
- Apply caustic soda by spraying.
- Wait until completely dry.
After this, the iron will be completely protected from corrosion.
How to paint
A special, heat-resistant paint is used for painting.
Painting
Instructions:
- Wash the surface thoroughly. Degrease.
- Fill the can with paint and shake well.
- Spray paint (optimal distance – 300 mm).
- Wait until dry (30 minutes) and apply the next layer.
There should be 3-4 layers in total.
What to consider when choosing a project: which design is better to use
When deciding which type of furnace to choose, horizontal or vertical, which pipe is best to use, rely on your own preferences, the level of your resources and qualifications.
You will have to take into account the size of the dressing room and steam room.
The advantage of horizontal type devices is that due to the low position of the body and the long firebox, the heating area of the cobblestones is larger.
This increases the natural convection of hot air in the steam room.
If the size of the room allows, it is better to choose a horizontal unit.
Necessary materials
To make a sauna stove you will need:
A pipe made of any metal with a diameter of 50 cm and a length of up to one and a half meters
It is important that the walls are intact, without holes or patches. If there is a hole, you can make a firebox in this place. Clutch. Metal sheets with a side no less than the diameter of the pipe. Container with valve.
You will need tools - a welding machine, a hacksaw.
Installing the foundation for the furnace
Any stove, no matter what it is made of, requires a reliable and strong brick foundation. For a light metal stove, a foundation with a height of approximately 70 cm is suitable.
First, a pit is prepared, the top layer of soil is removed, and the ground is leveled. Sand is poured onto the cleaned surface and compacted.
Next, the reinforcing mesh is stretched and the plane is filled with concrete. We place red solid bricks flat on the concrete surface.
Preparation of 200 and 250 mm pressurized pipes
Before installation, the pipe is cut into two parts measuring 60 cm and 90 cm. The first piece will go under the water tank, the second - under the firebox and heater. Next, the blower is cut out - a rectangle measuring 200x60 or 250x60 mm. A round steel plate about one and a half centimeters thick is welded on top.
Sauna stove options
The shape of the sauna stove is of great importance. Performance and heat transfer depend on this. Experts consider rectangular ovens to be the most convenient. The coals do not become hot. This shape ensures more uniform heat exchange in the steam room. As a heating device, you can build a gas boiler for a bathhouse with your own hands.
Steam locomotive stove for a bath
It is more convenient to make a stove for a steam locomotive with your own hands from a pipe with a diameter of 30-50 cm - this is a ready-made body, which is supplemented with some elements. Walls without seams will last much longer than welded structures. It is recommended to use steel grade St3 for the furnace. A closed heater will allow you to use the sauna continuously.
Installation steps:
- The metal pipe is cut to the dimensions of the drawing. A hole is made at the bottom the size of the ash pan.
- Corners are welded inside to accommodate the grate.
- Cover the back walls of the heater and ash pan.
- A hole is made for the chimney and the pipe is welded.
- A pipe is welded inside.
- The pipe is welded to the chimney.
- The body is sheathed with sheet metal according to the size of the stove. Doors, hinges and latches are welded. Install grates above the ash pan and a grate under the heater.
Buleryan stove for baths
The Buleryan unit is equipped with many tubes around the body, through which heating of the room is achieved. The principle of operation of a do-it-yourself gas sauna stove is the constant movement of heat. The tubes welded into the firebox heat up, and under the influence of draft, warm air moves. The oven body has a low temperature and is therefore safe.
The air movement is regulated by a valve, which is placed on the firebox door or on the nozzle.
Operating principle of the Buleryan stove
To make a stove you will need:
- pipe with a diameter of 70 cm and a thickness of 5-8 mm;
- sheet metal 5-8 mm and 2 mm thick;
- pipes with a diameter of 7 cm;
- electrodes;
- welding machine.
Cut the pipe to the size of the future stove and place it on legs. At the top of the cylinder, two plates in the form of a cone are welded. The works are bent at an angle of 45° and welded to the upper part of the body. Pieces of metal are secured in a checkerboard pattern. The structure is placed in the housing and welded. Cut out holes for the chimney and oven doors. Install hinges, plugs and doors.
The efficiency of the resulting unit is 75-80%, but there are disadvantages:
- many elements that increase production time;
- the unit turns out to be large;
- very heavy construction.
Potbelly stove for a bath
Small-sized stove for a hot potbelly stove.
Drawing of a potbelly stove for a bath
To install the stove you will need:
- chimney pipe and base
- Metal sheet;
- rods;
- grate bars.
The pipe is cut to size. Make holes for the doors of the ash pit and firebox. We weld the middle wall with a hole for the grate, the top with a hole for the pipe and the bottom of the stove. The chimney, hinges, latches and doors are welded. Install grate bars.
Stages of constructing a potbelly stove from a bathhouse pipe
Attention! The minimum height of the chimney pipe installed above the firebox is 4 m. This will provide the necessary draft.. Do-it-yourself sauna unit:
Do-it-yourself bath unit:
Rocket stove for a bath
To make a sauna stove you will need the following materials:
- 2 square pipes of different diameters;
- metal corners;
- grate bars.
Drawing of a metal reaction furnace
Pipes are cut according to the dimensions of the drawing. In a smaller container, at a distance of 4 cm from the bottom, corners for the grate are welded to the side walls. A hole is made on the top wall to align at an angle of 45° with a larger pipe.
The bottom of the larger container is cut off at an angle of 45 degrees. The two structural parts are welded to each other. The bottom, hinges, doors and legs of the unit are welded.
Square tube reaction furnace
People call the simplest stove design “topi wash”.
Gas cylinder stove for a bath
Empty gas cylinders are ideal for making a small sauna stove with a volume of up to 10 m3. The container is carefully emptied of gas residues and the tap is cut off.
A hole is made in the upper part of the cylinder for the firebox door. The container is turned on its side and 5 rows of holes are made on one side with a pitch of 2 cm and a diameter of 1 cm.
The ash pan holes are located at the bottom of the oven
A piece of channel is welded over the hole. This is a box for a retractable ash pan.
Doors and latches are welded onto the firebox and ash pan. A chimney pipe was welded to the rear wall.
The doors were welded onto the ash pit and firebox
Next, a test fire is carried out.
Heating device for a bath from a gas cylinder:
Metal models
Design and selection of materials
Most homemade sauna stoves are made of steel and brick models. Of course, there are also original designs that use factory parts (for example, solid cast iron fireboxes), but they are rather the exception, and therefore we will not consider them.
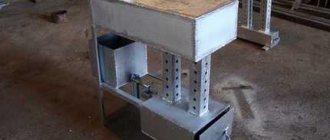
A metal stove made of steel pipes is the simplest device. To make it, we will need a piece of steel pipe or a thick-walled barrel, as well as a welding machine and a grinder.
So, if we like the steel model, we begin planning the work:
First you need to decide on the design features
The construction of a steel model is one of the options
- As a rule, steel pipes with a wall thickness of at least 8-10 mm are used for the manufacture of all workpieces. To make a standard compact stove for a steam room you need about one and a half meters of such pipe.
- We will also need some gratings and sheet metal. The dimensions of the metal sheet must be determined in advance, since they depend on the dimensions of the individual elements.
- In addition, it is worth buying two sets of hinges and latches for the firebox door and ash drawer, a tap for the water tank, etc. The price of these parts is low, so you don't have to worry about going over budget.
When all the materials have been purchased, you can begin making the structure yourself.
We assemble the blanks into a single structure
A homemade sauna stove made of steel pipe is made according to the following algorithm:
- We cut a one and a half meter piece of pipe into two parts - 90 and 60 cm (approximately). The larger part will be used as a blank for the firebox with a heater, and the smaller part will be used as a water heating tank.
- Next, we begin to process a segment of 90 cm. In the lower part, we cut out a groove up to 50 mm high and 20-25 cm wide. The resulting hole will work as a blower, providing the firebox with oxygen.
Cutting holes
- Above the ash pit we weld a thick steel plate with a fixed grate. This plate serves as the bottom of the firebox.
- We make a combustion hole in the wall of the pipe. We weld hinges on one edge of the hole and hang the door - it can be made from the same steel sheet, first bent along the radius of the pipe.
- Next, you need to make a heater - a container in which heating elements (pebbles, cobblestones, special stones for a bath, etc.) will be placed. As a heater, you can use either a piece of pipe or a metal basket welded from reinforcing bars.
Twig heater
- From a piece of pipe 60 cm long we make a tank for heating water. To do this, we weld the bottom with a hole for the chimney in the lower part, and install a tap in one of the side walls.
- It is better to make the lid on the tank in such a way that at least a third of it remains open: this way you can add water without fear of getting burned on the metal.
We weld the firebox with the heater and the tank to each other. For a more durable connection of the parts, you can fasten steel strips or a coupling made of sheet metal around the perimeter. We pass the chimney through a water heating tank and weld it to the bottom as tightly as possible.
Chimney pipes
Installation Tips
Homemade iron sauna stoves are quite easy to install.
However, it is still worth listening to some recommendations:
- The structure must be installed in such a way that the firebox opens towards the front door.
- It is worth pouring a concrete foundation up to 30 cm thick into the base of the furnace. It would also not be superfluous to lay two layers of refractory bricks on a clay mortar.
- The distance from the edge of the stove to any vertical surface should not be less than 20 cm.
- To ensure fire safety in a wooden building, heating structures can be lined with half-brick masonry. By the way, this will also save you from burns!
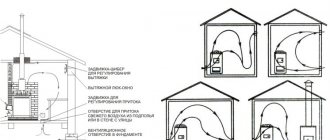
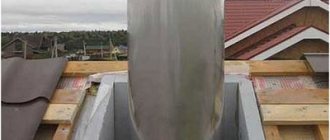
Chimney installation
- Square holes measuring 450x450 mm are cut out in the ceiling and roof. A pipe will pass through them.
- Two metal blanks are cut out (to the same dimensions). One piece that will need to be attached to the roof slope should have an oval hole. The second blank is made with a round hole.
- A galvanized casing is placed on the internal pipes along with the insulation. The ends are closed with metal rings, which are fixed by bending the edges.
- The lower pipe is put on the stove pipe, while its upper end is pushed into the hole in the ceiling. You should make sure that it is clearly in the center.
- A blank sheet is attached to the ceiling.
- An upper pipe with a metal blank is inserted into the hole in the roof.
- The lower end of the upper pipe is pushed onto the upper end of the lower pipe and secured with a clamp.
- A metal sheet placed on the top pipe is screwed to the inside of the roof.
- It is imperative to fill the gap formed between the pipe and the ceilings. It is filled with some non-flammable substance (clay, expanded clay, asbestos).
After completing the work, the bathhouse must be thoroughly heated. This is best done with firewood, the temperature of which will enhance traction. Now the chimney is ready and you can safely go to the bathhouse to take a steam bath!
Basic safety rules
Solving the problem of how to weld a metal stove for a bathhouse is not difficult. The main thing is to comply with fire safety rules when carrying out all work:
- the finished stove can be installed indoors only after repeated preliminary heating in the open air;
- all seams must be welded tightly;
- only high-quality material can be used in compliance with all specified dimensions;
- the stove is positioned so that the firebox opening is opposite the front door;
- there should be no wooden floors, walls, etc. near the stove;
- around the stove, the floor and walls of the room must be covered with sheet steel and heat insulation;
- the chimney pipe is led outside, the minimum height is 70 cm above the roof ridge;
- around the passage of the smoke exhaust pipe through the roof you need to apply a layer of plaster, then whitewash it with lime;
- Small tubes should be installed in all technological openings in the direction of the chimney - this will prevent soot from accumulating;
- a damper must be installed in the smoke exhaust pipe to regulate draft;
- Chimney pipes must be cleaned periodically to avoid accidental combustion of accumulated soot.
The walls near the sauna stove must be insulated for fire safety
Description of typical diagrams of pipe furnaces
A pipe stove is a metal cylinder with holes made for the firebox and ash pan and a chimney welded on top. There are two main options for pipe stoves:
- horizontal;
- vertical.
Horizontal models are suitable for baths and industrial premises, since their design provides for the installation of a tank for heating water and other auxiliary devices.
Grills and barbecue grates are installed on “lying” stoves, which makes them the best option for a personal plot or cottage.
Vertical stoves take up a small area and are suitable for heating sheds and cooking in small country kitchens.
Reference. In a vertically located stove, wood burns faster and produces more heat, while horizontal structures melt more slowly, but allow you to retain heat longer with less fuel consumed.
Types of metal furnaces
The simplest version of a metal stove is an ordinary potbelly stove. It consists of a casing with a door and legs, inside of which a grille is installed. Wood is burned on it. Like all stoves, a chimney is required. Let's face it - this is not the best option, although it heats the bathhouse perfectly. But it consumes too much fuel. You simply will not have time to throw firewood into the mouth of the potbelly stove in order to maintain the required temperature in the bathhouse. Many say that this is generally a relic of the past.
But let's not immediately write off this model, which faithfully served the baths for many years. Today, modern Kulibins offer an improved potbelly stove, which is classified as a long-burning stove.
What has changed inside the structure itself?
- Firstly, its combustion chamber was divided into two parts by a horizontal partition. Firewood is burned in the lower one, and flue gases are burned in the upper one. They pass through a channel left on the side in the form of a gap between the partition and the vertical wall of the device.
- Secondly, the firewood is stacked tightly together so that it burns with less oxygen.
- Thirdly, special channels are installed through which fresh air enters the second combustion chamber.
And yet these metal stoves are not the most economical. And their efficiency is not very high. That's why we offer other types of products.
Traditional metal homemade stoves are unique structures in which there is a place for a firebox, heating planes, a heater, and a tank of water. That is, there must be a complete set that will provide the bathhouse not only with heat, but also with hot water. By the way, about the water tank. Its volume may vary, but experts say that for small bathhouses with a small metal stove, the best option is 60–70 liters.
However, there are two very important warnings:
- A metal sauna stove must be made of sheet iron with a minimum thickness of 4 mm. You can also make it from a pipe.
- It must be covered with bricks. This will increase the safety of the structure and create conditions for uniform heat distribution throughout the room.
Making a stove with your own hands
After choosing the design of the furnace and purchasing all the necessary materials and tools, you can begin to manufacture it.
Furnace drawings
The first stage of construction is to draw up a drawing. The drawing of a pipe bath stove determines the installation location of the necessary components.
Drawing of a horizontal furnace
You can make a drawing of a pipe stove yourself (this will require certain knowledge) or use a ready-made one.
Vertical pipe drawing
It is not recommended to start manufacturing a furnace without a preliminary drawing, as there is a possibility of making mistakes that could lead to the device not working. Incorrectly assembled stoves can adversely affect human health.
Instructions for making a horizontal oven
A horizontal pipe stove is made with your own hands according to the following scheme:
- a piece of pipe is cut out, the length of which corresponds to the drawing dimensions of the furnace (the optimal furnace length is 0.7 - 0.9 m). The cutting areas are sharp, so it is recommended to sand them a little.
- a grate is installed in the lower part. Making this device yourself looks like this:
- cut a rectangle of the required size from a metal plate (fully consistent with the internal dimensions of the oven);
- in the prepared rectangle, the middle is cut out so that there is room for welding at the edges;
- metal rods are welded horizontally or vertically (at a short distance from each other);
Self-made grate
- the manufactured (purchased) grate is installed in the prepared section of pipe;
It is recommended to place the weld seam under the grate, since the first thing that is destroyed under the influence of temperature is the connecting seams.
An example of installing a grate in a furnace
- The back of the stove is welded. To do this, a sheet of metal with dimensions slightly larger than the diameter of the pipe is cut out. If a heater is supposed to be located in the upper part, then the length of the sheet needs to be increased by the size of the compartment for stones. This will avoid additional welds;
- a sheet is being prepared for the façade of the furnace. The dimensions of the sheet should be slightly larger than the dimensions of the oven;
- Rectangular holes are cut in the prepared sheet for the combustion door and the blower. If ready-made doors are used, the dimensions of the holes must correspond to the dimensions of the doors;
- the front sheet is welded to the front of the stove;
- a hole (approximately 15*15 cm) is cut in the upper part of the stove body to install the chimney;
- doors are hung;
- the finished stove is cleaned of rust and scale formed as a result of welding.
Next, the stove can be painted with heat-resistant paint or lined with brick.
If the stove is covered with paint, it is recommended to heat it outside before installation. As a result of this action, the excess paint will burn off without harming human health.
Instructions for making a vertical oven
A do-it-yourself vertical pipe bath stove is made according to the following scheme:
- cut off a piece of the main pipe 0.7-0.9 m high;
- the cutting areas are cleaned;
- A circle with a diameter equal to the diameter of the pipe is welded onto the lower part of the pipe. This serves as the bottom of the stove;
- A hole for the blower is cut in the lower part of the pipe. The dimensions of the hole must correspond to the dimensions of the door;
- grate bars are installed (how to make a grate bar yourself is described above). The grate needs to be installed slightly higher than the blower.
- A rectangular hole is cut above the grate, equal in size to the door being installed. This will be the combustion chamber;
Arranging a compartment for the firebox and blower
- If necessary, a hole for stones is provided. The easiest way to organize a heater looks like this:
- a rectangular hole is cut 10-15 cm above the combustion compartment;
- an additional grate is installed in the hole (it is on it that the stones will subsequently be located);
- a door is installed on the hole. If you open the door, you can pour water onto the stones to generate additional steam;
- purchased or self-made doors are installed on all openings;
- a hole is cut in the upper part for installing the chimney;
- as in the previous case, the stove is sanded and painted.
If desired, you can attach a tank to heat water on any stove.
Making a sauna stove yourself is only possible if the craftsman knows how to operate a welding machine. The manufacturing process is not complicated, but requires certain knowledge and skills.
How to install the stove correctly
- The first priority is choosing the installation location and measuring the area. Everything must comply with safety regulations. The stove should be installed at a distance of at least 60 cm from the plaster and 80 cm from the wallpaper.
- The stove must stand on a concrete slab (at least 0.7 cm), asbestos or basalt cardboard.
- The furnace elements are assembled according to the instructions, after which it is necessary to check the tightness of the assembled structure.
- A protective element must be attached above the stove, on the ceiling.
- Installation of a chimney (it is better to choose a round option - rectangular ones have worse draft).
- If you want to paint the stove, then any paint will not work for this. You need to choose special enamels (silicate or organic).
- Call a fire inspector who will check the correct installation.
- Test check of the entire system.
Horizontal pipe stove
The advantage of a horizontal stove is that you can arrange a more spacious firebox here. The firewood here will burn longer, and your bathhouse will be heated hotter. The firebox door of such a stove is easier to open into the dressing room. But it is impossible to install a heater with a tank directly in the pipe with this design. For this you will need attachments. The stove itself is made from a piece of pipe 0.8 m long.
Horizontal sauna stove: drawing
- Organize the foundation for the stove in the same way as for the vertical one (step 1 of the previous instructions). Calculate its dimensions accordingly.
- Make a grate platform. Cut a rectangular blank with sides 40 x 80 cm from a metal sheet (thickness 10-12 mm). Weld the finished grate in the center. You can weld the grate in the same way as in step 3 of the previous instructions.
- Weld the platform inside the future furnace. The welds of the grate should be on top, not on the bottom. This will reduce the load on them.
- Cut out the front wall for the stove from metal. Its shape is a rectangle, rounded at the top to resemble a pipe. The lower part of the workpiece will serve as a support. Its width is 60 and height is 70 cm.
- Make two holes in the front part: one for the firebox and one for the blower. Install the doors.
- Cut out the back wall of the oven. It will be a rectangle with sides of 70 and 90 cm. There is no need to round it, since it will serve as the back wall for the heater.
- Cut a 15 x 15 cm hole in the upper part of the body at the back. Install a vault welded from sheets of metal on top. Make a hole in it, to which you will then weld the pipe. Move it 10 cm forward. The distance between the hole in the furnace body and in the roof will cut off the flame. The wood will burn, releasing more heat.
- Weld the pipe. The vault is the bottom of the heater. Complete its front wall. To make it accommodate more stones, you can weld 15-20 cm sides from the lattice.
- Buy or weld a water tank. Place it on the back of the oven.
Attention! To prevent the stove from becoming a fire hazard, you need to follow basic safety rules. The pipe must be routed to the roof through the ceilings using penetrations made of non-combustible materials
It’s good if you can equip the stove with a movable damper at the entrance to the chimney. This will prevent the oven from overdrafting. In addition, the stove must be periodically cleaned of soot, because it can also catch fire.
So, making your own sauna stove is not such a difficult task. If you are familiar with welding, you will be able to do it. All you need for this is a piece of pipe, sheet metal, a few hours of free time and golden hands.
Brief description and dimensions of the metal stove
Our design will have a separate tank for heating water and a heater built into the top of the stove. The flame heats the heater from all sides, this significantly increases the efficiency of the stove. You can take arbitrary sizes, take into account the parameters of the steam room and the number of people washing at the same time. We give the dimensions of our stove as an example.
- External heater. Width 50 cm, length 50 cm, height 80 cm.
- Internal heater. Width 40 cm, length 40 cm, height 50 cm. The distance between the walls of the inner and outer heater is five centimeters around the perimeter.
- Bake. Width 50 cm, length 90 cm, height 50 cm. You can change the length of the stove, make it only for an external heater 50 cm long (then the water tank will have to be mounted on the side on stops) or increase the length to increase the volume of the tank.
- Water tank. Width 40 cm, length 50 cm, height 60 cm. The tank holds 120 liters of water, which is enough to wash three or four people. Of course, hot water needs to be diluted with cold water.
Recommendations
In order for the stove to work for a long time, you need to follow some recommendations:
- Do not forget to regularly clean the chimney, the inner walls of the pipe, and the ash box from soot and ash. It is recommended to sometimes heat the stove with aspen wood. They effectively clean the chimney.
- Do not use fuel with various impurities.
- Cover the stove unit with a layer of brick. It will protect against infrared radiation and improve heat transfer.
- To install a tank for heating water on the stove, you need to make a built-in heater. For it you need to cut a separate hole with a door.
- You can assemble a wooden fence to avoid getting burns when accidentally touching hot metal surfaces.
When painting the stove, it is recommended to add anti-corrosion additives to the paint composition. They will protect the metal from rust formation.
Not everyone can afford to buy a ready-made sauna stove or assemble a brick structure. If desired, you can make metal furnace equipment from large diameter pipes. By following simple recommendations, you can make a homemade design that will allow you to obtain high temperatures and high-quality steam.
Types of Iron Furnace Construction
There are 2 types of metal heating devices for baths:
- Hot. Such structures heat up quickly. Experts recommend installing them in premises of non-permanent use, for example, in a country house. In other rooms it will be impossible to control the heating temperature, which will lead to overheating of the air.
- Cold. The units are equipped with a temperature control system. The walls of such devices do not heat above 50 0 C.
According to the type of design, heating devices are divided into cold and hot
There are 3 types of design of heating devices:
- Closed type devices. Compact equipment is installed in small baths. The inside of the device is lined with fireproof material to increase heat resistance. A grate for stones is also placed.
- Open type units. The devices are often equipped with a water container and an open heater.
- Combined devices.
There are open, closed and combined types of ovens
Sauna stoves are classified according to the type of fuel:
3 types of fuel: wood, electricity and gas
Manufacturing and installation
The process of making homemade stove equipment depends on the type of stove chosen.
Manufacturing of vertical structure
Manufacturing stages:
- Cut round lids from a sheet of metal and weld the tube with them on both sides.
- Cut a hole in the top of the pipe for the chimney.
- On the front side of the tube, make holes for the chimney door and ash pan.
- Secure the grate from the reinforcement inside.
- Install the doors onto the cut holes.
Manufacturing of horizontal equipment
Manufacturing stages:
- Use a grinder to cut out two metal disks that will cover the ends of the tube.
- Fasten the grate inside the pipe.
- Weld the ends, cut holes for the combustion chamber door and ash drawer. Hang the doors.
- Make a hole in the top of the pipe for the chimney.
- Weld a frame of reinforcement above the tube. It will act as a heater.
- Place the pipe on the legs and secure the chimney.
When the work is completed, you need to install the stove on the base.
Decoration
To make homemade stove equipment more attractive, you can use special heat-resistant paint. It must be applied to metal surfaces in two layers. The metal is pre-cleaned of any dirt and sanded with fine sandpaper.
Performance characteristics
First of all, it should be noted that the steam locomotive sauna stove is very durable. Depending on the quality and thickness of the steel used for its manufacture, its service life can range from 7 to 15 years or more, and this is no less, about 1200 bath cycles.
We present the average typical indicators for a furnace of this type in the form of a table:
| Parameter name | Numerical indicator |
| Dimensions of the furnace with lining, mm | |
| Length | 1250 |
| Width | 1000 |
| Height | 1300 |
| Weight of the furnace system, kg | |
| Directly from the oven | 230 |
| Facings | 1350 |
| Stone bookmarks | 270 |
| Sandwich chimney, primary/secondary diameter, mm | 160/140 |
| Diameter of the chimney pipe, mm | 140 |
Drawings of the “Steam Locomotive” furnace
A classic furnace of this type has two complete completed horizontal turns. The front door of the smoke circulation circuit makes it possible not only to carry out inspection and prevention, but also to additionally adjust the air flow, which initiates the transfer of the furnace to the “sleeping” smoldering mode of operation of the furnace and a qualitative reduction in the temperature of the outgoing flue gases.
The convection of the stove is relatively small, which is due to the round shape of its combustion chamber and the massive stone filling in the heater. At the same time, the top layer of stones heats up quite moderately, which allows you to pour solutions of essential oils onto the “lid” without fear of their thermal destruction.
An operational feature of the furnace is the ability to remove “fast steam”, that is, until the stones have reached a temperature sufficient for steam generation, water evaporates from the steel body of the furnace. At the same time, it is impossible for such a stove to choke even with an excessive amount of water; unevaporated water simply flows off the rounded sides.
Important! A furnace of this type is one of the few steel furnaces that meet fire safety requirements in accordance with the regulatory document of the Ministry of Emergency Situations SP 7 13131, which provides for the possibility of admitting flue gases with a temperature not exceeding 400 degrees Celsius into steel chimneys.
Due to the high inertia of the oven, it perfectly dries the steam room after finishing the procedures, relieving it of excess moisture.
A word from Experienced! Furnaces of this type have the weakest point in the furnace roof, at the point where it transitions to the upper part, since this is where the flue gases flow out with a peak temperature. Since the stove is very repairable, the consequences of burnout are eliminated by applying a repair patch no less than the thickness of the body of the vault.
In general, the stove provides excellent performance characteristics and can be recommended for use in classic Russian steam baths with virtually no restrictions.
Furnace assembly process
Naturally, a do-it-yourself stove for a bathhouse made from a pipe will not look super ideal in appearance. However, it looks quite decent, and will perform its main functions no worse than the factory model - uniform heat release.
When installing a stove in a bathhouse, it is worth remembering that it carries with it the danger of burns and must comply with all fire safety measures, so you must follow the installation rules:
- it must be placed on the foundation, 0.2 meters away from the wall;
- where the pipe exits to the outside, a thickening of 120 mm should be made, and it should protrude above the roof by at least 0.5 meters;
- all wooden elements must be treated with an insulating compound containing clay;
- the section of the chimney between the ceiling and the roof must be plastered and lime mortar applied;
- place shelves near the wall where the stove is installed.
Foundation
Independent production of any stove model in a bathhouse begins with installing the foundation.
- In the place in the bathhouse where the stove is planned to be placed, it is necessary to dig a hole 0.5 meters deep, and the length and width can reach 0.7 meters.
- Cover it 0.3 meters with crushed stone, small fractions, and compact it well.
- Prepare mortar, cement and sand, at the rate of 1 to 4, dilute with water.
- Pour the solution into the hole and leave for 24 hours until it dries and becomes hard.
- You need to put roofing felt on top, it will protect from moisture.
- Prepare a concrete solution, its composition is cement, sand, fine gravel and water, in a ratio of 1 to 2 to 4. Pour the roofing material with the resulting mixture.
- It is good to level the base with a building level.
When the mortar dries, you can use brickwork for a more aesthetic appearance.
grate
The grate is a special grate that provides traction. There are two ways to make a grate.
First:
- Cut a metal rectangle 10 - 12 mm thick, the size corresponding to the parameters of the pipe inside.
- In the manufactured part, remove the middle, leaving places for welding along the edges.
- Weld metal rods to this frame, placing them horizontally or vertically.
Second:
- Cut a circle out of metal, its diameter should coincide with the pipe inside.
- Cut large holes in the circle to create something similar to a sieve.
The structure is welded inside the pipe, it is located 15-20 cm from the bottom.
Chimney
Chimneys are:
- Ceramic - most resistant to high temperatures. These models have the longest service life.
- Brick - since the surface is rough, soot accumulation occurs quickly, which leads to slower air draft.
- Steel - this option is the most suitable for a self-made bathhouse, since its price is not high. The material is light in weight and highly durable; in addition, it can withstand temperature changes well and is resistant to water and corrosion. It heats up quickly, so a tank of water is placed on it for further bath procedures.
The assembly process is simple:
- First you need to mark the location for the hole and make it according to the marks.
- Attach a steel casing to the pipe, put on the rings and fix them to the ceiling. Secure its lower edge with self-tapping screws.
- Bring the second edge to the roof. Expanded clay, clay or asbestos can be used to fill the gaps between it and the roof.