- Types of installation: where to install
- How to choose the size and shape of a chimney
- Preparatory stage
Before you begin installation, familiarize yourself with how to properly install a chimney pipe in a bathhouse with your own hands. The process largely depends on how competently you can choose a design, based on the parameters of the stove and the volume of the steam room.
In addition, it is necessary to consciously approach the choice of material, set of elements and installation method. And also in this article we will talk about the main design features of chimney systems, and the problems that can arise if installed incorrectly.
Design features
Chimneys for sauna stoves are constantly being improved; a variety of materials are used in their manufacture, and new technologies are emerging. Knowledge of the features of different modifications allows you to install them correctly, ensure the required fire safety measures, and ensure regular cleaning and replacement of components.
According to their configuration, chimneys can be internal or external. Internal ones are brought out through the wall using adapters. The design allows you to save useful space in the room and eliminates the possibility of burns or fire of internal equipment. But there is also a minus - low efficiency - a considerable portion of the heat simply “leaves” into the atmosphere.
External chimneys lead directly from the stove to the outside through the ceiling and roof. The required shape and direction are given through a variety of fittings, and safety is ensured by the correct selection of insulation in accordance with SNiP 41-01-2003.
Popular device circuits
When choosing steel, metal thickness and insulation, we recommend focusing on the type of fuel you plan to use. The height depends on the power of the heating device and the diameter of the heating device.
For sauna stoves operating on solid fuel, we recommend using steel with a thickness of 0.8 mm.
To assemble a smoke exhaust system of any complexity, Ferrum has provided a bell-shaped design for assembling the structure. It consists of a hermetically sealed connection of two elements into one due to mounting extensions at the ends. The sockets are produced by cold forming of high-quality low-carbon steel while maintaining the plasticity of the materials during manufacturing. The alternative crimping technology does not provide a tight seal and leads to the accumulation of soot at the joints and creates difficulties during cleaning.
Elements of smoke exhaust systems
Required parts during assembly: boiler adapter, single-wall meter chimney, damper, start sandwich, sandwich pipes, polyurethane foam, roof trim and cap, as well as clamps.
The sandwich is the main element of the system for removing flue gases in straight sections. It consists of two pipes nested inside each other, between which thermal insulation is placed. This design has the following advantages:
- extremely low amount of condensation;
- soot practically does not accumulate;
- higher fireproof properties compared to single-wall chimneys.
This option is not connected directly from the furnace, as this could cause the pipe to burn out.
The boiler adapter is the starting pipe component of the future chimney. It is necessary for condensate assembly, as it reorients the turn during installation.
The gate blocks the flow of flue gases if necessary, representing a valve with holes to prevent combustion. The start sandwich is an intermediate element in the transition from single-wall to double-wall construction.
A ceiling-passage assembly (CPU) with mineralite is a mandatory element when maintaining fire safety at the point of passage through roof and ceiling slabs. PPU contains fireproof insulation material, an air layer and an area for placing an additional layer of thermal insulation.
The groove on the roof insulates the chimney from rain and snow. The increased rigidity of Ferrum structures will protect during snow melting, preventing leaks.
Clamps are used to fix the chimney relative to the installation plane. Steel fasteners are needed to position the system so that it does not rest on the stove or fireplace.
The role of the tee in the smoke exhaust system is to change the direction of the smoke channel, drain condensate downwards using a condensate drain and facilitate maintenance. Ferrum tees have sealed joints obtained through laser welding and the use of cold metal drawing. There are designs at 90° and 135°.
When assembling a chimney for a bathhouse, we suggest focusing on the Ferrum assembly diagram.
You can make a more accurate selection in the Constructor section, which in real time allows you to completely assemble the device taking into account the size of your bathhouse.
Single-circuit chimneys made of steel
For a number of reasons (the likelihood of condensation, thermal expansion), such devices are practically not used on their own, but are installed in the form of sleeves for brick pipes. The material is designed for temperatures up to 1100 degrees and has high heat retention parameters. Chimneys are made of stainless, alloy, painted or galvanized steel. Some parts are made of brass.
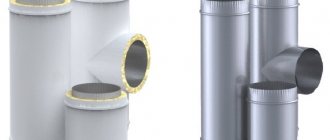
Metal chimneys and adapters Source strojdvor.ru
The benefits include:
- Easy to install.
- Affordable price.
- Replacement parts of the smoke exhaust unit.
- Light soiling that does not require frequent cleaning of the structure.
- Possibility of operation in different climatic regions.
The disadvantages include the appearance of carbon deposits on the walls and the formation of corrosion processes. The optimal material for pipes is steel, which contains at least 17% chromium with a wall thickness of up to 1.5 mm.
Where do unscrupulous manufacturers save money?
In conditions of handicraft production, it is impossible to achieve precise geometry of products, tightness of joints and a high service life of chimney systems. This is due to manufacturers saving on materials and the lack of an automated production line.
Cheap steel chimneys are obtained by using:
- Thin sheet steel less than 0.5 mm with a small chromium content of less than 13%. It quickly loses its properties, deforms and collapses under the influence of high temperatures. Perforation corrosion occurs in less than a year.
- Construction mineral wool (up to 300°) instead of technical wool (up to 600°). The insulation is stuffed by hand and crumbles over time. The pipe heats up unevenly and becomes deformed.
- Old equipment for rolling sheets. In this case, the exact geometry of the products is not ensured.
- Welding occurs with an overlap or a mechanical connection in a lock; the high temperature causes the seam to separate.
- Zigging method for connecting parts. Soot accumulates at the joints, making cleaning difficult.
Double-walled stainless steel sandwich chimneys
The correct installation of a chimney in a bathhouse for a wood-burning stove requires installation strictly according to specific instructions. Otherwise, the wall insulation contained inside the pipe will absorb moisture, which is fraught with negative consequences. Compared to its classic steel counterpart, the sandwich is more reliable and durable.
When purchasing, you must carefully measure the diameter of the working pipe so that it fits the outlet element of the furnace. An important factor is not only the grade of steel, but also the type of insulation used. The best option is stone wool. The desired density is 120 kg/cubic meter with an insulating layer thickness of at least 40 mm. Pay attention to the assembly. For internal models it is performed “by condensate”, and for external ones - taking into account the smoke output.
When purchasing, “sandwiches” must be carefully measured Source aliansgk.ru
See also: Catalog of companies that specialize in roof repair and design.
Briefly about the main thing
The main questions when choosing a pipe for a bathhouse are which one is better, safer, more practical, cheaper, more durable. Each owner has his own requirements, so their choice may vary. First you need to decide where the chimney will be installed - inside or outside, and then select it based on the material it is made of. The most practical and durable option is ceramics, but it is also the most expensive. The cheapest pipe is made of ferrous metal, but it is susceptible to corrosion. The optimal solution is a modular chimney made from a sandwich pipe. Regardless of the type of pipe chosen, it is necessary to calculate its diameter and length and select component materials for installation and insulation.
| Additionally The exhibition of houses “Low-Rise Country” expresses sincere gratitude to the staff for their help in creating the material. Schiedel is a leading global manufacturer and supplier of chimney, stove and ventilation solutions, with over 70 years of experience in the field. If you need more detailed advice or a free estimate, you can use the following contacts: Website: schiedel.com email: tel.: +7 (499) 271-30-74 tel.: +7 (499) 271-30-75 |
Ratings 0
Read later
Installation recommendations
It is prohibited to lay a horizontal part of the chimney longer than one meter. The total height of the outlet channel should be more than five meters, which will ensure stable and good traction.
It is prohibited to carry out work with tools that do not have rubberized insulating surfaces. The layout of the structure is worked out in advance. When installing chimneys for a stove in a bathhouse, several important rules are followed:
- The pipe should not come into contact with furniture, wallpaper, electrical wiring or other communications.
- An empty space is left between the ceiling and the sheathing (more than 30 cm for uninsulated pipes and at least 15 cm if there is insulation).
- Contact of the chimney and wood with the exhaust channel is not allowed.
- If the pipe is laid through an unheated attic, thermal insulation is used to prevent condensation.
- Do not place the chimney near combustible or flammable materials.
- When planning the exhaust system, the number of components is taken into account, depending on the height of the device.
Contact of the chimney with any surfaces is excluded Source rinnipool.ru
How to avoid burnout?
Even with correct cutting, it is not always possible to avoid overheating. The pipe heats up to extreme temperatures, and the likelihood of burning increases.
Useful information: “Which ceiling is better to make in a bathhouse?”
There are several ways to protect the structure and minimize damage:
"Water jacket". It is done directly on the chimney. The heated water can be used for showering. Effective, but not easy to build. You will need to install a remote tank and water supply. But the temperature above the water jacket will be low, and any burnout is excluded. Samovar type tank. A simplified option that will also heat the water
It is important to drain it in time or add cold water, avoiding boiling. Mesh for stones. The advantage of this method is that the stones dry the air very well. Difficulties may arise only with finding reliable support, since the stones weigh a lot.
Difficulties may arise only with finding reliable support, since the stones weigh a lot.
Using any of the above methods will significantly reduce the temperature of the pipe. However, you can try air cooling. The heat-insulated pipe will need to be fitted with the same one, but of a larger diameter. A grille is constructed at the top and bottom, ensuring free air inflow and outflow.
Installation nuances
After preparing the tool, unpacking the chimney elements and counting them, specialists begin installing the product.
All work is divided into several stages:
- Markings are carried out to determine the distance from the bottom of the furnace to the center of the outlet channel. This parameter is marked on the wall at the location of the firebox.
- The width of the stove and the axis of the outlet pipe are displayed in relation to the obtained size.
- The contours are indicated , taking into account fire safety standards (a square is drawn using a tape measure, a building level and a pencil.
- Dismantle the designated part of the wall partition. Holes are made in the wooden sheathing in the corners and in the center. Cut using an electric jigsaw according to the existing markings.
- The insulation is cut with a special knife and removed from the wall.
- The wooden part is protected with non-combustible slabs with a thickness of 30 mm. Cut a round hole for the pipe outlet. A flange of suitable size is used as a template.
- The protective element is attached with self-tapping screws, for which four sockets are pre-drilled. Bushings for inserting screws are placed between the wall and the sheet.
- Screen protection is placed on the floor to prevent sparks, heat and embers from entering.
General diagram of the chimney arrangement Source banya-ili-sauna.ru
Water tank on a pipe for a bath
When building a bathhouse, it is worth considering where hot water for washing will be supplied from. It is more advisable to install the water tank next to the air duct. The container will heat up as hot air passes through the pipe. Heat exchangers are made of cast iron, enameled and stainless steel. The most popular is the last option.
It can be installed near the stove and on a pipe passing through the attic of the bathhouse. The arrangement is similar, but in the attic it is easier to fill the tank with water. Since the heat exchanger is not located in the steam compartment, it is possible to connect a water supply with a tap from the pump. Water will be supplied to the tank automatically.
Exterior works
The fragment to be removed is marked from the outer part of the bath. Insulation is installed at the point where the pipe passes through the wall, taking into account the required amount of material.
The thickness of the walls is measured, strips of basalt wool with foil are cut. They are installed along the prepared contour with the shiny surface inward. When laying mineral wool, maintain a minimum of gaps between parts of the insulation. The process continues until there remains a hole similar to the diameter of the outlet pipe.
Design selection
The first thing you need to decide when choosing a chimney is where to install it. There are few options. It can be entirely indoors and go vertically outside through the roof. Or it can be brought out horizontally through the wall and rise up from the outside.
Each option has both advantages and disadvantages that will affect the choice of chimney location.
Internal chimney
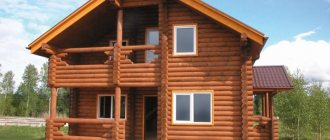
The traditional and more familiar way of installing a chimney is inside the bathhouse, vertically upward from the stove, which ensures maximum draft. Passing the entire distance to the ceiling through the pipe, the hot smoke becomes an additional source of heat, so the bathhouse heats up faster, and less firewood is required.
Bathhouse with internal chimney Source rakentaja.fi
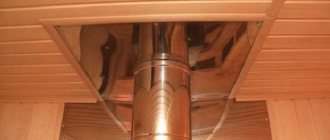
Its main disadvantage is the complexity of installation, since the pipe passes through two structures at once - the ceiling and the roof. And the passage units must not only provide protection for their elements from the hot surface of the chimney, but also be sealed so as not to let precipitation inside.
Pipe passage through the roof and ceiling Source sdelai-lestnicu.ru
Another disadvantage is that the chimney takes up a certain space. This can be critical for small rooms, both by reducing the usable area and by increasing the risk of getting burned from the hot surface of the pipe.
However, an additional advantage of the internal chimney is the ability to install a tank for hot water on it, which will heat up, taking heat from the walls of the pipe. Such a tank is called a “samovar”. It can only be mounted on a chimney for a stainless steel bath; in this case, you don’t have to choose which pipe material is better - metal heats up more than others, and it’s only possible to ensure the tightness of the tank.
Stove with a samovar tank for hot water Source e-stroy.pro
External chimney
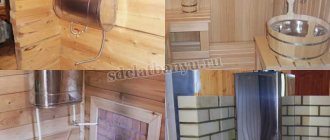
A chimney that immediately goes outside from the stove through the wall is not the best solution for latitudes with cold and long winters. A huge amount of heat that could remain in the bathhouse is immediately thrown out into the street. And this leads to additional fuel consumption and increased time for heating the premises.
In addition, when hot gases come into contact with the cold walls of the pipe, condensation forms on them. Soot and other combustion products settle on a wet surface, clogging the passage and gradually narrowing the lumen of the pipe. To prevent this from happening, its outer part must be insulated.
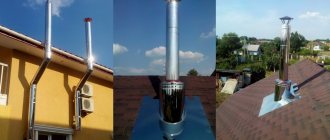
External chimney - view from inside and outside Source vosaduly.ru
But this solution also has significant advantages:
- ease of installation - there is only one pass-through unit, through the wall, and it is easier to make;
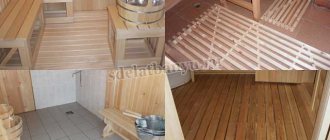
- maintaining the usable area of the steam room;
- reducing the risk of smoke and fire inside the bathhouse in the event of damage or depressurization of the chimney;
- availability of all components for inspection and repair.
Combined option
External or internal pipe for a bathhouse - which one to choose will be determined by the size and layout of the heated premises, as well as personal requirements for fire safety, fuel economy, and ease of installation.
If you don’t want to touch the roof, but want to install a samovar tank in the bathhouse, you can use a combined design, where the pipe rises up almost to the ceiling and then goes outside through the wall. But the height of the ceiling must be sufficient for such a maneuver - a fire distance must be left from it to the horizontal part of the pipe.
In a combined design, the pipe goes out to the street at the top of the wall Source demyan-pechi.ru
Note! The fewer turns the chimney has, the better the draft. In terms of this parameter, direct internal chimneys connected to the stove from above win.
Video description
What mistakes happen when installing stoves, watch in the video:
Assembly
The chimney structure is assembled in parts. First, the bracket fastener, tee and horizontal element laid from the stove are connected. The parts are mounted sequentially, with corrugated clamps directed downward. The connection points are treated with a sealant that is resistant to increased thermal effects.
Remove the drip plug, install it on the bottom of the tee, secure it with a clamp, do not use sealant. The further assembly procedure consists of the following steps:
- The straight part of the chimney is fixed to the tee; it will be laid through the wall ceiling.
- A square flange is installed on the horizontal tube and the structure is placed in the hole on the wall.
- Using a building level, the verticality and degree of tightening of the fasteners are controlled, and the self-tapping screws are tightened in the sockets of the triangle brackets.
Installation of the “sandwich” element Source 36doors.ru
- The flange is fixed using self-tapping screws.
- The structure is extended upward, connecting the component parts together using clamps and sealant.
- All nuts are tightened securely, since the chimney is constantly exposed to wind.
- Mount the bend on the roof overhang using a pair of elbows with a bend angle of 135 degrees.
- Three elements are assembled, installed on the straight part, and the upper elbow is secured with a clamp.
- After installing the straight part, a deflector and a cone are installed.
- The further procedure is carried out indoors.
- Install a single-level pipe with a valve (gate). The outlet pipe of the furnace is connected to it.
Applying markings to the wall Source banya-expert.com
Highlights of exiting through the roof
Now the next stage: we need to “punch holes” in the roof and roof. The work is unpleasant, but necessary. Again we start with the markings. If we compare it with the ceiling, then here we mark it differently. The roof usually has a slope. And the greater this slope angle, the larger the area of the hole cut for the chimney will be.
With the lateral vertical markings, everything is simple: we retreat 10-15 centimeters from the sandwich pipe and cut out the wooden sheathing. With horizontal upper and especially lower markings it is more difficult. Here you should take into account the slope of the roof and be more careful with the bottom sheathing board. Make sure it is not too close to the chimney.
The roof itself will have to be cut in the form of an oval. Again, the greater the angle of the roof, the more stretched the hole will be. To close the cut hole from the street side, special rubber seals are used. In common parlance they are called “flash drives”. They are called roof penetration seals. A very convenient and practical thing.
Flash drive - roof passage seal
By the way, about the “flash drive”. Always purchase it with the desired slope, at the angle of your roof slope. Often managers in retail chains offer a direct version of the flash seal. In practice, it can only be properly placed on a horizontal surface. Take this point into account.
Installation of an internal chimney
The internal chimney is similar to its external counterpart. All connections are made using clamps and sealant. Installation differences include:
- The insulation sheet is placed in its place immediately, and the stove is placed on it. A single-wall pipe or economizer is connected to the nozzle
- A damper, a water heating tank, a smoke damper, and a mesh heater are connected to the direct element.
- The parts are mounted with the corrugated part down so that the internal element overlaps the wall of the lower compartment. This will protect the insulation from condensation drops.
- An important stage of installing a chimney is the correct arrangement of passages through the ceilings and roof.
Main stages of work
Installation sequence of the internal chimney:
- A diagram of the future chimney is marked on the ceiling.
- The passage is constructed in accordance with the standards and requirements of SNiP.
- A square hole is made.
- A special dividing box is placed on the straight part.
- About 20 millimeters of free space is left between the vertical walls and the sawn nest.
- The chimney is expanded with an additional vertical segment.
- The box is applied to the ceiling cladding and fixed.
- In the attic, basalt cardboard is laid around the dividing part, and expanded clay or mineral wool is laid in the inside.
Exiting the chimney through the attic to the roof Source uteplovdome.ru
Elements of the chimney system
The main part of the chimney system is the stove pipe. There are 3 types with different sizes - 250, 500, 1000 mm in diameter.
The next element of the system is the throttle valve. It is used to adjust traction. It is a pipe with a built-in butterfly valve and an outward handle.
For installation you will also need tees, a cover, thermal insulation, a condensate collector, connections, an ash pan, special adapters, and various protective elements. Some of them are mandatory, while others serve as an addition to the combustion product removal system.
Commissioning
The chimney must be inspected, paying special attention to the quality and tightness of the joints. Clean the inside of the structure with a dry cloth. All unnecessary items are removed from the chimney and firebox. Test ignition is carried out using a small amount of fuel. At this stage, the efficiency of draft, the presence of smoke at the joints, and its drawing into the room are determined.
After testing, after a few hours the oven is fully heated. You should not cram the combustible materials used into the firebox to capacity; this can lead to failure of the chimney and a fire. All flammable elements and partitions near the pipe must be insulated, the distance between them and the exhaust structure must be at least half a meter. Visual inspection and preventive cleaning are carried out once every six months.
Cleaning and care
The main job is to clean the internal surfaces from soot. When the draft level decreases for the first time, you will need to immediately clean the channels from adhering soot. Such preventative work is carried out at least once every 30 days.
The work is not difficult. To clean, we pass a cable or wire through the top. At the bottom we tie a metal pipe cleaner along the diameter of the pipe and stretch it along the entire length. You can tie a weight to a cable and clean the soot from above, lowering a heavy blank. After the work, a general cleaning of the steam room will be required, so it is better to cover the shelves with polyethylene and take out light items.
People use several other cleaning methods. In winter, having rolled a snowball along the internal size of the pipe, it is lowered into the pipe and, as it descends, it will clean off the soot from the walls. The simplest and most effective way is to burn a stack of aspen firewood in the stove. Aspen releases moisture, which settles on the soot layer and causes it to collapse.
You can install a powerful fan and direct the air flow into the pipe. Just don't forget to warn your neighbors about your operation. Otherwise, you are guaranteed to get into trouble and wash your neighbor's clothes.