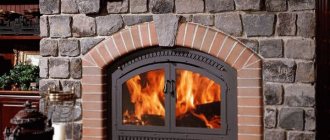
Used oil is a proven fuel that can be used to heat small spaces. Recently it has become less profitable, but it is suitable for small warehouses, garages or utility blocks where fuel consumption is low.
An oil stove is an inexpensive way to heat the average garage. The material for the firebox is not difficult to find, and you can assemble it yourself in a matter of hours. It is not difficult to assemble the unit; it is made from scrap materials.
For refueling, regular motor oil is used, which can be drained from the car. Compared to expensive diesel heating devices, there is no need to buy diesel separately.
How to weld a simple stove
Then the heat is released in greater quantities into the room, rather than being “thrown out” to the street.
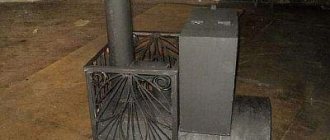
Another upgrade is to make an iron drawer. Oil is poured into it. With this design, the stove is easier to maintain. The drawing contains all the necessary dimensions. Before assembling a homemade oil stove, it is necessary to select the correct diameter of the firebox and body. Here everything depends on the volume of the room that needs to be heated. If it is a garage of 3 by 6 meters, take a profile of 80x80x4 mm. The fuel box is made of metal 60x60x4. It is more difficult to work with round rolled metal.
The step-by-step instructions look like this:
- Cut the metal according to the drawings to make a casing, drawer, afterburner. If the latter has a bend, the tube is cut at an angle of 45 degrees.
- For a profile of a smaller standard size, one wall is cut out with a grinder. Plugs are welded to the sides. The result is an open container to which you need to attach a handle.
- The structure is welded. It is necessary to drill an air hole at the top of the fuel chamber. The pipe is perforated. At this point the work is completed.
It should be taken into account that you need to calculate the number and diameter of holes in the afterburner. If you use a profile of 80 by 80 mm, then the cross-sectional area will be equal to 6400 square millimeters. This value is divided in two
Pay attention to the markings of the drill used. If it is 8 mm, then the hole area will be 50 sq. mm
Now 3200 must be divided by 50. The result is that 64 holes will be required to work effectively. However, as a result of customization, their number can be increased.
It is important that the chimney is of sufficient length. The elevation of the chimney outlet must be at least 5 meters
Then the operation of the stove during testing will ensure the highest possible efficiency even without supercharging. Otherwise, the pipe will have to be extended to this mark. But you can further increase productivity if you organize an inclined chimney running along the wall. The heated metal will release heat into the room. Only in this case is it important to follow fire safety rules. There should be no wooden shelves above the pipe, and no wallpaper on the walls. Even better is to cover the wall with a metal sheet.
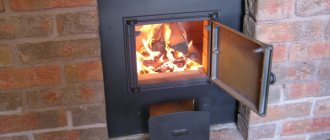
Making a drip heater
Professionals who have assembled more than one “dripper” use old propane cylinders with a diameter of 200 mm. Oxygen ones are also suitable, since their cross section is 220 mm. the latter benefit due to thick walls. They serve for a long time, do not burn out, and accumulate heat. Pipe C-10 is also suitable if it has a wall thickness of 5 mm. An excellent option for a durable housing is pipes made of heat-resistant stainless steel alloys, alloyed chromium, molybdenum or nickel (for example, 15X1MF or 12X18H12T) with a wall no more than 3 mm. However, it is not advisable to specifically purchase this raw material due to its high cost.
Technologically, the manufacturing process is as follows:
- A flame bowl is made using a piece of pipe or ready-made steel containers. This one is pulled out through a rubber hatch, so it is not made too big.
- The openings necessary for connecting the chimney pipe and the cleaning service hatch are cut out in the body. The latter is framed and closed with a door. Bolts can be used for fastening.
- An afterburner is being made. All holes are not made at once. Usually the bottom 2-3 rows are drilled, and the rest are drilled during the setup process. If you do everything at once and there are too many of them, you will have to make a new one.
- Weld the cover with the air duct and flange. The latter is necessary for installing the fan. The fuel supply device is connected. Photo and video instructions will help here.
Now assemble all the components and connect the electrical wiring. The structure will be more stable if you make a metal frame. A heavy metal profile is suitable for this.
How to build a stove from a pipe?
Do-it-yourself sauna stove from a pipe
One of the common homemade options is a bath stove made from a pipe. Let's consider how such construction is carried out.
Pipe is an excellent “semi-finished product” for constructing a furnace
Metal stoves can be made from a sheet of steel or, for example, from an old barrel. But if there is a piece of pipe of suitable diameter on the farm, then it is worth using this “blank”.
A homemade stove for a bathhouse made from a pipe can be made with a vertical or horizontal direction of a piece of rolled pipe. By using prefabricated stove pipes, the amount of welding work required when making sheet metal stoves is reduced.
Only high-quality pipes without signs of corrosion are suitable for the manufacture of furnaces.
If the pipe has been lying outside for a long time, it should be inspected first and reinforced in problem areas by welding patches.
Preparing parts
To make a good stove from a pipe, you will need a piece of rolled pipe with a diameter of 50 cm and a length of 1.5 meters. The thickness of the pipe walls must be at least 10 mm.
The workpiece should be cut into two parts, measuring 0.6 and 0.9 meters, respectively. A longer piece is needed to build a firebox and heater, and the remaining piece will be used to make a tank.
Making a furnace
An example of using a pipe stove in a bathhouse
- First of all, you should take care of the blower. A hole 5 cm high and 20 cm wide is cut at the bottom of a long section of pipe. A thick round steel plate is welded above the hole.
- Next, a niche for the firebox is formed and a door is made for it. The door is hung on hinges or hooks.
- A piece of pipe is welded above the firebox, which will be used as a heater. The height of the segment is 30-35 cm.
To fill the heater, you should use rounded cobblestones; in extreme cases, you can pour electrical insulators made of ceramics.
A steel coupling is installed in the upper part of the future furnace, which will be required to fix the water heating boiler.
Making a water heating tank
Assortment of pipe bath stoves
When building a sauna stove with your own hands, a water heating tank is also formed from a pipe.
- For its manufacture, a piece of pipe 0.6 m high is used.
- A steel circle – the bottom – is welded to the end part of the pipe section.
Advice! The thickness of the metal for making the bottom of the water tank is at least 8 mm
A hole is cut in the bottom of the tank to accommodate the chimney. It should be moved towards the rear wall of the tank. The chimney is fixed to the bottom of the tank by welding
It is important that the seam is of high quality to prevent water leaks into the firebox. The upper part of the tank is closed with a metal lid with holes made for the passage of the chimney and for filling with water. The chimney is welded tightly to the lid, and a neck with a lid is installed in the hole for filling water.
Where to apply and how to modify
Due to a significant list of disadvantages, waste oil heaters are rarely used in housing. But they are widely used for heating technical and production areas. Motorists use them in garages, gardeners - in greenhouses, livestock breeders - in outbuildings. There is always a place for them at car washes, service stations, and warehouses where there are no flammable materials.
Often basic designs are subject to various kinds of modifications. For example, a water jacket or water heating coils are used for these purposes. Such equipment is included in water heating. Furnaces of this type must operate using automation, otherwise their functioning will have to be closely monitored.
Making a pyrolysis furnace for mining
Now you know how to assemble a stove from a gas cylinder with your own hands. The unit running on exhaust or any oil will delight you with a lot of heat. For example, the exhaust furnace diagram presented above is designed to heat a room with an area of 70-80 square meters. m. Let's now look at the scheme for creating a pyrolysis unit - that is, a small potbelly stove.
Assembly diagram of a pyrolysis furnace operating on waste.
This oven will consist of three main parts:
- Oil container with lid and flap;
- Combustion/pyrolysis chamber;
- Afterburner chamber.
It all culminates with a chimney. Its recommended length is at least three meters, but chimneys with a height of 4-5 meters work best.
The oil container is made from a piece of pipe with a diameter of 344 mm, its height is 100 mm. We weld a sheet metal lid on the bottom. Our top cover is removable, it is made from a pipe with a diameter of 352 mm - sides with a height of 600 are welded to it. In the cover we make a central hole for the combustion chamber with a diameter of 100 mm. We make a hole nearby with a diameter of 60 mm - it will serve as a blower. This hole is closed with a simple rotating lid.
By adjusting the clearance of the blower, we can regulate the intensity of combustion, which will affect the air temperature in the room. If you completely close the vent while the stove is running, it may go out.
We make an afterburning chamber - we use a pipe with a diameter of 352 mm and a height of 100 mm. In the lower part we make a hole with a diameter of 100 mm into which the combustion chamber pipe is inserted. In the top cover we make a hole with a diameter of 100 mm for the chimney. Inside, closer to the chimney opening, we weld a small partition 330 mm wide and 70 mm high. Our do-it-yourself oven is almost ready.
It remains to modify the combustion chamber. Everything is simple here - take a drill and a 9 mm drill bit, drill 48 holes (6 rows of 8 holes each). With a total combustion chamber pipe height of 360 mm, the holes should be located in an area 20 mm from the bottom and 50 mm from the top.
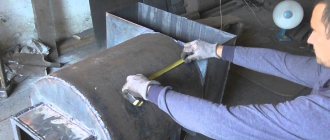
After completing all the work, check the tightness of all welds - this will allow you to count on maximum efficiency of the stove.
Check the performance of the resulting unit outside. This will protect you from possible fire and other accidents.
We start testing the furnace - we install it outside, pour the waste into an oil container, and add kerosene on top. Carefully set it on fire, leaving the ash pan open. After some time, the stove will return to operating mode - you can adjust the burning intensity using the blower. After this, the stove is moved indoors (it must be ventilated).
In order for heating to be as efficient as possible, install the furnace in a corner, and line the side walls with galvanized iron so that all the heat is reflected into the room.
Case manufacturing
I will make a stove from this cylinder
I used a used cylinder. There was no more gas in it, but just in case, I opened the valve and left the cylinder outside overnight.
Then I carefully and slowly drilled a hole into the bottom of the cylinder. To prevent sparks from appearing, I pre-moistened the drill with oil.
Hole
Then I filled the bottle with water and drained it - this removed the remaining gas. Work carefully, try not to spill gas condensate, as... It stinks very strongly and for a very long time.
Then I cut out a couple of openings. In the upper opening I will make a combustion chamber and install a heat exchanger, in the lower opening there will be a burner with a tray. The chamber at the top is specially made so large that, if necessary, it can be heated with wood, pressed briquettes, etc.
Shown how to cut a balloon
Shown how to cut a balloon
Shown how to cut a balloon
Shown how to cut a balloon
In the end this is what happened
Then I once again washed the opened gas cylinder from gas condensate.
Improvement options
The model presented above is a basic base, onto which additional elements can be attached at the request of the master. For example:
- To increase the efficiency of the stove, a heat exchanger can be built in its upper part. Passing through the labyrinths, hot air heats it, and therefore the air in the room. Then, to the method of heating with infrared radiation, air is also added.
- Sometimes a reflector is made consisting of two pipes. One of them forces cold air in; hot air will come out of the other. This option is good because the heat from this pipe can be transferred to the next room.
- You can “dress” the stove in a brick coat. When warming up, the brickwork retains heat for some time.
- You can also build a permanent water tank in the upper part and use the stove as a boiler.
- A metal tube and any container (even a plastic bottle) is suitable for making automatic oil supply, based on the principle of communicating vessels.
How to paint the stove? To make paint, you need to mix liquid glass (500 g), aluminum powder (200 g) and chalk (20 g). Mix everything. Ready!
Heat exchanger assembly
I made the stove to heat the garage. I don’t have hot water heaters in my garage, so I decided it would be better to have it immediately heated and circulate the air. If you have water batteries, then you can abandon the air heat exchanger and simply run 4-5 water coils through the upper chamber, connecting them in parallel. In this case, the design must be supplemented with a circulation pump and fan. Such equipment will allow you to heat the entire house with a stove; you just need to allocate a room for installing the stove.
Heat exchanger assembly
Let's go back to my heat exchanger. I installed it between the smoke exhaust pipe and the stove burner - this is where the heat is greatest. I welded an iron plate to the heat exchanger. Thanks to it, the flame will be held better. It will also help distribute the fire inside the stove body.
An air swirler was installed inside the heat exchanger. There are no engineering delights in such a swirler, but it copes with its task one hundred percent. When operating at maximum power, the metal of the case heats up to a scarlet color, and the heated outgoing air even penetrates the glove. You can see the swirler itself in the photo.
I'm making a swirler I'm making a swirler I'm making a swirler I'm making a swirler
Next, I took a duct fan and placed it on one side of the heat exchanger. By the way, you can connect a thermal relay to the fan for automation. This will allow you to set the temperature yourself and save resources. For example, I decided to use a thermal relay from Autonics - I just had it lying around idle. But you can also take some budget model, for example, Vemer KLIMA. I tried it too, it works great.
I supercharged it and this is what happens
Heat is concentrated in the firebox compartment.
Comparison with modern models
As for today's stoves, they are not at all similar to the old prototypes, with the exception of the potbelly stove, which retains the original principle of operation. In the sixties of the last century, the combustion of fuel to the state of carbon dioxide and water vapor was not considered something harmful, which cannot be said about the present time. Now any greenhouse gases are a dangerous enemy of the environment, so people are trying to abandon systems that pollute the environment. It is still impossible to ensure complete afterburning of the waste, but achieving maximum efficiency is quite possible.
Modern oil furnaces are different from the original ones
Also, in the distant past, there were no motor oils on the market with synthetic additives and clever additives, which can reduce the fuel consumption of internal combustion engines several times, but if burned incorrectly, they release carcinogens, toxic substances and mutagens. And people then were more resistant to various environmental influences, and the population was about 2.5 times smaller than now.
And in the end, Soviet engine oil was a natural petroleum product made on the basis of saturated carbons, which could not reach a high combustion temperature. This means that the appearance of harmful and dangerous nitrogen oxides in those heaters was practically eliminated. Modern installations emit such substances in significant quantities, which forces us to look for cleaner and alternative solutions.
Video: subtleties of filling a closed system
By observing caution and starting rules, you can independently cope with adding water to the old system. At the first start, checking and filling should be done by the technicians who installed the heating
If you do not have the skills, do not try to fix the leak or replace the coolant in the circuit yourself. Entrust the work to a specialist - the master will select the optimal media, a cleaning agent that will not damage the internal surfaces, and will correctly fill the system.
How to make a burner yourself
To understand how to make a Babington burner device, you need to study its design from the drawings. You can find quite a few of these on the Internet, but for manufacturing it is better to adopt the experience of specialists and use a proven prototype for work. Below is a drawing of a burner made and tested by one of the experienced participants in one of the specialized forums:
Now a few words about what the unit can be made from according to this drawing. The author used a regular steel tee with threads for connecting pipes with a diameter of 2 inches (DN50) as a body. Instead of a tee, a cross of the same size will do. The remaining elements are in accordance with the list:
- Any metal part with a hemispherical end can act as a nozzle
Hemisphere or hollow ball for a Babington burner. There are several options - starting from a brass door handle and ending with various spherical nuts.
- The nozzle is made from a metal pipe with an external pipe thread, length – 150-200 mm.
- Copper tube with a diameter of 10 mm for the fuel path.
- Metal tube for organizing air supply. Diameter – at least 10 mm.
- Threaded fittings are used to connect a copper tube to the body.
You will also need a small pump to pump used oil. Units from a VAZ car or motorcycle cope well with this task; you just need to ensure their rotation from an electric motor. Any low-power compressor is suitable, including one from a refrigerator, since the pressure in the air path should be low (nominal - about 2 Bar, maximum - 4 Bar).
An important operation is to drill a calibrated hole of very small diameter in the improvised nozzle. But first you need to select a drill of the required size, because the power of the future homemade Babington burner will depend on the size of the hole. Calculating power will be discussed in the next section, and how to make a small hole yourself is shown in detail in the video:
Increasing the efficiency of room heating
To increase the efficiency of heating the room, it is necessary to ensure a more intensive selection of excess heat from the stove. You can do this in two ways:
- forced airflow of the hot body - air heating;
- heating water and then pumping it into the heating system - radiator heating system.
Heat is removed from the upper zone, where the temperature reaches its maximum. Both options have already been developed and below are the most successful and simple designs of such stoves.
The photo clearly shows how the additional chamber for heating the air is organized. The partitions form a kind of labyrinth and lengthen the path through the heated zone. The air blowing chamber is welded on top of the upper combustion chamber. According to the developers, the efficiency of heating the room more than doubles.
Instead of an air labyrinth, you can weld a water boiler. The heated water will have to be pumped into the radiators, but the increase in the efficiency of heating the room is worth it.
How does an exhaust boiler work?
Heating a private house with a waste oil boiler is organized thanks to several important elements of the fuel supply, filtration and heat exchange system. The design contains the following components:
- Oil pump - connected to a preheating chamber and a filter that traps solid particles. Pump function, optimization of supply of waste quantity to the burner device.
- Preheating chamber - to reduce the percentage of underburning, used oil is preheated to a temperature optimal for combustion.
- Turbines - fuel is sprayed into the combustion chamber in the form of fine dust, while at the same time a stable flame is maintained. To operate, the simultaneous operation of two turbines, a combustion fan and a compressor is required.
- The controller is the heart of domestic oil recovery boilers. Ensures synchronous operation of all important components of heating equipment. Modern stations are connected to a remote control and warning unit and have a multi-level protection system that prevents emergency situations.
- Heat exchanger – depends on the type of boiler:
- Convection models - air heaters, do not have a heat exchanger at all.
- Domestic boilers for the home are equipped with one or two circuits connected to the heating and hot water system.
For use in domestic conditions, it is impractical and dangerous to install homemade heaters. It is allowed to connect exclusively factory-assembled boilers registered by Rostechnadzor.
An oil-fuel heating boiler for a private home or cottage, using waste oil, is economically beneficial for several reasons:
- Availability of fuel.
- Low cost of development.
The average calculation of the required amount of oil is calculated in the following way:
- Find out the maximum performance of the boiler; information is in the technical documentation.
- Divide it by 10.
- The result obtained is multiplied by 1000 50%.
The principle of boilers operating on recycled fuel is the same in all cases. It consists of evaporating the oil and burning the steam from it.
Principle of oil evaporation
But there are small nuances in this technology. All used oils contain many heavy metals, additives and other elements. The task is to build a unit that will allow you to accumulate heat inside, and not immediately discharge all these elements into the chimney. Complete oxidation of all elements occurs only if the maximum temperature inside the boiler is reached - 6000C.
The temperature indicator in this case is a very important point. Without going into lengthy explanations of chemical processes, we can say briefly: harmless combustion and evaporation of fuel can only occur at a temperature of 600 degrees. A deviation of 200 degrees to one side or the other will provoke the release of very harmful toxic substances.
Exhaust boiler with water circuit
Used oil is poured into the lower tank. The top layer of oil in the evaporation chamber heats up, resulting in the formation of steam. As it rises, it exits into a perforated pipe and connects with air, reaches the upper tank and burns. And the combustion products themselves are discharged through the pipe through the chimney.
Thus, the room is heated, but no toxic waste is released that is harmful to human health. This fact immediately answers the main question that interests many before building such a unit: “How harmful is a boiler during mining?”
Waste oil boiler diagram
You should clearly understand the operating principle and technology of oil evaporation in such a unit. It is not the oil itself that burns here, but its vapor. Due to the fact that the spent fuel heats up and begins to evaporate even before combustion begins, it becomes possible to decompose such burning fuel into lighter elements.
Where are similar heating units used?
- in production premises;
- in premises for keeping animals;
- in auto repair shops, service stations;
- in greenhouses;
- in warehouses and garages.
Almost any oil, including shock-absorbing oil, can be used as fuel for such a boiler.
Differences and features
The main difference between a drip furnace and similar coolants operating on waste oil is that inside the fuel chamber there is a perforated pipe through which combustion air is supplied. The oil flows through the oil pipeline, which then drips into the combustion tank. Preheating occurs using a fuel tube installed in the afterburner. Such a stove operates either due to draft in the chimney or with the help of a fan, which increases heat transfer without increasing fuel consumption. The diagram shows how a drip furnace works:
Types of Russian-made waste oil burners
During the cold season, not only residential but also auxiliary premises need heating. Currently, devices using different types of fuel are used for heating, including waste or waste technical oil. On the Russian market you can find devices that process different fuel bases, as well as having a narrow specialization. Based on the type of fuel burned, such devices are:
In terms of functionality, burners used for testing are not only heating, but also welding and lighting.
- gas;
- liquid fuel;
- combined.
The simplest and most economical device for heating a room is considered to be an exhaust burner. According to functionality, burners are divided into 3 subtypes:
- welding;
- lighting;
- heating.
The operating principle of these devices was borrowed from primitive kerosene gas back in the 50s. Quite quickly, the simplest burners became popular; they began to be purchased for heating country houses and garages. In those days, any fuel was inexpensive, but over time, zealous owners, inventors and innovators began to look for a replacement for gasoline, diesel fuel and kerosene. Fuel oil and waste oil were used, which are now used as full-fledged fuel. Today, the device is still relevant, and is also an excellent way to preserve the environment.
Note! In a room where any liquid fuel device will be used, be it a homemade gasoline burner, a working unit, or a DIY diesel fuel burner, there must be a fire extinguisher! By type, burners for processing are liquid fuel, gas and combined
Security measures
A stove for a working garage is a simple and inexpensive solution for heating a technical room. And if the garage is a workshop where people often come for oil changes, then there will be no problems with fuel - there will always be plenty of it. When using the oven, you should be careful:
- Do not light faulty stoves;
- Do not use gasoline, alcohol or other aggressively burning liquids for ignition.;
- Do not overheat ovens;
- Do not leave equipment unattended;
- Do not touch hot elements;
- Keep a fire extinguisher nearby;
- Homemade stoves during testing must be tested in outdoor conditions.
By following these rules, you will ensure complete safety of the premises and protect yourself from injuries and burns.
Disadvantages of the furnace during mining
Furnaces under development
Of course, such designs have a significant advantage - low cost of fuel. But there are also many disadvantages:
- To ensure uninterrupted combustion of the furnace, constant and sufficiently strong draft is required
- high fire hazard (we will discuss the rules for operating the furnace during mining below)
- frequent cleaning of soot: if you make the body one-piece, after a couple of months you simply will not be able to use the stove - it will begin to smoke mercilessly
- high fuel consumption - you will need at least 2 l/hour
- The heat transfer of devices is not that great; most of the energy, unfortunately, flies into the chimney
Most of these shortcomings can be smoothed out by improving the design - installing a fan to increase the combustion temperature, an expansion tank, etc. But due to these shortcomings, stoves are used mainly for temporary heating of utility rooms.
Even if you make a stove according to proven drawings, in any case you will have to bring it to perfection yourself: adjust the draft force, fan rotation speed and fuel dosing. It’s also not worth making all the holes in the afterburning pipe right away - do the first two bottom ones first, and drill the rest after full setup.
Chimney installation
I'm making a chimney
I made the smoke exhaust structure from a 10-centimeter pipe. Nothing supernatural - I simply welded the pipe to the hole in the center of the top of the body.
The chimney led to the street through the wall to the roof. A piece of metal sheet was attached to the wall for fire protection. It is better to pass the pipe itself through the wall in a special fireproof glass.
Here you can see how the pipe goes through the wall
Chimney, view from the street
Popular options for pre-fabricated furnaces, their characteristics
The Teplamos NT-612 stove is often chosen as a device used for heating a garage. The power of such a drip fanless heater can vary between 5-15 kW. Fuel consumption is 0.5-1.5 l/hour.
This furnace for use in a garage is a closed type device. It is equipped with a chimney, an air supply pipe and a built-in tank designed for 8 liters of fuel. Fuel combustion occurs in the inner chamber. The operation of the device begins with electrical heating of the plasma bowl. When the required temperature is reached, fuel is supplied and air is forced into the combustion chamber. The average cost of the device is 30 thousand rubles.
Another popular model is the Zhar-25 (MS-25) stove. This device can operate not only on waste oil, but also on diesel fuel. The device operates from the electrical network, which powers the internal fan. The thermal power of the furnace varies from 25 to 50 kW. It is designed to heat a room up to 500 square meters. m. Maximum fuel consumption is 4.5 l/hour. The device has large dimensions. Its weight reaches 130 kg. This stove needs to be equipped with a good chimney. You can buy it for 45 thousand rubles.
The exhaust furnace is equipped with a chimney, an air supply pipe and a built-in tank
Do-it-yourself stove made of sheet metal and pipes
Depending on the type of device, the structure can be created from pipes of different diameters or from iron sheets. To work you will need the following tools:
- grinder with cutting and grinding wheel;
- sheet metal and pipes;
- welding machine and electrodes;
- metal corners;
- metal paint that can withstand high temperatures.
Before making a furnace for testing, a detailed drawing of the apparatus is made. You can create it yourself or use ready-made options that are easy to find on websites on the Internet.
The first step is to make the lower part of the chamber connecting to the fuel tank. It looks like a rounded or straight tank with a lid where two pipes are located. The first is used to supply oil, and the second is used to strengthen the pipe that goes into the middle part of the device. Elements for the tank are cut out with a grinder and connected according to the drawing.
Depending on the type of device, the structure can be created from pipes of different diameters or from iron sheets
The bottom and metal corners are welded to the walls of the tank, which act as the legs of the structure. To create a lid, a sheet of metal is taken and holes are made in it. The first, with a diameter of 100 mm, is located in the center; the second, 60 mm in size, is located closer to the edge. The lid should be removable, which will make cleaning the stove easier.
A pipe about 37 cm long and 100 mm in diameter is used to supply oxygen. It has holes along the entire length of the element necessary for the supply of oxygen. The pipe is welded perpendicular to the cover at the bottom of the apparatus. An air damper is fixed on it, which will be secured with a rivet or bolts. The hole under the damper should be 6 cm in size. It is intended for supplying oil and igniting fuel.
The design of the upper tank is carried out by analogy with the design of the lower tank according to the drawing of a furnace using waste oil with your own hands. The walls of the product must have a thickness of at least 350 mm. A bottom with a diameter of 10 cm is cut out of the bottom of the tank, which should be placed closer to the edge. A small piece of pipe with a diameter of 11 cm is welded to the bottom of the hole. This is necessary to connect the element to the gas combustion tank.
Before making a furnace for testing, a detailed drawing of the apparatus is completed
Since the top cover of the supercharged exhaust furnace is exposed to high temperatures, a metal sheet with a thickness of at least 6 mm should be used for its manufacture. There is an opening in the lid for the chimney pipe, which should coincide with the opening at the bottom of the container. Between these elements, a partition made of dense metal sheet is mounted, located near the smoke hole. A pipe is attached to the top of the lid, connecting to the chimney part. The self-production process can be seen in detail in the video of the furnace being tested.
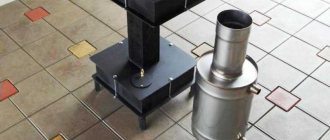
Bowl evaporator
For it, you can take any metal container with sufficiently thick walls that will not be afraid of temperature deformations. In this case, it is a brake disc made of heat-resistant cast iron (1).
We weld the bottom (2) and the lid. Since the design is for a drip furnace to be used for development, we leave a sufficiently wide opening in the lid for supplying fuel (3). A pipe is welded onto the top of the lid, which will connect to the heater pipe through a larger diameter coupling (4). This is done to make it easier to remove the bowl for cleaning. The coupling is made from a pipe of the same diameter of 100 mm, simply by cutting it lengthwise.
How to build your own apparatus based on the Babington burner principle: drawings
The principle of operation of a homemade burner, made based on the idea of Robert Babington, is clear from the drawings, where the components of the unit are visible:
Drawing of a waste oil burner according to Babington.
- waste oil tank;
- waste tray;
- fuel supply pipe;
- a small fuel pump for supplying portions of oil;
- hemisphere for spraying with a small hole;
- heating chamber with heating element (may be missing).
On a note! The testing nozzle is not a mandatory element for organizing the smooth combustion process. It can be successfully replaced by a nozzle - a small hole for supplying an air stream and fuel. To ensure that it does not become clogged, its serviceability must be monitored.
The used oil evaporates and flows down the hemisphere. These oily vapors are mixed with the air mass, resulting in a fuel mixture. The remaining oil that has not had time to be utilized flows into the pan, and from there through the tube back into the fuel tank.
This unit, based on Babington's patent, designed to burn liquid fuel, is quite simple. Therefore, it can be reproduced from scrap parts in a home workshop. Success depends on the exact compliance of the parts with their intended purpose and on the coordinated operation of all components. Therefore, before making a burner with your own hands, you should carefully calculate all the parameters.
The design of the burner is quite simple, so it can be made from available materials. Note! If you take one option as a basis, for example, the Gnome burner, using ready-made drawings and recommendations from craftsmen, it is difficult to make a mistake in the size and functionality of the parts.
Furnace using a gas cylinder
Materials and tools for making a stove
The easiest way to make a furnace is from a used gas, oxygen or carbon cylinder. The cylinders have good wall thickness, thanks to which such a stove will last for many years. A heating unit from one cylinder can heat a room up to 90 m2. This design can also be converted for water heating. A stove from a cylinder will not require forced air supply, and the oil will flow by gravity. To prevent the cylinder from heating up to fire-hazardous temperatures, it is necessary to set the height of the unit contour in accordance with the height of the combustion source inside the device. To make a stove from a used cylinder you need to purchase:
- chimney pipes with an internal diameter of at least 10 cm, a wall thickness of no more than 2 mm and a length of at least 4 m;
- fuel tank with a volume of 8−15 liters;
- burner pipes;
- welding machine and electrodes;
- Bulgarian;
- file;
- steel corners;
- drill and set of drills;
- level and roulette.
Manufacturing technology
up to 1.5 cm thick, filled to the top with water
The top of the cylinder is cut off with a grinder. After the first cut, water begins to flow into the pan or onto the ground. When the water has drained, you can continue cutting the top. Most of the bottom will serve as a chamber, and the cut off top with a valve will become the oven lid.
Using a welding machine, we weld 20 cm “legs” for the stove from steel corners to the bottom of the cylinder. Then the balloon is placed on its “legs”. In the upper part of the sawn-off lower half of the cylinder, we retreat 10-15 cm from above and, using welding, cut a hole for the main exhaust pipe along the diameter of the pipe.
As a hood, you need to choose a thin-walled chimney pipe with a diameter of at least 10 cm and a length of at least 4 m. We insert it into the hole made, hold it strictly vertically and weld it. You also need to make a small hole in the chimney pipe, covered with a plate. With its help you can regulate the air supply.
In the same pipe, at a height of one meter from the floor, a hole is made for a new pipe with a diameter of 5-8 cm and a length of 2-4 m. The pipe is inserted parallel to the floor and welded.
A hole with a diameter of 5-8 cm is cut in the cut off upper part of the cylinder. Recycled oil will be poured into it.
In the upper removable part of the cylinder you can connect a “tray” on which you can heat a mug of water or porridge. To do this, a small square or rectangle is cut out of a steel sheet and welded to the lid. Or it can be installed on a pipe that is parallel to the floor.
Oven operation
Used oil is poured into 2/3 of the container. Then you need to light a sheet of paper, place it on top of the oil and close the oven lid.
After a certain time, the temperature inside the furnace will begin to rise, the oil will evaporate and spontaneous combustion of oil vapors will occur.
After finishing work and cooling the oven, you need to empty it of its contents. Clean the upper removable part from accumulated soot by tapping the lid on the cylinder.
Materials
To assemble a drip furnace with your own hands, you need to prepare:
- used 50-liter gas cylinder with a whole body;
- a two-meter metal pipe with a diameter of 100 millimeters with a wall thickness of at least 3.5 millimeters;
- for the heat exchanger and other small parts - the remains of an equal-flange metal corner with a thickness of 40–50 millimeters;
- a sheet of 4 mm steel or its trim of the required size;
- cast iron brake disc from a car, can be used;
- a regular-sized freon bottle with a needle valve;
- half-meter half-inch metal pipe;
- a hose of the required size, which is suitable for attaching to a ½-inch pipe and clamps;
- half-inch ball valve;
- door hinges and fire door latch.
In addition, pipes of a certain cross-section and a duct fan are needed to assemble an air heat exchanger. You can use a corrugated pipe or components for the chimney. To ensure a high-quality result, you should use drawings of a stove from a gas cylinder during testing.
Installation and first ignition of the device
If possible, the chimney should be positioned strictly vertically, and its length should be 4 meters or more. The exhaust gas exhaust pipe must be insulated. Otherwise, condensation will form. It is desirable that the stove has a collapsible design, especially for the chimney. This will make it much easier to clean the unit when it becomes clogged with soot.
Both mineral oil and its synthetic analogue can be used as the main energy resource. Do not fill fuel more than half the tank capacity. After pouring the waste, you need to leave the lower chamber damper open for a while - this will allow the fuel to be fully enriched with oxygen.
For ignition, use special fireplace matches or a wooden splinter, which is lowered into a container with fuel through a special hole. After the oil flares up, the hole in the homemade furnace during mining is half blocked. This is necessary to regulate the oxygen supply, which ensures uniform combustion of gases in the furnace of the unit.
Heating oil
As we have already said, any type of fuel can be used as fuel for waste furnaces. The easiest option is to purchase used machine oil. Its cost is from 25 rubles per liter. If you try hard, you can find oil at more affordable prices. In this regard, car oil change shops are lucky - they can get it from customer cars (usually no one takes it).
In addition to processing, you can use any types of oils:
Vegetable oil ignites quickly if heated thoroughly. It even causes fires.
- Vegetable - the most common sunflower oil burns well, releasing a large amount of thermal energy ;
- Gear oil - if you are lucky enough to get a barrel of this oil, you can use it to run your stove;
- Synthetic oils are excellent liquid fuels for waste furnaces.
In addition to oil, you may need kerosene to light the stove - it is used in pyrolysis stoves.
The use of gasoline and solvents to ignite stoves is strictly prohibited - they are highly volatile and ignite with pops and explosions. The same kerosene is ignited softly and safely.
Furnace add-ons
When making a drip-type furnace with your own hands, you must remember that it can be supplemented with some elements. This will allow the structure to be used for heating several rooms at once. The stove will have this functionality if it is connected to the heating system. Initially, you need to install a tank for heating water, which must be connected to the system, only after that the return line is connected. Thus, the installation will not only be able to heat rooms, but will also allow heating water and cooking food. A design of this type has many advantages, one of which is its small dimensions, which allow the stove to be dismantled in a short time and then installed in another place. You will definitely need to equip homemade drip-type furnaces with your own hands with a chimney, the height of which should not be less than 4 m. Make sure that the chimney is devoid of horizontal sections. In order to be able to clean the pipe, which will have to be done once a week, you need to equip the element with a system that will allow dismantling.
Read also: Kirchhoff’s second law determines the ratio
Cleanable
It is definitely worth remembering that the chamber where the oil is burned must be made so that it can be disassembled during operation; this is the only way to make cleaning easier. The chimney does not need horizontal sections, since they can impair draft; in addition, there should be a minimum number of inclined sections. It is preferable to make the pipe vertical.