Since the bathhouse has its own specific operating conditions, the requirements for the supporting structure are special.
The article will present arguments in favor of one or another type of foundation for a bathhouse. The reader will also learn how to design and calculate the support base of a structure, what preparation for construction involves, how to build different types of foundations with your own hands and how much it will cost.
When to choose a pile foundation for a bathhouse
The main circumstances under which it definitely makes sense to install a bathhouse on stilts are the following:
- weak and clayey soils;
- high groundwater level;
- light weight of the building;
- no need for a basement;
- economic infeasibility of installing another foundation.
That is, if you want a light wooden building without a basement, then a pile foundation is the best option for such a bathhouse.
However, for heavier baths, you can also consider pile foundation options - especially if you are the owner of a site with difficult soil.
Which base is best?
A sauna measuring 4 x 6 meters in plan is one of the most popular home sauna projects. A compact budget building will fit on the smallest plot of land.
The choice of foundation type depends on factors such as the characteristics of the soil foundation, the complexity of the work and the cost of constructing the supporting structure.
On solid soils, a strip foundation would be the best option.- If the task is how to make a foundation at a lower cost, then install columnar supports.
- In order not to risk the first two options, piles are driven on loamy soils, which, after passing through weakly bearing soil layers, reach a solid soil base.
- In the case of building a bathhouse on a peat bog or swampy soil, a monolithic slab is erected, which, holding the entire structure on itself, will “float” on the surface of the earth.
In the process of designing, calculating and comparing various foundation options, the developer can make the optimal choice in favor of a certain type of basic support for the structure.
Types of pile foundations
Driven piles
- These are reinforced concrete pillars driven into the soil using a hydraulic hammer.
Bored piles
– supports obtained by pouring concrete into pre-drilled wells. Depending on the soil, they can be made without formwork, with formwork or casing pipes. When constructing light wooden or frame buildings, they are economically too expensive.
Driven piles
– the general name for piles made directly in the ground, which also includes bored piles. To make the latter, the method of drilling wells is used, and in general, wells can be made using punching or stamping methods.
Screw piles
– a metal rod with blades for drilling. A simple multifunctional design, ideal for laying the foundation of light buildings on different soils and in difficult terrain.
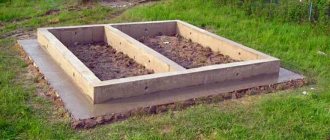
Pile-grillage foundation
– a field of piles installed at the required points, connected to each other along the heads by a grillage. An increasingly used alternative to monolithic strip foundations due to ease of installation and obvious budget savings with full functional compliance with the tasks.
Types of pile foundations
Step-by-step installation instructions
Let's consider the procedure for installing a pile-screw foundation for a bathhouse. We’ll skip the design and calculation process and go straight to practical actions.
The work is carried out in stages, the following operations are performed:
Preparation
The area is cleared of unnecessary objects, plants and other obstacles. It is necessary to provide access routes for equipment if mechanical installation of piles is planned . Purchase and delivery to the site of the required number of trunks of the required size.
You will need the following materials and tools:
- Shovel.
- Roulette.
- Scrap metal and two pieces of pipe, 1.5-2 m each, into which this scrap fits freely, but without unnecessary play.
- Grinder with cutting wheel.
- Welding machine with electrodes.
- Heads for the pile size used.
- Cement and sand for making concrete.
- Pegs for marking.
- Laser level.
- Coating for metal parts, protection of welds.
- Channel, I-beam, strapping rail.
Marking
Using pegs, the installation locations of the piles are marked according to the design data. Marking should begin from the corners, immediately checking the equality of the diagonals . Until they are aligned, marking cannot continue.
The installation points of the piles are marked with pegs. After marking the corners, they move on to the intermediate piles and mark their position. Then, using a shovel and personal courage, small depressions up to 30 cm deep and a width equal to the diameter of the blades are dug at these points.
This will allow the piles to enter the ground more easily and provide less deviation from the vertical.
Dive
Screwing of piles is carried out according to a certain pattern. This is done so that the already installed trunks do not become an obstacle to other supports . This is especially important when installing by machine, where the equipment must come close to the immersion point.
Usually they start from the center and move sequentially to the edges in a spiral or snake.
When driving piles, it is necessary to constantly monitor the vertical . It is especially important to do this at the initial stage, when the barrel swings quite freely and can be installed at an angle.
It is forbidden to twist the pile back for leveling; it is prohibited to install it at this point a second time due to the violation of the strength of the soil after contact with the blades. All corrections are made at first, when the barrel is immersed to a shallow depth.
Trimming, tying, pouring concrete
After installation of all piles, trimming is carried out. A laser level is installed to mark the horizontal plane at the required height, and cutting lines are marked on the surface of the piles with chalk or a white marker.
Use a grinder with a cutting wheel to cut off excess pieces of pipe.
After this, the strapping is performed. All piles are connected to each other in the longitudinal and transverse directions by welding. Pieces of channel, I-beam or other type of rolled metal cut to size are used.
After connecting the piles into a single system, you should immediately paint all welding areas with a protective layer of paint, kuzbasslak or other material.
Then the internal cavity of the piles is filled with concrete. This gives the trunks additional rigidity and resistance to lateral heaving loads. It is necessary to use thick stamps, starting from M200 and above.
Heads are installed and fixed onto the filled piles, forming platforms for installing a grillage and intermediate (internal) supports.
Grillage
For a bathhouse, a wooden beam with a cross section of 150: 200 or 200: 200 mm is usually used. The beams are laid on the head platforms, having previously placed a double layer of roofing felt on the metal . The corners are connected halfway through the tree.
They carefully check the equality of the diagonals, align the beams along their axes, and then fasten them to the heads using specially created mounting holes. Wooden beams should be immediately covered with waterproofing material to protect them from moisture.
In what soil is a pile foundation for a bathhouse recommended?
Technically, piles can be installed in any soil except rocky soil. Another thing is that it is not always economically profitable. For example, on sandy soil you can make a simple shallow columnar foundation yourself.
However, there are soils where professionals recommend building a bathhouse on stilts. We are talking about complex soils in which:
- the soil structure (predominance of clay) retains water well;
- there is unpredictable mobility, as in peat bogs;
- large depth of soil freezing;
- high groundwater level.
Soil for the foundation
Cooperation with us
Our company offers to purchase and install screw supports in Moscow and the Moscow region on a turnkey basis. We are not resellers or intermediaries, so the prices for our piles are lower than market prices. All work is carried out according to the generally accepted algorithm and includes the following stages:
- assessment of geological and geodetic features of the area;
- project development;
- marking the territory at the point of future construction of the house;
- delivery and installation of piles, trimming, strapping and additional anti-corrosion treatment.
All work is carried out in a short time - 1-3 days, taking into account the size of the construction site. You can order a pile foundation for a log house from us by calling the phone number listed on the website. Our managers will tell you about the range and prices of the products we sell and help you place an order. The visit of a specialist to the construction site is free.
Why pile foundations for wooden baths are the most popular
Obvious savings in completely different buildings.
Frame baths
- the lightest. For the foundation in this case, as a rule, screw piles are used, which are considered the most cost-effective option.
Baths made of timber
heavier, so it all depends on the weight of the building and the soil. Screw and driven piles can be used.
- profiled timber is not the heaviest material, so for the foundation of a not too large bathhouse, piles without a grillage are usually sufficient;
- glued laminated timber is heavier and in this case a pile-grillage foundation is preferable.
Log baths
- heavyweights among wooden buildings, which is the reason for the more frequent preference for driven or bored piles. As a rule, with a grillage.
It must be taken into account that even for fairly heavy log baths, a pile-grillage foundation will be cheaper than a strip or slab foundation. Especially in difficult soil.
Pile foundation made of wood
Types of piles and which ones are better to choose
There are different types of screw piles:
- Single or multi-blade.
- With cast or welded tip.
- With or without protective zinc coating.
In addition, they differ in the diameter and length of the barrel and the type of blade. The choice of screw piles is made based on the properties of the soil and the weight of the building.
For an ordinary family bathhouse, measuring 6:4 m, made from rounded logs or timber, weighing about 5-7 tons, single-bladed screw piles with a diameter of 57 or 76 mm are quite suitable.
Their permissible load per unit reaches 1 and 2 tons, respectively, which is quite acceptable for such a building.
NOTE!
The smaller the diameter of the trunk, the easier it is to immerse it in the ground with your own hands.
Pile-grillage foundation for a bathhouse
Recommended in cases where the weight of the building is quite large. The grillage allows you to evenly distribute the load, relieving stress from individual supports.
In addition, experts always use a grillage in moving soils - this makes it possible to strengthen the foundation.
Of course, it is necessary when building a bathhouse made of bricks or building blocks - individual elements that require laying on a supporting structure.
Pile-grillage
Preparatory work at the construction site
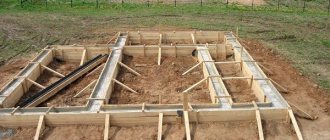
When the project for the future bathhouse is ready, the initial marking of the site is done before construction begins. All debris is removed from the designated area, then the turf is removed (usually a layer of 10–15 cm). If there are roots of trees or shrubs left in this place, they must be completely removed.
An example of the layout of small baths
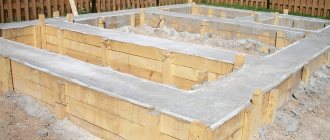
The uneven area must be leveled - the holes must be filled in, the protrusions must be cut off. The site is cleared with a size slightly larger than the design size - 1 meter on all sides. Then markings are made for the foundation for the bathhouse using pegs (rods) and a cord.
To mark the future bathhouse, you need to drive pegs or metal rods into the four corners, then stretch the cord around the perimeter. From it you need to measure the planned width of the foundation and drive 4 more rods into the inner corners and pull the cord. The correctness of the markings can be checked by stretching the cords diagonally. If they are the same length, then the angles are exactly 90 degrees. If their length differs by more than 3 cm, then such a distortion may be noticeable later during the construction of walls and installation of the roof.
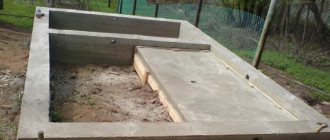
Combined pile-slab foundation for baths
It is used when there is a need to construct a basement or a swimming pool is planned in the project.
This can be a foundation with a recessed slab, which will serve as the floor of the underground floor, or with a slab laid on the heads of piles (for example, in the place where there will be a pool or font).
In addition, such a combined pile foundation for a bathhouse is recommended in very difficult soils.
Combined pile-slab foundation
Disadvantages of screw piles
This is primarily due to the quality of the metal from which the structures are made, as well as compliance with the technology for protecting parts from rust. It is very important that the manufacturer carefully observes all established standards during the manufacture of structures (steel grades used; compliance with pipe wall thickness), and also carries out high-quality anti-corrosion insulation of products. Pipes immersed in the ground are negatively affected by stray currents, which accelerate metal corrosion and shorten their service life piles
Why is a pile-screw foundation for a bathhouse in great demand?
Let us immediately clarify that we are talking about lightweight buildings - usually frame or not very large ones made of timber. In these cases, the popularity of saunas on screw piles is truly deserved. And there are several reasons for this:
- easy to install;
- does not require a large amount of excavation work;
- reliable, since the piles are precisely installed at the required depth and even at the desired angle (if necessary);
- in most cases, screw piles for a bathhouse are the most budget option.
Pile classification
Design
Near reservoirs and in areas with frequent flooding, they tried to raise objects above the soil surface, for which purpose they drove logs into the ground, placing them in the corner sections of the structure, under walls and partitions. For such piles, hard wood was used, which could resist moisture for a long time.
Larch was considered the best option, as it gained additional strength from water.
Nowadays, pile supports made of wood are used quite rarely, but the foundation of such supports turns out to be the most profitable and quite reliable.
In modern construction, twelve options for pile supports are known, but for low-rise buildings they use one of three:
- driven reinforced concrete;
- screw metal;
- bored.
Foundations on reinforced concrete piles are very rare, because to install such supports you will have to hire special equipment. But with such pillars the foundation is the strongest.
The screw version is good for screwing in - this work can be done manually. The disadvantage lies in the material of manufacture - metal is capable of conducting heat. You will have to install additional insulation to make walking on the floor comfortable.
When constructing a pile foundation on your own, in most cases, preference is given to the third type. Bored piles, although they are considered the most labor-intensive option for installation, provide an opportunity for good savings.
Why tie piles under a bathhouse with a pipe or channel?
Purely for reliability. Installing a reinforced concrete grillage will take longer, be more difficult, more expensive, and it is not always justified from a financial point of view. But tying the piles with a pipe or channel will provide both reliability and budget savings.
This approach will distribute the load, protect individual piles from loosening, strengthen the foundation, and increase the load-bearing capacity.
Installed piles
Rectangular piles
Round piles
Floor installation in a bathhouse on screw piles
It is distinguished by the need to insulate the space under the building (basement) and careful waterproofing of the junction of the piles or grillage with the floor.
The simplest option for insulating a basement is to close the space between the piles (intakes) with brickwork, beams or panel structures, leaving holes in them for ventilation (vents).
Another popular method is a hinged structure attached to a grillage or frame.
Otherwise, the non-spillable floor in a bathhouse on stilts is made as standard - either a concrete screed or a wooden floor with good heat and waterproofing.
But it should be borne in mind that despite all the reliability and durability of the concrete screed, this option significantly increases the weight of the bathhouse on stilts. In addition, it does not warm up well in winter.
Floor on screw piles
Log house
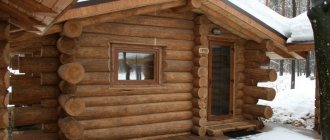
A log house is the walls of a house made of solid logs. In the corners of a wooden house, logs are connected into so-called crowns. At the bottom of the log, a piece of wood is cut out the width of the transverse diameter of the log. Wooden elements in the corners of the house form locking systems that do not require additional strengthening. This confirms the popular expression - to build a house without a single nail.
Such houses are most often built in areas where timber is available to consumers at a low price. Such places include Central, Eastern Siberia and the Far East. Although it is worth noting that the popularity of building private houses from solid wooden elements has increased widely in all regions of our country.
The low specific gravity, excellent thermal insulation qualities, durability and environmental friendliness of wood are an undeniable advantage over other building materials.
Installation of a pouring floor in a bathhouse on stilts
This is the simplest design, when boards with a gap are placed on the joists and water flows through the cracks into the pan and further into the drain. A significant disadvantage is that without insulation, such a floor can only be used in the warm season.
How to make a pouring floor in a bathhouse on stilts so that you can steam all year round? This will require the construction of a subfloor with hydro- and thermal insulation and the organization of a concrete screed with a drain hole on it. Logs and pouring floor boards are placed on top of this structure.
Installation of a pouring floor in a bathhouse
How to correctly calculate the number of piles for a bathhouse
First of all, you need to decide on the construction project and the material from which it will be made. The heavier the sauna on stilts, the smaller the distance between the supports. It is permissible to install piles in increments:
- up to 3 m for light frame baths;
- up to 2.5 m for baths made of timber and logs;
- up to 2 m for heavier buildings made of building blocks or bricks.
Next, only attentiveness is important, and the principle of arranging and counting piles is the same.
- supports are placed under each corner of the bathhouse;
- piles are added at the intersections of partitions in the bathhouse;
- at least two supports are installed in the place where the stove is planned;
- Piles are placed along the contour of all walls with the necessary spacing.
That's it - all that remains is to calculate the required number of supports.
Important!
Calculations are always made to the advantage of reliability. That is, it is correct to add supports, and not to increase the step if the piles do not fit comfortably into the drawing.
Calculation of the number of piles
How to make a foundation on bored piles
The first step is to mark the perimeter of the future building on the site. Then it is very advisable to remove the top layer of soil with vegetation over the entire area and fill it with crushed stone. Many people don’t do this; as a result, the plants under the house rot and spread “odors.” Even worse, parts of the rot can get onto the wood, and this contributes to its spread (maybe impregnation will protect, but why take the risk).
Then, using pegs and cords stretched between them, mark all the lines along which the piles will be located. In this case, you need to ensure that the marking pegs are positioned vertically (usually using a plumb line). You also need to check that the laces are stretched horizontally (this is done using a building level). Having arranged everything, measure the diagonals of all the rooms. Deviations should be minimal - a few millimeters, no more. This is the only way to be sure that during construction everything will be as it should be.
It all starts with ground work - removing the soil, then you need to mark the house plan with pegs and cords
Calculation of the number of piles
To lay the foundation, wells are drilled around the perimeter, into which piles are then installed (poured/driven). The number of piles for each project will be different. When building and planning with your own hands, proceed from the following rules:
- The distance between piles should not be more than 2 meters.
- Be sure to have supports at the corners of the building, as well as in places where partitions extend away. Next, place supports between these nodes, based on the fact that the distance between them should be less than 2 meters.
But 2 meters is for a one-story bathhouse made of lightweight materials. If you are going to install a bathhouse on two floors, you need to install supports more often. The distance is also affected by the bearing capacity of the soil. If it is dense, you can place it less frequently; if it is loose or unreliable (peat, wooded soil), place it more often.
The depth of wells on heaving soils is calculated based on the depth of soil freezing in winter: 30-50 cm must be added to this value. When installing a pile foundation on unstable soils, the installation depth of the supports depends on the depth of the dense layer that can withstand the load. The support should fit into it at least the same 30-50 cm.
Well preparation
Wells are made at the locations of the piles. When building private small houses/dachas and bathhouses, this is done using hand drills. Their diameter is about 20-30 cm. Choose the one you see fit. The drill handle is usually composite, which is why you can use it to make holes up to 4-6 meters deep.
Hand drill for drilling wells with blades of different diameters
Bored piles come in two designs: with an expanded base (heel) and without. The “heel” located below increases the chances that the building will not move during heaving. Therefore, it is advisable to make such an extension. There are drills with a folding knife for this. When you reach the desired depth, release the wide knife by pulling the special lever.
Several buckets of crushed stone and sand are poured into the drilled wells and compacted (alternately, first crushed stone, then sand). On top of the sand layer is concrete with gravel backfill, which will serve as a support (sole or heel - whoever says what).
Before the solution hardens, formwork is immersed in it, into which a reinforcing frame is then inserted and the whole thing is filled with concrete.
Formwork for bored piles
It is not so important what material the frame into which the concrete will be poured will be made of. The most common option is asbestos-cement pipes (diameter greater than 200 mm).
These are metal screw piles
The use of asbestos-cement pipes is not necessary, but it is desirable: they do not rot, have sufficient strength, and their outer surface is smooth enough, which allows the piles not to change their position when the soil swells (i.e. your bathhouse will not tilt).
It is advisable to coat the underground part of the asbestos-cement pipe with a mineral-based (construction) lubricant. This will prevent the pipe from freezing to the ground.
Instead of an asbestos pipe, you can install a steel pipe (you never know, maybe someone has a lot of them), but they must be well primed and painted, otherwise they will quickly rust and collapse.
Some people use plastic sewer pipes of suitable diameter as formwork. The choice is not bad: they tolerate being in concrete and are not afraid of moisture. The surface is very smooth and slippery, which will not allow horizontal heaving forces to move them from their place.
There is another option for piles: make formwork from roofing felt. This material is wound in two or three layers, fastened and used as a frame. To make your work easier, you don’t have to worry about the diameter of the pipe every time, find yourself a pattern. It is more convenient to wrap the roofing material onto a large-capacity water bottle. The main thing is to find the appropriate diameter. Having rolled several layers, you fix the roofing material, and take out the “pattern” by the handle and you can make the next post.
This is how you can make permanent formwork for piles from roofing felt
It’s just not very convenient to fasten roofing felt. Previously, they used wire, but it is easy to pinch, and its area is small. More convenient with tape. Only he doesn’t want to stick to the sprinkles. Helping the problem is simple: use a stiff brush to clean off the crumbs in the right places (if there are any), then wipe with white spirit. After drying, the tape sticks perfectly.
Sliding formwork can be used. To do this, a pipe with a diameter of at least 20 cm is formed from a sheet of iron, plastic, thick cardboard or roofing felt. Handles are attached to the top of it. The formwork is lowered into the hole, reinforcement is inserted, the space around it is filled with coarse sand, and it is thoroughly compacted. Concrete is poured inside the formwork. Shaking the formwork, lift it up by the handles by 40 centimeters. Add sand from the outside, tamp it down, and pour the next portion of concrete. This is how the pile is prepared for its entire length. This, of course, is a very economical option, but in terms of strength and reliability it is much inferior to piles with any formwork. The fact is that without a protective layer, cement laitance can (and usually does) leak into the soil. As a result, the concrete has insufficient strength.
Reinforcement
Reinforcement scheme for bored piles
To give the piles greater strength, three or four reinforcement bars are inserted inside. Diameter 8-10 mm (you can play it safe and take 12 mm, but this is clearly overkill). They are tied together with thinner reinforcement and knitting wire to form a frame. The distance between the longitudinal rods is chosen such that they are all at least 5 cm from the wall.
Pouring concrete
This structure is installed inside the pipe. The space around the pipe is covered with soil or crushed stone with sand, compacting it thoroughly and making sure that the pipe stands vertically.
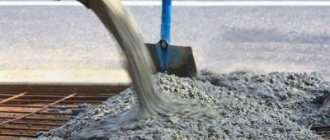
The last stage in the manufacture of a bored pile is filling the pipe with concrete. For this purpose, a cement-sand mortar is usually made. Its composition is as follows: for 1 part of cement (grade no lower than M300), take 3 parts of medium-grained sand, mix it all dry. Then water is gradually added. Its quantity is slightly less than 1 part: the solution should be like thick sour cream.
To increase the strength of concrete, it is necessary to remove air that could get into the solution. To do this, take a long pin (reinforcement rod), pierce the freshly poured solution, then rock the rod from side to side. Do this on each support several times. As a result, air escapes, the solution settles a little, it must be added to the required level.
Immediately try to make piles of the same height - there will be less work later. It is much easier to remove/add a little bit of fresh solution than to knock off/cut off the excess later. Having made them all the same, level the surface. Grinding hardened concrete is also not the greatest pleasure.
It is better to process the mortar in piles using a submersible concrete vibrator. In addition to increased strength, it will also become frost-resistant.
Finishing work
A cap is installed on top of the finished pile - a sheet of steel, on which roofing felt can then be laid. Actually, that's all. The pile foundation created by yourself is ready. If necessary, attach a grillage (beam 200*200 mm or larger, impregnated with antiseptics) to the finished supports. After a few days, you can begin building the walls.
If necessary, the tops of the piles are tied with a grillage. It is needed if a brick, block or frame bathhouse is being built.
To make it easier to attach the grillage or the first crown of the log house, studs are inserted into the concrete before it hardens. After the solution has set, holes are drilled in the right places on the timber/log, and it is simply pushed onto these studs. There is another option - steel heads with a U-shaped plate are installed. But such fastenings are more expensive, and they do not differ in strength. Perhaps, install adjustable heads so that when certain piles settle, the difference can be corrected.
If you are planning to make the grillage out of iron, then you need to use steel pipes as formwork. In this case, it will be more convenient to install screw piles, but they are expensive, and it is also necessary to monitor the quality of their manufacture and painting. In this case, it is better to take galvanized ones - they last longer.
The distance between the finished piles is then filled with concrete or concrete/wood beams are installed and secured together. This is done to prevent wind from blowing under the floor.
Pros and cons of pile foundations
There is no point in arguing with the popularity of using piles for a bathhouse, since the combination of functionality and cost is extremely convenient. But still there are disadvantages.
Pros:
- simplicity and high speed of foundation installation;
- lack of a large volume of earthworks;
- suitable for a wide range of soils of different composition, including difficult ones;
- Possibility of installation on uneven terrain;
- screw piles can be installed at any time of the year;
- reliability with correct calculation of all technical components;
- budget-friendly cost.
Minuses:
- in suburban construction they are used for fairly light buildings;
- creating a basement is impossible or extremely difficult;
- incorrect calculation can lead to subsidence of individual piles, so here it is better to trust the specialists;
- not used on rocky soils.
The main advantages of screw piles:
- Ease and speed of installation - heavy special equipment is not required to install a pile foundation. The design does not require preliminary preparatory work for the installation of wells. Cost-effective - foundations for log houses made of screw piles are much cheaper than classic versions of concrete foundations. Reuse - if necessary, piles can be unscrewed from the ground and used in the construction of a new facility. Durability and stability – a pile foundation ensures high strength and stability of the building, especially with possible soil heaving in winter. Possibility of use on any soil, including water-filled, sandy, peat or clay. Use on any terrain.