The screed for a warm water floor is a simple cement pour. It is called roughing and is done to level the surface, prevent heat loss, and pipe deflections. In addition, it affects the durability of the finishing layer, which is poured on top of the heating system. It can be laid in three ways. Let's talk about them first.
Types of screeds used
There are three types that are suitable for installing a water heated floor system. Each of them has advantages and disadvantages.
Dry
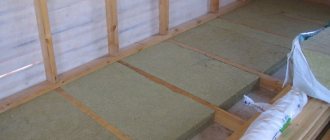
The presented species is considered common, consisting of expanded clay. The base material is foamed with vermiculite, polystyrene foam or perlite. Convenience lies in self-installation, since it is enough to scatter the dry screed and level it. The surface is covered with a sheet of plasterboard or chipboard. An important condition here is the use of only moisture-resistant material.
The advantages include simple and quick installation, good sound insulation. Workers have the opportunity to lay out a finished floor the very next day. The use of this variety reduces the load on the slabs by 2 times.
The disadvantages boil down to the possible appearance of mold, which occurs due to the ingress of water. A dry screed cannot withstand a large load - this is explained by the use of chipboard and gypsum boards. Therefore, it is not recommended to install additional partitions. Owners of apartments and houses note the presence of characteristic rustling sounds when walking during the first time of use.
Wet
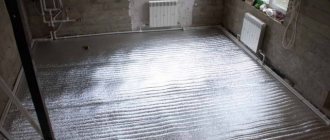
Water-heated floors are usually placed on a wet screed . This is a cement-sand mortar or concrete mixture, which is diluted in accordance with the proportions of the purchased products. The work requires accuracy and attention, so self-installation is not always undertaken. Suitable for floors with ceramic or stone finishes. Requires precise surface leveling. Otherwise, finishing will be carried out with errors and geometry violations.
The benefits are as follows:
- This type is stronger, so it is recommended to use it when constructing additional partitions in the room.
- Can be used as a finishing coating indoors. After it is completely dry, it is enough to paint the floor in the desired color.
- High sound and thermal insulation.
The disadvantages include the laboriousness of the process and the large weight of the resulting layer. Therefore, it is not recommended to use the presented type of screed in panel houses. They have weak floors, and heavy weight can lead to cracks in the wall. They also note that it takes a long time to dry, which significantly complicates the process.
Attention! To prepare a wet screed, additional equipment will be required. You can rent it or request it from friends.
Semi-dry
A semi-dry screed is not much easier to lay than the wet version, since here you will need a pneumatic blower, a mixing machine and a grinder to work. The mixture is presented in the form of a sand-cement composition, which is difficult to level over a large area. With self-installation, you can do without additional equipment, but only if small areas are being repaired. Otherwise, laying out the floor evenly will not be possible at all.
The advantages of the semi-dry variety are the following factors:
- The light weight of the cement mortar ensures safe living in an apartment building.
- Finishing can begin after 2-3 days, since during this time complete drying is achieved.
- Moisture resistance, good sound and thermal insulation.
The only negative aspect is the need for additional equipment for repairs. If you can rent it, then there shouldn’t be any problems with the semi-dry screed.
Is it possible to make a water heated floor without a screed?
Not every foundation can support the weight of a poured floor. In addition, the installation of a concrete base cannot be carried out if the room has low ceilings, when the deadline for the completion of the project is pressing, or the owners who carry out the repairs with their own hands do not have enough skills to work with building mixtures.
In such situations, various dry styling technologies are used. The most common and easiest option is to use ready-made polystyrene tiles with bosses.
The material is laid out on a surface that is leveled and cleared of small fractions and dirt, secured together with adhesive solutions, after which you can begin assembling the heating system according to a pre-developed scheme. Next, the entire surface is covered with plastic film, on top of which GVL sheets are laid, which are the basis for the floor covering - laminate or linoleum.
This technology allows you to minimize the height of the room, minimize the load on the floor and reduce the delivery time of the object, and also carry out all the work yourself, without the involvement of expensive specialists.
Materials used in work
To install a water heated floor, you can mix the materials yourself and get a solution of the desired consistency. To do this you need to prepare:
- sand with a fraction of 1.8-2.00 mm;
- Portland cement - categories no less than M-400;
- plasticizer - at the rate of 1 liter per 100 kg of cement used;
- polypropylene fiber - added to the desired consistency, up to approximately 900 g per batch;
- water in the right quantity.
The presented materials are kneaded until smooth so that there are no lumps. If the mixture does not work, it is recommended to use a mortar pump. The resulting composition is used for one and a half hours for its intended purpose, in accordance with the installation techniques for water-based underfloor heating.
This mixing method helps save money, and the resulting solution is not inferior to the properties of purchased ready-made compounds.
"Semi-dry" method
There is much less water in the solution for the “semi-dry” method. If the mixture is made correctly, it will be moist but not runny.
They check it this way: squeeze a little semi-dry solution in your palm. It should form into a plastic lump without cracks. This is the consistency of a factory-made solution. It is more difficult to level, but then you can rub it to a shine, and ultimately get a surface that is dense and durable in structure.
If you order such a solution ready-made, you need to explain for what purposes it will be used. This concrete layer can withstand heavy loads. It is of higher quality than when laying concrete using the “wet” method.
You will have to rub it very carefully; this requires skill and patience. You will need a long grater or trowel. Semi-dry mixtures from screenings are practically not amenable to smooth grouting, so it is ground with sandy mortar.
Thickness under system
Before installing a water heated floor yourself, you should learn all the technology, including what thickness should be under the pipes. In this case, adhere to the following recommendations:
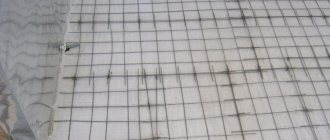
- It is necessary to lay out a rough fill under the pipes. It is carried out efficiently, since to correct errors the entire floor will have to be dismantled. Almost the entire load is placed on the roughing. The presence of errors leads to the destruction of the entire coating. There is heat loss, pipe breakage and destruction of the finish coating.
- You can make the composition for rough filling yourself. For this, sand, cement and plasticizer are used. You can purchase a ready-made bag of dry mixture.
- For rough finishing, a plasticizer is used at a rate of 1 liter per 100 kg of cement. If it is not available, it is enough to use PVA glue; a similar amount is required.
The screed should be laid under the pipes in a layer of 2.5-3 cm. You can do a little more if you plan to clutter the room, including an additional partition. But you should not make a layer more than 4 cm, or less than 2 cm. Otherwise, the laid floor will begin to break.
Device requirements
All requirements for the device are specified in SNiP, which allows you to make a high-quality floor. The following criteria are adhered to in the question presented:
- The minimum thickness is 2 cm. The given value applies to rough and finishing coatings. If additional sound insulation is used along with water pipes, the thickness increases to 4 cm.
- The thickness should prevent any deformation. Otherwise, the finishing coating will collapse. Since the water floor requires the use of copper pipes, the top screed should be made thicker.
- The solution is made from cement and sand with the addition of PVA glue or plasticizer. The strength of the finished composition should be 25 MPa. The minimum value is 15 MPa. If the finishing layer is a polyurethane self-leveling floor, which is then simply painted, it is enough to make the mixture with a strength of 20 MPa.
To check the flatness of the coating, it is recommended to use a special level 2 m long. In this case, there may be unevenness of up to 2 mm if the finishing coating is parquet, laminate, linoleum or a self-leveling floor based on a polymer mixture. If other coatings are used, unevenness of 4 mm is allowed.
Attention ! The presence of recesses will not interfere with the further installation and operation of the finishing coating. If there is a “hump”, it is removed with a grinding machine or other method.
Rough laying technology
The rough screed should be treated with all responsibility, so tools and materials are prepared in advance. To work you will need:
- a mixer for kneading the mixture (can be replaced with a drill) and a wide, deep container;
- beacons, level, spatula and rule for controlling and ensuring the laying of a flat surface;
- cement, sand and water are the materials for mixing.
The following instructions are followed during the work:
- If the room is being completely renovated, it is necessary to first plaster the walls and ceiling. It is important to do this before pouring, since the plaster will fall and the surface will have to be leveled again.
- All drain holes and other fittings are covered with polyethylene or masking tape. If there are cables, they are clearly fixed.
- It is necessary to remove all debris from the floor surface. It is important to remember that even a small speck can lead to subsequent damage.
- Next, beacons are installed, which are secured with alabaster.
- Prepare the mixture for pouring - combine cement and sand in a ratio of 3:1. Add water until a thick mixture is formed and a plasticizer in accordance with the above recommendations.
- The prepared solution is immediately poured between the beacons, distributing it evenly and evenly over the surface. The mixture must be compacted to release air. If it remains, the layer will crack when it dries.
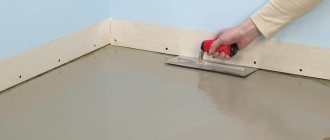
- A rule is used to level the surface. The movements should be wave-like, towards you.
Then you should close the room. An important condition here is that there is no penetration of light or draft into the room. After a day, polyethylene is placed on the floor, which increases the drying speed. Leave the material to dry completely for several days.
Attention ! It is better to let the bottom layer dry for 3-4 weeks if the technology presented above is used. This will provide a certain guarantee of protection against cracking.
Finish laying technology
The technology for laying out the finishing coating is no different from the above. The only difference is the thickness, as well as the necessary check of the laid water floor equipment. It is recommended to use one of the methods here.
The first method is to bring the system to operating temperature. First, heat the water to 20 degrees Celsius. Leave in this state for 3-4 hours, after which the temperature is raised by another 5 degrees. If there are leaks, they are eliminated in any available way. Then turn on the system again. This is done several times over 2-3 days, leaving the system turned on for several hours. You can leave the heating element at elevated temperatures for a day. If there are no leaks during this time, proceed to pouring the finished floor.
The second method is to increase the pressure in the pipes. They do this 2-3 times in a row at once, after which they leave it in this state for a day. The absence of leaks allows the finishing screed to be filled.
To test the water system, you must first attach the pipes. In the event of an emergency, this will help the master avoid big problems.
Please note : Craftsmen recommend sketching the created water-based heated floor system before finishing pouring. In the future, this will help in repairing pipes if a leak occurs.
Preparing the base
The technology of laying heated floors requires careful preparation of the surface for installation. Initially, a capital screed is installed, which allows you to smooth out all the unevenness of the base. This is especially true for cases with large elevation differences. If this is not done, air pockets will form, negatively affecting the warm water floor system. After this, additional layers are installed to improve the performance of the system - heat, hydro and vapor barrier. They can be used as polyethylene films, waterproofing mastics, polyethylene foam insulation, etc.
All components must be positioned correctly relative to each other. In this case, the technology for laying water heated floors under the screed will not be disrupted, therefore, it will be possible to obtain all the positive properties and characteristics during operation. Even the pouring process will not create difficulties due to poor foundation and the quality of its preparation.
Nuances and secrets when styling
Craftsmen can share their experience gained over years of work and pouring screeds under water-heated floors. The following recommendations will help novice professionals or home owners:
- The presence of cracks or chips on the dried surface prohibits laying out the next layer. It is necessary to repair any defects that have arisen. This is done by pouring additional mixture.
- Waterproofing is always required in the bathroom and kitchen. The finishing layer is laid on top of the waterproofing layer.
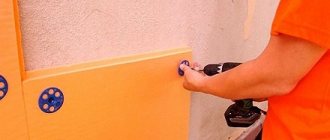
- When using the dry variety, it is better to additionally use thermal insulation. It is also installed in a private home, which provides additional comfort for the family.
- The screed should dry under protection from sunlight. Therefore, you should hang thick curtains on the windows; it is better to use blinds.
- The surface must be clean and dry before pouring the mixture. This will prevent cracks from forming.
- It is recommended to coat the surface with a primer. It forms a film, therefore providing a water-repellent effect and making the mixture adhere to the surface more firmly.
Compliance with the presented nuances will help you avoid mistakes when working independently. It is recommended to take technology into account and use expert advice.
Possible errors during installation
Newbies at work or simply men who prefer to do home repairs themselves often make mistakes. They boil down to the following factors:
- incorrect and inaccurate setting of the level and beacons - leads to the formation of waves on the surface;
- failure to comply with proportions increases the risk of cracks;
- thin layer - leads to cracking of the finish coating;
- no expansion joints - recommended when working in a room larger than 20 square meters. m, otherwise the finishing coating will be destroyed;
- the surface is not reinforced - it is better to reinforce the screed layer to prevent cracks;
- improper care (before the cement layer dries) also leads to the formation of cracks.
Which screed for a water floor is better, everyone can determine for themselves. When choosing, you should be guided by the advantages and disadvantages, technology features and precautions. Otherwise, the topcoat will not withstand constant use.
Necessary purchases
In order to install a water heated floor under a screed, you must purchase the necessary materials. The most basic thing is the system components, which include pipes, a heating boiler, a manifold group, etc. You will need to lay a layer of thermal insulation underneath. Various insulation materials can be used, but the final layer thickness should be in the range of 80-100 mm. Only in this case, even a basement without heating will not allow heat to be transferred to its side. It will all be directed to the base of the floor in the room.
For the screed, you will need to purchase materials in the form of sand and cement for preparing the mortar, or ready-made mixtures that greatly simplify the entire pouring process. The cost of additives to the solution is not high, but they significantly increase the reliability and strength of the entire structure.
In addition to this, you may want to consider hiring a construction team to carry out the work. But in this case, there must be funds available to pay for their services. The most important thing is that the end result will be a high-quality and efficient design of a warm water floor system.