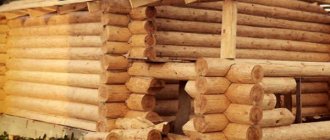
If you decide to build the log house yourself, you will need to decide how you will connect the logs or beams at the corners. You will also need to understand how, if necessary, to join two logs or beams in length and insert a partition.
Regardless of what the frame is made of, there are two types of corner joints:
- with a remainder (or release) - this is when there is still some piece of log or timber behind the junction;
- or without any remainder.
When cutting with residue, there is a fairly large waste of material. Each remainder is at least 20-25 cm. These “tails” in one crown take 160-200 cm. The consumption is quite considerable. But on the other hand, such a cutting is called a “warm corner”, precisely because with normal caulking they do not dry out.
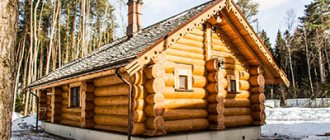
The corner in the log house can be with or without remainder
Cutting a log house without residue is more economical in terms of material consumption during the construction stage, but in this option the corner is the most freezing place. Also, with this method of connecting logs and beams in the corner, even small errors greatly affect the quality. Therefore, increased demands are placed on the quality of cutting bowls.
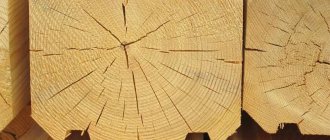
There is a big difference in the technology of constructing a log house from logs and timber. The logs have a round shape and without processing it is impossible to join them tightly. Therefore, a recess is made in the lower or upper crown - a groove, into/on which the next log is laid. This increases the surface of their contact. It is the width of the groove that is the actual thickness of the log wall. How warm the wall will be depends on the shape of the groove and the accuracy of its execution.
With timber everything is different. Since the planed one has almost the same dimensions, and the profiled and glued ones have no “almost”, and their edges are flat, no adjustment or groove is needed. Therefore, the entire assembly of a log house from timber consists of forming joints in the corners. Inter-crown insulation (jute, tow, moss) successfully copes with blocking small inconsistencies. As a result, a log house is built many times faster.
Butt-butt
Is the easiest way. One beam is joined at the end to the side of the other. Each subsequent row is shifted, covering the joint itself. This method is considered not very reliable, and the corners may become blown out over time. Therefore, it is not recommended to use the method for residential buildings, but for outbuildings it is quite possible.
Butt joint of timber Photos from open sources
Fastening the crowns of the log house
A crown is one row of timber laid in a rectangle and fastened at the corners. They make up the walls of the building, its foundation. The beams must be fastened together very carefully, both in corners and in straight sections, so that they do not rotate around their axis or shift. This is possible even if the beam is rectangular in cross-section. Iron nails cannot be used for wood - they will not withstand the load and conditions of use. Wood has a certain moisture content, which will cause the iron to oxidize and break down over time. And then the house itself will fall apart.
When constructing log houses, wooden nails are used - dowels. They can be round or rectangular in cross-section, but preference is given to round ones. As the timber structure dries and shrinks, it creates less stress. The dowels must be placed strictly vertically.
On straight sections of walls, holes are drilled at regular intervals of 1.5-2 m, into which the dowels are driven. It is customary to retreat approximately 50cm from corners and openings. Then the top row is combined and installed. To make the task easier, the crowns are assembled on the ground in sections of several rows. For corners, there are several ways to attach timber.
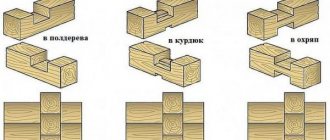
To the floor of a tree
One of the most common corner joint methods in construction. Its execution is accessible to a carpenter without much experience. The procedure involves cutting symmetrical straight notches from the end sides up to half the thickness of the lumber. Then the beams are laid on top of each other with their sawn sides.
Connecting a timber “to the floor of a tree” Photos from open sources
Support Modifications
The range of supports offered by manufacturers allows us to solve the following problems:
- Rigid T-shaped end fastening of the timber to vertical and horizontal surfaces;
- Laying corners without connecting locks and inserts;
- Connection of timber “end to end”;
- Sliding mount for rafters;
- Installation of vertical structures.
To solve the above problems, fastenings have different designs, can be open or closed, and are distinguished between right and left. Detailed information about the configuration and standard sizes is presented in catalogs, price lists and on the website of the hardware manufacturer.
Rectangular support brackets
Mounting on a support-bracket
Rectangular support brackets allow you to fasten building parts to various surfaces or make corner connections. Such fastenings are used for installing joists, installing ceilings and internal partitions. Fasteners are made from solid galvanized metal sheet 2.0-2.5 mm thick by cold stamping.
The support brackets are L-, Z- or U-shaped. L-shaped products can be right or left-handed, Z-shaped ones are used for multi-level installation. In U-shaped brackets, the timber is installed in the internal space and fixed with self-tapping screws; the landing dimensions correspond to standard sizes of lumber. For ease of installation, the working surfaces of the brackets are perforated with holes of different diameters for various fasteners. Depending on the weight of the structures and the design load, several holes can be used for fasteners.
Supports for timber, open and closed
Beam support closed and open
The edges of the sidewalls of the U-shaped brackets are bent at right angles and form two mounting strips (flanges). The planks can be bent inward or outward; in this design, the support brackets are called closed or open. Closed beam supports will allow timber to be laid in rows with minimal gaps, while open beam supports are used for fastening joists and load-bearing beams. Open beam supports are installed on brick or concrete surfaces and secured with screws. Closed-type supports are attached to a wooden surface with self-tapping screws.
End to end connection
Connection to MZP
Reliable end-to-end connection of timber is provided by nail plates; the product is a metal plate 1.0-1.5 mm thick with spikes 8.0 mm high. Spikes are formed as a result of cold stamping using a special stamp; 80-100 spikes are formed on one square decimeter of surface. The plate is installed on the side surfaces of the mating parts with the tenons down, the tenons are completely driven into the wood. The model range is coordinated with the standard sizes of lumber.
Sliding supports for rafters
The sliding support is installed correctly
The sliding support is not installed correctly
The beam supports for the rafters have a complex design, consisting of two parts fastened together. After attaching the rafter leg to the load-bearing element (mauerlat), a play of 50 to 80 mm is maintained in the support unit, allowing the rafter structure to move freely in the vertical plane. The use of such a compound counters the negative processes caused by shrinkage, snow pressure and seasonal deformations of wood.
Sliding support brackets are manufactured in open and closed versions from galvanized steel sheet 2.0 mm thick by cold stamping.
Embeds and driven ones
The support is installed during concreting
Embedded and driven supports are used for the construction of lightweight foundations, canopies and fences. The basis is a metal U-shaped profile or a similar welded structure; a pin, a welded cone or a piece of pipe is welded to the back side. The structure is installed in a concrete base or driven into the ground, the stand is secured in a vertical position with bolts through through holes in the U-shaped profile.
In the paw
From the end sides of the beams, symmetrical oblique grooves are cut out, up to approximately half the thickness, with expansion towards the end. This method allows you to prevent windage than in the case of conjugation “into the floor of the tree”. If the cut is made in such a way that the opposite edges are parallel to each other, then the conjugation is called “straight paw”.
Connecting timber “into the paw” Photos from open sources
Which option is better when building a log house?
It’s impossible to say unequivocally which assembly technology – a warm corner or a bowl – is better. With qualified installation, they will have approximately parity in terms of thermal performance indicators: both options have low thermal conductivity and are not blown through.
Therefore, the microclimate in the house, if at all, depends on the choice of timber assembly method, but not too much.
But there are other aspects:
- When installing a bowl, the cost of purchasing material increases due to the formation of a protruding part on each beam. The cost increase is not too large, but on a large-scale project it can be noticeable.
- A house or cottage assembled in a warm corner is more economical in terms of materials. But the construction itself will take longer, and a more qualified team of builders will need to be involved in the work (with a corresponding difference in wages).
- It is also worth considering whether your own thermal insulation of a timber frame is enough for you. If the thickness of the walls is insufficient to retain heat in the house, you should choose a warm corner. This way you can install external insulation - either immediately at the construction stage, or later, if it seems to you that the effectiveness of thermal insulation is insufficient.
When choosing a method for assembling a log house between a bowl and a warm corner, you need to take into account the appearance of the building. The option with protruding parts of the beams is closer to the classic log house, while the design with even plane joints looks more modern. But in any case, the final result - both externally, attacks and in terms of operational performance - will depend on the quality of the design and assembly of the structure.
Dovetail
A type of “claw” connection. The joints in the connecting nodes are made in four planes, each of which has an inclined cut. The result is the shape of a complex trapezoidal prism. This method turns out to be quite durable and airtight, preventing the corners from diverging both inward and outward.
Angular connection of dovetail beams Photos from open sources
Tenon and groove (warm corner, root tenon)
A groove is cut out on the side of one beam. A tenon is cut out on the end of the other. It is necessary to take into account that when joining, it ends up on the inside of the wall being built - this way the corner of the wall allows less warm air to pass through from the room. The advantage of this method is that the corner becomes windproof.
Timber connection “tenon-groove,” “root tenon” or “warm corner” Photos from open sources
Construction technology has its own variations that provide more reliable fixation of the timber in the groove and eliminate the possibility of separation under loads or during the period of shrinkage of the log house.
Half a frying pan
The spike is made in the form of a rectangular trapezoid. Including, it is applicable for joining internal walls and is also called “half dovetail”.
Connecting timber with a “half-frying pan” Photo from open sources
Skovorodniy
The spike is made in the form of a symmetrical trapezoid. It is most often used for joining internal walls, as well as splicing, and is also called “dovetail”.
Connection of timber with a “frying pan” or “dovetail” Photo from open sources
Connection with remainder
The corner of the frame laid in the bowl is called a connection with the rest; this technology is used in the construction of log houses, less often - buildings made of timber. The corners of such buildings have a kind of angular crown formed by the ends of logs or beams protruding 300-500 mm beyond the edges of the building. The logs are laid in rows at an angle of 90 degrees, and at the joints a round recess is cut to fit the size of the log. When using timber, the recesses are made rectangular. The process is called chopping into a bowl or into an oblo - this is how it sounds in the Old Russian language. To improve adhesion, a longitudinal oval with a depth of 30-40 mm is cut along the entire length of the log. The most common options for assembling crowns:
- In the clap - a recess is cut down only on one side of the workpiece to the depth of half a tree, the top log is laid (clasped) in the clap, the castle is formed by the recess and the log laid in it, turned 90 degrees. This solution became the standard for bathhouses, sheds and outbuildings;
- In okhryap - the simplest type of connection, in this case, rectangular recesses are made on each workpiece, a quarter of the wood deep. After this treatment, the logs will fit tightly into the notch.
Less commonly, more complex connections are used for the construction of a log house: a “Canadian bowl” of a triangular shape, a lock “in the tail” with an additional ridge. Such connections of the crowns provide a tighter fit to each other.