Saunas are always built with one purpose: rest, relaxation and strengthening the body's immune system. Regular visits to the sauna also guarantee cleansing of the body from toxins, is an ideal preventive measure in the fight against infections and colds, and thanks to intensive blood circulation, the skin becomes more elastic and saturated with oxygen.
Perhaps every Russian dreams of having his own sauna or bathhouse. But in the case of apartments, there is simply nowhere to put it (and it’s dangerous from a fire safety point of view). But in the case of your dacha or country house - here God himself commanded. If the plot allows, you can build a small wooden bathhouse in its corner, and if you have an extra room, you can build a sauna right within the walls of your own home.
Bathhouse in the house: pros and cons
A bathhouse in the basement has not only positive, but also negative aspects that should definitely be taken into account:
- An attached or basement bathhouse is beneficial. In addition to convenience, it should be noted that there are savings on the construction of an additional bath room. There is no need to spend money on laying the foundation, walls and arranging the roof; a bathhouse in the basement does not require all this. The basement space will be used to the maximum advantage, and the land plot will not be cluttered.
- Communications for arranging a heated floor in a steam room can easily be connected from a home boiler (read: “How to make a heated floor in a bathhouse from a stove - device diagram”).
- When installing a steam room in a house, it is important to carefully consider the installation of the ventilation system. Otherwise, increased humidity and fungal formations are inevitable. For safety reasons, you will have to additionally install a drainage system and fire-fighting equipment.
- It is more difficult to install a sewer drain system in the basement. You will need to dig a hole in the basement floor large enough to accommodate the waste water tank. In the future, the contents will have to be pumped out of it using a pump and sent to the main sewer.
- Building a separate structure for a steam room is better because you can build a second floor and equip it as a holiday house.
- In the basement, a steam room stove is often installed with an electric one, since a wood-burning stove is considered a fire hazard. If, however, the bathhouse is built on the ground floor and a wood-burning stove is provided, then it is extremely important to responsibly approach the installation of a powerful exhaust system. In the end, what is better is a bathhouse in the house or separately, it is a matter of personal preference.
Furnace installation
In modern saunas, electric stoves are most often installed. You can buy them in a specialized store or assemble them yourself. But in fact, it must be installed and connected correctly.
The oven is selected based on the parameters of the steam room, that is, its volume. Calculations carried out by specialists from sauna equipment manufacturing companies show that for high-quality heating of one cubic meter it is necessary to spend 1.4 kW of energy. A simple arithmetic calculation shows that, for a steam room with a volume of 5 - 9 cubic meters. m, it is enough to install a stove with a power of 6 kW. Such a stove can operate on a 220 V network. Furnaces with higher power must be connected to a 380 V network.
In addition, there are certain restrictions on installing a stove in a steam room. So a 6 kW oven must have safety zones - at least 70 mm on the sides, 100 mm in front. To connect it, you will need to install a 35 A fuse.
How to set up a home steam room
As already noted, a steam room in a home can cause some difficulties with wastewater drainage and ventilation. But besides this, there are some other aspects of the arrangement that require no less attention - these are hydro and thermal insulation. Now let's talk about everything in order.
Stages of building a basement steam room:
- Before you set up a bathhouse, you need to think about everything, build a wooden frame, which will later be sheathed with insulating and finishing materials. It is advisable to make the bathhouse small, then the power of the installed stove will be required.
- At the insulation stage, it would be good to use a material such as mineral wool. The thickness of the layer for the ceiling is 10 cm; laying occurs perpendicularly in two layers. To insulate the walls, you will need a thickness of 20 cm or more. This stage is necessary to preserve heat in the steam room and save on the power of the heating furnace. It would be a good idea to use mineral wool with an already provided layer of waterproofing. Important note! Insulation materials such as polystyrene foam are prohibited from being used in bathhouses for fire safety reasons.
- The arrangement of a bathhouse or sauna also requires a vapor barrier. To do this, you will need thick-layer polyethylene or heat-reflecting insulating material, which is important to be tightly and firmly attached to the frame with a construction stapler. The joints must be coated with a waterproofing compound and taped.
Important notes! When making the frame, it is important to strengthen the places where the shelves will be attached and the stove will be located. Read also: “Correct arrangement of a bathhouse FROM AND TO.”
Finishing work for the bathhouse:
- Tile is always chosen as a floor covering for a bathhouse or sauna. It would be a good idea to additionally make a floor grate from smooth wood beams. Important note! Before decorating the walls, it is necessary to lay the wiring. Wires are selected that are resistant to thermal loads of more than + 170 degrees.
- It is necessary to attach slats on top of the vapor barrier layer on the walls to provide a small free space between the decorative sheathing and the insulation layers.
- The final finishing of the steam room is made from lining (10-12 mm). Using pins (the step between fastenings is 30 cm), the planks are attached one after another. The joints are closed, if desired, with decorative molding. Important note! Before finishing the steam room, it is advisable to leave the lining for a day in the room of the future bathhouse, so that the planks get used to the humid climate.
- The installation of shelves at the top and bottom follows the same principle. For greater comfort, you can make the lower shelves removable or, in extreme cases, retractable. Installation work is carried out using stainless steel screws. But the caps of the consumables will be hot during steam procedures. To avoid accidentally getting burned, you should slightly deepen the screws into the thickness of the planks.
- The next step is to install the door. It can be wooden or glass, but it must swing outward. For aesthetic purposes, it is advisable to finish the door in the same way as the walls. The handle for easy closing is made of wood; no lock is required.
- For lighting, special lamps with increased insulating properties are used, and they are screened from above with a grille.
Insulation of sauna walls
The walls of the steam room are insulated from the inside. A vapor barrier material is laid on a pre-prepared base; it can be bitumen paper or other material with similar properties. Vapor barrier sheets are laid with an overlap of 150 mm. To increase the reliability of fastening these sheets, either clamping slats or stapler staples are used.
The frame for installing thermal insulation is made of timber with a section of 50x50 mm. The pitch between the slats determines the size of the insulation. In order for it to fit into the cell as tightly as possible, the dimensions of the latter should be somewhat smaller than the size of the insulation mat.
By the way, holes must be made in the slats that are installed in the frame to create hidden wiring and ventilation.
A dry pipe (fire extinguishing agent) is placed in the hole and stretched along the entire perimeter of the steam room.
Installation of stove and chimney
When installing furnace equipment, it is important to follow all fire safety measures, as well as manufacturers’ recommendations. One of the important measures is the installation of a protective thermal screen on the wall behind the stove. The stove is attached to a pre-strengthened frame using the parts provided in the package. It is advisable to create a protective fence around the stove so that you do not accidentally get burned on it.
If a wood-burning stove is provided, regardless of whether the bathhouse is in the house or separately, you will need to install a chimney. It can come out through the roof slab or along the wall outside. A sandwich pipe or an ordinary stainless steel pipe is used as a chimney, but in this case it will need to be insulated with mineral wool (5 cm thick).
Insulation is done from the side of the room to increase draft. There should also be a hole under the pipe to drain condensate. The upper zone of the pipe must be covered with a deflector to prevent accidental fire or backdraft. Where the chimney pipe passes through the wall, a metal nozzle must be provided, which is filled inside with non-combustible material, expanded clay, for example.
Naturally, it is best to provide for the construction of a bathhouse during the initial construction of the house. However, this is not always possible, so the described method of arranging a steam room is a good alternative.
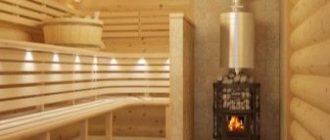
Arrangement of sauna walls
It is advisable to use lining for covering wall surfaces. It can be made of pine, linden or alder. Each of these types of wood has its own advantages. Linden has a pleasant appearance and, thanks to its properties, it has a positive effect on human health. This tree has long been used for the construction of baths. Lining made of alder is capable of retaining heat well, however, it does not heat up so much and this reduces the risk of getting burns when coming into contact with it. But it has a significant drawback. Alder is soft wood and even a slight blow will leave dents on it.
Pine is most often used for arranging saunas and baths. During the heating process, pine releases many substances beneficial to humans.
The process of finishing a steam room is as follows. The lining is cut to a size corresponding to the height of the steam room. To extend the service life of the lining, it can be treated with special compounds.
How much money does it take to build a bathhouse? Do-it-yourself sauna - savings, pros, cons
Owners of suburban areas often consider self-construction an option to save money. There is no need to hire a team, or even contact a construction company, whose services are not cheap - from drawing up a building project to final finishing. The owner-developer only loses personal time, and money will be required to purchase materials.
This option looks attractive, but you should think carefully about it, because not everyone will be able to:
- make the calculations correctly, it’s not for nothing that companies use design documentation to build even a miniature bathhouse;
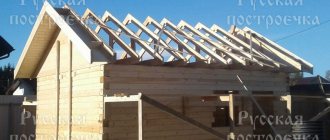
- It’s purely physically necessary to lay out the foundation, assemble the walls, install the rafters and roofing work, and then there’s also the finishing touches ahead along with the installation of the stove, windows and doors;
- choose materials yourself without falling for the bait of unscrupulous suppliers and sellers at construction bases.
To do the job you will need a tool that is unlikely to be lying around in someone’s closet. But if these difficulties do not scare you, be patient and move forward!
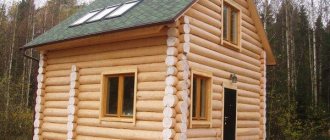
Building a 3x4 sauna with your own hands from timber is not as difficult as it seems, if you carefully think through everything and provide for it. If you doubt your ability to calculate correctly, purchase a ready-made standard project or order an individual one. The documentation will indicate the required dimensions and values. There is also the option of purchasing a ready-made house kit - this will reduce the number of expensive tools for the work and simplify assembly.
Among the advantages of self-construction are savings and full compliance with the result. The owner will carefully monitor compliance with the rules and requirements, while unscrupulous assemblers “from the outside” may “mess up” in an effort to simplify their work, or even purchase substandard materials and pocket the saved difference. The downside is that the developer does not have the extensive experience that professional carpenters have, so construction will be delayed.
Saving
The cost of timber or a finished house kit depends on various factors. This includes the type of wood, the degree of humidity, and the pricing policy of the manufacturer. Let's consider a cheap and common option - pine with natural humidity, average price on the market, cross-section - 150x150 (so that there is appropriate heat in the steam room even in winter).
The cost of a house kit is calculated in rubles per cubic meter. Under the conditions described above, the lower level is 9-12 thousand rubles/m. cube A bathhouse with dimensions of 3x4 meters will require about 5 cubic meters of timber (without internal partitions), the exact amount depends on the cross-section of the lumber. The total cost of the finished house kit will be 55-65 thousand rubles. But don’t be fooled, these are just walls. The foundation, roof, rafter system, and interior decoration still remain.
If you plan to do all these stages of construction yourself, there will be savings. But is it worth it? Preparing the foundation is not an easy task. Even a columnar foundation will require an investment of time and effort. The cost of installing the base is one third of the final cost of the bath. Roof – another 15% of the price of the finished building.
When the frame of the log house is ready, you will need to invest in finishing, interior and floor partitions, as well as doors and windows. Let’s not forget about the stove, because it also costs money. Total: the cost of construction will be 130-170 thousand rubles. Construction companies will charge more - from 200 thousand, the cost of work by coven workers will seem lower - from 150 thousand, but in this case additional operations will be required, the cost of which will be announced to you during the process. Private teams carry out such a scheme - they inform the potential client of a low price for construction, after which, already in the process of work, they talk about the need for additional thermal insulation, inserting casing boxes, and installing swarms. In this case, the customer has nowhere to go and continues to pay. It is not uncommon for such a cheap construction of a bathhouse or house to actually cost more than in large, reputable companies.
Ventilation
The bathhouse must have an adequate ventilation system. Mechanical ventilation is considered the most effective and expensive.
Supply and exhaust ventilation. Inlet openings are installed in the lower part of the walls and in the area of the stove. The exhaust vent is located on the opposite wall under the ceiling. To eliminate the influence of the wind rose, a fan must be installed in the hood.
For a DIY device, the easiest option is natural ventilation. The simplest ventilation system is a hole in the wall leading to the ventilation system of the house or directly to the street.
Documents for construction permission
The first thing you need to know: the planned extension of a bathhouse to a house is considered a reconstruction of a residential building . And permission is obtained specifically for the reconstruction of a permanent structure (a residential building is a permanent structure).
However, a free-standing bathhouse is also considered a permanent structure, and permission must also be obtained for it. (Although not always, there is some kind of loophole that allows you not to take a construction permit , but then still register the already built bathhouse - in order to install electricity, water, gas there.)
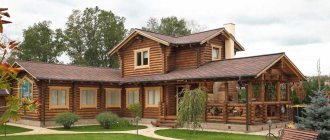
House with sauna and terrace. Photo ProSIP
To obtain permission to reconstruct a residential building, you must go to the regional BTI . Take the following documents with you:
- a document confirming your ownership of the site (or a long-term lease agreement with the right to build);
- an application for reconstruction written by the owner of the site or an authorized representative (+ power of attorney for this person);
- general site plan;
- a renovation project that includes existing and planned buildings.
The package of documents will be reviewed within 10 days , and as a result, permission will either be given or denied. If permission is received, it is valid for 10 years. If it’s a failure, try a new project, taking into account the complaints.
What should you consider first? When a project is submitted, they will look at what building materials you indicated there . Therefore, you need to know the fire safety requirements (more about them below) and draw up a project so that it complies with all of them.
Now about registration. It is produced by municipal authorities. A completed construction is registered. This is done to secure ownership of it.
List of documents for registration:
- passport of the owner of the site;
- land ownership document;
- application for registration of a building, which contains the actual address of the land plot;
- design documentation for construction - with all building materials, dimensions, equipment and other details;
- a list of communications to which the building is connected, along with engineering diagrams.
IMPORTANT! Check with the BTI whether the reconstructed residential building with an extension will need to be registered, because it already has registration before the reconstruction. The above exactly applies to a free-standing bathhouse.
The design of a bathhouse attached to a house can be done independently or ordered from a design organization.
Extension to the bathhouse at home
No matter how funny it may sound, this option is also possible. For example, if we are talking about a guest house.
So, what standards apply if the owner of the site decides to add an extension to the house to the bathhouse? The bathhouse is a permanent structure , therefore a large-scale extension that makes it a residential building must also receive permission from the BTI.
What you need to know about the foundation
Until you built the house, the soil underneath had the same properties, but the violation of its integrity, the pouring of the foundation, the load of the built house - all this changed them.
The zone within which a change in soil properties occurred does not exceed a couple of meters from the boundary of the building .
Stabilization of the soil after a house is placed on it lasts from 3 to 5 years. During this time, you should not place anything next to it, especially on a connected foundation.
Once it is established, you can build. But it is advisable that the project be carried out by specialists who can calculate how much weight the future extension will be, how much, on the one hand, it will sink the soil, and on the other hand, resist the forces of frost heaving, which tend to push the foundation out of the ground.
Of course, a lot depends on the soil itself . Some people are lucky and have sandy soil with coarse sand and gravel. And others have heaving clay, for example. Therefore, you need to know the geology of the site.
And the foundation for the extension of the bathhouse is selected according to the depth, design and material in accordance with the type of soil, the depth of groundwater, as well as the depth of soil freezing in winter. See the section on types of foundations.
ATTENTION! It is better if the groundwater is at least half a meter below the base of the foundation. If higher, then think about drainage.
This means that bathhouses are usually placed on a shallow strip foundation, but it is unlikely to be suitable for an extension to a house.
Firstly, because it is very desirable to build such a bathhouse from non-flammable material, and it weighs a lot , even if it is aerated concrete.
Secondly, because a shallow foundation is laid
above the freezing depth of the soil , and therefore, the forces of frost heaving will act more actively on it if the soil is heaving.
And it is better not to consider options for connecting the bathhouse to the house through the foundation or just the roof. Everything is fine when the foundation is laid at the same time and for both buildings at once. Therefore, it is recommended to pour the foundation immediately, taking into account all subsequent additions, if they are planned, and to implement them as funds and other opportunities become available.
If the foundations are laid at different times, and even more so at different depths, then their vibrations in the ground will not coincide in any way. It follows from this that it is best not to make a connected foundation of the house and extension.
But what's wrong with a single roof? If two foundations rise to different heights, but at the same time have a common roof, stresses will arise in the roof, which will lead to the destruction of the most stressed structural parts .
It is easier to add a bathhouse to an old house. It’s also easy to get to a house with a wide, warm blind area. In both cases, changes in the soil around the house will not have the same effect on the foundation of the bathhouse.
ADVICE! Of course, we have simplified a lot here, but the best thing you can do for yourself is to talk to specialists. So the project will be competent, the BTI will accept it, and there will be no need to expect destruction over time.
Useful video
Here is an example of the fact that it is still possible to attach a frame bathhouse to a house - we had no doubt about the technical reality of this, but the video says nothing about the resolution. This extension looks like this:
And here is another video that shows some techniques that can increase the fire safety of a bathhouse attached to a house. See if something from another person's experience will be useful.
The following video was recorded by a professional builder with a decent amount of work experience and the mental activity associated with it. That's why it's valuable. See if you also tend to think carefully about your decisions before getting down to business.
*** When writing this article, we encountered gaps in knowledge about the legal part of construction. Like most land owners, we believed that garages, bathhouses, sheds and verandas were the owner’s personal business. It turned out that the state thinks differently. It’s very interesting how many of our readers knew about permits and registration of buildings, sign up below if it’s not difficult!
Which steam room is better based on health requirements?
The choice between a bathhouse and a sauna should first of all be dictated by the state of health of the owner of the house and all members of his family. It is advisable to undergo examination by doctors before using one of the types of steam baths. This is especially true for people with diseases:
- Of cardio-vascular system;
- Gastrointestinal tract;
- Lungs and respiratory tract;
- Skin;
- Kidney and liver;
- Muscles and joints.
The most important differences between a bath and a sauna for health are temperature and humidity. The latter figure is lower in the sauna, where the atmosphere is very dry (about 30%). But the temperature in a Finnish steam room can reach 120 °C. For people with diseases of the cardiovascular system, a bathhouse would be more preferable. The temperature is lower (about 70 °C) and the humidity is higher (90-100%). For men and women with kidney and gastrointestinal diseases, a sauna is suitable, as it warms up the body better. We must not forget that in a Finnish steam room a person always relaxes and is in complete peace, and in a Russian bath he washes.