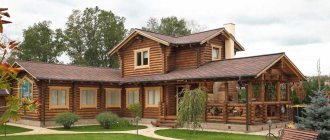
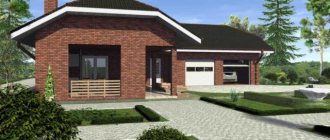
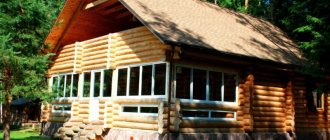
Baths and any steam rooms traditionally enjoy well-deserved love among our fellow citizens. More than a dozen generations have grown up on bathhouse traditions, and today it is more of a way of pleasant relaxation than just bathing procedures. If you start designing the construction of a bathhouse on your own plot of land, then why not make a full-fledged complex for comprehensive relaxation? We are talking about equipping the bathhouse with a beautiful terrace, and at the same time providing space for a barbecue area.
Advantages
A bathhouse with a gazebo under one roof has a number of advantages:
- Economical from a financial point of view. The construction of a combined structure, as a rule, is several times cheaper than the construction of two unrelated buildings. This is due to the fact that the gazebo and bathhouse have the same foundation and roof. Moreover, it will be possible to save on paths that lead to buildings.
- The ability to minimize time and effort costs. There is no need to pour an extra foundation and maintain additional paths.
- The construction of a combined building does not require additional lighting. The annex can be powered by electricity from a panel located in the bathhouse.
- There is no need to strain to get from the bathhouse to the gazebo. You just need to open the door and go out.
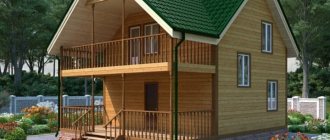
Types of baths with gazebos
The design of a bathhouse with a gazebo can be anything, there are a lot of them, but such structures are usually roughly divided into two types: open and closed.
The first option is a simplified design with a combined floor and roof, the roof of which is mounted on special supports that can be combined using curbs or railings.
They are intended to mark boundaries. If we take the financial aspect, then this option is much more profitable because it does not require the construction of large walls and partitions. Also, such a project excludes glazing work, because an open gazebo is a common area under a roof.
Of course, you won’t be able to protect yourself from the wind in such a gazebo, but you can protect yourself from the rain. Based on this, it becomes clear that open gazebos are a seasonal pleasure.
Closed gazebos are full-fledged buildings because they are equipped with thick walls and large windows. The building, which includes a bathhouse and a gazebo, will look monolithic.
This building is very comfortable, especially if you equip it with a fireplace or barbecue. You will be able to spend time in it not only in warm, but also in cold periods.
Pile foundation for the terrace
If you plan to make a terrace with wooden flooring, you can get by with an easy-to-make pile, drilled-rammed foundation. One note: this foundation will perform well in areas with low groundwater levels. If groundwater is close to the surface, it is better to make a shallow columnar one.
It is most convenient to use pipes. Metal ones are expensive, and they also need to be carefully treated to prevent rust; asbestos-cement ones are the most acceptable option. Some people install plastic sewer lines. Despite the low strength of such formwork, it can be a good option. After all, the plastic is smooth, and it will be difficult for the emerging lateral forces of heaving to “catch” it. And they are the most difficult to deal with: they are almost not calculated.
In any case, the diameter of the pipes is about 20 cm. The pitch of installing the piles depends on the type of soil and the load on the terrace. On average it is 1-1.5 meters.
This is what a pile foundation for a terrace and its piping looks like schematically
Wells are drilled in the ground below the freezing depth of the soil. Approximately 15-20 cm of crushed stone is added and the crushed stone is compacted. Insert the pipes, placing their upper edges at the same level. To make installation easier, you can throw a couple of shovels of crushed stone inside the pipe.
Vertical installation is checked with a plumb line; alignment along planes is easier to do using stretched threads. To do this, reinforcement bars are driven in at key points, they are also positioned vertically, then cords are tied to mark the lines for installing the pillars.
Schemes for reinforcing pillars under the foundation
Two or three reinforcement bars (diameter 8-10 mm) need to be driven into each pipe. They must first be connected to each other. You can use any sufficiently flexible and strong wire that will allow you to hold the rods in a given position. The reinforcement must be positioned so that each rod is at least 5 cm from the wall. This way they will be inaccessible to moisture and oxygen, which is why they will not rust.
After installing the reinforcement, you can fill the piles with concrete mortar. To give the structure increased density, it is necessary to achieve homogeneity of the solution. In this case, you need to use a submersible vibrator for concrete, with a flexible shaft and mace length of 1.5-2 meters. As a last resort, you can pierce the concrete. They take a thick rod of reinforcement, pierce the concrete right through, and then shake it a little. This removes air bubbles. Do this immediately after pouring. As a result, the solution settles a little, you have to add a little. Another option is to knock on the pipe, but preferably either with a rubber mallet or a wooden mallet (so as not to break the asbestos, since it is quite fragile).
How to attach the harness
After the concrete has set, wooden blocks of the lower frame are attached to the posts. It is better to take timber 150*50 mm or 75*150 mm. Before laying, they are treated with impregnations and antiseptics, if desired, tinted with stains and always covered with varnish or paint. Paint and varnish products are used for outdoor work. It will reliably protect the wood from atmospheric influences.
Joist mounting options
To prevent moisture from penetrating through the concrete to the wood, a layer of waterproofing (regular or euroroofing felt in two layers) can be laid on the tops of the piles under the bars. There are no problems with attaching the joists to the concrete. You can do this in several ways:
- when pouring piles into concrete, drown the studs, and then “string” logs on them; Such plates are used to attach logs to the timber.
- fasten with steel corners using large dowels;
- they use U-shaped galvanized plates (there are two models - one is attached with dowels to the pile, the second has a pin that needs to be sunk into the concrete when pouring).
More difficulties arise when attaching the joists to the building: this operation is not often required. A reliable option is the following: attach the beam to the wall at the required level (do not forget to process it). They are fastened with studs (for example, M12*1000), wood grouse or anchor bolts (with a diameter of at least 10 mm). The installation step of the fasteners is 50-60 cm. To make the fastening more durable, they are installed in a zigzag pattern - one higher, the other lower. To prevent water from flowing between the wall and the timber, seal the joint with silicone sealant.
The logs and all other elements are attached to the beam with special fastenings made of galvanized iron (see photo).
The height of the terrace flooring should be slightly lower than the floor in the bathhouse or house. Approximately 25 mm. This will prevent water from flowing into the house. To make it easier to navigate, you can measure the height of the window sill in the room from the floor. Then, on the outside, mark a level 25 mm lower, then lower the level even lower, but this time by the thickness of the board (if you are using a board 25 mm thick, then in general the support beam should be nailed below the floor level in the house, not 50 mm).
Therefore, they begin to install the harness by attaching the support beam to the wall, and they are already guided by it when installing the harness and joist. The same block can be used when setting the level of piles (the piles are placed along the lower edge of the beam).
The terrace flooring should be located 2.5 cm below the floor in the house
To two bars - one on the wall, the second on stilts - transverse bars - logs - are attached. Their installation step is 40-60 cm. After fixing the logs, you can nail the flooring to them. It can be made from edged boards, or from a special terrace. It differs in that a wave-like profile is formed on one side. This surface is not so slippery even when wet.
What to think about before construction
Before building a bathhouse combined with a gazebo, you need to think about some details:
- About waterproofing walls, especially general.
- About how you will protect the bathhouse from a possible fire.
- About how many people will be in the gazebo at any time of the year.
- About how many people will use the constructed structure.
Construction Features
The structure can be erected on any foundation, even a columnar one, but in advance you need to remove the layer of earth and turf, as well as remove all possible obstacles.
It is extremely important to remove all tree and plant roots. The post holes must be equipped with a sand cushion, and the concrete that will be laid on it must be reinforced in advance.
Once the concrete has hardened, a pillar foundation must be placed on it. To get it you need to use ceramic bricks or blocks. For bonding, you can use a solution of sand and cement.
What kind of foundation will be under the terrace?
For terraces with wooden flooring, a columnar foundation is often made - it is easier to manufacture and cheaper. For areas finished with tiles or porcelain stoneware, an insulated slab is needed; if the finishing is paving slabs, they can be laid on a profiled membrane and a backfill of crushed stone and sand. This is perhaps the most inexpensive and fastest option.
A pile foundation for a wooden terrace is not very expensive and labor-intensive
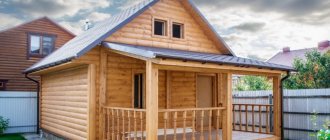
A pile foundation requires less expense, but only requires the installation of wooden support posts on which the roof will rest. Such barbecue terraces often have a low wooden fence. These projects “fit” well into the traditional style: they are attached to walls made of logs or timber.
Bathhouses designed in a modern style often have open terraces with tiles (ceramic or paving) lined with finishing stone. But for brick or stone pillars, it is necessary to make a shallow slab foundation with insulation. In winter, on heaving soils without insulation, not a single finishing material will hold up, and the slab may crack (and, most likely, it will). Without insulation, you can make a foundation for a terrace only on dry sandy loam soils that are not prone to heaving.
What would such a terrace look like?
Construction
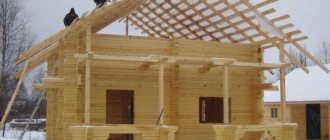
- You should start with a log house: make a frame for it, and lay a layer of roofing material on top.
- Place the first rows. It is advisable to do this on centuries-tested soil.
- During the process of laying the log house, you can tie the dressing room.
- Start tying the gazebo, while building the foundation of the future dressing room. Only hewn logs can be used for the gazebo, but the stands are made of small blocks.
- For example, let's take a hip roof, so after installing the base, you can immediately nail down the rafters. To do this, it is necessary to precisely align the corner braces of the hip so that the rafters fit as they should.
- Cut each corner into a single tooth, and punch the joints using perforated tape.
- Completely cover the floors.
- Start filling the sheathing so that after a while you can install metal tiles on it. While the roof is covered with one or more layers of roofing material.
- Proceed to sheathing the dressing room.
- Insert the windows into the pre-prepared holes. It’s better to insert them right away, but you can wait with the door. As for the railings and balusters, they must be sealed, but an exit must be left to the place where the barbecue will be installed.
- Now you can start painting the bathhouse. Color is at your discretion.
- After the paint has dried, you can begin installing the door. It is advisable to trim the bathhouse with clapboard.
- All! All that remains is to take care of the interior of the erected structure. Decide where the chairs will be installed and where the table will be.
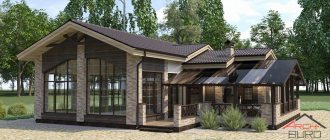
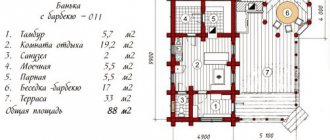
To understand what should happen in the end, you should look at the photo of the bathhouse with a gazebo.
How to build a slab for a terrace with a barbecue with your own hands
The construction of any foundation begins with earthworks. First, select soil to the width of the planned terrace, plus fifty centimeters. This half a meter is used to create a protected insulated blind area. It covers the side of the stove and prevents it from freezing.
This is what a slab base for a terrace looks like schematically
The depth of the pit depends on the region, the degree of heaving of the soil, and the thickness of the finishing.
It is recommended to use high-density extruded polystyrene foam (EPS) (at least 35 kg/m3) as insulation for the slab base. It has excellent heat-insulating properties, does not rot, does not absorb water, is not damaged by rodents and insects, fungi and mold do not develop on it, and it is also resistant to mechanical stress. For central Russia, the thickness of polystyrene slabs should be about 100 mm.
Connecting the terrace to the house
How to connect the base of the terrace to the foundation of a bathhouse or house is shown in the figure. Please note that SPA anchors are not a required part. If the slab insulation is properly carried out, there will be no shifts or movements. Even if the entire terrace is covered with bricks. But for your own peace of mind, you can install them.
Option with drainage pipe for areas with high groundwater levels
Bedding
In the pit for the terrace, the remaining soil is leveled and compacted. A substrate of crushed stone (middle fraction) 10-15 cm thick is poured and compacted. It’s better not to do it manually, but with a vibrating plate - the result will be better, there will be less shrinkage. At this stage, the formation of the slope begins to create a blind area. From the edge of the terrace, at that same 50 cm, the crushed stone is leveled so that its layer becomes thinner towards the edge.
Crushed stone is necessary to create a drainage layer
If the groundwater level is high, a drainage pipe is laid in the crushed stone. It should be located at a distance of 20-30 cm from the foundation of the house. Its function is to drain water that has fallen under the slab. 10-15 cm of sand is poured onto the compacted crushed stone, leveled, spilled, and also compacted to a high density (when no trace of the boot remains). Here the slope for the blind area is also preserved.
Waterproofing and insulation
This is a modern waterproofing material - a profiled membrane.
It has high reliability, and at the same time, due to the uneven surface, it compensates for heaving forces. Waterproofing material is pricked on top. In a budget option, this is a dense polyethylene film (density 200 microns higher), but it is advisable to use other waterproofing materials, in particular, polymer membranes. They are much stronger and more durable, and due to their uneven surface they partially compensate for the loads of winter heaving.
The width of the waterproofing should be decent: one edge should extend approximately 10-15 cm onto the wall of the building, the second should cover the entire width of the blind area (the second edge is not fixed, then sprinkled with soil).
Expanded polystyrene insulation boards are laid on the waterproofing. If the insulation thickness is 10 cm, it is better to take five-centimeter thick slabs and lay them in two layers, overlapping the joints of the lower row with sheets of the upper one. Expanded polystyrene is also laid in parts of the blind area, but here the thickness of the insulation is 50 mm (in this area the slope “from the foundation” is maintained).
Another layer of waterproofing is laid on the insulation, its width is the same, one edge is placed on the foundation of the bathhouse. Both films are fixed together with a clamping bar.
Reinforcement and filling of the slab
Now formwork is placed around the perimeter of the terrace (exactly along the perimeter of the terrace, excluding 50 cm for the blind area) - a board more than 100 cm high, reinforced with posts or jibs, you can sprinkle it lightly with soil. The reinforcement is laid out on the brick halves. They will provide a distance of 5 cm from the edge of the concrete slab.
When creating a reinforced frame, do not forget that reinforcement is required for each column or post. It is bent with the letter “G” and two such rods are tied in the right place
For reinforcement, rods with a diameter of 6 mm are used. They are laid in increments of 100 mm both lengthwise and crosswise. They are tied at the intersections with knitting wire. Having finished making the reinforcing frame, concrete mixture is poured into the formwork. The thickness of the mortar layer is 10 cm. It can be made standard: 1 part cement, 2 parts sand and 3 crushed stone, less water than cement.
How to make slab reinforcement and what you need for this, read the article “How to knit reinforcement with your own hands: devices and methods.”
To increase the frost resistance of the slab, it is advisable to treat it with a concrete vibrator. Since the depth is shallow, you will need a surface model (you can rent it for a few hours).
Curing
After setting, the surface is covered with film. If the weather is hot, the stove is sprayed with water for several days. The next day after pouring, wetting is abundant, and on all subsequent days it is moderate. In addition to the film, you can cover the stove with something that does not allow light to pass through - uneven heating can cause cracks to form. If additives that accelerate the setting of cement were not introduced, then finishing can begin in three to four weeks.
The formwork can be removed a week after pouring. After this, soil can be poured over the blind area (extreme 50 cm) and leveled. If you wish, you can then sow grass or plant flowers - that’s up to you as you wish.
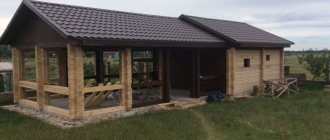
Third variety
A bathhouse with a gazebo and barbecue has a very important advantage - it serves as a kitchen for the warm season. Cooking outdoors is fun without having to heat up the house too much.
This gazebo belongs to the third, additional type - semi-open. It has several closed walls, but makes it possible to erect a complex of buildings from already built structures.
That is, for its construction you need a ready-made bathhouse and gazebo. Between them you need to place a closed corridor along which you will walk. A gazebo can be built from a canopy and available materials, such as bricks and beams.
Best location for construction
It is difficult to imagine the optimal location of the future bathhouse if you do not see the features of the site. This refers to its total area and sides, as well as the presence of existing buildings. For example, it is planned to build a terrace on the site. It is better to place it not on the south side, otherwise it will not be able to protect visitors from the hot rays of the sun.
The surrounding landscape cannot be ignored. The bathhouse terrace should not be located overlooking outbuildings or adjacent to the fence. If there are natural attractions in the form of a lake, meadow or grove, then it is worth making it facing exactly in this direction. Ideally, it will run along the entire perimeter of the bathhouse complex or from its front side.