Wooden floors on joists are one of the oldest methods of flooring and the only one used in the northern regions of our country. Modern materials have only improved ancient technologies, due to which the scope of applications has significantly expanded and performance indicators have improved. Before proceeding directly to the consideration of various options, you should familiarize yourself a little with the engineering requirements for calculations.
Installation of wooden floors on joists
Reasons for the popularity of log structures
Technical characteristics of logs and requirements for their installation
Logs are distinguished from beams by their smaller size and mobility. If beams cannot be moved after installation, and repairs are very long and labor-intensive, then logs are a mobile architectural element. They are much easier to install and, if necessary, repairs are carried out faster.
Distance between joists
Optimal section proportions
Before you start building a floor, you need to study the requirements of regulatory documents for the size of the joists and the distance between them, taking into account the thickness of the floorboards.
Table of lag sections at a pitch of 70 cm
| Distance between joist supports | Linear dimensions of logs |
| 200 cm | 110×660 mm |
| 300 cm | 150×80 mm |
| 400 cm | 180×100 mm |
| 500 cm | 200×150 mm |
| 600 cm | 220×180 mm |
Table of distance between joists depending on the thickness of the board
| Thickness of pine floorboard, mm | Distance between adjacent joists, cm |
| 20 | 30 |
| 25 | 40 |
| 30 | 50 |
| 35 | 60 |
| 40 | 70 |
| 45 | 80 |
In order to learn how to independently make calculations based on tables, it will be useful to consider a simple example. Initial data: the length of the room is 10 m, take a floorboard 30 mm thick.
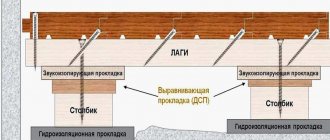
floorboard
Lags
Batten
Calculation method
According to the table, with such a thickness of the board, the distance between the logs is 50 cm; with a room length of 10 m, 20 logs will be needed. The distance between the logs and the walls cannot exceed 30 cm. This means that we will have to increase their number by one piece, the distance between the others will decrease to 45 centimeters.
Important note. During calculations, all roundings should be done only downwards, thus creating an additional margin of safety.
There is no need to calculate dimensions and distances accurate to the millimeter; no one takes such measurements. By the way, during construction, the vast majority of architectural elements and structures are measured in centimeters, the greatest accuracy is half a centimeter. Millimeters are almost never used during measurements.
Floor joists
A wooden beam of rectangular cross-section can be used as a log
Material requirements
The best option is to buy ready-made timber. It will already meet all the requirements for density and reliability. Despite this, it is possible to make the timber yourself. The process of forming the product will not take much time, but will require high-quality materials. The wood must have a certain moisture level - 18 or 20%. If this value is higher, the structure of the entire floor will soon deform. This will happen immediately after the wood dries.
As a rule, most buyers choose pine. This material is characterized by increased resistance to all kinds of influences and is quite durable. Fir and spruce are also often used. In general, quality is not considered the main criterion when choosing materials. You can buy both the second and third grade of wood. The whole thing will form a strong structure.
Note! In cases where the repair budget is small, you can use simple boards. They are often fastened together with self-tapping screws. They are placed on the edge.
When installation of beams that are too long is required, a special lock-type connection is used. You can also join the material end to end. In the place where the beams are attached, specialists install a stable support. Small brick pillars often serve as such support.
Strength and smooth sides are the main indicator of the reliability of the subfloor. Materials must be resistant to deformation under critical loads. Sometimes reinforced concrete, metal parts or plastic are chosen. But none of the listed options is as successful as wooden beams.
Since quality is not a priority, you can buy cheaper product options. Pine and spruce are considered the only types of wood that can be bought cheaply. However, as experienced specialists say, installing logs from these rocks will require additional waterproofing.
Aspen is considered expensive, as is larch. These breeds, although overpriced, are irreplaceable options in rooms where there is a high level of humidity. If the key selection criteria are the material's resistance to rapid decay and maximum strength, larch will be the best solution.
Dimensions of bars
Correctly determining the size of the logs will allow you to create the most reliable and durable structure. Before paying for goods in a specialized store, it is necessary to calculate not only the length of the products, but also the optimal thickness.
In general, determining the length is not a difficult task. Initially, a certain direction of laying is set, and the length is calculated relative to it. In this case, all dimensions of the room in which the flooring structure is being constructed should be taken into account. As a rule, the length of the beams is set 3 cm less than the length and width of the room. Why is this being done? So that over time, due to temperature changes, the entire coating does not deform.
Splicing lags
High strength and stability of the structure can be ensured by using solid materials. True, this option is only possible if the parameters of the beams coincide with the dimensions of the room. But it may also turn out that the length of the lumber will not be enough. How to strengthen sexual lags in this case?
Increasing the size and strengthening the structure is carried out by splicing the material. To do this, take products with a half-wood cut and fasten them together. Often, special galvanized linings are used for these purposes. The rules for splicing bars are as follows.
The connection point must be supported by a special support. To ensure stability, you can build a small support pillar from brick or other materials.
The connection points of the joists must necessarily move relative to each other.
If these rules are not followed, home owners risk ending up with a floor with weak spots where the joist connection may soon fail.
Also an important fact that cannot be neglected is the obligatory displacement of the place where adjacent joists join together. This rule should be taken into account when purchasing materials, since as a result, the parameters of the original beams may change.
Optimal cross section
The next criterion for selecting products is the cross-section. It is a little more difficult to install than the required length. What is a section? This is the thickness of the beam, which directly depends on the material and design data of the entire structure.
To calculate the optimal cross-section of the beams, it is necessary to take into account the maximum load and the distance between the supports of the beams. For residential premises there is a single maximum load indicator - 300 kilograms per square meter.
Thanks to generally accepted data, you can begin to calculate the cross section. You can use a ready-made table, which was compiled by specialists in floor installation. For clarity, here are a few examples.
In apartments, as well as in private houses, a scheme is used - for 2 meters of span length, wood with dimensions of 110 by 60 mm is used. If the length is 3 meters, the timber is selected with dimensions of 150 by 80 mm. A larger distance means a thicker wood product.
Detailed diagram:
- 2 m – 110 by 60 mm.
- 3 m – 150 by 80 mm.
- 4 m – 180 by 100 mm.
- 5 m – 200 by 150 mm.
- 6 m – 220 by 180 mm.
The section is always chosen to be rectangular. It is reliable and practical during installation. Moreover, timber laid on edge can withstand extreme loads and last for many years.
Distance between joists
This stage of calculations is as important as the previous ones. To determine the appropriate pitch, you must first set the thickness of the flooring. Thick materials such as boards make it possible to increase the distance between adjustable joists. In the case where the flooring is made of insufficiently strong material, it is better to place the beams more often.
A practical example of calculation (surface thickness/distance between beams):
- 2 cm – 30 cm.
- 2.4 cm – 40 cm.
- 3 cm – 50 cm.
- 3.5 cm – 60 cm.
- 4 cm – 70 cm.
- 4.5 cm – 80 cm.
- 5 cm – 100 cm.
This guide will allow everyone to establish the optimal relationship between the distance and the thickness of the finishing flooring.
Floor subfloor options
These types of floors can be installed on a wooden or concrete base or on the ground. Each option has its own technological features, which must be kept in mind during work. As for the specific purpose of the premises, taking this parameter into account, the base of the floor and its operational characteristics are selected. The technology of the device itself remains almost unchanged. There are, of course, options for warm and cold floors, but these features also have a common construction algorithm.
How to install logs?
An example of installing adjustable joists
If you decide to install the sheathing and floor boards yourself, then prepare in advance. Namely, in addition to beams and floor boards, prepare the necessary tools and adjustable support elements. They are the best option because they allow you to install logs on a cement base with perfect evenness.
Do not forget to additionally secure the beams against the walls during installation using a hammer drill and galvanized corners. If the logs will be laid on wooden beams, they must first be treated with an antiseptic, and holes for fasteners must be drilled in advance. This simple action will prevent the timber from splitting when connecting it to the beam using a dowel.
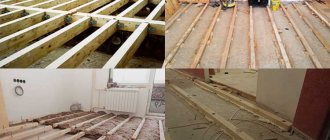
Installation of a wooden floor on joists on wooden bases
Such floors can be made in both wooden and brick buildings and can have several varieties. The features of flooring need to be considered at the building design stage. Not only the purpose of each room and its size are taken into account, but also the climatic zone of residence, microclimate requirements and the financial capabilities of the developer. Below are step-by-step recommendations for constructing this type of flooring.
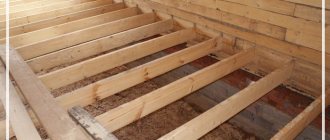
Laying a wooden floor on joists in a wooden house
Wooden floor - photo
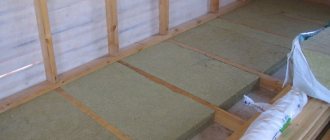
Depending on specific conditions, the algorithm can be slightly modified, but all main construction operations must be completed. The base can be moisture-resistant OSB boards or sheets of plywood. The design of the floor coverings provides for the possibility of laying insulation; the use of rolled and pressed glass wool or polystyrene foam is allowed. If there are insulation materials, then you should definitely install hydro- and vapor barriers.
roll waterproofing
Step 1. Take the dimensions of the room and calculate the number of joists, taking into account the above recommendations. Prepare materials and tools, make markings. Do the work slowly; mistakes made at this stage have extremely negative consequences. Eliminating them will take a lot of time.
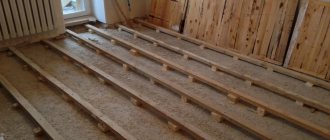
Step 2 . Start installing the logs from the outer wall ones. If the room has subfloors, then the logs can be fixed directly to them. To make work easier, it is better to use metal squares with perforations; such elements significantly speed up work and increase the stability of the joists. Using the mark on the wall, taking into account the thickness of the floorboards, align one end of the joist and fix its position.
Installation of floor joists
Practical advice. When installing the outer joists, do not fix them immediately; first, you should only tighten the screws. This will allow you to make final fine adjustments.
Do the same actions at the second end of the log, constantly monitor its level position. Once the lag lays down normally, you can firmly fasten the ends and begin installing intermediate fasteners. The distance between them depends on the thickness of the boards that are used for the logs; it is approximately 70 centimeters.
Step 3. You need to stretch the ropes between the outermost logs; align all the remaining logs along this line. Constantly check with a level; installation accuracy should be ±1–2 mm. There is no point anymore, it takes a lot of extra time. A small difference in height will be removed during finishing of the front surface of the floorboards.
Step 4. If the floors are warm, then you need to lay thermal insulation between the joists; waterproofing and vapor barrier are used to prevent moisture from entering. The distances between the logs must be adjusted taking into account the length and width of the insulation. This can be either mineral wool or polystyrene foam, or bulk types of insulation. If all the preparatory work has been completed, you can begin laying the floorboards.
Laying thermal insulation between joists
Thermal insulation of the floor with mineral wool
There are options for installing joists on floor beams. These are so-called ventilated floors and are most often used for non-residential premises. There is no need to be particularly precise; size alignment is done using lags. The logs are attached to the beams with nails or self-tapping screws from the side. The algorithm of work is the same. First, the extreme ones are placed, a rope is pulled between them and all the others are fixed along it.
Laying lags on the beams of the lower frame
Ventilation is carried out through special vents in the foundations; the distance between the ground and the floor must be at least fifty centimeters. Otherwise, the air exchange rate does not meet the required indicators, and this causes damage to wooden structures.
Basic rules for installing joists
When installing logs yourself, you should strictly follow the following rules:
- Before installing the log, the surface must be cleaned and primed;
- all wooden elements of the pie structure are thoroughly dried and treated with antiseptic antifungal drugs;
- sand or fiberboard can be used as a soundproofing material;
- adjustable floors with your own hands must be fixed well, and then use a long construction level to make sure that the logs are installed straight horizontally;
To control the horizontality of the structure, you must use a level - Under no circumstances should you begin installing the floor without checking the horizontalness and evenness of the joists;
- floor boards are attached to each and every joist;
- In order not to spoil the board, the slots for fastenings must be made in advance; when using self-tapping screws, the holes are made with a thin drill.
Installation of floors on wooden joists on concrete
Such floors are considered more complex, labor-intensive and expensive; all wooden structures must be reliably protected from direct contact with concrete. Otherwise, the structures will quickly become unusable and will have to be replaced prematurely. There is a chemical way to protect lags from rotting processes using various impregnations. They are quite effective and actually prevent the process of wood deterioration. But unfortunately, impregnated wooden structures can no longer be considered environmentally friendly, and it is for this indicator that most developers install natural wooden floors.
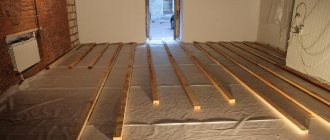
If the logs are laid over the entire area on concrete, then waterproofing is required between them.
Waterproofing is laid between the floor joists and the concrete base
But they can also be secured using metal squares, which allows you to create a gap between the base and the joist. It must be borne in mind that in this case the load-bearing characteristics of the floor are somewhat reduced.
Attaching joists to the floor with corners
Fasteners for joists
- Make an exact marking of the position of the joists on the concrete screed, mark the line with a rope with blue.
- Using a drill and a Pobedit drill, drill holes for the angles; the distance between them is selected depending on the size of the lag.
Fixing corners
- Align the two opposite ends of the lags according to the marks and level, attach them to the squares. Check the position with a level.
- Fix the remaining angles to the joists under the level.
In the photo there are fixed logs
This fixation method has its advantages. Firstly, direct contact of wooden structures with concrete ones is completely excluded. Secondly, logs can also be installed on a black screed. Using corners, you can eliminate irregularities of several centimeters; there is no need to make a finishing screed. This saves a lot of time and money.
Adjustable supports for floor joists
Boards or sheet materials are laid on top of the logs
The second method of laying on a concrete screed is to lay the logs directly on it; a material based on modified bitumen is used for insulation.
Procedure for laying tongue and groove floor boards
- The first board is installed at a distance of 1-1.5 cm from the wall.
- The board is attached to the joist with a self-tapping screw. The self-tapping screw is screwed at 45° angles into the tongue of the board, with the head recessed.
- The first board is also fastened with another screw perpendicular to the floor at a distance of 1-1.5 cm from the edge of the board. This row of screws will subsequently be covered with a plinth.
- The very first self-tapping screw is attached in the middle of the board to the central joist, not into the tongue, but into the edge.
- Next, apply a long building level or rule to the end of the board. The board is evenly aligned along the wall and secured with a second screw into the tongue and groove. The first board is the standard for subsequent boards, so its even laying is the most important stage of work, affecting the overall quality.
Recommendation! It is better to place a special rubberized gasket between the board and the joist for additional shock absorption and increased sound absorption of the wooden floor.
- The boards are attached to all the joists. For better joining of tongues, the boards are tapped. To avoid damaging the tongue and groove when tamping, use a piece of the same tongue-and-groove board. It serves as a tamping block, and the hammer strikes on it, and not on the board being laid.
- The seams between the boards of the rows should be offset in relation to each other. This displacement is called staggered or waddling. The camber must be at least 10 cm.
- The width of the last board should not be less than 9-10 cm. If this does not work during the initial marking, then the first board should be sawed to width.
Laying logs on the ground
The method is used for outbuildings, bathhouses, gazebos, verandas, etc. The wood must be treated with antiseptics. It is better to have a columnar foundation; if you want to make a more durable strip foundation, then it is necessary to provide vents for natural ventilation in advance.
Floor on joists on the ground
How is this floor made?
Step 1. Remove the topsoil. You can use it to fill the beds or level the area in front of the house.
Removing a layer of soil
Step 2 . Mark the columns. The distance between them is selected taking into account the load and size of the logs. The posts can be made of concrete, block or prefabricated. The dimensions of the supports are approximately 40x40 cm, the burial depth is within 30 cm. A layer of sand ≈ 10 cm thick should be poured onto the bottom and compacted.
Step 3. Fill the supports with concrete. To prepare concrete, you should use two parts crushed stone and three parts sand for one part of cement. Water is added as needed. There is no need to make formwork in the ground; formwork from boards or OSB scraps is installed above the ground level. During the manufacture of formwork, you need to use a level; all edges must be strictly vertical.
Wooden floor base
Ready-made concrete pillars
Practical advice. It is much easier to make columns from ready-made blocks. Horizontal alignment must be done along the rope. After the outer ones are aligned with the hydraulic level, a rope is pulled between them. Deviations should not exceed ± 1 cm. This variation is eliminated during installation of the log.
Installation of blocks under logs
Laying columns under plank floor joists, diagram
Step 4. Start fixing the lags; you should also start work from the outermost ones. For precise horizontal alignment, you can use shims. It is not advisable to take wedges made of wood; over time, they will dry out and wobble will appear: the floor will begin to creak unpleasantly when walking. Between wooden structures and concrete surfaces, it is imperative to place two layers of roofing material for reliable waterproofing.
Joists laid on supports
Step 5. After the outermost logs are laid, a rope is stretched between them and all the remaining ones are laid under it. The logs are fixed with metal squares on dowels and screws. To increase stability, it is recommended to install them on both sides. Floor boards can be laid directly on the joists or a subfloor can be laid first. The final choice depends on the characteristics of the operation and purpose of the room.
Wooden floor on joists
Joists laid on blocks and waterproofing
How to determine the thickness of floor insulation
The thickness of the floor insulation is selected according to calculation, providing standard heat transfer resistance R = 4-5 m2oK/W. If the base is not insulated, then the thickness of the floor insulation is determined from the condition that the temperature of the space under the floor is equal to the temperature of the outside air. The recommended thickness of mineral wool insulation in this case is no less than 150-200 mm.
For a house with an insulated foundation and plinth, the thickness of the floor insulation can be reduced so that the sum of the heat transfer resistance of the plinth + floor is no less than the standard (see above).
how to calculate the thickness of floor (floor) thermal insulation here.
A sheathing of bars with a thickness of at least 50 mm is laid across the joists. Another layer of insulation is placed between the sheathing bars. This two-layer insulation design ensures that the insulation covers the cold bridges through the joists. The distance between the sheathing bars is chosen in the range of 300-600 mm, a multiple of the width of the subfloor covering slabs.
This two-layer construction of the floor base (joists + sheathing bars) allows you to conveniently place both insulation boards and floor covering slabs (CBF, plywood, etc.).
The insulation with the lathing on top is covered with a vapor barrier film. The joints of the film panels are sealed. The junctions of the film to the walls are connected to the waterproofing of the walls and the same is sealed.
It is recommended to choose the thickness of the sheathing bars at 25-30 mm. greater than the thickness of the top layer of insulation. This will allow, by lowering the film on both sides of each sheathing bar, to create a ventilated gap between the vapor barrier film and the floor covering.
Professional advice on choosing lags
Coniferous wood should be used for logs.
Larch logs
If possible, materials should be impregnated with antiseptics. These are very effective means for protecting wood not only from fungi, but also from many pests.
wood antiseptic
Antiseptic for wood
Antiseptic
Always select joists with a safety margin, especially in cases where the installation method involves bending loads. It must be remembered that correcting mistakes made during the construction of flooring always costs much more than carrying out the work with high-quality materials and in compliance with recommended technologies.
Logs from boards
Choose your joist boards carefully. They must be absolutely healthy without signs of rot. The presence of through cracks and rotten knots is completely prohibited. If there are large healthy through knots, then you need to install the joists in such a way that there is a stop under them.
When attaching the logs, do not allow the possibility of wobbling.
Fix the joists firmly
Most loose joists cause very unpleasant squeaks in the flooring while walking. To eliminate such phenomena, you will have to remove floor coverings; this is time-consuming and expensive; it is not always possible to keep the dismantled materials in a condition suitable for reuse.
Vapor and thermal insulation with penofol
| Attach penofol with a stapler to the sides of the sheathing bars or joists. |
Instead of the top layer of insulation and vapor barrier film, it is more profitable to lay penofol - a foamed polymer covered with aluminum foil, 10 mm thick.
(also available under other trade names).
Penofol must be laid with the aluminized side up, towards the ventilated gap, across the sheathing bars and lowered on both sides of each bar. After this, penofol is nailed with a stapler to each side of all the bars so that a gap of 3-4 cm is formed between the aluminized surface and the floor covering slabs. The joints of the penofol panels are sealed with aluminized adhesive tape. The penofol layer will provide heat transfer resistance equivalent to a 40 mm thick layer of mineral wool and the necessary vapor permeability.
Subfloor boards are attached to the sheathing bars on top of a vapor-proof film or penofol. Instead of boards, slabs are more often used: cement-bonded particle boards (> 22 mm thick), plywood (> 18 mm), etc. Sheets and slabs are placed with the long side on the sheathing bars. Spacers are secured under the short side between the sheathing bars. All edges of the laid sheet must be supported - a block or spacer.
The use of polystyrene foam and polystyrene foam boards as insulation is not recommended. Such slabs serve as a barrier to moisture, which is always contained in the wood of the floor. By preventing moisture from escaping from the wood, foam insulation shortens the service life of the wooden floor parts. In addition, mineral wool insulation, due to its better elasticity, adheres more tightly to the joists than polystyrene foam.
To protect the underground space from ground moisture, it is advisable to cover the entire surface of the soil with a waterproofing film (and not just under the posts, as in the figure). The joints of the covering panels are sealed. The junction of the film to the walls must be connected to the waterproofing of the walls and also sealed. The floor posts lie directly on the film.
As a result, we obtain a ventilated underground space, limited by sealed shells - on top (vapor barrier) and below (waterproofing).
Products for construction and repair
⇆
Such an underground space protects the house not only from moisture and cold, but also from the penetration of radioactive soil gas radon
.
Installation of columns under logs
After the soil is compacted and leveled, they begin to install columns under the logs. But first you need to mark the installation locations of the supporting pillars. In practice, cords are used for this, which determine the location of the lags. At the intersection of these cords, places are designated for the foundation for the columns, which are laid out from ceramic bricks or concrete blocks. The cords are then removed, and the locations of the posts are fixed with wooden pegs driven into the ground.
Next, at the locations of the pegs, holes are dug for the foundation for the posts. The depth of the holes depends on the density of the soil and the depth of groundwater. If the soil is sandy or rocky, a depth of 25–30 cm will be sufficient, however, and if the soil is clayey, then the depth of the foundation should be 40–50 cm, since crushed stone will have to be poured into the bottom, which must be thoroughly compacted.
Pouring concrete for the foundation must be taken very seriously, observing the required proportions of concrete, sand and water. You should not skimp on cement, but prepare the mixture in the following proportions: one part cement + three parts sand + three parts fine crushed stone (10–15 mm). Before pouring the solution, it is recommended to lay plastic film at the bottom of the hole so that the “milk” does not go into the ground. And one more thing: below the level of the middle of the pit it would be more rational to attach a metal mesh made of wire Ø 4–5 mm, which will act as reinforcement for the concrete.
After the concrete has hardened, the surface under the brickwork of the columns must be protected with waterproofing made of roofing felt or other material with an allowance of 10–15 cm on each side. Then you can begin laying brick columns, which, for reliability, it is advisable to lay from two rows of bricks. The height of the brick columns must be calculated so that the top bricks are perpendicular to the laid logs.
Types of wooden beams:
• Timber
The most common material for making floor beams at home. Their height is 14–24 cm, and their thickness is 5–16 cm.
• Made from logs
The cheapest option. The log copes well with the additional load, but it is not a flexible material. To construct the floors of the house, only those beams that have been drying for about a year are used.
• Boards, logs.
The joists save money and the consumption of materials for laying the flooring of the house. They have low fire safety. Also, logs have low sound insulation and a short service life. They are used mainly for attic spaces. Those who still choose joists for flooring at home use this method to strengthen them: they fasten two boards together along the length. Self-tapping screws are used for fastening. This design copes well with loads.
Types of wood floors
You can install a wooden floor in your home using the following materials:
Solid wood board. Parquet consisting of small planks with tongues and grooves. Solid parquet board with solid wood locks, the standard dimensions of which are 0.5-2 m in length and 1.8-2.5 cm in thickness. Glued parquet board - in appearance and characteristics it is very similar to a solid board, however, it consists of several layers of wood, only one of which is made from valuable wood (its thickness is about 5 mm). The inner and back layers are made from cheaper types of wood, so this material is cheaper than a solid solid parquet board. A glued board contains at least 3 different layers of veneer
Before laying this floor covering, it is important to carefully understand how to lay parquet boards and what the installation nuances are.
Application area
Currently, the main area of application for wooden floors is the construction of small private houses. Especially often, floors on logs are installed in wooden houses and log houses, in which the floors between floors are made of beams.
Especially often, floors on logs are installed in wooden houses and log buildings, in which the floors between floors are made of beams
Much less often, wooden floors are laid in city apartments with reinforced concrete floors. However, the technology is still used, especially in cases where pouring a full leveling screed is impossible for some reason.
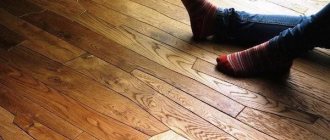
Wooden floor in the apartment
Sometimes plank flooring is a finishing coating and part of the designer’s idea when creating a renovation concept. In this case, beautiful wood species such as oak, larch or pine are chosen for the flooring. The boards are thoroughly polished, impregnated with an antiseptic and covered with varnish or wax. The result is a very beautiful and durable coating that pleases the eye with the natural texture of wood.
Natural wood floor
Wooden floors can be used even when arranging wet rooms, such as baths and bathrooms. However, this is done infrequently, as it requires careful selection of wood, reliable waterproofing and impregnation of the boards with very expensive solutions that prevent moisture absorption.
Wooden floor in the bathroom
Rules for selection and use
To choose the right paint, you need to determine the maximum temperature of the surface on which it will be applied. You also need to calculate the area and make a choice between a spray in a can and a liquid consistency in a jar. But there are still some rules that you need to know.
Specific nuances in terminology
Many salespeople in their advertising campaigns are very frivolous with the terminology adopted for compositions that can be applied to surfaces with high temperatures. There is no normatively established gradation according to the correspondence between the name of the composition and its maximum permissible heating temperature.
However, three established terms are usually used:
- high temperature;
- heat resistant;
- heat resistant.
High-temperature paints for metal include compositions that can withstand prolonged surface heating up to 2000C. They are used for processing radiators and heating pipes, brick stoves and fireplaces. In addition, they are suitable for automotive parts such as engine, muffler and exhaust system.
Water jacket of a metal furnace. From the outside, it does not heat up above the temperature of the coolant, so high-temperature paint can be used to treat its surface
Heat-resistant compounds are used for surfaces with temperatures up to 6500C.
These paints are used for the following metal objects:
- sides and bottoms of furnaces;
- barbecues;
- pipes for exhausting combustion products;
- the junction of the water circuit pipes to the furnace or boiler.
Heat-resistant paints and enamels often contain pigments that give them color, so they can be used to create original interior design solutions.
Heat-resistant paint is designed to cover surfaces that are heated to temperatures above 6500C. First of all, these are cooking stoves and furnace fireboxes, as well as grates for wood-burning stoves and fireplaces.
Some types of thermal paint have an additional feature - fire resistance. This means that the painted surface may be in direct contact with the flame. Among household metal objects, this is relevant for the fireplace grate and the inside of the barbecue.
Theory and practice of thermal hardening
Heat-resistant paint is essentially heat-resistant enamel. To create an impermeable barrier, it is necessary to perform a thermal hardening procedure. In the process of heating the surface with the composition applied to it, polymerization of the layers occurs, after which the access of air to the painted metal is stopped.
Sometimes, to protect metal products, a colorless varnish is applied to them. This type of coating also requires thermal hardening
It is after thermal hardening that neither oxygen, which causes the rusting process, nor moisture can penetrate under the enamel. Before this, the paint has only a decorative and, partially, protective function from physical impact.
Moreover, after creating an impermeable layer, the evaporation of substances contained in the paint into the room air stops. Therefore, ideally, it is necessary to wait until the specified period of complete drying, which is indicated on the label or in the instructions, and then immediately carry out the thermal hardening procedure.
Typically, the temperature at which enamel polymerizes is 200-2500C. This leads to one common mistake that is often made by people who have leftovers after painting their stove.
You cannot apply a heat-resistant compound that requires heat hardening to radiators and heating pipes, since the degree of their heating is insufficient to complete the process. For slightly hot objects, you need to use ordinary high-temperature paint.
Theoretically, the thermal hardening process should take place at a constant temperature for 30-60 minutes. However, in practice, such “laboratory” conditions are impossible to achieve.
Therefore, wood stoves, barbecues and fireplaces are not heated to full capacity and their heating is gradually increased. Typically a test run takes 1.5-2 hours. Another option is heating with an industrial hair dryer.
This is interesting: Heat treatment of metals and alloys: we present it in detail
Location rules
The first and last lags from the wall should be at a distance of no more than 20 cm. If, while observing the calculated step, the outermost lags are located further, their number is increased and the step is reduced.
They are placed either along the wall in which the door is located, or perpendicular to it. If one wall is much longer than the other, then it is along this long wall that the logs are placed. If the room is square or similar in shape, then the location of the window may influence the choice: floorboards look best if they are located along the flow of light. That is, in this case, the logs are placed along the wall in which there is a window.
Using plywood to level the base
In older buildings, it is often necessary to level the base before laying the flooring. It is no secret that new buildings do not guarantee a perfectly level foundation. To eliminate such irregularities, use plywood or OSB panel. The construction of such floors contains the layers described above for the floors along the base and plus a layer of plywood.
It is laid on top of the glue on the concrete, the glue is applied on top and the floor covering is laid. For greater strength, the plywood is screwed to the base.
Installing a wooden floor using plywood to level the floor
Design advantages:
- this method is cheaper compared to using leveling mixtures;
- This arrangement of floors allows you to equalize the height of the flooring in different rooms;
- ability to level the base with a height deviation of up to 1 cm.
Installation features:
- the thickness of plywood or OSB panels should not be less than the thickness of the wooden floor laid on top;
- the flooring is made on a dry base;
- For better adhesion of plywood to glue, its surface is sanded and primed before use.