Buying logs
Before buying logs, you must calculate the required number. Remember that the thicker the floorboards, the less joists you will need, but excess joists will not hurt and will give the floor additional strength. The maximum distance between the logs is 80 cm if the boards laid on them are 45 mm thick. Based on this example, calculate the required number of joists for your floor.
Speaking about the choice of logs, the first thing to note is that they should be made of coniferous wood, for example, pine or larch. Coniferous wood has high moisture resistance, as well as antiseptic properties that prevent the formation of mold and mildew.
Remember that during construction it is often necessary to resort to alternatives, so here too you can replace the timber with double pine boards. This method of laying a floor is almost as strong as a floor on blocks, but choose boards with a large cross-section without any defects.
When purchasing timber for construction of logs, inspect it carefully. You cannot use material with many large knots, however, by using support posts under the joists, you can allow a large through knot, remembering that it must be strictly above the support. There should also be no cracks or rot on the surface of the joists. It is better to buy a more expensive material that will last a long time than to change the floor several times using cheap wood.
Don’t forget to also buy an antiseptic, which should additionally be used to treat the logs before installation (for more details: “How to treat logs against rotting - choosing an impregnation and antiseptic”). It will protect the wood from fungus and most pests.
What are they needed for?
Properly installed beams and the distance between them ensure sufficient ventilation of the underground space of the house.
Laying wooden beams as lathing under the future floor allows you to strengthen the entire floor structure as a whole. In addition, noise and heat insulation materials are placed in the distance between the joists, which greatly improves the characteristics of the floor.
What methods are there for joining floor boards together?
Properly installed beams and the distance between them ensure sufficient ventilation of the underground space of the house, which means that the wood will not rot over time. Especially if the building is located on an area with high groundwater. How to properly install logs and calculate the optimal distance between the sheathing beams is discussed below.
Base for a wooden floor on joists
The joists can be laid on various bases made of wood or concrete, they can also be attached to the walls, additionally installing support pillars under the joists to give greater strength to the floor. Each option has technological features, which we will discuss below. When choosing one of these methods, you should pay attention to the operational purpose of the room in which you are building the floor, for example, if the floor in this room will bear heavy loads, then it is better to use a concrete base for a wooden floor.
Location
The first and last lags from the wall should be at a distance of no more than 20 cm. If, while observing the calculated step, the outermost lags are located further, their number is increased and the step is reduced.
They are placed either along the wall in which the door is located, or perpendicular to it. If one wall is much longer than the other, then it is along this long wall that the logs are placed. If the room is square or similar in shape, then the location of the window may influence the choice: floorboards look best if they are located along the flow of light. That is, in this case, the logs are placed along the wall in which there is a window.
If the thickness of the board is at least 50 mm, in this case the logs are laid at a distance of one meter from each other. However, in private housing construction, 40 mm boards are more often used; in this case, the logs are placed in increments of 70 cm. Many people are interested in the question of how to make the structure reliable and the loads accurately distributed? Here it is important to maintain the exact distance between the lags. The first board is laid no further than 25-35 cm from the wall.
Distance
The main rule that must be followed if you want to perform correct installation is location. The logs are laid perpendicular to the floor boards. If boards in two layers are used to create a structure, then the top one is laid “cross” to the bottom one.
Installation of logs in different rooms is carried out differently. If the installation is carried out in the living room, then the floor boards are installed in the direction of sunlight. In this case, the logs themselves are mounted in a transverse position. But for rooms where there is a lot of traffic, floor boards are laid in the direction of movement.
Distance table
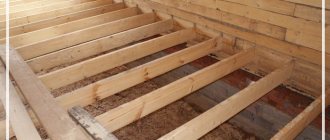
Installation of a wooden floor on joists on a wooden base
This method of constructing a wooden floor also has many different options, which have minor differences, but even the little things need to be thought through long before the construction of the building. When thinking about building a floor, consider not only the purpose of the room, but also the local climate, as well as your financial capabilities.
The floor construction algorithm may differ slightly from what is described below, but it is always the same. The wooden base for a floor on joists can be OSB boards or moisture-resistant plywood (for more details: “Installation of a wooden floor on joists - laying technology”). When building such a floor, you can lay insulation - glass wool or polystyrene foam, but do not forget that steam and waterproofing must be laid under the insulation.
Construction process:
- Preparatory stage
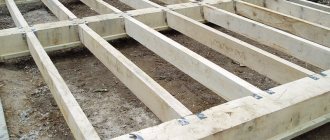
. Calculate the required number of logs and purchase them. Next, proceed to the most crucial moment - marking. If you do it incorrectly, you may face many difficulties later. - Installation of extreme joists
. The outermost logs will serve as guidelines along which you will lay the rest of the timber, so at this stage it is important to constantly monitor the horizontal level with a building level. If you are installing joists above a subfloor, you can fasten them to it with iron angles, which will increase the reliability of the future floor. Start attaching the joist from one of its ends, focusing on the marks and controlling the distance from the wall. Do not rush to immediately tighten the self-tapping screw to the end; first, it is better to simply tighten it in order to make control adjustments.
Having secured one end, adjust the opposite part of the log, controlling its horizontal position, and then securely fasten both ends.
In the same way, secure the outermost joist to the opposite wall.
- Installation of the remaining logs
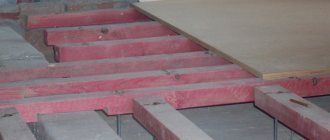
. To avoid adjusting each joist separately, stretch ropes or wire between the outer joists. Using the rope as a guide, lay the remaining logs. Be careful and control the height difference with a building level, which should not exceed 2 mm. It makes no sense to align the joists more accurately, because it will take a lot of time, and a difference of 2 mm can be easily corrected when installing the finishing coating. - Floor insulation
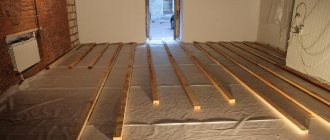
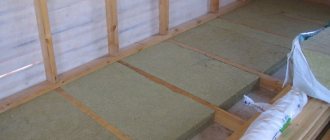
. If you decide to insulate the floor, then first you should lay waterproofing material on the joists and base. When choosing insulation, make sure that its thickness is 5 cm less than the height of the joists. Next, cut the insulation so that its width exceeds the distance between the joists by 2 cm. Lay the insulation and begin laying the floorboards.
Floor beams can also serve as a wooden base for laying logs. This flooring is often used in non-residential premises. The algorithm for its construction is similar, but the logs are attached to the beams from the side with nails.
Ventilation of such a floor is ensured by vents in the foundation; in addition, you must ensure that the distance between the floor and the ground is at least half a meter.
Fastening boards
Any wood is subject to deformation under the influence of moisture and temperature changes, so the edge board is laid so that there is a gap of 1-2 cm between it and the wall, this will preserve the integrity of the wooden flooring, even with strong changes in temperature and humidity.
After laying the floor boards is completed, the gap is closed with a plinth. Nails can be used to secure the boards, but they can rust and lift off the surface of the board over time. Therefore, for fastening it is better to use self-tapping screws with a length of 60 mm and a diameter of up to 4.5 mm.
What the logs on the posts look like is shown in the video:
Source
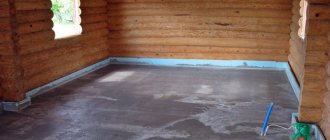
Construction on a concrete base
Concrete flooring is a complex and expensive structure, but its strength and long service life make concrete the most popular base for a wooden floor. When laying logs on concrete, you will not need cabinets for the logs, but they will have to be isolated from each other, otherwise this will lead to the formation of moisture, which will lead to damage to the wood.
Isolation is performed in several ways:
- Laying insulating materials. It does not carry any disadvantages and perfectly preserves wood from rotting.
- Logs can be impregnated with special solutions that prevent rotting processes. This method is really good, and the expensive impregnation will not be inferior to the previous method, but there is one drawback - such treatment negates the environmental component of your floor.
- The gap between the joists and the floor will prevent rotting of the wood, thanks to good ventilation. Construction while maintaining a gap is much more difficult, but the result is worth the effort. If you decide to maintain a gap, you can use metal corners for this. Using this method, you will slightly reduce the load-bearing characteristics of the floor.
Algorithm for building on a concrete screed:
- Marking. To make markings on a concrete screed, you can use a special rope that is dipped in paint, but you can also use improvised means. A rope soaked in paint is attached to the concrete at both ends, after which it is pulled back and abruptly released. This will “punch” a straight line on the concrete.
- Next you need to drill holes for the mounting angles. This can be done with a pobedit drill and a drill.
- As in the case of logs on a wooden base, secure two logs to opposite walls, screwing them to the corners, after which you can tighten the thread and adjust the horizontal position to install all the logs.
Installing joists using corners is one of the most common solutions. Despite the fact that this method somewhat reduces the strength of the floor, builders recommend laying logs on a concrete screed in this way, because it has a lot of advantages:
- You completely prevent rotting processes caused by contact between concrete and wood.
- To secure the logs in this way, you do not need to pour a clean concrete screed, because all the unevenness of the rough screed (up to several centimeters) will be hidden thanks to the metal fastening corners. Without making a clean screed, you save a lot of time, because it will take a lot of time to dry it, in addition, you will not have to spend money on the solution.
If you decide to lay logs directly on concrete using waterproofing materials, then they should be secured with anchors or also with fastening angles.
Laying wooden logs on the ground
You can use this method of laying logs if you decide to build an economic, non-residential building, for example, a bathhouse, gazebo or barn. Laid logs must be treated with antiseptics, otherwise they will not last long. This method of laying lags assumes that you should use brick columns under the lags, which will serve as the foundation. If the load on the floor indoors is high, then you should use a strip foundation, but do not forget to make special ventilation vents in the foundation so as not to rot the wood.
Work order:
- Preparing the area. First, you must remove all the topsoil inside the room. You can use the removed soil to level the area.
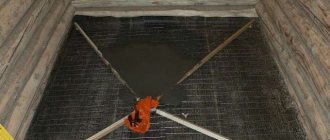
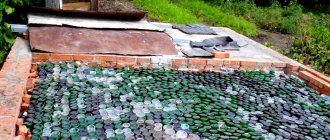
- Holes for support under logs. Start with markings: calculate the required number of columns, taking into account the load on the floor and the size of the floor joists. Next, dig holes in the marked places. The dimensions of the pit should be equal to a masonry of 2 bricks (approximately 40x40), and its depth should be 40 cm. Next, you need to create a layer of sand inside the pit. Fill in the sand, water and thoroughly compact it down to 10 cm. After this, you need to fill in crushed stone 15 cm thick. To measure the layer, you can use a thin strip, which must be removed after completion of the work.
- Pouring concrete begins with preparing the solution. In order to make columns for floor joists, use a solution of cement, sand and crushed stone in proportions: 1/3/2. Next you need to talk about how to make columns for logs. The formwork for future posts does not need to be made in the ground, but it should be done above it in any case. The height of the wooden formwork depends on your further decision. If you build brick columns under the logs, then the height of the formwork should be small, about 5 cm above ground level. When making columns entirely from concrete, the formwork should be made directly under the logs, measuring the horizontal line with a building level. Pour concrete mortar inside the formwork and wait a day, after which you can begin laying joists or bricks. If you have made a concrete base for brick posts, then it’s time to start laying. The easiest way would be to do this with two people, so that one person lays out the brick and carries the mortar, and the other does the masonry with a single-row dressing. Having laid all the pillars under the floor joists, additionally measure them with a building level to avoid difficulties when laying the joists. When thinking about how to make the joist cabinets more durable, you can reinforce them using a wire frame.
- Laying lags. Before laying the logs, be sure to cover the cabinets under the floors with two layers of roofing felt, which will protect the wood from moisture. The logs should also be laid starting from the edges. To eliminate large differences in height, use special pads between the posts and joists. Do not use wooden wedges as they may dry out and lose their shape, causing an unpleasant squeaking sound on the floor.
- Lay all the remaining joists, stretching a guide between the outer bars. To secure the logs to the posts, it is best to use iron corners, which are attached to the posts with dowels. To give additional strength to the floor, as well as to avoid unpleasant creaking, it is recommended to fasten the corners on both sides of the joists. Next, you can lay the floorboards directly on the joists, or lay a subfloor first, such as plywood. Read also: “Which mastic is best for a wooden floor - types and rules of use.”
How to attach
There are several ways to attach joists. This is done using metal corners or nails. However, professionals say that nails for fastening joists are ineffective, and after a certain time they will need to be repaired.
It is better to secure the beams with self-tapping screws, which penetrate deep to a distance of 3 to 5 cm. If the support for the logs is made of brick, then the first thing you need to do is cover it with a waterproofing layer, fastening is done with dowels.
If the length of the beam is not enough to lay a log of the required length, it is recommended to carry out the extension using the cutting method, it is also called “half a tree” and then secure this place with nails. When laying logs directly on the ground, the skull blocks are first installed.
In addition to wooden bars, plastic structures are now used; they can easily withstand significant loads and are self-regulating. The use of plastic logs completely solves the problem of their leveling. If the question is how to attach the cabinets, then such work is not very difficult; the main thing that needs to be done is to adhere to the installation technology.