Sizes that are comfortable for a person
There is no way to get around this point: there is a certain relationship between the size of the table and how many people can comfortably (or not) fit behind it.
Therefore, each bathhouse owner should estimate in advance how many people will most likely gather at the table in the recreation room or on the veranda at the same time. The second important factor in choosing the size (and, possibly, shape) will be the area of the room. After all, you need not just to place a table, but to make sure that a person can sit down and get up from the table freely, that there is room for passage, etc. To do this, you need to add a few more parameters to the table dimensions - the width and depth of the seat, the width of the seat for one person at the table, and also the minimum width of the passage.
For our part, we will present the standards of ergonomics, which is the science of how to adapt things to human anatomy.
REMEMBER! To sit comfortably at the table, a person needs 70 cm of space. This is called the seat depth (see picture). Add these 70 cm to the dimensions of the table on all sides - you will get a spot that you allocate for this area. The minimum passage behind the seated person, if necessary, must be at least half a meter.
Now the dimensions of the countertops themselves (according to the estimated capacity):
A person is comfortable at a table if he is provided with at least 60 cm of table space in width. It's minimum.
A two-seater table of square or round shape should be 60 cm on the side or in diameter. However, the “spot” of the zone together with the chairs is calculated as 120 by 210 for a square and 120 by 200 for a circle.
A three-seater table is only possible for a round shape, but the dimensions increase: the table diameter is 80 cm, the spots are 220 cm.
The four-seater can be either cross-shaped or parallel. The side of the square is 85 cm, the side of the spot is 225 cm. The diameter of the circle is 90, the spot is 230 cm. The rectangle is 85 by 125 cm, the spot is 185x225 cm.
Five-seater – circle 100 cm, spot 240; rectangle, size 135 by 85 cm, spot – 235 by 225 cm.
Six-seater – three types. Circle: diameter 120, spot 260, rectangle parallel seating – 85x175, spot – 235x225 cm, perimeter – 85x145 cm, spot – 285x225 cm.
We'll probably stick with eight-seaters. The circle is 140 cm in diameter, the spot is 2.8 meters. Rectangle: parallel seating – 80 by 250 cm, spot 220x285 cm around the perimeter – 85 by 195 cm, spot 225x285 cm.
Also worth mentioning is a design called a “corner”. It looks cozy and fills the space well. The module of the proposed scheme is a seat measuring 55x55 cm. A corner measuring 220 by 165 cm is folded out of them. The table is also square in shape with a square side of 85 cm. Single seats in front of the table are the same dimensions as the module.
Design selection
Material and design can be selected in parallel, although one does not depend on the other in any way. The table shape can be any, but still the number of basic options is limited:
- square;
- rectangular;
- round;
- oval;
- polyhedron.
This concerns the shape of the tabletop.
In addition, it can be sliding. The number of legs on the table may vary:
- one;
- two;
- three;
- four.
As for three legs, this option is, of course, rare, but possible. If the number of legs is less than three, then their stability will directly depend on the crossbars on the floor on which these legs are installed. For a one-legged person this will be a cross, for a two-legged one it will be a single perpendicular on each leg.
In addition to the tabletop and legs, there may be other structural parts. These include a transverse beam that connects the legs, if the table has two of them, as well as strips that mask the junction of the legs with the frame, which at the same time impart rigidity to the structure.
Yes, and it would also be worth mentioning folding tables that can be used not only in the rest room, but also in other rooms. This table is mounted on the wall, when folded it takes up very little space, and when unfolded it is no worse than a stationary table.
BY THE WAY! Those who love the original may recall hanging tables, like on a ship.
Features of manufacturing furniture for a steam room in a bathhouse
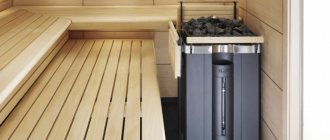
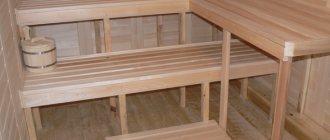
There should be nothing unnecessary in this room so as not to interfere with proper air circulation. Therefore, only shelves and a bench are traditionally installed as furniture here. You can make them yourself by making the right calculations and choosing high-quality wood.
Selection of materials for furniture in steam baths and preparation
Furniture for the steam room is made exclusively from wood. It is environmentally friendly and has low thermal conductivity. In this case, the boards for the shelf and bench are selected without cracks and knots. Wooden furniture for a bath should be made of even and smooth material.
It is undesirable to use coniferous wood due to its high resin content. At high temperatures, they are released, which can result in burns. The best option is aspen, linden, African abashi tree.
When purchasing lumber, be sure to pay attention to shrinkage. Damp wood will rot and warp
Only galvanized fittings are used for fastening individual elements. Such fasteners are resistant to moisture.
After choosing materials, you need to decide on the design of the future structure and the location of its installation. To do this, you can familiarize yourself with existing drawings of bath furniture or come up with your own. First of all, the shelf should be comfortable. Its optimal width is 0.6-0.8 meters, and its length is 1.8-2.2 meters. You can make it with one, two or even three tiers. However, please note that the height from the top shelf to the ceiling must be at least 1.2 meters. At the same time, in three-tier structures, it is advisable to make the upper and lower steps removable, and the middle one fixed.
Separately, you should take care of sanding the wood. It is performed twice: the first time with a grinding machine, the second time it is cleaned by hand.
Instructions for making a two-tier bath shelf
Bath shelf - diagram
Shelves for a small steam room Before making shelves for a bath, you need to take some measurements. The shelves should not cause inconvenience. Its device can be either single-tiered or three-tiered. It is believed that the heat is higher at the very top. The design resembles the shape of steps.
Once the required dimensions of the boards have been determined, you can begin to work:
- It is necessary to mount a frame of wooden posts. For this, a timber is taken.
- The racks are fastened together. You can even use metal screws here, because the body will not come into contact with this part of the shelf. The distance between the two posts should be about 50 cm.
- The frame must be attached to the walls of the bathhouse.
- Then the boards are attached to the frame. When installing them, you can no longer use metal. The distance between two adjacent boards should be about 1 cm. This is necessary so that the water can drain freely. In addition, this device allows the structure to dry faster.
Technology for making a bench for a steam room in a bathhouse
The bench in the steam room can be used to place a bucket, a tub on it, or just for relaxing. To equip it yourself, we adhere to the following algorithm of actions:
- We prepare four legs 0.6-0.7 meters long and two struts from a beam with a cross-section of 5 cm2.
- We sand two boards 0.4 meters wide and connect them together along the edges with slats.
- We fix the legs with crossbars at the top and bottom.
- We nail the resulting structures to the seat.
- We attach the struts with one side to the bottom of the seat, the other to the crossbars of the legs.
Before use, shelves and benches in the bathhouse must be treated with a special oil composition that will prevent the wood from drying out.
Specifics of installing bath furniture in a steam room
When placing furniture in the steam room, it is necessary to take into account some safety rules. It is better to mount the shelf on the wall opposite the stove, but not immediately opposite it to avoid burns. The distance between the benches and the stove should allow you to steam freely without touching the hot surface. Also keep in mind that it is not advisable to sew up the space under benches and shelves. This will lead to wood rotting due to poor drying. The distance from furniture to walls should be at least 3 cm for good ventilation.
Important conditions for creating an interior
When decorating the interior of a relaxation room in a bathhouse, several specific conditions and rules are observed. So, to create a beautiful design, they use finishing materials that do not contain metal parts and are moisture resistant.
This room is equipped with a good ventilation system.
Important! The dimensions of the rest room are determined by the dimensions of the bathhouse. The minimum area is considered to be 10 sq.
m.
Also, when creating a beautiful room design, perform the following actions:
- install hooks for drying several bathrobes and towels;
- construct storage areas for a variety of personal items;
- put a mirror.
This place is not cluttered with massive furniture or decor. This way the passage remains clear.
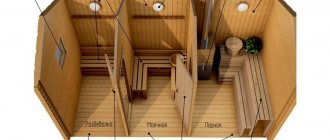
Zoning Features
The rest room usually has 3 zones:
- place for cooking;
- dining area;
- relaxation area.
Bath curtains create a feeling of security. Sometimes zoning of this place is carried out at the stage of construction of the bathhouse. Then they make a special partition wall.
The kitchen is separated from the dining area by a bar counter or a wide countertop. A fireplace is placed in the center of the room, which decorates the interior design.
Color spectrum
The rest room is decorated with light and pastel colors. These tones create a light and cozy atmosphere that relaxes guests.
Orange, light brown or yellow shades bring peace of mind and warmth to this zone. Furniture for such a place is selected according to the color of the cladding.
Variety of materials
When carrying out the interior decoration of this room, only high-quality building materials are used, which are moisture resistant and tolerate temperature changes well. When arranging the design of a relaxation room in a bathhouse, the following materials are used:
- decorative stones - artificial or natural;
- various types of tree species;
- fiberglass or non-woven wallpaper;
- majolica or ceramic granite tiles;
- decorative plaster;
- plastic.
When decorating walls, the following materials are used:
- lining made of oak, aspen, alder, pine or linden;
- various stones - cobblestone, marble, granite or sandstone;
- non-woven wallpaper;
- plasterboard moisture-resistant sheets.
When finishing a room ceiling, wooden panels and linden or cedar lining are used.
When installing floors, the following building materials are used:
- wooden boards 3.5 cm thick, the finished coating is covered with stain or colorless fixing varnish;
- ceramic granite.
After finishing, the recreation area becomes a stylish and comfortable place that gives guests homely warmth and comfort. This area is also a good place for winter holidays or a regular family vacation.
Selection of furniture
When choosing the right furniture for the rest room, perform the following steps:
- buy furniture that suits a certain design and fits well into the room interior;
- the table, chairs and other furniture items are placed as far as possible from the steam room, thus preserving the appearance of the room and increasing the life of the furniture;
- do not clutter up the resting place with various objects - make the space free;
- buy furniture made of durable, moisture-resistant material.
Comment! Wooden furniture is considered the best option when designing a relaxation room. After all, tables and chairs made of wood are covered with antibacterial impregnation.
More often furniture made of beech, oak, alder or larch is placed here.
Lighting in the bathhouse in the relaxation room
In order to create proper and pleasant lighting in the recreation area, perform the following actions:
- Small lamps are placed around the perimeter of the room, from which a lot of diffused light comes;
- install bright but unobtrusive light in the center of the room and dimmer light along the edges of the room; such lighting relaxes the bathhouse guests;
- Several spotlights are placed under the ceiling, which emphasize the youth style, this can be seen from the photo of the interior of the bathhouse and relaxation room.
There are also several narrow windows here, through which direct rays of the sun do not penetrate. This creates natural, pleasant lighting.
Decorating the relaxation room in the bathhouse with decor
Decoration of the rest room is carried out after completion of all other construction work. This completes the design of the room.
Various textiles are hung on the windows and walls, which make the room more comfortable and soft. Window curtains, sofa throws, soft pillows and tea towels create a feeling of home.
The walls are decorated with paintings or individual photographs, and open shelves are installed in the corners. Small souvenirs are placed on them: cups, figurines or vases.
Ergonomics
Loungers or benches should be ergonomic. Therefore, they are made smaller than the room, or corner. The latter do not take up much space and free up space.
The benches on which they will lie are made long and wide so that a person can sit on them at full height.
Attention! The knees should not rise above the pelvis of the person sitting on the bench. When making a bench, you need to proceed from the distance from the floor to the knee joint of an adult.
Benches without backs
One type of ergonomic compliance is benches without a back. Such benches are placed opposite the wall on which visitors lean, which saves space.
However, such benches cannot be placed in spacious steam rooms. It won't look nice. For spacious steam rooms, benches with backrests or multi-tiered loungers are made.
Benches with backrest
To make a bench with a back for a bathhouse, it is advisable to use a drawing. Additionally, take into account the size of the people who will sit and lean on the back.
The width of such a seat is calculated based on 40 centimeters for the place where they will sit. If you need a person to lie down, then increase it to 70 cm. Take 60 cm for the size of the backrest. These are three boards 15 cm wide and with an opening between them of 5 cm.
Attention! A distance of 3-5 cm is left between the boards so that the entire bench can be washed after bath procedures. Otherwise, fungus and mold will form.
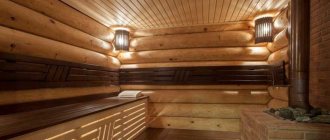
Homemade furniture for the heart of the bath - steam room
In a good, proper steam room, apart from places to lie down and a few handy accessories (rest for head and feet, basin, ladle), there should be nothing superfluous
It is important that hot air circulates freely in the steam room, so you should not clutter the steam room. You can make shelves for your bath or sauna yourself
Before you start making sun loungers for the steam room, you need to decide what you need. What shape, width or size should the shelves be, how will it be located: in the form of steps or along the perimeter of the steam room; what it is intended for: for sitting or lying - all this depends on the desires and imagination of the owner, as well as on the characteristics of the room.
Before you start making furniture, prepare drawings
The first stage of making a shelf for a bathhouse is measuring the room and sketching the future lounger. It is necessary to measure the steam room as accurately as possible and draw a schematic drawing of it, where you must indicate the location of the boiler and door. Then draw the future shelves on the drawing, indicating its dimensions and attachment points.
- After all measurements have been taken, boards and timber have been purchased, you can begin to work. We assemble a frame from timber (section 100 x 50). The racks can be fastened together with metal screws, so they will not be on the surface. The distance between the posts is no more than 45-50 cm.
- Next we make seats for the shelves. They can be made from well-sanded boards or from lining. The boards must be fastened at a distance of 1-1.5 cm from each other. This will allow water to flow down smoothly and also allow the seats to dry out faster. It is better to fasten the boards for the seat with wooden dowels, since you can subsequently get burned on the metal heads of nails or screws.
Advice! Do not treat wooden products in the steam room with anything: varnish, paint, chemical impregnations. At high temperatures this is fraught with toxic fumes and poisoning.
Sliding shelf for a bath - video
Removable shelf in the bathhouse and sauna
A removable shelf is a separate shelf surface (sidewall or seat), which is not connected to the frame in any way and can be removed if necessary. The main reasons why owners resort to such a design are the features of the sauna room and layout, ease of cleaning and replacing equipment or lighting under the shelf. The grooves in the frame help fasten and fix the removable shelf , but the main load for holding the removable structure is provided by special fasteners. There are several types of fastenings for a removable shelf - read more - “Removable shelves in baths and saunas”
How to treat shelves in a steam room (sauna)
An important stage in creating a structure is its treatment with special protective agents. If you ignore this point, the wood will soon become unusable, become damp, and the mechanism will have to be reinstalled. Rot and mold are enemies number one, and it is better to prevent their occurrence than to waste energy on the fight in the future.
It is strictly forbidden to use traditional chemicals - varnish and drying oil - to treat shelves in a bathhouse , because in such critical conditions these substances emit a sharp, unpleasant reserve, and contact with the skin of such vapors can provoke a severe allergic reaction.
You should purchase a special impregnation for the bath, which is based on natural oils that create a protective film . These products effectively counteract moisture and protect the surface of the shelf from premature “aging”. It is customary to treat only benches with such impregnation; for floors there are stronger mixtures that do not emit an unpleasant odor or harmful fumes.
Bath shelf care
The issue of hygiene and cleanliness in the bathhouse always remains relevant. And although the temperature in the steam room does its job, killing most bacteria and germs, you need to remember about dirt. Sweat also comes out of our body when taking bath procedures. Therefore, it is recommended to periodically wash it off the surface of the floor and the wooden structure of the shelf with ordinary warm water.
No newfangled detergents should be used to wash benches in the bathhouse. The maximum that can be useful for keeping the room clean is ordinary laundry soap . In case of severe contamination, you can always organize mechanical cleaning of the wood with an abrasive material.
The steam room has always been and will be the heart of the bathhouse. Climbing onto a warm shelf, you will forget about the hustle and bustle and fly away to the heights of pleasure. The shelves seem to have a very simple design. However, wood flooring is not so simple. Follow our tips and recommendations and you will know how to make bath shelves comfortable and reliable.
Accessories for a shelf in a bathhouse
After you have built the shelves in the bathhouse, you can install additional elements that increase the level of comfort. A headrest or pillow looks similar - like a footbox. “Pillows” can also be stationary in the form of a triangle attached to the bench or removable ( headrests ). The space between the levels of benches can be left open, but it is advisable to build backrests.
When a person is lying on a bench, he should raise his legs higher than his head, because this part of the body warms up slowly and additionally requires a temperature “load” to improve the outflow of blood. Stationary supports are beams placed on the wall, on which you should rest your feet. For convenience, they traditionally make a couple of steps. On a shelf in a bathhouse you can often see removable footrests - two wide boards that are connected to each other at an angle of 30-45 degrees. One side with the bench forms a right angle and acts as a support, while the other serves as a ribbed “slide” designed to position the legs.
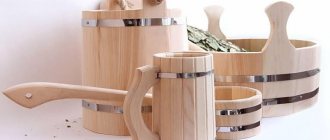
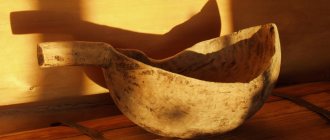
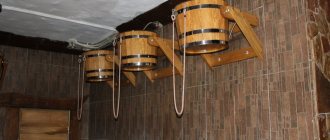
All sorts of tubs, tubs and gangs will not be superfluous . You can, of course, get by with household plastic or metal containers, but wooden products create a special atmosphere and have a positive effect on the well-being and health of bath-goers. A variety of sauna ladles are also important - they are needed to supply water to the hot stones of the heater. Moreover, their handle must be long - otherwise the cloud of steam will cause a serious burn.
We make bath furniture with our own hands
Actually, the whole process consists of three stages:
- production of blanks;
- pre-assembly, adjustment;
- final assembly.
From the purchased boards, according to the drawings, we cut out all the necessary blanks, then we carefully process them with a sanding machine. Surfaces intended for sitting must be sanded with special care - there should be no burrs, roughness or irregularities on them. If necessary, we mill the edges, blunt the sharp edges - for this you can use a sander or plane, you can also round the edges of the boards with a milling cutter.
Basic drawing of a table for a bathhouse: all dimensions can be changed and adjusted according to individual needs
We do preliminary assembly. During preliminary assembly, we do not recess the screws into the wood; the task of this stage is to check all dimensions, the coincidence of the parts with each other, and their joining with each other. If everything is in order, we disassemble it and reassemble it completely using wood glue and recessing the screws. If not, we disassemble, correct errors and shortcomings, and do preliminary assembly again.
If you wish, the table top and seats for benches and stools can be made not from separate boards, but made into a furniture panel for them. To do this, we mill the boards along the edges - on one side we mill a groove, and on the other, the corresponding tenon. You need to position the cutter very carefully so that there are no “steps” between adjacent boards. We mill the edge boards on one side only. Then we coat the tenons and grooves with glue, connect them together on a flat surface, and tighten them with carpentry clamps until the glue dries completely. Then we remove the clamps and carefully sand the surface - ideally, the joint between the boards should be almost invisible.
Basic drawing of a bench for a bathhouse: all sizes can be changed to suit individual needs
If you are making shelves or benches for a steam room, then it is not recommended to make a furniture panel for them - here, on the contrary, you need a gap between the boards for air circulation.
It should also be noted that it is strictly not recommended to varnish or paint furniture intended for use in a steam room - most paints and varnishes for wood are not intended for use at elevated temperatures, and, among other things, this can simply be harmful to health.
shelves
Bath shelf - diagram
Shelves for a small steam room
Before making shelves for a bathhouse, you need to take some measurements. The shelves should not cause inconvenience. Its device can be either single-tiered or three-tiered. It is believed that the heat is higher at the very top. The design resembles the shape of steps.
Once the required dimensions of the boards have been determined, you can begin to work:
- It is necessary to mount a frame of wooden posts. For this, a timber is taken.
- The racks are fastened together. You can even use metal screws here, because the body will not come into contact with this part of the shelf. The distance between the two posts should be about 50 cm.
- The frame must be attached to the walls of the bathhouse.
- Then the boards are attached to the frame. When installing them, you can no longer use metal. The distance between two adjacent boards should be about 1 cm. This is necessary so that the water can drain freely. In addition, this device allows the structure to dry faster.
Varieties of benches and benches for baths
There are four types of sunbeds. There are portable and stationary benches. The design of the lounger is chosen in combination with the size of the steam room where it will be located.
Types of sun loungers:
- single-tier;
- two-tier;
- three-tiered;
- stepped.
Single-tier is a portable type of bench for a steam room or recreation room. Ergonomic and mobile. The lounger can be taken out and brought in at any time. Doesn't take up extra space. Used in small steam rooms.
A two-tier lounger is recommended for construction in spacious baths. Placed opposite blank walls without windows or cracks. Should not be installed close to the stove. Otherwise, burns may occur.
Three-tier type. Installed in steam rooms. Not suitable for other rooms because it is not mobile. The distance between tiers is set at 100 centimeters. Recommended for placement in spacious steam rooms. The third floor of the sun lounger is close to the ceiling. It can accommodate people who are not predisposed to heart disease. Because the temperature on the last tier reaches its highest degree.
Stepped ones are placed in the entire steam room. This is done so that a person can use the first floor as a seat or stand on it.
Wooden splendor
The wooden bath table continues to be an unfading classic of the genre of domestic bath interior. Wooden objects have many advantages:
- High ecological purity of the product, its naturalness and naturalness in the interior decoration;
- Low thermal conductivity and heat capacity, which is a very valuable quality in relation to the realities of a Russian bath;
- A wooden table for a bathhouse has the necessary margin of strength and natural durability with relatively simple and unpretentious maintenance;
- Wood is easy to process and to work with it you need a fairly small list of available tools.
To be fair, it is worth mentioning the use of other materials from which it is theoretically possible to make a bath table:
- Plywood and MDF are unique substitutes for solid natural wood, in the production of which various chemicals are used, including alkyd resins;
- Plastic - some of its types, manufactured to food grade tolerances, are suitable for the production of furniture and tables in particular. Products based on plastic masses are durable, lightweight and sufficiently strong. Caring for them is easy. However, the presence of plastic in the bathhouse interior negates the charm of the bathhouse itself;
- Metal - due to the characteristics of steel, cast iron and tables made of non-ferrous metals and their alloys, their presence in the bathhouse is appropriate in the form of individual elements, but not the structure as a whole.
Types of wood for making bath tables
A wooden table for a bath is made from certain types of industrial wood that have the necessary consumer qualities. These include the following:
Linden. A pleasant, easy-to-work wood with well-structured wood of uniform color and a pleasant aroma. Retains its original qualities for a long time; Alder. Wood of this species should also be classified as a priority. Easily and predictably processed, satisfactorily resistant to warping under conditions of frequent temperature changes
The texture of the wood has an attractive appearance with minimal decoration and processing. When choosing commercial raw materials, special attention should be paid to the degree and quality of its drying; for alder raw materials this is fundamental and important; Aspen. It is distinguished by good quality solid wood, in which knots and other serious defects are rarely found. Materials of this type are affordable and well processed
Among the disadvantages, it should be noted the tendency to warping and drying out. It is worth remembering that aspen tabletops do not withstand significant mechanical loads very well; Poplar. In terms of their characteristics, materials made from this type of wood are close to aspen. However, despite being cheap and accessible, poplar products are not particularly durable; Oak. It’s especially nice to make a table for a bathhouse with your own hands from this wood. Its noble color, deep original texture, and spicy oak aroma distinguish it from a host of other species. Excellent strength and record durability put oak furniture beyond competition. The disadvantages include the high cost of conditioned wood and the tendency to split when fastened with self-tapping screws.
It is worth mentioning separately about the use of coniferous wood in our carpentry practice. Spruce and pine are among the most affordable lumber on the domestic market. However, making a table for a bathhouse with your own hands from such raw materials is not always rational. Firstly, all conifers are quite resinous, secondly, it is unlikely to obtain a beautiful and bright texture without subsequent processing and, finally, using them in conditions of high humidity means dooming them to a short life. From coniferous wood, it is worth using cedar and larch, and the latter is more preferable in terms of the cost of raw materials.
To summarize this section, we present a table reflecting the hardness of various types of wood, which directly determines the durability of the countertop and the resistance of its surface to mechanical stress:
| Wood type | Compliance with its hardness class, according to current industry standards |
| Boxwood, dogwood, white acacia | I class, very hard |
| Hornbeam, pear, ash | II class, hard |
| Beech, English oak, European maple | III class, moderately hard |
| Birch, elm, larch | IV class, moderately soft |
| Pine, spruce, alder, chestnut | V class, soft |
| Linden, aspen, poplar | VI class, very soft |
How to make: instructions
After we have shared with you a dozen options for do-it-yourself sauna benches, the drawings of which are given above, let's take a closer look at one of them.
Tools
Let's start with the tools that are needed to make a bathhouse bench with your own hands from wood. It is clear that carpentry has been around much longer than power tools, so the same result can be achieved, say, by choosing a groove with a chisel or milling cutter. However, using a power tool is more difficult because it requires both good skill and adjustment. Therefore, we will present a more “democratic” option with modern hand-held power tools:
- Miter saw;
- electric milling machine;
- screwdriver;
- electric planer.
Material
The entire bench is made of boards of the same width and thickness - 50 by 100 mm.
The total length of the boards used is 9140 mm.
This value needs to be cut into:
- three pieces of 1800 mm each (seat);
- two pieces of 170 mm each (fasteners);
- four pieces of 400 mm each (legs);
- four - 100 mm each (spacers);
- one - 1400 mm (cross member).
For fastening, use stainless steel screws.
And here is what the drawing looks like according to which our bench is made:
Do-it-yourself bathhouse bench: drawing
- Let's start by putting the boards that have not yet been cut in order - sanding them until even and smooth. This can be done with a plane or sander.
- Then use a miter saw to cut it into the required lengths.
- The seat boards need to be smoothed along the edges - see the video below to see how this is done with a router.
- Next, the seat boards are placed on a plane with the bottom side up, and liners 1 cm wide at both ends are placed between them.
- A distance of 200 mm is measured from each edge along the long side and 170 mm bars are attached in the middle.
- We attach a spacer block to each leg at a distance of 150 mm from the floor.
- We screw each leg to 170 mm bars and to the seat boards.
- After this, all that remains is to insert the crossbar and secure it.
Here is a video that clearly shows all the steps:
As you can see, there is not much work. All that remains is to finish sanding the ends, smooth out the necessary corners and think about whether impregnation or varnishing will be needed.
And here is the promised video on how to easily smooth corners using a router: