Despite the external similarity, most projects for bathhouse buildings require individual planning and taking into account the characteristics of the area, climate and method of heating the room. But there are many technical solutions of a universal plan, for example, heated floors in the bathhouse. It can be used without any particular concerns; heating the floor in a bathhouse, no matter where and how its box is built, will not spoil the project or add problems, and the level of comfort will be noticeably higher.
When installing a heating system, you have to cut grooves in the wooden floor
Installation of heated floors in the bathhouse
Heating wood or ceramic flooring first of all eliminates the main problem inherent in all rooms heated by wood stoves. Often, heating floors in a bathhouse seems to fade into the background. It is believed that warm air from wall convectors, water radiators or just a potbelly stove in the rest room is quite enough to heat and create comfortable conditions.
In fact, the heat in the bath with such heating methods is distributed extremely unevenly:
- The ceiling part of the room and the entire volume up to the level of an adult’s head is heated to a high temperature, warm air with slight overheating turns into “boiling water”, often burning the face and torso;
- The middle part remains moderate; it is most comfortable to be in a sitting position. The air is warm and dry;
- The lower part of the air flow, directly on the floor and in the adjacent layers of the bath atmosphere, is the coldest. The floor will be warm only if the owners, in addition to the brick stove, have blown their feet using an electric fan heater.
The problem is that all the heating surfaces of a water heating system or wood stove are located much higher than the floor level, at least 20-25 cm. In addition, due to convection, cold air entering from the street through the ventilation further cools the surface of the floor covering.
All rooms of the bathhouse suffer from similar problems, with the exception, perhaps, of the steam room, where the floor will be warm, if only because the air temperature below is 30-35oC, no less. In sinks, dressing rooms, and rest rooms, the floor, if it is not equipped with a heating system, rarely warms up above 12-15 ° C in winter, even if the base is insulated.
The only exceptions are sauna boxes installed inside residential private houses or commercial saunas operating 18 hours a day. In this situation, the building is heated almost constantly, and there is no need to install a heated floor.
Important! Installing heated floors in a bathhouse is not a whim or even a desire for comfort, it is primarily a concern for health.
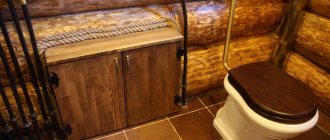
Everyone decides for themselves whether to wear felt boots in the waiting room and dressing room of the bathhouse in winter or whether to make a warm floor in the bathhouse with their own hands. Moreover, the presence of heating is also an excellent way to dry the surface of tiles, tiles or boardwalks after completing bath procedures.
Options for arranging heated floors
To heat the coating and heat the bathhouse premises, standard technologies used in residential apartments and houses are used. The design of a heated floor does not require special knowledge and skills; you can use standard sets of floor heaters.
Electric heated floor mounted on a metal mesh
There are only four main options for organizing floor heating inside a bathhouse:
- Electric cable heated floor;
- Heating using conductive films;
- Water floor heating with heat extraction from a boiler, boiler or built-in heater;
- Air heating, the surface is heated by a flow of warm air taken from a brick stove or sauna fireplace.
The first three options for heated floors can be equipped with your own hands at almost any stage of bathhouse construction. A furnace-heated scheme can only be implemented at the initial stage. The problem is that the stove itself must be equipped with channels for heating the air blown under the heated floor. Therefore, without remodeling the stove, it will not be easy to heat up a ready-made bathhouse.
The water-heated floor is laid on a compensating substrate
In addition, the choice of arrangement scheme is influenced by the size of the floor inside the bathhouse, its layout and the availability of resources. If the steam room is heated by a small metal stove, then perhaps the best option would be a scheme with an electric heated floor. For a large bathhouse with a brick stove, it would be more rational to organize heating with air or a water circuit placed in a screed of a warm base.
Film version of a heated floor for a bath
Warm floor in a water bath
This heating method is ideal for a large bathhouse complex, where the cost of providing heat using electricity is simply enormous. In addition, in winter, in cold weather, warming up a concrete screed or joists with floorboards inside a large bathhouse using only electricity will hit your wallet hard, and sometimes it becomes simply technically impossible. In this case, a warm water floor in a bathhouse becomes the only possible solution to the problem of combating the cold.
Structurally, a water heated floor consists of several contours of pipes laid on a special foam substrate and filled with cement-sand screed. The pipes are connected in parallel to a special manifold with control valves. A pump and a gas boiler for heating water are mounted separately.
To whom are floors good in Rus'?
Warm bath floors were invented a long time ago, by the ancient Greeks, and improved by the ancient Romans. However, keeping the Greek name for this invention is hypocaust.
From the point of view of convection and efficiency of the entire heating installation, the hypocaust can be called the optimal design. However, this design also has disadvantages, and significant ones.
Pipe layout diagram
Important! There is no point in making a heated floor in a bathhouse with heating of the coolant from an electric boiler; it is not economically feasible. Mainstream or bottled gas will be cheaper, and in addition, gas fuel can be used to heat the stove and sauna heater.
This is the safest option for arranging a heated floor, since there is no electrical wiring under your feet, which means the risk of receiving a painful or fatal electric shock is almost zero. The pipe can be laid in grooved channels in a concrete floor or under the foundation being filled with a self-leveling mixture. The thickness of the heated floor, taking into account the screed and floor covering, is 110-120 mm, the load on the foundation increases greatly, so backfilling with expanded clay, reinforcement and strengthening of supporting structures will be required.
The base of the heated floor must be insulated and reinforced under the screed, after which the surface is filled with mortar and covered with tiles
A heated floor in a bathhouse can be installed in 4-5 days; it will be possible to use it no earlier than after three to four weeks, depending on the air temperature. The costs of arrangement, taking into account the use of automation, installation of a boiler or boiler, are the highest of all possible options, but taking into account the operating costs, the water floor system pays for itself after 5-7 years of using the bathhouse.
You cannot save on materials and tools; repairing a heated floor with water is very difficult and expensive, even if the damage can be visually determined. Most often, this is a defect that occurred when laying the pipe in the floor of the bathhouse. Therefore, no amateur work; it is better to invite a specialist to install and weld pipes, fill screeds and pressurize water circuits. Water floor heating in a bathhouse can last 20-30 years without repair, with regular maintenance of the control equipment, boiler and periodic flushing of pipes, otherwise after 3-5 years the heating circuit in the bathhouse will be clogged with dirt and deposits.
Electric heated floor in the bathhouse
To organize heating, a special high-resistance cable is used. The diameter of the wire is 5-12 mm, so it can easily be confused with materials used in television or computer networks. A square meter of underfloor heating with a heating cable laid in the base can output 150-350 W/h into the room, which is more than enough to maintain comfortable conditions even in the absence of insulation.
A warm electric floor in a bathhouse is of interest for use in bathhouse conditions for the following reasons:
- Possibility of zoning and arrangement of floor heating only in those places where it is important and necessary. There is no point in making a heated floor at the entrance to the steam room or in the dressing room, at the furnace firebox and back; a heating cable will be useful in the locker room or rest room. Moreover, you can lay heated electric floors in a bathhouse both under tiles and under wooden floorboards;
- High reliability of wiring. It is much more difficult to damage a cable in durable polymer insulation, even under sauna conditions, temperature and humidity changes, than a graphite film or a soft water pipe.
If damaged, a cable heated floor in a bathhouse is much easier to repair than film or water heating.
Electric heated floors are sold either in rolls or as ready-made cables
Installation of underfloor heating system
To carry out the work, you will need tools and equipment: a container and mixer for mixing concrete, a spatula, usually scissors for cutting plastic pipes, beacons, a container for heating bitumen.
The materials you need to prepare are: ready-made dry sand-cement mixture (or its individual components), waterproofing (you can take roofing felt and bitumen), thermal insulation (for example, Penoplex), damper tape, clamps, reinforcing mesh, fiberglass, mushroom dowels, plastic pipes diameter 1.6 cm.
Fiber fiber for screed reinforcement
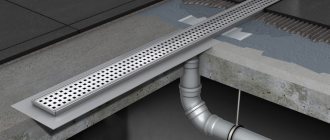
Step 1 . The base is cleaned. If defects are found in the form of cracks or potholes, it is necessary to pour a thin screed to level the surface (providing for drainage if necessary). The drainage chute must be made of stainless steel or plastic. After this you will have to wait for the concrete to harden.
Step 2 . The base is being waterproofed. To do this, heated bitumen is applied in an even layer to the subfloor. Roofing felt sheets are placed on it (with an overlap of 100 mm). After this, the procedure is repeated: a layer of bitumen and a layer of roofing material. In this case, the strips of rolled waterproofing in different layers should be placed perpendicular to each other. The unpleasant smell will disappear over time.
Waterproofing the floor in the bathhouse
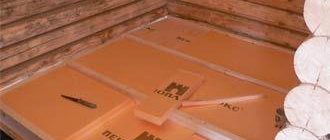
Step 3 . To reduce heat loss, thermal insulation is installed. She must be tough. The thickness of the sheets is at least 100 mm. During installation, you need to ensure that there are no gaps between the elements.
Laying thermal insulation
Step 4 . A metallized substrate is laid.
Step 5 . A reinforcing mesh is placed (wire diameter - 4 mm, mesh cell size - 150x150 mm). It is needed to give rigidity to the structure and secure the contours.
Step 6 . The perimeter of the room is covered with damper tape. It is made from foamed polyethylene. The purpose of the tape is to compensate for possible thermal expansion of the concrete screed (this effect may cause cracks to appear). It has an adhesive layer applied on it for ease of installation. However, it is recommended to additionally secure the tape with dowel mushrooms.
Step 7 . The plastic pipe circuit is laid in a spiral. To do this, at the initial stage, pipes are placed around the perimeter of the room. Gradually, in increments of 25 or 30 cm, they wrap towards the center. From the central point, the contour layout is carried out in the opposite direction (parallel to the previous one) so that in the end there is 12.5 or 15 cm between the pipes.
A circuit of plastic pipes has been laid
The contour is fixed using clamps that secure the pipes to the reinforcing mesh.
Step 8 . The thermal circuit is connected to the heat exchanger. A test run of the system is being carried out. It is recommended to leave the heated floor running for two days. This way you can check its functionality and tightness of connections. If no problems are found, you can proceed to filling the system with screed.
Step 9 . A solution of CPS and water is mixed. For this it is more convenient to use a concrete mixer. But if you don’t have it, you can make do with improvised means (a large container and a shovel). To increase the strength of the base, it is recommended to add fiberglass to the mixture.
Prices for electric concrete mixers
electric concrete mixer
The performance characteristics of a concrete composition can be improved by adding a plasticizer.
Instructions for use of plasticizing additive
Beacons should first be installed on the base to determine the filling level. The screed should rise approximately 5 cm above the pipeline. If water needs to be drained from the room, it is necessary to provide some slope in the direction of the drain holes. The concrete solution is poured onto the base and distributed evenly (using a rule and a spatula) over the beacons. Once the floor level has been determined, the beacons can be pulled out, and the resulting depressions must be filled with the same solution.
Pouring concrete solution
After the concrete base has gained strength (this usually takes 4 weeks), you can begin laying the decorative coating. Most often, tiles act in this capacity. We must not forget that before fixing the tiles to the adhesive, the screed must be treated with a primer.
All work must be performed as carefully as possible so that later, due to mistakes made, there is no need to repeat the process, which will require significantly more effort and time.
Warm floor in the bath
High-quality water heating in a bathhouse is quite possible for anyone who has at least some skills in finishing work. Using a furnace as a heat source, it is possible to significantly reduce equipment costs, as well as energy costs. The result of the work will be comfortable conditions for everyone who likes to spend time taking bath procedures.
Features of cable heating
Electric heated floors have many other advantages. For example, cable heating is not afraid of direct contact with water and easily tolerates deformations and residual stresses in a cement-sand screed, if, for example, you lay a heated floor in a bathhouse under tiles. In addition, the system will not require significant capital costs; it is quite possible to make electric heating yourself, without resorting to the services of specialists.
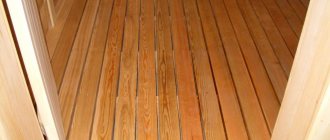
The cable has proven itself to be excellent when installing wooden heated floors. This is one of the few methods that makes it possible to effectively dry and warm the space under plank floors. However, in this case it will be necessary to treat the wooden logs and beams of the base of the bathhouse with fire-prevention impregnations. For completely wooden bathhouse buildings, it is better not to use electric cable heating.
There are also disadvantages, for example, in winter, when heating a bathhouse, one square meter will require at least 300 Wh of electricity consumed. For a small country sauna of 20-25 m2, the warm floor will “eat up” at least 4-5 kW/h in one visit. In general, an electric floor can quickly warm up the interior of a bathhouse, but it is not suitable for long gatherings in a steam room.
In addition, cable heating uses an electric current of fairly high voltage. Therefore, each bath room has its own circuit, and the cable system is necessarily covered with additional insulation. Unlike an ordinary apartment, the safety of a heated floor in a bathhouse greatly depends on several factors:
- Quality of the cable tie poured over the cable;
- There are no cracks or cavities through which water could leak from the surface to the conductor;
- Compliance with the radius of rounding and the distance between turns recommended by the manufacturer.
Another disadvantage of an electric floor is that heating occurs unevenly, as a result of which floor coverings, laminate, linoleum or plastic tiles quickly become unusable.
Diagram of cable laying in the base of a heated floor
The cable heater in the bathhouse is always laid in a “snake”. On the one hand, this simplifies installation, on the other hand, this scheme makes it possible to equalize the heating of the heated floor. In a steam room or washing room, the heating wire is embedded in the screed, resulting in a thick floor, 50-70 mm thick.
For a rest room or dressing room with wooden floors, installation is carried out on a fiberglass or, in extreme cases, metal mesh with reflective insulation made of aluminum foil.
In this case, the mesh is laid on a layer of mineral wool, and the cable should not touch the thermal insulation, otherwise the polymer sheath with the heating wire may melt. For the same reasons, you cannot attach wires to wooden floor parts.
A two-core cable can be used for heating; in this case, the end of the wire is simply closed with a contact plug. For single-core systems, you will additionally need to lay a ground and ground wire. In both cases, a temperature sensor of the thermal control system is built between the turns.
Recommended air speed in ventilation ducts
The speed of movement of air masses in the channels is not limited or standardized; it should be taken based on the calculation results, guided by considerations of economic feasibility.
Recommended air speed for various ventilation systems:
- for general ventilation systems with air duct cross-sections up to 600×600 - less than 4 m/s;
- for ventilation systems with a duct cross-section of more than 600×600 - less than 6 m/s;
- for smoke removal systems and specific ventilation systems - less than 10 m/s.
Correct calculation of air speed allows you to build an effective ventilation system!
Source
Warm floor in the bathhouse film
In this case, ready-made tapes with thin graphite strips printed on top of plastic are used to heat the floor covering, performing the functions of a low-voltage heating element.
To install the underfloor heating strips, you need to spread them on a special heat-insulating substrate, cut to length and secure with heat-resistant tape. Each tape is connected to two electrical wires with copper clamps, after which all contacts are insulated with mastic.
If the floor is laid in a recreation room, then it will be enough to lay a waterproof laminate on top of the heating tapes. For the remaining rooms of the bathhouse, the film heating system is filled with a polymer concrete screed for further laying of ceramic or tiles.
The thermostat and temperature sensor system makes it possible to very accurately maintain the degree of floor heating, so the film is often laid not only in the “inhabited” areas of the bathhouse, but even at the entrance to the room, on the covered terrace and in the locker room. Electricity consumption is noticeably lower than in the case of cable systems, so heated floors can be used in most rooms of the bathhouse, except for the steam room and places adjacent to the heater.
Film heated floors are ideal for a washing room; the thickness of the screed under the tiles is only 30-50 mm, taking into account waterproofing.
The disadvantage of the system is low heat generation. The film can be used without restrictions for washing or heating the floor in the living room of a bathhouse, but its capabilities will not be enough as a heating system. Another disadvantage is that film heating requires careful handling and easily breaks down during the installation stage.
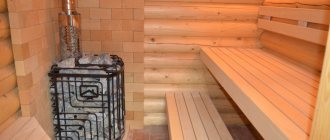
Warm floor in the bathhouse from the sauna stove
In practice, two heating systems are used. The schemes are very similar and differ only in the method of intake of warm air. In both cases, hot air heated in the channels of the brick oven of the bathhouse is used for heating.
The simplest and most common version of a heated floor in a bathhouse from a stove is shown in the diagram.
In this case, the floor in the bathhouse is heated by air flows ejected from the stove through the windows in the lower part of the brick body. Here below, but in the opposite corner from the stove, there is a receiving window for taking in cold air for heating.
Such a heated floor scheme is convenient because, in addition to heating the surface, wooden floorboards or tiles very quickly and effectively get rid of any amount of water spilled on the surface.
The second option involves taking warm air from outside the bathhouse. Air flows are heated by heat in the ceramic chamber and are directed through clay or asbestos-cement pipes laid in the underground. The walls and ceiling of a steam room are often heated in this way.
In general, the system turns out to be very economical and effective enough to warm up the bathhouse even in the most severe frost in 30-40 minutes. time.
Options for arranging kitchen units on 15 square meters
In this block we will talk about the layout and placement of the most important thing - the kitchen unit. And from there you can “dance”, shaping the further interior of the kitchen. It’s much easier to figure out how to furnish the remaining area.
So, what options are available to you at this quadrature?
1. Straight kitchen 2. U-shaped 3. L-shaped 4. Set on two sides of the walls 5. Set + island 6. Set with bar counter
We will devote a separate section and a selection of photos to each of these types of placement (except linear) so that you can see how it all looks in the interior.
Now let's discuss all the options in more detail.
How to properly make a heated floor in a bathhouse
First of all, you will need to take care of waterproofing and insulating the foundation. If the water is very close to the surface of the soil, then it is best to pour a monolithic screed with a thickness of at least 100 mm into the base of the bathhouse. An electric heated floor turns out to be quite sensitive to the appearance of condensation, and often it is condensed water and moisture from the ground that causes heating systems to fail.
It may seem that pouring a powerful concrete slab is an excessive solution, both in terms of strength and insulation, but practice confirms the opposite. It is the concrete base that guarantees the durability of the heated floor in any climatic conditions.
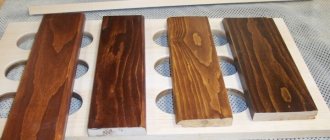
What materials do you need to purchase?
To make such a floor you will need the following materials:
- coil, heat exchanger - you can make it yourself or buy a store-bought one, but since the dimensions of the furnaces are extremely individual, making it yourself is the best option (nominal dimensions: 3 meters of inch pipe),
- storage tank - a metal barrel with a wall at least 5 mm thick, with a breather installed on it (prevents steam formation, if this occurs). The sum of the volume of the storage tank and pipes must be at least 100 liters,
- thermal head - is a temperature controller of the system,
- bypass - provides flow from forward to return,
- three-way valve - regulates flows through the bypass,
- circulation pump - circulates fluid in the system,
- pipes are the main heating element,
- collector - distributes fluid flows into the system circuits,
- additional elements - insulation, waterproofing, vapor barrier, substrate, reinforcement, fasteners, fittings.
Floor installation and preparation
Before laying the cable, you need to insulate the slab; to do this, lay a layer of penoplex or any extruded polystyrene foam on top; the thermal insulation layer must be at least 50 mm. The next step is waterproofing in two layers, usually a layer of mastic is applied to the insulation and a thick polypropylene film is glued. The seams can be soldered or sealed with heat-resistant tape.
Before laying the cable, the floor must be insulated and covered with a layer of waterproofing
The next step is to lay a layer of moisture-resistant plasterboard, seams and joints between the edges and around the perimeter of the room are sealed with silicone sealant. The edges are trimmed and the cable can be laid.
Preparatory work
Like any construction, the beginning was made from the foundation. First, they removed a small layer of soil and made a gravel backfill. The foundation was planned and made monolithic (slab). Concrete steps were laid around the perimeter, reinforced lining was made in the corners, and sand was poured inside. The sand was well leveled, compacted and expanded polystyrene slabs were laid on it, the joints between them were foamed with polyurethane foam.
monolith foundation for a bathhouse
foundation - polystyrene foam
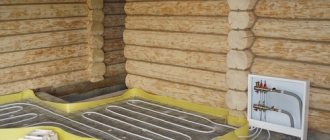
Expanded polystyrene also had to be laid vertically along the inner perimeter of the foundation in order to repel the cold bridge from the walls. A sewerage system (water drainage) was pre-made so as not to damage the plastic floor pipes later. After this, we laid out a roll of foil insulation - ecofol, which is specially designed for heated floors. The joints were taped with foil tape.
Step-by-step installation instructions
Before installing the cable, you must select a place on the wall of the bathhouse to install the thermostat. If the heated floor is installed in a damp room, for example, in a steam room or sauna, or in a washing department, then the location for the control device is chosen in the dressing room or in the relaxation room. In other cases, it is enough for the box to be on the wall of the bathhouse at a height of at least 30 cm. This is done in order to exclude the influence of warm air on the control electronics.
Wiring installation
From the thermostat installation point you will need to cut two grooves - grooves. The first is needed to connect the underfloor heating cable, the second is used to lay the electrical network from the installation site of the bath meter to the heat regulator. In both cases, a two-core copper cable is used, laid in a plastic corrugation. The cross-section should be in the range of 1.5-2.5 mm2, this is enough to connect a heated floor with a power of 4.1-5.9 kW.
Preparing for cable installation
Next, we treat the rough surface with a primer for better adhesion to the screed material and apply cable laying markings. The snake will have to be at least 50 mm away from the walls of the bathhouse.
The next step is to lay reflective thermal insulation based on aluminum film and polyethylene foam. The panels are spread on the floor of the bathhouse and glued at the joints with heat-resistant tape.
The cable heater must be fixed to the mounting tape, otherwise during the process of pouring screed or laying tiles, the wire will move and the system will burn out.
Cabling
Before installing the heating wire, you will need to attach adhesive tape; it is fixed with dowels through the reflective layer to the plasterboard base. The distance between the strips is chosen within 0.5-1.0 m.
Wire laying begins from the point where the wire is connected to the thermostat. The cable is laid out like a snake, strictly observing the pitch between the individual sections recommended by the manufacturer. The wire is fixed to the mounting tape with bent tendrils - clamps. We plug the two-core wire on one side, the single-core wire is connected to the thermostat through an additional piece of wire.
We put the temperature sensor in a plastic corrugation, plug it with a plug, place it between parallel sections to a depth of 50 cm and connect it to the thermostat.
All that remains is to fill the floor of the bathhouse with self-leveling screed and, after the surface has dried, prepare it for laying tiles or floorboards. If the heating system is installed in the washing compartment of the bathhouse, then you will first need to install beacons and, after pouring the solution, plan drain slopes to the installation site of the drain or bellows.