Not everyone wants to install wooden baths: there are a lot of hassles with them, both during construction and during operation. Although the use of non-wooden materials is not “feng shui”, foam block baths behave much better in this regard. The main thing when building with your own hands is to choose the right project, and then do everything according to technology. And there will be no problems.
Foam blocks are called foam concrete or cellular lightweight concrete. This material is far from new, but with the development of technology it is becoming increasingly widespread: new materials make it possible to eliminate the disadvantages that are inherent in them (hygroscopicity). Foam blocks are three different materials created using similar technology:
Baths made of foam blocks: although not according to Feng Shui, but in operation without problems
- Aerated concrete. During production, aluminum powder is added to cement diluted with water. As a result of a chemical reaction, the mass begins to bubble. At a certain stage, it is placed in an autoclave, where the aerated concrete hardens. Due to the nature of the technology, private production is difficult - autoclaves are not cheap equipment. That’s why they are made at enterprises, and it is in this group that the block sizes have the smallest deviations. Good geometry allows for minimal seams when laying, which reduces construction costs. Sometimes this material is called autoclaved foam concrete or aerated concrete. Silica concrete is white, gas blocks and foam blocks are gray in different shades
- Foam concrete. The technology is similar, but without temperature effects. A foaming agent is added to the cement mortar, the mass is mixed, and then poured into molds. Hardens naturally. With this technology, everything is simple and you can prepare such material at home, but the blocks are obtained with fairly large allowances in size.
- Silica concrete. This is aerated concrete in which lime is used as a binder. It differs in color - it is white, and has the greatest hygroscopicity among all the materials presented.
Foam concrete of any type is good because it has a relatively low price. In addition, the building is constructed quickly, since the blocks are large in size and weigh a little more than ten kilograms. One person can easily handle carrying and installation. It is not surprising that more and more often bathhouses are made of foam blocks: you can build them with your own hands. All you need is a project that you can implement on your own with a little modification. Below are ready-made drawings of baths of different sizes and formats.
Foam block bath projects
Let’s immediately talk about what should be present in the layout of a good bathhouse. Traditionally, all drawings of baths include a steam room, a sink and a relaxation room. The distribution of space can be very different: a large steam room and a small sink, or, on the contrary, a spacious relaxation room and small functional rooms. Choose what you like best and what seems more correct: everyone has a different idea of how everything should be organized. And don’t be afraid to move the partitions in the way that is most convenient for you; then you’ll put a foundation under them and everything will be fine.
What is certain is that when using the bathhouse in winter, the entrance should not be directly to the rest room, but through the vestibule. If it is not in the bathhouse design that you like, you can either fence it off - if the space and configuration allows, or attach it outside.
Pay attention to the position of the doors. They should be located so as to take up as little space as possible, because the passages cannot be exploited in any way. The stove is selected according to the volume of the steam room, but take it with a reserve, especially if it will be heated from another room. The heat will be partially used to heat this room, which means more power is needed. Read about choosing a wood-burning stove for a sauna here.
Read more about the layout of a bathhouse in the article “Optimal bathhouse: what is it like?”
Bathhouse project 5 by 5.5 from foam blocks
A small bathhouse made of foam blocks.
Three-dimensional drawing In this layout option, the steam room has a fairly large area - slightly less than 6 squares. The smallest room is the washing room - 5.7 m2. Please note: there is a window in both the steam room and the washing room. It should be in a Russian bathhouse to ensure ventilation between visits to the steam room. It should be located on the wall opposite the entrance. But in terms of level it will need to be lowered: the upper edge of the window should be at the same level as the door lintel. For more information about how to place windows in a bathhouse, read the article “Bathroom windows: where to install and what sizes.”
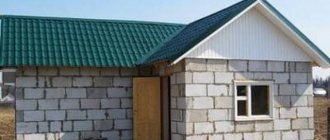
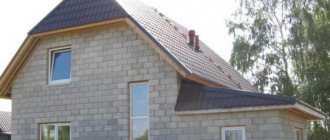
Regarding the vestibule, we have already written, if you plan to steam in the winter, either fence off part of the rest room, or build a vestibule outside. Installing a partition with such a layout will be problematic: you will have to move the doors to another corner. But this is a good option. In the photo below you will see the implementation of this project. The bathhouse is built from gas blocks; the roof is planned to be made of metal tiles.
Photo of the finished foam block bathhouse project
Project of a 6 by 6 bathhouse made of foam blocks
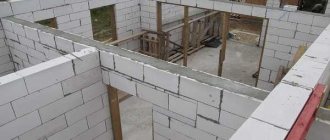
A well-thought-out layout of a compact and functional bathhouse is shown in the photo below. The project is drawn taking into account the thickness of the walls and partitions; there are “clean” dimensions of the premises. The entrance doors and windows are not marked on the plan; the vestibule will be built outside.
Bathhouse project made of aerated blocks
The premises turned out to have the following areas:
- steam room - 5.3 m2;
- sink - 7 m2;
- bathroom - 1.8 m2;
- locker room - 1.7 m2;
- rest room - 11.2 m2;
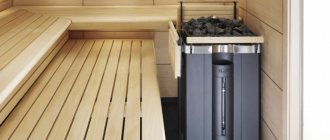
The stove is heated from the rest room, the steam room has two-tier shelves for lying on, and there is a small shelf for sitting.
Drawing of a bathhouse made of aerated blocks with a veranda
Layout of a bathhouse made of 6 by 3 foam blocks (several projects)
Layout options for a 6 x 3 bath made of gas blocks
These are far from the only options for planning a 6 x 3 bath. As you can see, they differ in the size of the steam room and shower, as well as their location relative to each other. In one version, a stove is also installed, which is heated from the steam room, in the other two - from the relaxation room.
Read about how to install a stove in a bathhouse here.
Advantages and disadvantages of foam block baths
Foam concrete blocks are good because buildings made from them are very warm and light. A 30 cm thick aerated concrete wall has thermal conductivity characteristics similar to a 1.7 m thick brick wall. This means that when building a house, it does not need additional insulation. When building baths (if the wall is sufficiently thick), only the steam room requires insulation, and then from the inside.
Read about insulating a steam room in a bath here.
For comparison, the thickness of walls made of different materials is presented in the form of diagrams
But the following point must be taken into account: these are the characteristics of walls laid on a thin layer (1 mm) of special glue. If you use ordinary cement-sand mortar (the thickness of the joints is then 10-12 mm), the performance will be much worse. This is because the solution in this pair conducts heat many times better, that is, it “flows” through it.
It is also worth considering that only blocks of ideal geometry with deviations in size of no more than 1 mm can be placed on glue. You need to look for these. Otherwise, a 1 mm layer of glue is clearly not enough to correct these deviations. So they put aerated concrete on a thick layer of mortar, not glue (glue is much more expensive, but due to low consumption the masonry is more economical), and then insulated.
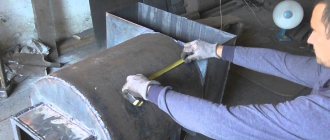
Foam blocks are also good because they are easy to work with. Although quite large in size, they have a low weight - 10-14 kg. So one person can easily handle the masonry. They are cut with a hand saw, but it is better to look for a blade using foam concrete rather than metal - it will be easier to work. If necessary, they can be grooved quickly and easily, even with a hand tool.
Cutting foam blocks right on site with a saw
One tip: look for blocks that have a tongue and groove design. This will make it easier to achieve tight connections, and there is an additional guarantee that the seams will not glow (this happens with a lack of experience).
The relatively low density of aerated concrete is both an advantage and a disadvantage. The disadvantage is that nailing anything to such walls is problematic. For fastening, special dowels are used, which have an increased surface of the spacer elements. Advantage: the design is lightweight, which allows you to make less massive foundations. Less massive foundations mean less costs, because this cycle can account for up to 50% of the cost of the entire construction.
The second serious disadvantage of aerated concrete is its high hygroscopicity. Therefore, when building bathhouses from aerated concrete with your own hands, you need to make hydro- and vapor barriers both inside and outside.
Characteristics of foam concrete used for private housing construction
Among porous concretes, gas blocks absorb moisture more than others, so from this point of view they are not the best choice for building baths. But it is precisely for its production that more expensive equipment is used - the peculiarities of the technology. And as a result, the blocks have better geometry. And gas blocks are often placed on glue rather than on mortar, since the geometry of the material allows this. So from the point of view of thermal conductivity, this material is preferable. And problems with hygroscopicity are solved by organizing a ventilated façade and/or impregnation to reduce hygroscopicity.
Combination options
Despite the fact that an extension seems like an obvious thing, it can mean three completely different options for adding a bathhouse to a house.
- You can make a connected foundation and use one of the walls of the house as a ready-made wall for a future bathhouse.
- You can make a separate foundation and not even use the wall of the house as the wall of the bathhouse, but combine everything with a common roof.
- You can make a bathhouse on your own foundation, with your own roof, a meter or more from the house, but connect the house and the bathhouse with a canopy, ensuring a quick and dry transition from one building to another. Or you can make a completely closed vestibule between them.
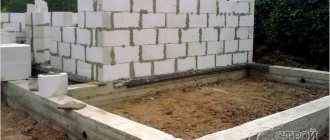
Strip foundation. Photo StroyDom
These options are far from equivalent to each other. It seems that if you use a common wall, you can reduce the amount of building materials , but below you will read about foundation shrinkage, and only after that start thinking about the benefits of this option.
As for the option with a common roof, it will only be suitable if you provide for the possibility of a hinged connection or any other that can compensate for the possibility of uneven movement of the two buildings as a result of frost heaving and other forces acting in the ground.
The option with a completely separate bathhouse and vestibule raises the least amount of concern about destruction associated with ground movement, the main thing is that this separate structure is recognized in the BTI as a reconstruction of the house, and not as a separate permanent structure that you placed next to the house.
Sauna walls made of aerated blocks
For central Russia, a block thickness of 25-30 cm is sufficient; for regions located further north, 35 cm or more may be needed. But the question here is more about density. In this material, the lower the density, the warmer the wall: more air is contained in the pores, and there is less concrete through which heat escapes. At the same time, a larger amount of air and a smaller amount of concrete leads to the fact that the strength of such a wall is slightly lower. But you need to take into account that changes in thermal conductivity and changes in density are not very large, but they exist.
For low-rise construction, gas blocks D400 or D500 are most often used. The recommended thickness of external walls in residential premises is 300 mm; the same material is used for partitions, but their thickness is 150-200 mm.
Brands of aerated blocks and their characteristics
Another feature of the construction of bathhouse walls from foam blocks is the need for reinforcement in every third or fourth row. This measure makes the structure more durable and monolithic.
Soundproofing characteristics of foam concrete of different brands and their use for different types of walls
For reinforcement, two ribbed rods with a diameter of 12 mm are used. For them, grooves are cut out in the laid blocks. This can be done with a grinder, a hand-held circular saw, a jigsaw or a hand-held wall cutter for aerated concrete.
This is a manual wall chaser - one of the tools for working with foam blocks
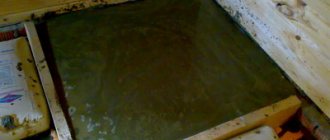
The distance from the edge of the block to the groove is at least 5 cm, the depth is at least 12 mm, so that the rod does not protrude above the surface. The groove is partially filled with mortar, the reinforcement is laid, a layer of glue is applied on top and the next block is placed.
Please note that at corners and at the junction of walls, the reinforcement bars are bent and not cut off
Insulation
If the bathhouse constantly maintains a positive temperature, then insulation from the outside is desirable: the costs of maintaining that “+” are lower. If the bathhouse is heated only periodically, then there is no point in external insulation. It’s already warm in the summer, but in the winter it will still be minus in an unheated room.
In an unheated bathhouse you need to have good internal thermal insulation. Then it will be possible to heat the room without touching the walls. The insulation layers are discussed in more detail below, since without a vapor barrier they do not work as they should.
Bathhouse as an extension to the house: design features
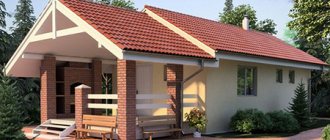
What should a bathhouse be like? An extension to a house of this type has various embodiments. The bathhouse can be combined with the house in completely different ways. If desired, you can equip a veranda or terrace for a pleasant relaxation in the fresh air after bathing procedures.
Finished projects
If an unusual layout is not planned for the future building, you can use ready-made projects. Simple construction plans can be easily found online. If you want something unusual, you can turn to specialists. They will help bring to life the most daring and unusual ideas in compliance with all safety requirements. But such services are not cheap.
Waterproofing and vapor barrier of walls
The problem of hygroscopicity of gas blocks during the construction of baths is solved quite simply today: there are cement-based impregnations with polymer additives that significantly reduce the amount of moisture absorbed by the material (such as “Penetron”). They can be used to coat the finished building inside and outside (in two layers). This will protect against water in its liquid state. But it is better to make a ventilated facade on the outside: it is more reliable in the sense that it protects from precipitation and makes it possible to ventilate the wall, drying out the steam present in it.
Walls made of foam blocks are coated with impregnations to reduce hygroscopicity
But in the most problematic rooms - the steam room and washing room - additional protection from steam will be needed. Vapor barrier from the inside will be done using a special film. Moreover, for a steam room they often use foil on a cardboard or paper base (Izospan FB), for a washing room you can get by with a regular vapor barrier.
Steam room wall insulation
You can do it differently: without impregnation. It costs a lot, and the consumption is decent - at least 7 liters per square meter. To reduce consumption, you can first putty the wall (with breathable putty) and then treat it. But in this situation, labor intensity increases.
If you provide good ventilation, there will be no problems without impregnation. For example, a cake of insulation and waterproofing in a steam room made of aerated concrete can be made like this (from the wall, inward):
- sheathing;
- heat insulator (basalt wool with minimal formaldehyde release) 5 cm thick;
- foil paper taped at the joints and in places of fastening with foil tape;
- counter-lattice creating a ventilation gap of 3-5 cm;
- lining.
The steam room uses foil vapor barrier on a paper or cardboard basis
If you ensure normal ventilation of the facade from the outside, and do not close the pores tightly, such insulation should work normally, and it will dry out quite well. It is only important to make the vapor barrier from the inside (from the steam room) reliable. For this film, the films are laid with an overlap of 10-15 cm, and at the joints (two strips are obtained) they are glued with double-sided tape.
Read about how to make lathing here. How to nail a lining in a bathhouse is written here.
There is a second approach to thermal insulation of walls. It is based on preventing moisture from reaching the outer wall. In this case, it is recommended to build a frame inside that will completely cut off the walls from moist air.
A foam block bathhouse must have a good ventilation system
To do this, a vapor barrier is placed on the walls, a sheathing is placed on it, then a rough wall, another sheathing, between the beams of which the insulation is laid out. It is covered with another layer of vapor barrier film, on top of which the sheathing and finishing (lining) are already placed. This frame “eats” about 20 cm around the perimeter. A luxury that not everyone can afford.
In both cases, for effective ventilation of the insulation, closed on all sides with films, it is necessary to make two ventilation holes in each wall, closed with doors. The holes are not through. They do not go into the steam room (washing room), but end in a layer of insulation. In order not to reduce the temperature, the doors are closed while vaping. They are opened to dry after the procedures, because steam will still get inside, albeit in smaller quantities.
With any solution, the bottom of the wall 10-15 centimeters is decorated with ceramic tiles - they protect well from splashes, covering the wettest part. And higher up (but with an overlap in height onto the tile) comes the sheathing.
For waterproofing in the steam room, there is another option - gluing foam glass slabs. This material is quite expensive, but its waterproofing is excellent and there are no leaks. There is foam glass: European, Belarusian, Chinese. The most expensive and highest quality is European, the cheapest and lowest quality is Chinese. They “put” it on a special glue, there is no hassle with gluing: everything is easy and simple. To achieve the required degree of waterproofing, a layer of 50 mm is sufficient.
Washing room wall insulation
There is not much point in walling up such a pie in the sink: if the walls are finished with tiles laid with special glue, the problem is easier to solve. True, it still requires treatment: first, a layer of plaster is applied to close the pores of the aerated concrete, and then a layer of thin-layer hydrophobic waterproofing (these are cement-based compounds).
It is better to lay tiles on the walls in the washing room
It is only important to coat the walls well with liquid waterproofing, following all the manufacturer’s recommendations. This coating works simply: it penetrates the pores of the concrete. The polymers contained in it begin to crystallize, and the growing crystals prevent the passage of water. The amount of water absorbed becomes significantly smaller.
The same composition can be used to treat walls outside. But such impregnation costs a lot, and the consumption is high. Moreover, the facade still needs finishing in this case: the surface is not very attractive.
In the washing room and steam room on the floor, you can apply a coating of waterproofing (with rubber paint for swimming pools) along the screed, and lay tiles on top
Interior wall decoration
A lot of questions arise with baths made of aerated concrete. Including interior decoration. We decided on the steam room - it definitely requires lining. In the sink, it is more advisable to lay tiles on the walls.
What remains is mainly a rest room, sometimes a vestibule. Many people would like to have wooden walls. Since the humidity will still be high, you can attach a vapor barrier film to the walls. The sheathing will already go on top, and the finishing board will go to it.
It is better to leave a ventilation gap of about 2-3 cm under the lining
If a good ventilation system is thought out in the bathhouse, then you can completely do without a vapor barrier: aerated concrete both absorbs vapors and releases them. The main thing is to provide him with this opportunity: to organize air movement along the walls. This is done using lathing, which provides a gap of 2-3 cm between the finishing material and the wall. As soon as the lathing is filled vertically, air circulates from bottom to top without problems. So the lining is packed horizontally.
Documents for construction permission
In order for a bathhouse in an extension to a house to be considered legal, the owner must contact the local BTI with an application for reconstruction of the home.
You must have with you:
- passport;
- document confirming ownership of the site;
- extract from the Unified State Register of Real Estate;
- a reconstruction project with a detailed indication of the characteristics of the future building and a list of all materials;
- communication connection diagram.
The application is reviewed within 7-10 days, after which a reconstruction permit is issued, which is valid for 10 years.
Roof
Quite a lot of questions arise when building a bathhouse from aerated concrete with your own hands, related to the construction of the roof. After all, it will not be possible to reliably attach a complex structure to such blocks.
Therefore, a reinforced belt is installed over the top row of blocks: a frame is knitted from four bars of reinforcement, which is filled with concrete mortar. For longitudinal reinforcement, a ribbed rod 8-14 mm in diameter is laid, transverse posts are made from a smooth rod 6-8 mm. The installation step of the transverse posts is 100-150 mm. The height of the armored belt is 200-300 mm, depending on the type of roofing material used, snow and wind loads in the region.
How to make a reinforcing belt for installing a roof on a bathhouse made of foam blocks
You can make an armored belt in several ways:
- Along the perimeter of the wall (width at least 200-300 mm) install removable formwork made of boards, fiberboard, OSB, etc. The lower part of the boards is fastened with self-tapping screws to the blocks, then the reinforcement is laid and then the edges at the top are tightened with transverse bars (so that the mortar does not expand the formwork). The solution is poured into this structure. Just note that the reinforcement must be filled with concrete on all sides with a layer of at least 5 cm thick.
- There are U-shaped blocks. The top row is laid out from them. Then a layer of insulation (which is not afraid of moisture) is laid along the inner edge, then associated fittings are installed. Fill everything with concrete mortar. In this case, the blocks play the role of permanent formwork.
- Almost the same design can be made using thin wall blocks. Along the edges of the wall, blocks 50-60 mm thick are installed on glue. The block directed inside the room is laid with a layer of thermal insulation, reinforcement is laid, and concrete is poured.
Concrete for the armored belt is used no lower than M 200, pouring is done at a time. To ensure uniformity and increase strength, excess air must be removed from the solution. If you still have a concrete vibrator after pouring the foundation, you can use it. If not, take the reinforcement pin and bayonet the solution well. If the weather is hot, the concrete is covered with film. Work on installing the rafter system can begin no earlier than 4 days later.
What you need to know about the foundation
Building a house and pouring a foundation changes the properties of the soil around the structure. Within 3-5 years, it is unacceptable to erect new buildings near a new home, especially on a connected foundation. It is necessary to wait until the soil around has stabilized and the building has completely gone through all stages of shrinkage. Is it possible to somehow attach a bathhouse to the house?