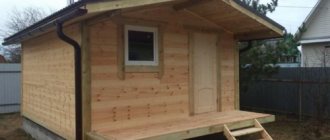
Do you love saunas enough to decide to make one yourself? If the desire to regularly receive excellent steam is really strong, and spending money on the services of contractors is not at all useful, then it makes sense to thoroughly study the technology and make a frame sauna with your own hands. In fact, there is nothing extremely complicated about this, but in terms of reliability and safety it will be in no way inferior to the usual structures made of timber or rounded logs. All you need is to decide on the size, and detailed step-by-step instructions will help you avoid common mistakes.
Advantages and disadvantages
Properly using all the advantages and, if possible, leveling out the existing disadvantages - perhaps this is the main task of a person who undertakes the independent construction of a frame bathhouse. If you have studied the projects of bathhouses made of foam blocks and seen what shortcomings this material has, do not think that everything is so rosy with frame structures. Let's not mislead you: there are disadvantages in every business, and therefore the best way to deal with them is to carefully study them. Actually, let's start with them.
Flaws
- possible shrinkage of the bath over time;
- the need for high-quality insulation and the associated increase in costs;
- material and time costs for finishing - both internal and external;
- careful care and careful use.
It is no coincidence that we started with the minuses. So you will immediately see the pitfalls that the construction of a frame bath is associated with. And if, after getting to know them, they seem to you not like large cobblestones, but like small pebbles, then pay attention to the following advantages of the chosen type of construction.
Advantages
- lightweight construction does not require grueling preparation of a solid foundation;
- retain heat well, but only with high-quality insulation;
- attractively cheap assembly;
- environmental friendliness and resistance to vibrations in the earth's crust;
- the ability to build a frame bathhouse in the shortest possible time, even in difficult weather conditions.
If the advantages still outweigh the possible disadvantages, and you still want to build a bathhouse of this type, then proceed to the next stage.
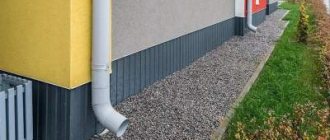
Arrangement of the roof of the building
For such a small structure as a bathhouse, you can build a gable roof. It is safer to assemble all roof elements on an open plot of land. The rafter system is made of timber with a section of 150x50 mm. To avoid mistakes, it is better to make a preliminary layout and then repeat the assembly of the rafters.
For the roof frame, you need to nail the two rafters together at the top end. The bottom of the rafters must be placed on support points and secured. Use a crossbar (crossbar) to connect the legs of the rafters using screws.
When the frame is ready, you can begin installing it. First fix the front structural elements. Use a construction cord as a guide, stretching it between the pieces. It should run along the line of the roof ridge. The remaining elements must be mounted at its level
The distance between the rafters can be selected individually; usually 1.2 m is used. Between the rafters, the location of the chimney must be taken into account. Use a plumb line to check the level of each element being installed. If there are deviations from the vertical, level the position by placing a piece of board under the rafter leg.
Now start lathing. If you plan to use soft roofing material, for example, ondulin, for example, then the sheathing pitch should not exceed 10 mm.
You can insulate the roof with the same materials that were used to insulate the walls. Next, the roof is covered with roofing. The final step will be to install a galvanized corner on the roof ridge.
Necessary materials with current prices
| Material | Price (per cubic meter) |
| Concrete | from 2000 rubles |
| Profiled timber | from 11,000 rubles |
| Lining | from 200 rubles |
| Board | from 190 rubles |
| Vapor barrier | from 400 rubles |
| Mineral wool | from 200 rubles |
| Metal tiles | from 300 rubles |
Flaws
The increased fire hazard of frame buildings has already been written about. And this is the main disadvantage of houses built using this technology. Therefore, it is advisable to treat all materials with fire retardants (agents that reduce the flammability of materials).
The flammability of walls leads to the fact that all electrical wiring must be laid in metal boxes or special non-flammable corrugated sleeves. For this reason, electrical installation work becomes more complicated and more expensive - the cost of casings and corrugated hoses is added.
A frame bath has additional disadvantages: high humidity makes its own adjustments. You will have to pay increased attention to the vapor barrier of the walls. When using mineral wool, you will need to protect the insulation from moisture very carefully: when wet, it loses its properties. Moreover, when dried, it restores them only partially. If it freezes wet, it simply crumbles. Therefore, we choose a high-quality and reliable vapor barrier (not “hydro”, but “steam”). When laying, we follow the technology down to the smallest detail (overlaps, gluing joints and fastening points, etc.).
Step-by-step technology
When all the materials have been purchased, and the tools have been collected in a pile and humbly waiting in the wings, it’s time to move on to practical actions. And it’s worth starting with the project. You should build a frame bath only after you have decided on the layout . If you want to arrange, for example, a bathhouse with a veranda and a barbecue under one roof, then reflect this desire in your working design.
- What size plot do you have?
- Do you want to separate the steam room and sink?
- Are you ready to sacrifice a rest room for the sake of extra meters in the dressing room and vestibule?
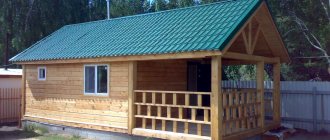
Find the answers to all these questions - and then it will be easier for you to decide on the design of your frame bathhouse. In addition, the Internet is now full of ready-made projects and drawings . All that remains is to adjust the scale and take the tools into your own hands. However, do not forget that you are based on the size of the area at your disposal. And it goes without saying that for complete comfort you should take care of a certain usable area around the building. And in case of frequent use of the bathhouse during the winter season, you should even ask about the veranda .
Work on the foundation
- we drive pegs around the perimeter of the proposed frame bath and make a ditch approximately 0.6 meters deep, the width can be determined in each individual case, but not less than 0.4 meters;
- fill the vacated space with sand to approximately 1/3 of the entire depth and fill it with water on top, after which we compact it thoroughly;
- we fill in the prepared gravel, and on top - a layer of sand, which is then leveled with soil using a building level;
- we make formwork from reinforcement and fill everything with concrete;
- The final touch is insulation with roofing felt; a thin layer of it is enough.
Leave your foundation for at least a week - during this period it will settle well and “gain strength”.
Walling
- dry the lumber prepared for the construction of the walls of the frame bath; it is best to choose linden or aspen, since these species have an excellent ability to retain heat;
- after erecting the wooden frame, treat the inside of the boards used with any antiseptic, and the outside with varnish, and it is advisable to use at least 2 layers of it;
- make a harness from timber and fix it from below;
- secure the beams in each corner with regular nails and support them with metal posts so that they do not disturb their balance;
- fill the base posts with concrete;
- mount intermediate support posts; the same material that you use for the basic structure is suitable for them;
- decorate the floor by laying out timber, give preference to a section of 0.15 meters.
Erection of the roof
- select eight ceiling beams cut at a certain angle;
- align the outer rafters, and then fasten a few more directly in the center;
- arrange the remaining ones through the ridge, fixing them to the capital structure from different sides;
- the next step is to install vertical posts to improve the strength of the base;
- if the frame bathhouse you make with your own hands has an attic, then think about an exit for it in advance;
- those rafters that protrude beyond the edges are sequentially processed - we cut out the beams with our own hands, and then we nail the boards and fix the battens.
We insulate the walls, floor, ceiling
- one of the best options is mineral wool, but roofing felt should be abandoned, since during operation it can release harmful substances into the air and cause a nasty odor;
- we place roll-type insulation between the vertical posts, and then secure it with slats;
- We have already protected the floor from moisture with timber, and now we use expanded clay - it is cheap and retains heat well;
- To insulate the ceiling with your own hands, you can use polystyrene foam, but you should protect it with a vapor barrier film - this way you will avoid an unpleasant odor and can extend the life of your frame bathhouse.
We design windows and doors
If your project includes openings for windows and doors, now is the time to fill them. Don't forget that both windows and doors must be securely sealed. During breaks between using a frame bath, the room should be ventilated as thoroughly as possible.
Interior decoration
The logical final touch is the pleasant interior decoration of the frame bath. Making it yourself will not be difficult. Moreover, the key to comfort is not only a reliable design and high-quality materials. It is also important to carry out competent finishing work so that every person feels as comfortable as possible in the bathhouse and can fully relax. That's why:
- the ceiling can be finished with pine upholstery - this not only looks impressive, but also reliably protects the materials from the harmful effects of high temperatures;
- the stove is finished with red ceramic brick or its fireclay version - this way the heat will be retained much longer, and the air in the steam room will be more humid and pleasant;
- the walls are finished with clapboard - it’s inexpensive, but very practical and, by the way, quite nice. You can use different types of lining, or better yet, its spectacular European version.
Construction plan development
Before starting construction work, you need to carefully work out the construction plan and project. Only by drawing up a project can you correctly calculate the amount of building materials.
It is necessary to determine the place where the building will be erected. The choice of bathhouse foundation directly depends on the quality of the soil. And after this, they decide on the choice of the most suitable bath design.
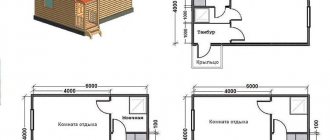
The standard bathhouse project includes a dressing room, a vestibule, a steam room and a shower room. The location of the furnace must be indicated on the diagram.
At the project development stage, you need to take into account all possible little things: the type of ventilation, chimney, internal finishing materials, external finishing and even the type of roofing.
In addition to the steam room, for additional comfort in the bathhouse, it is worthwhile to provide a bathroom and a relaxation room. This needs to be done at the design stage, since it will be difficult to change anything at the construction stage.
The project must indicate the dimensions of the premises. It is difficult to heat a large bathhouse, but in a small one you need to think about the maximum permissible number of people so that it does not become crowded. The most suitable size for a steam room is 2.4x2 m with a ceiling height of 2.2 m.
Additional rooms in the bathhouse will make your stay more comfortable and interesting. Therefore, if the budget allows, it is better to immediately include in the project: a swimming pool, a relaxation room, a bathroom, and a billiard room.
A well-designed project will greatly facilitate the construction process of the premises.
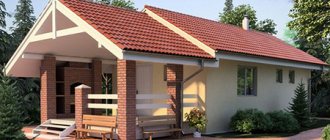
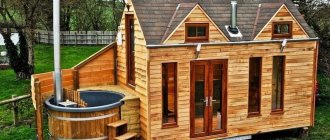
Standard solutions
In order to make it easier for you to prepare for the construction of a frame bath, we have collected for you the best projects and drawings that will help you cope with the task. These materials will be great for DIY construction if you are faced with the task of building both a rather modest 3x4 frame bathhouse and a more spacious 3x6 one. Let's consider other popular options: 5x5, 6x6, 6x8. Dividing by building area will help you better navigate this variety of promising solutions.
5x5
6x6
6x8
3x6
3x4
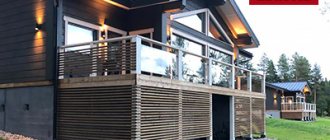
Advantages of frame buildings
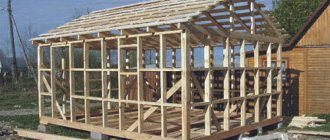
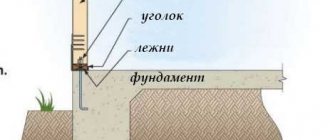
The frame building is a skeleton made of timber, sheathed on both sides with finishing materials. A vapor barrier and insulation are laid between them. It immediately becomes clear that, if necessary, construction can be low-budget. After all, it is possible to use inexpensive thermal insulation materials (straw, sawdust, etc.) which, despite their availability, retain heat well.
It is clear that the weight of the walls with this technology is very small. And this leads to the fact that the foundation can be made lighter. When building baths, they are most often made using piles, piles and grillages, or strips. But a monolithic slab or block foundation is also suitable.
This is how the walls of buildings erected using frame technology look schematically
A lightweight foundation means lower costs for materials and construction, because the foundation sometimes costs half the cost of the entire construction. And in this option the costs will be relatively small.
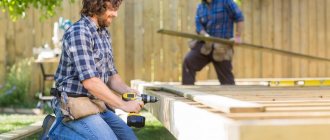
To build a frame house, no sophisticated equipment is required. All you need is a saw, a hammer, nails, screws, a screwdriver, a plumb line and a level to check the verticality of the walls. If there is another technique, use it for your health, but this is the minimum you can get by with.
An important advantage is that you can work alone, only occasionally inviting assistants for some operations. A striking example is presented in the video: the woman herself, with her clearly unathletic hands, has almost completed the construction of a small two-story house using frame technology.
What to use for wall decoration besides wood
Many people believe that wall decoration is limited only to wood. In fact, this is far from the case. You can use your own materials in different areas. These are tiles, plastic, cork. The most important thing is that moisture does not destroy the materials or that they are sufficiently well protected, as is the case with a metal frame .
There is no single scheme on how to properly arrange the shade and interior space in a arcade-type . You must rely on your own calculations construction options that can be implemented cheaply and quickly .
Tools
Also, before starting work, you should check the availability of all the necessary tools or rent the missing samples:
- Normal construction level;
- Drill with various attachments;
- Hammer;
- Screwdrivers of different sections;
- Tape measure for measuring (it’s good if it’s infrared);
- Pliers.
Foundation
At this stage, we should talk separately about all the execution steps, because this is not the easiest thing:
- We fence off the perimeter of the future bathhouse with pegs;
- We dig a ditch with a depth of about half a meter;
- The width of such a ditch should not be narrower than 0.4 meters; it is usually determined individually based on the parameters of the entire building;
- We fill one third of the entire depth with sand. Fill with water and compact the wet sand;
- Pour the gravel mixture on top of the sand. You can initially use a gravel-sand mixture and compact the entire volume;
- We form the formwork and fill it with concrete;
- We make insulation from roofing felt;
- We wait until the foundation is completely dry. This usually takes about a week. Experienced craftsmen advise leaving a gap of two weeks for the concrete foundation to dry and shrink.
Recommendations for planning a bath
First of all, consider the optimal building area . For one person, 5 m2 is provisionally provided. That is, if you want to accommodate four visitors in a steam room, start from a total area of 20 m2 (at least). Below we offer a list of which rooms should be included in the bath complex:
- steam room;
- shower and font;
- restroom;
- dressing room;
- toilet.
Sketch out a few diagrams and drawings for yourself:
- general plan of the building;
- separate drawing for each room;
- schematic structure of the foundation;
- plan for fastening and laying out timber;
- floor and ceiling arrangement plan;
- installation diagram of a sauna stove with the removal of its design features.
Which one is more environmentally friendly?
You need to understand what a frame bath is . It can be made entirely of wood, including the frame, as well as external and internal finishing. Naturally, this option is the most environmentally friendly.
Of course, a similar effect cannot be achieved with a metal frame, but the biggest mistake for environmental friendliness would be the use of plastic in any finishing option. Even the highest quality materials will release harmful substances under the influence of temperature, albeit in small quantities.
Wiring
The bathhouse requires electricity, but taking into account the humidity and temperature, its arrangement is quite dangerous. The thickness of the walls of the frame bath allows you to reliably hide communications. The wiring must be carefully insulated according to all standards.
You should immediately think through the lighting system and installation plan. Often the wires are even stretched outside the bathhouse, hidden in special boxes under the roof canopy or along the bottom in order to avoid exposure to elevated temperatures.
Remember about floor insulation
When figuring out how to build a sauna with your own hands , you definitely need to pay attention to the insulation of the floors, because the cold often comes from below.
A win-win solution would be to use two layers of different materials. Such projects meet all basic needs; all that remains is to figure out how to do this taking into account frame technology.