Beton-House.com
Website about concrete: construction, characteristics, design. We combine the experience of professionals and private craftsmen in one place
Plywood floor: comfortable and practical
Quite often, when installing floors, decorative materials are used, the installation of which requires a perfectly flat base surface. Many owners of apartments and cottages, trying to make their homes more comfortable to live in, use warmer materials rather than concrete screed to level the floor.
The most popular method is to lay plywood on a concrete floor under laminate or linoleum. The use of sheet wood is explained by its many advantages. The material is affordable and easy to use. In this article we will tell you how to carry out the work correctly and what materials can be used.
- Dispersion composition
- How to glue plywood to concrete?
Plywood
This building sheet material is an excellent choice for leveling the surface, but it is necessary to carefully select both the wood material itself and the methods by which installation will be carried out.
Sheets must be carefully fixed, and they should be selected of a certain quality, with appropriate properties. What types of plywood are there, and what should you pay attention to when purchasing?
Mode of production
In the production of such sheet products, veneer of deciduous and coniferous trees is used. The most common materials for production are birch and pine. The layers are laid taking into account the direction vector of the wood fibers.
Each adjacent material has a different direction vector. The layers are glued together under a press. This production method creates a fairly strong layer that has additional resistance to bending and twisting.
Veneer layers are glued inside a plywood sheet
Gluing veneer in this way leads to improved performance in plywood sheets with low anisotropy. Physical and mechanical properties are evenly distributed not only over the area, but also throughout the entire volume of the sheet. Regardless of the size and thickness of the material, it bends well.
Basic properties
Before laying products on a concrete floor, it is important to determine its characteristics. Plywood can be used both as a substrate and as a finishing decorative coating.
This is due to the excellent performance properties of the sheets, including:
- long service life;
- high strength;
- resistance to deformation;
- relative immunity to humidity (does not swell);
- good thermal insulation qualities;
- guaranteed clear dimensions of sheets with low weight;
- absence of unpleasant odors and harmful fumes.
To determine the required material, you should understand the marking system for sheet wood.
Variety
Indicated by Roman numerals or the letter E: E, I, II, III, IV. The addition of the letter “x” in the grade designation means that the sheets are made from softwood.
This gradation divides them according to the structure of gluing layers, the quality of the front and back layers:
| Variety | Standard permissible number of defects (deciduous wood) | Variety | Regulatory permissible number of defects (coniferous species) |
| E | Not acceptable | Ex | Not acceptable |
| I | 3 | Ix | 6 |
| II | 6 | IIx | 9 |
| III | 9 | IIIx | 12 |
| IV | No limits | IVx | No limits |
Sometimes in construction stores you can find sheets marked grade V/V (5/5) or 6/6. Don't be fooled. This designation indicates that the material does not comply with GOST.
You can also hear the term “shop”. In this way, some manufacturers designate chipped edges of a plywood sheet without delamination.
On a note! Pine plywood has less structural strength, but bends better, and, in the guise of a birch product, its price is more affordable.
Varieties differ visually
Marking
Plywood for concrete should be selected in accordance with its performance properties. To do this, you should understand the labeling and understand the meaning of the symbols indicated on the packaging. In addition to grade, the material is divided into brand or level of moisture resistance, surface roughness and safety class.
Table of marking values:
| Marking | Designation symbols | Characteristic | Note |
| Brand | FSF | increased water resistance | Resistance of the material to changes under the influence of high humidity |
| FC | moisture resistant | ||
| FKM | increased water resistance | ||
| FBA | non-waterproof | ||
| Surface | NS | not polished | During the manufacturing process, the sheet can be sanded on one or both sides, or go on sale unsanded |
| Ш1 | polished on one side | ||
| Ш2 | polished on both sides | ||
| Safety class | E1, E2, E3 | E1 - no more than 10 mg, E2 - from 10 to 30 mg | Indicates the amount of formaldehyde and other harmful substances used in manufacturing. |
In addition to the specified characteristics, dimensions and thickness must be printed. You can see what the markings look like in the photo below.
Example of product labeling on packaging
Step-by-step guide to laying sheets
The work of laying plywood on a concrete floor yourself consists of several technological stages. By following the instructions, you will cope with all the necessary activities on your own, without involving third-party contractors and significantly saving on their services.
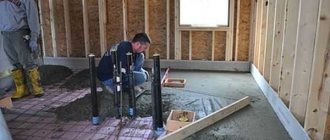
First stage. Checking the moisture content of the concrete base
Determination of concrete moisture content using a sclerometer
Before starting work, the contractor must check the moisture content of the base. If this indicator exceeds the permissible values, in the future the plywood will simply delaminate. Surface humidity can be checked without special instruments, using plastic film and several suitable weights. Do the following:
- spread plastic film over the concrete floor;
- Press down the edges of the material with any suitable weight. The center of the plastic film must be free. Leave the homemade structure for several days. To obtain the most reliable results, experts recommend keeping it for a week;
- Check the condition of the film after the specified time. If condensed moisture appears under the polyethylene, you cannot lay plywood on such a floor. Before this, work must be done to create an additional waterproofing barrier. To do this, use the appropriate compositions.
Second phase. Cleaning the base
Grinding the concrete base
First of all, sand down any uneven surfaces. To do this, you can use a grinder with an appropriate attachment. Next, you need to eliminate the remnants of old mixtures (putty, paint, etc.) and fill in the recesses, if any. To eliminate cracks and other similar defects, various mixtures are suitable, for example, cement-sand mortar.
Particular attention must be paid to the stage of cleaning the base from dust. If possible, it is recommended to use an industrial vacuum cleaner for this purpose. In the absence of such a unit, you can get by with an ordinary broom, but you will have to spend much more time on cleaning.
Cleaning the concrete surface
Third stage. Base primer
Base primer
Experts recommend giving preference to the so-called. primers. The product is applied using a paint roller and has a number of advantages over conventional primer, including:
- high rates of surface dust removal;
- good penetration depth - this ensures higher strength of the top layer of the floor structure;
- the ability to increase the rate of adhesion of different materials.
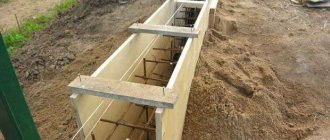
Fourth stage. Laying plywood
By this stage, you have already cut out the sheets and adjusted the elements to the area of the room. Proceed to laying plywood, focusing on the previously completed numbering. The work is performed in the following sequence:
- the base (concrete floor) is covered with plywood glue. The recommended layer thickness is up to 2 mm. Helpful advice: consistently apply glue to small areas of the base so that you have time to lay out the plywood before the binder begins to set;
Laying plywood with glue
- plywood is laid on the lubricated base in accordance with the previously established pattern;
- the sheets are additionally fixed using self-tapping screws along the perimeter and diagonally. Screw in the screws in increments of 150-200 mm, the distances from the edges of the flooring elements are no more than 20 mm. Use fasteners that are at least 3 times the thickness of the plywood sheets. For example, if you chose 12 mm plywood, fix it with 40 mm long self-tapping screws;
Additionally, the parquet is fixed with self-tapping screws
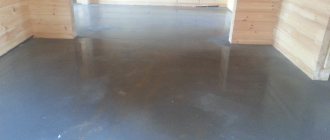
- process the laid plywood with a sanding machine with an appropriate attachment or sandpaper. Careful grinding allows you to get rid of minor differences in the height of adjacent sheets, eliminate burrs and other minor defects.
Sanding plywood involves creating a perfectly flat and smooth floor.
Fifth stage. Checking work
Carefully inspect the equipped surface. Make sure that the plywood sheets do not touch the walls. Check for gaps between individual elements.
Additionally, you need to make sure that there are no differences in surface height. The maximum acceptable difference is 2 mm.
Finally, you need to carefully tap the surface with a wooden block or a hammer of the same material. If a dull, inhomogeneous knock is detected, the work will have to be redone, because
Such manifestations indicate peeling of plywood from concrete.
Any type of floor covering can be laid on a flat plywood floor.
Good luck!
Material selection
Can these products be laid on a concrete floor? Of course, you just need to choose the right sheet material and fastening method.
- The choice depends on the type of floor installation. If you plan to lay it on joists, then it is better to give preference to birch plywood; it is stronger and bends less easily.
- Leveling a concrete floor by gluing squares onto the base can be done from softwood sheets.
- If the material is not a finishing material, then grade 3 or 4 sheets, unsanded, or sanded only on one side, are suitable.
- The level of moisture resistance should be selected based on the purpose of the room.
On a note! Before purchasing, draw a floor plan and “lay out” the sheets. This fitting will allow you to select the optimal dimensions of the sheets when purchasing in order to minimize waste. Try not to place joining seams in areas of greatest load on the floor.
Comparison of characteristics
To choose the most suitable option for rough or fine finishing of a floor structure, it is necessary to take into account the main parameters of the product.
Environmental friendliness
Health safety is one of the main factors. The indicators of wood-based panel materials comply with the standards reflected in standardization documents.
- Plywood. Eco-friendly option. The most harmless products are those that are glued using natural resins.
- OSB. It does not pose a threat, but only if the production technology is followed. It is better to choose trusted manufacturers.
- Chipboard. This variety causes the most controversy regarding health hazards, since formaldehyde resins are used for gluing. Products must comply with standards (marking E1 or E0.5).
- Fiberboard. Does not pose a threat provided that high-quality raw materials are used.
- MDF. Eco-friendly material made using urea resins. These products must also comply with class E1 or E0.5.
Since the outside of all materials is finished, harmful fumes are minimized.
Strength
To choose the most reliable option, you need to take into account the density and structure of the product:
- OSB and plywood. Oriented strand panels can withstand heavy loads well: the layers are placed in different directions and glued together extremely firmly. But wood-laminated board may have a significant disadvantage - the possibility of deformation due to non-compliance with the technology.
- Chipboard and fibreboard. They have sufficient hardness. Their areas of use are somewhat different. Wood-shaving parts are thick, and wood-fiber parts are very unstable in bending, so they cannot be used for leveling voids.
- MDF. A relatively soft material that is not used in places with high loads.
It is difficult to compare all products on this parameter, since they have different sizes.
Dimensions
The length and width of all varieties are approximately the same, so it is necessary to compare the thickness:
- Hardboard. The thinnest material. Its thickness can reach up to 7 mm, but the most common is 3.2 mm.
- Plywood. For the floor, products with a thickness of 12–15 mm are selected.
- OSB. Can be of different sizes, but for flooring options from 10 to 22 mm are used. If you need to level the existing base, then a thickness of 1 cm is suitable, but in order to lay the material on wooden logs, the parts must be more durable.
- MDF. Due to their softness, the recommended thickness of the slabs varies from 18 to 25 mm.
- Chipboard. For horizontal structures with increased load, a tongue-and-groove version with a thickness of 16–22 mm is used.
The thickness and structure of the parts also affects protection from sound penetration and heat retention. If the noise pollution is very strong, then it is recommended to give preference to medium-density fiberboards of maximum thickness. They also serve as additional thermal insulation, which is similar to OSB.
Price
The difference in the price of materials depends on many factors: production method, raw materials used, additional processing, size and even place of sale.
- The most expensive is high-grade plywood.
- The cost of MDF is calculated per square meter and depends on the manufacturing method.
- The price of OSB-3 and 2 corresponds to wood-laminated boards of grade 3 or 2 of a smaller size.
- The lightest and cheapest option is fiberboard.
To ensure that the total work budget does not amount to too significant an amount, it is necessary to immediately determine the scope of application of each type of product.
Easy to install
Laying wood boards is not difficult; it does not require professional skills or complex tools. The order of work depends on the specific situation:
- If a frame structure is being erected, then OSB would be the best option.
- The light weight and thickness of hardboard make processing the fastest, but it is not suitable for serious leveling.
- Chipboard and OSB panels are cut and fixed almost identically. They are much easier to trim than MDF, which due to its dense structure offers more resistance.
- The most labor-intensive material to process is plywood. It will take much longer to place the product. It is more difficult to drill or adjust to size due to the presence of layers of natural wood in the structure.
All floor slabs are mounted on glue or joists, the only exception is the fiberboard covering: these sheets are not intended for laying on joists, they need a flat and durable base
Glue as fastening material
Having decided how to choose sheets, let's move on to selecting the adhesive mixture. The quality of the flooring largely depends on what material is used when installing the products. For the installation of the substrate, the adhesive should be selected especially carefully.
Laying plywood using an adhesive solution can be done with the following solutions:
- water-dispersed;
- alcoholic;
- two-component.
What are the pros and cons of each possible adhesive?
Dispersion composition
Environmentally friendly product. The composition does not require a solvent. Before use, dilute with water to the required consistency.
Consumption is approximately 1.2 kg/1m2. When dried, this composition does not emit anything other than harmless water fumes, and therefore has no odor.
It is precisely this harmlessness and environmental friendliness that determines the disadvantages of working with it:
- The solution takes a very long time to dry, on average at least 7 days.
- Installation of plywood using dispersion compounds requires additional fastening of the sheets to the floor with nails.
Parquet adhesive can be used for laying plywood
- Due to the large amount of water in the composition, it is recommended for use when working with moisture-resistant types of plywood.
Important! Using this fastening method is quite problematic if communication cables were installed in the screed. It is necessary to have a clear plan for their location so as not to get a dowel-nail into the communications.
Alcohol or resin based
Alcohol glue is made on the basis of artificial resins or solvents. When working with it, it is recommended to use a respirator. This is due to the peculiarity of the material: it has a strong toxic odor.
As in the previous case, it is the composition that determines the advantages of this type of glue:
- fast setting and drying time;
- in addition to gluing, it performs the function of minor repairs to the base, filling cracks and small chips;
- During operation, it retains elasticity throughout the entire period.
It is recommended to use additional fastening with nails only in high-traffic areas. Average material consumption is approximately 1.5 kg/1m2.
Polymer composition for laying any type of wood
Two-component compound
Using this adhesive for installing plywood, you get significant advantages over previous compounds, but the price of this product is much higher.
Advantages:
- firmly fixes the material on the concrete surface, which eliminates the need to use nails;
- sets on average within 24 hours, after which the surface is ready for further processing;
- has the highest fastening strength and longest service life.
The instructions on the package will explain how to knead correctly and in what proportions. Due to the short life span of the glue, it is not recommended to prepare it in large quantities. Read the special instructions carefully, the composition may be toxic.
The two-component composition requires careful mixing proportions.
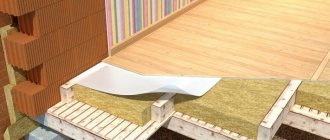
Why do you need a substrate?
Performs the following functions:
- Soundproofing. To achieve good sound insulation, it is necessary to use a substrate with a thickness of 2 millimeters or more.
- Thermal insulation . It has low heat conductivity, so it will keep the house warm in winter.
- Depreciation. Some floor coverings are deformed from mechanical impact on them, and the underlay will extend the service life of the coating.
- Waterproofing. This quality of the substrate is especially appreciated by owners of private houses whose houses are threatened by groundwater.
IMPORTANT . It is better to use materials that are covered with foil. They not only do not allow heat to pass through, but also reflect it back into the home. Thus, the temperature increases by 25-40%.
The following materials can be used for substrates:
- Cork tree. The advantages include: resistance to termites; elasticity; thermal insulation; surface leveling; environmental friendliness; soundproofing. Disadvantages: high cost.
- Composite material. Advantages: long service life. Disadvantages: high cost.
- Chips of wood with bitumen. Advantages: excellent protection against moisture. Disadvantages: poor thermal insulation.
- Polyethylene foam. Advantages: low cost; ease of installation; excellent heat insulator; long service life. Disadvantages: over time it loses its original shape.
Advantages and disadvantages of plywood flooring
“Planting” sheets on glue is a fairly common method of leveling a concrete floor.
The popularity of this method is due to its advantages:
- this type of work can be easily done with your own hands;
- the material is quite affordable in cost;
- the flooring will become an additional heat and sound insulation layer;
- wood is an environmentally friendly, strong and fairly durable material.
Of course, there are several limitations to the use of sheet plywood, but they are very minor:
- In rooms with high humidity levels, you should use material labeled FSF, and this is not exactly a budget option.
- If the concrete screed has significant differences, it will not be possible to install the flooring using glue: plywood is laid after the base is leveled.
Important! Before starting work, you should check the moisture level of the base. If it is increased, a layer of waterproofing should be laid or the concrete should be treated with a deep penetration primer.
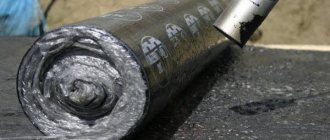
Bitumen mastic can act simultaneously as both a waterproofing and an adhesive mixture
Preparing the base
It is necessary to remove the old floor covering, inspect the concrete base for cracks, chips, and unevenness. The base of the floor can be leveled with a self-leveling mixture or simply repaired cracks and chips with cement mortar. If there is a large difference in height, it is better to make a new concrete screed. For more information on preparing the foundation, watch this video:
Before laying plywood, you need to prime the surface. You can use primers or regular deep penetration formulations.
Plywood can only be laid on a completely dry floor.
Glue or logs
Fastening plywood can be done in two ways:
- using glue when installation is carried out directly on a concrete base;
- if the condition of the base is not ideal, you can lay it on logs.
In addition to differences in the installation method, these methods can eliminate various problems. They are selected depending on the need to solve a specific problem.
Installation of flooring under laminate
How to glue plywood to concrete?
First of all, as usual, we prepare the base. We clean and dust the concrete. We remove all peeling parts and eliminate cracks. We impregnate the base with a deep penetration primer to improve the adhesion of the glue to the screed.
It is better to use a primer with antibacterial properties to prevent mold and mildew from developing in the cake floor. The concrete is processed with a roller, in at least 2 layers. The second is applied after the first has completely dried.
Further, all work occurs in the following order:
- Plywood is cut into equal squares. Usual cutting dimensions: 40*40 or 80*80 cm. Layout and fitting are carried out, and if necessary, the squares are adjusted to size. The squares are laid with the seam offset, in a checkerboard pattern. During the fitting process, the squares are numbered, which will greatly simplify installation with glue.
Cutting is done using a jigsaw
- The selected composition is prepared for installation.
- According to the cutting, laying the squares begins from the far corner of the room. The glue is applied with a notched trowel to the floor surface. The square is placed on the floor area with the desired side (not sanded towards the base) and pressed down.
The specialized mixture is applied to the base with a wavy spatula
- Some types of adhesive mixture require additional fixation of sheets with dowels to the floor. If such a composition is chosen, then it is better to drill the sheets around the perimeter and in the center before laying.
- All squares are laid in compliance with the seam, the distance between the parts of plywood should be 2 - 4 mm. Be sure to check the horizontal position of each square and the entire coating as a whole.
Laying is carried out with offset seams, the width of which must be at least 2 mm
- After the glue has set, you can proceed to further finishing work. The places where the self-tapping screws are drilled are puttied. If necessary, the floor is sanded.
Plywood flooring perfectly levels the floor
Device according to logs
How to attach plywood using joists to a concrete base? Floor preparation is similar to the previous method. The only difference is that perfect evenness is not required here.
After priming, we move on to installing the lag:
- Prepare timber of the required height and length. When fixing the logs to the floor, strictly maintain the horizontal direction using a building level. Check the installation of each beam separately and check the level of adjacent logs.
- In order to simplify the process, you can stretch rope beacons between the walls at the desired level. The logs are attached to the base of the floor through a backing, with which you can adjust the height of the beam.
- This method makes it possible to install an additional layer of thermal insulation. Before laying the flooring and installing the timber, consider the width of the insulation. The size between the joists should be equal to the size of the thermal insulation. When laying products in niches on the floor, the presence of unfilled spaces will lead to a significant deterioration in the insulating properties.
Laying along joists is also an excellent way of additional insulation
- Sheets of plywood are screwed to the joists with self-tapping screws. The material is mounted, as in the previous method, with the seams offset. This is done to properly distribute the load over the floor surface.
On a note! Before you start laying with joists, check the dimensions of the sheet. It should be laid on 3 beams. If necessary, transverse beam inserts should be installed.
The video in this article will tell you how to correctly calculate the distance between the beams, lay thermal insulation and lay sheets.
Method 1. Installation on old wood flooring
When laying plywood on a wooden floor, there are many options for fixing the sheets:
- on self-tapping screws;
- on glue;
- for liquid nails.
Adhesive compositions include water-based adhesive, two-component adhesive, assembly adhesive and bustylate. However, fastening with self-tapping screws is preferable.
Materials and tools
To successfully install plywood sheets, you will need the following tools and materials:
- plywood sheets;
- jigsaw;
- level;
- roulette;
- marker;
- self-tapping screws;
- screwdriver;
- substrate;
- construction vacuum cleaner or broom.
You may also need a sanding machine, a roller and primer, glue and sealant.
Preliminary preparation and priming of the floor
Installation of plywood on wooden floors is carried out only if the height difference when checking the level is no more than 1 cm. In this case, you will also need a substrate to compensate for unevenness and tape, which will need to be used to glue the joints of the strips of material.
Inspect the condition of the floors. Strengthen creaking and loose floorboards, replace rotten and damp floorboards. Do not try to restore boards that have traces of mold, damage, or have been attacked by rodents. They definitely need to be removed and the room ventilated.
We remove the baseboards and inspect the condition of the floor
Use a broom to sweep away dust and dirt from the floors. If desired, go over the wood surface primer twice to ensure better adhesion of the materials. And dry the base for at least 16 hours.
primer
Marking and cutting
Sawing plywood
Only saw plywood on a rigid base
Plywood sheets are sawn so that the number of joints is minimal, taking into account damping joints of 3-4 mm between sheets and 8-10 mm between plywood and the wall. This will help avoid swelling of the sheets, since during operation, under the influence of the microclimate and temperature fluctuations, the workpieces will increase in area by several millimeters.
Laying plywood sheets
Fixing the sheet
Leave a gap between the wall and the plywood
The cutting is done with a jigsaw, while the ends of the workpieces are carefully inspected for delaminations and sanded. On large areas, for ease of installation, plywood can be cut into squares of 50x50 or 60x60 cm. This technique will help to more accurately level the surface and eliminate possible installation defects.
The sawn sheets are numbered, and similar to their numbers, a schematic arrangement of the workpieces is drawn on a wooden base.
Leave the vent open
Laying plywood
Installation of blanks has several features.
- If necessary, a backing is placed on the old wooden covering, and the strips are glued together with tape.
- The holes for the self-tapping screws are drilled in advance and then countersunk with a drill of a slightly larger diameter.
- The screw heads are recessed into sheets of plywood.
Carefully recess the heads of the screws or dowels
- Laying plywood begins with niches, podiums, and ledges. Next, the sheets are arranged from the middle to the edges with a brick shift of the squares relative to each other.
Plywood flooring
- Cracks and gaps in the old flooring can be filled with glue, allowed to dry and peeled off.
Plywood scraping
Upon completion of installation, you should check the quality of the coating, remembering that the ideal gap between the level and the plywood is 2 mm, the maximum is 4 mm.
Expert advice
What should you do before laying plywood on a concrete base? There are some very simple steps that will nevertheless significantly improve the quality of the floor, regardless of installation method.
- Before starting work, let the wood rest for several days in the room where the flooring is planned. In this case, the indoor humidity should not exceed 18%. If the humidity level is higher, then during operation the timber or the sheets themselves may become deformed.
- Seasoned wood must be treated with impregnating compounds of various properties. Don't neglect fireproofing and insect repellent treatments.
- If a decision is made to lay the material in 2 layers, then the second one must be laid with glue and screws with the seams offset relative to the first flooring.
Diagonal offset option
- When attaching to joists, use black wood screws. Their length should be chosen depending on the thickness of the sheet, but not less than 35 mm. You should not use nails; this fastening will become loose over time and the floor will begin to creak.
- Remember to leave a gap between the wall and the plywood decking. Wood is “living”; it tends to change slightly in size depending on the microclimate in the room.
- When laying decorative materials on top of plywood: laminate, parquet, linoleum, be sure to use a backing.
Using a substrate
Laying
A subfloor made of plywood under linoleum can be laid on a concrete or wooden floor. Before laying the material, clean the floor from dust and dirt, check for height differences.
Before laying plywood sheets, cover the concrete base with a waterproofing film to prevent moisture from getting on it.
Before laying the material, clean the floor from dust and dirt.
Since plywood is a wood material, changes in humidity and temperature can negatively affect it. To prevent cracks from appearing under the influence of microclimate changes, a primer is used for plywood.
Allow the material to acclimatize before starting leveling.
For work, it is more convenient to cut the sheets into pieces to avoid deformation in the process. The sheets are first laid out on the floor to adjust the dimensions. When laying, keep the sheets of material offset relative to each other. Leave a gap of about 3 mm between the sheets so that the surface remains flat when deformed.
Plywood is fastened to a concrete floor using dowels, and to a wooden floor using self-tapping screws.
At the last stage of the work, the seams are sealed using a sealant, which is low priced and easy to apply.
Drying speed
Two-component compositions dry the fastest. When construction and repair work is under tight deadlines, the drying speed of the adhesive is of great importance.
The fastest way (in 1 day) is to glue plywood with two-component compounds, to which a hardener is added before starting work. This method does not require additional fixation of plywood with nails.
Solvent-based compositions dry in 3-5 days. Before applying the glue, you need to prime the screed. Additional fixation with self-tapping screws is required.
Water-based glue dries in up to 7 days. Before application, you can prime the concrete base with a compound diluted with water. Additional fastening of plywood with self-tapping screws is required.