Arranging the heating system of a private house involves certain difficulties with laying the chimney. The problem arises when using red ceramic bricks, which should only be laid using a special fireplace/stove mortar.
There are several types of compositions for laying a stove, and in each individual situation it is advisable to use only a specific type. The very use of the composition (its preparation) is quite possible with your own hands.
Mortar for laying brick pipes
When building a private home and installing a heating system, many homeowners are faced with the difficulty of laying a chimney. Quite often, red ceramic bricks are used for this work, which must be laid using a special oven mortar. We will talk about how to choose the composition used for laying the chimney in this article. Many homeowners mistakenly believe that for laying a chimney they can use ordinary cement mortar, which was used for laying brick walls. However, experts do not recommend using it when laying a stove and chimney. The fact is that during operation the chimney is subjected to significant thermal and chemical loads, and a conventional binder mixture cannot be used in this case. It is necessary to use special thermoeffective mixtures that can withstand increased thermal loads with equal ease and are resistant to various acids .
For laying the stove pipe, it is recommended to use compositions that are normal in terms of fat content, since they are characterized by proper plasticity and are not prone to cracks. For this work, complex compositions are used, consisting of several components. Binders based on sand, cement and lime are very popular. Also on sale you can find ready-made mixtures intended for bricklaying, characterized by excellent heat resistance.
The only drawback of such dry mixtures for masonry is that they are expensive. Therefore, many homeowners, when engaged in such construction work, prepare the solution themselves.
You should also pay attention to the density of the composition used. The prepared mixture should be homogeneous and vaguely resemble sour cream in structure. It should be slightly squeezed out when laying bricks, but should perfectly hold together the materials used. The following compounds are used for this work:
- Clay.
- Calcareous.
- Cement with the addition of lime and chamotte.
- Lime-gypsum.
Construction of a brick chimney
You must undertake the construction of a chimney from bricks, being thoroughly prepared for this process.
Brick selection
In most situations, the building raw material for constructing a chimney is ordinary red brick. But since there is an opinion that simple material will not withstand high temperatures, some lay out the chimney from refractory bricks, the price of which is much higher.
Builders claim that the use of refractory bricks is justified in cases where it is necessary to build an overmount chimney. It will be exposed to gases with the highest temperature.
The myth that ordinary red brick is not suitable for building a kiln can be debunked. Ordinary bricks are not at risk even at temperatures above 800˚C. And it doesn't get that hot inside the chimney.
Simple bricks will not be a cause for frustration if you take their choice seriously. It is worth taking only material with smooth side walls. Bricks with an uneven surface will make the interior of the chimney even rougher, which will lead to significant contamination of the pipe with combustion products.
Irregularities that appear on bricks during the process of laying and creating joints must be eliminated with a sponge moistened with water.
Sand-lime brick is definitely not suitable for the construction of a chimney. This construction raw material, when heated, releases toxins into the environment, which is why it can be used exclusively for finishing the outside of a house.
When purchasing bricks, it is important to examine the edges on several pieces. They should be completely even. A good brick is one that is distinguished by an ideal parallelepiped shape, sufficient strength and uniform firing.
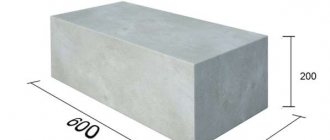
It is better to lay the chimney from bricks measuring 25x12x6.5 cm.
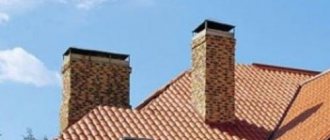
Brick for chimney over roof
It is strongly recommended to cover the chimney in the area where it exits the roof with facing bricks. True, there are opponents of this rule, who believe that the material used for cladding will collapse almost immediately, which cannot happen with other construction raw materials - clinker bricks.
The part of the chimney above the roof can be created from rough bricks and then covered with clinker material. But there is another option: immediately assemble the “top” of the pipe from clinker construction raw materials - about 50 bricks.
Calculation of brick pipe parameters
It is impossible to build a pipe without deciding on the cross-sectional size inside the structure. This parameter is very important because it affects the stove’s ability to get rid of fuel combustion products. The width of the smoke channel always depends on the power of the furnace equipment.
To find out what the internal cross-section of the pipe should be without resorting to complex calculations, you can use one of three standard sizes:
Another significant parameter for the smoke channel is height. When calculating the length of the pipe, take into account where the pipe exits onto the roof (in relation to the ridge).
A chimney, one and a half meters or less away from the ridge, should rise 50 cm above the roofing material. When the interval between the highest point of the roof and the chimney is 2 or even 3 meters, the height of the smoke duct above the roof is made equal to this distance.
If the chimney is located more than three meters from the ridge, the pipe size is selected so that an angle of 10˚ is formed between the upper edge of the structure and the ridge.
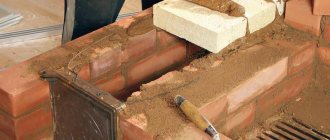
Mortar for smoke duct made of bricks
The mortar used to glue the chimney bricks together is a composition of water, sand and clay. Thanks to these components, the mixture becomes similar to brick in terms of linear expansion. This means that the solution will protect the masonry from the appearance of defects.
The clay used as one of the components of the solution must be clean. There are no other requirements for it, so it’s okay if the natural material taken is fatty or scanty.
Sometimes the clay for preparing the solution does not need to be mixed with sand. We are talking about a situation where the found clay is already saturated with sand in a ratio of 1:3 or 1:4.
If the clay portion is too large, the solution will become covered with cracks when it hardens. And an insufficient amount of this component in the special mixture leads to its crumbling in a dry state.
You can find out whether the content of components in the solution is optimal using a simple method: knead the composition with your fingers. If there are no deviations from the requirements, then the mixture will feel neither slippery nor rough, like a piece of sandpaper.
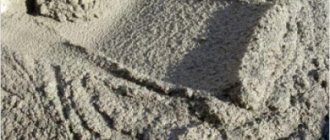
Sand has different requirements. It’s good if its grains have a large diameter - 1 mm. Raw materials of this size feel rough to the touch. Pulverized sand mined in the floodplain of a stream or river should never be used.
Preparation of the composition
The solution for creating a chimney from bricks is prepared as follows:
For fear of making a mistake with the quantity of mortar components, you can purchase a ready-made masonry mixture of sand and clay in dry form. The main thing is that the purchased composition is fireproof, otherwise it will not be suitable for laying bricks.
Making a brick smoke channel
Most stoves are suitable for a pipe with a cross-section of 25x12 cm. A smoke channel with these dimensions is created from bricks, which must be specially divided into 2 parts. The bricks are sold in this form. But if you wish, you can cut them yourself using a grinder with a mounted diamond blade.
When laying bricks, the mortar must be applied in a layer no more than 1 cm thick. A thicker layer may crack during expansion under the influence of heat.
It makes no sense to build a relatively complex brick chimney for a metal stove. For such equipment, it is better to find an ordinary iron pipe.
To assemble a smoke channel from bricks, certain tasks are performed:
If you doubt your ability to lay a chimney out of bricks, you can resort to test assembly of the smoke channel. This involves doing the work on the ground without using mortar.
Photo gallery: brick chimneys
Video: example of building a brick chimney
Lining a brick pipe
Lining is a method of restoring the tightness of a chimney by inserting a stainless steel pipe inside it. The need for such an operation arises for certain reasons.
The meaning of the chimney liner
In any case, you will have to deal with deterioration in the operation of the chimney, because the internal walls of the channel become contaminated with soot over time. It forms quickly and in large quantities if the temperature inside the chimney constantly changes and the combustion products contain chemicals.
Brick structures are most likely to become clogged with fuel combustion products. This is due to the roughness of the inner surface of the brick chimney.
A smoke channel clogged with soot stops functioning normally, causing backdraft to occur - a phenomenon due to which gases go not up, but down - straight into the house. To normalize draft, they resort to lining the chimney, which allows you to transform the uneven walls inside the chimney into a perfectly smooth surface. In addition, after sealing the channel becomes more airtight, easy to clean and retains heat better.
The most correct sleeve option is a pipe with an oval or round cross-section. A product of a different shape will allow soot to accumulate in the corners.
Instructions for lining the chimney
Lining a smoke brick channel involves performing the following actions:
Video: chimney lining
Clay mortars for masonry
High-quality clay compositions with the addition of cement and sand were successfully used for chimney laying in the past, but today they are gradually being replaced by other, high-quality and
inexpensive preparations. The clay-based composition is resistant to high temperatures, but it can be destroyed when exposed to moisture. That is why it is necessary to install a large metal umbrella over the stove pipe, which will completely prevent water from getting inside the stove. When using clay mortar for laying a brick stove and chimney pipe, you must remember that using wet, fresh firewood as fuel in this case is not recommended. This will also lead to failure of the chimney.
To increase the strength indicators when preparing clay mortar, you can add about one hundred grams of table salt per kilogram of Portland cement. Just remember that salt must be mixed with water an hour before cooking. To check the quality of the prepared mortar for the brickwork of the chimney, it is necessary to mold a small ball with a diameter of about 50 millimeters from the resulting mass. The resulting ball should hold its shape perfectly and not stick to your hands. Subsequently, the laying of the chimney using a clay composition is carried out according to the standard scheme.
Components and components of a chimney
Before starting construction, it is worth studying in detail the information about what components the chimney consists of. Many ordinary people mistakenly believe that such a structure is made only of brick. What does the smoke exhaust duct consist of?
It is based on the installation of a mounted pipe attached directly to the surface of the furnace. If desired, you can install a damper on it. It is necessary to lay such a pipe using the technique of tying the bricks after each laid row. Before approximately 4 rows overlap, you should stop laying out the base. The name of the place is the neck of the fluff. Next, the masonry expands from row to row upward.
It's time to install the chimney itself. Let's consider the main stages of construction.
- The design drawing is reviewed. Typically a standard installation scheme is used. If you plan to install a gas boiler, then special metal pipes should also be laid in the base.
- The size of the channel is determined, and according to the degree of patency of the pipes, it is selected individually. It is worth remembering that it also depends on the thickness of the joints in the brickwork.
- As mentioned earlier, the device begins with laying out the top pipe. Adhere to all previously installed brick dressings.
Lime mortar for stove pipe
Lime mortars for laying stove pipes began to be used relatively recently and today they have become the main masonry material. When properly prepared, it provides excellent heat resistance, is not affected by moisture and holds the masonry together efficiently, ensuring maximum durability of the entire structure. To improve the quality of lime mortar, it is recommended to use slaked lime, sand, a small amount of cement and gypsum. The classic recipe for brickwork involves one mass fraction of lime and five parts sand. Lime and cement are added in minimal volumetric quantities. You also need to add water and stir everything until smooth. The solution should have the consistency of thick sour cream and not stick to the trowel and concrete mixer.
When using such a solution intended for laying a stove pipe, you should remember that its quality directly depends on the quality of the lime.
That is why it is recommended to use boiling lime, which is filled with water and then left until it is completely quenched. It is best to carry out the lime slaking procedure in plastic barrels or pre-dug holes lined with boards. Only after this can you begin to prepare the composition necessary for brickwork.
Sand: select and prepare
The main components of the simplest mixture for laying a stove are clay and mountain sand. The fact is that its particles, unlike those mined in the seas and rivers, are more rough, which will improve the adhesion of the solution.
Before preparing the solution, the sand is sifted through a fairly fine sieve (the mesh size should be approximately 1.5 x 1.5 mm). If after this procedure there are still noticeable impurities in the sand, it must be washed with water. To do this, use a frame on which burlap is stretched. Using a stream of water, a small amount of sand placed on the device is washed until clean. This can be easily determined by the color of the flowing water.
Cement based mortar
Cement-based mortar is characterized by increased strength and ease of preparation. Cement-based brickwork is strong, durable and resistant to soot and other aggressive substances. Today, cement-based masonry mortar, due to the affordable cost of the components used and ease of preparation, is most widespread.
The composition for the chimney above the roof is made of cement, sand and the addition of water. The ratio of cement and sand can vary from one to one to one to six. It should be remembered that such a solution sets quickly, and an hour after preparation it begins to lose its strength and elasticity. Therefore, you should not prepare it in large batches, but use it immediately after preparation within 30 – 60 minutes.
High-quality preparation of cement mortar
We pour the used cement and sand through a sieve to completely get rid of lumps. Mix sand and cement until a homogeneous mass is obtained. At the final stage of cooking, add water to obtain the desired consistency. Just remember that such a solution based on cement and sand alone does not have proper heat resistance, so it is not recommended to use it for laying a chimney in the immediate vicinity of the stove.
If you need to prepare a heat-resistant solution, then you will need slaked lime, which is diluted with sand in a one-to-one ratio. Next, 0.5 parts of cement are added and everything is thoroughly mixed. A properly prepared solution of lime and cement has excellent thermal stability, which allows it to be used for laying the lower part of a brick pipe. Also, to increase the strength of the material, fireclay can be used, which improves the thermal strength of the composition.
When using cement to prepare mortar, it is recommended to use a material with a strength index of at least M400. This will ensure the necessary strength of the brickwork and its durability. The thickness of the seam can vary from five to ten millimeters.
Lime-gypsum mortar
Inexpensive to produce, lime gypsum mortar is actively used in finishing and plastering stoves. When cement and a large amount of lime are added to it, this composition can easily be used for laying a brick chimney pipe. The advantage of using it is the ease of working with it and faster setting. You just need to correctly calculate the ratio of components and achieve the desired consistency of the prepared mass.
Before firing the stove for the first time, you need to thoroughly dry the masonry, which will eliminate the danger of cracking the chimney.
Compositions for stove masonry
One of the features of furnaces is the big difference in the operating conditions of its parts. So, a brick pipe inside a building is exposed to hot air - smoke, condensation, and some acids formed during fuel combustion. Over time, soot and soot settle on the walls, which contributes to even greater accumulation of condensate and a decrease in draft, and so on. However, no destructive forces act on the pipe walls from the outside.
The chimney above the roof, in addition to all of the above, becomes a victim of weather factors: wind, rain, snow, and, most importantly, temperature. The difference between the temperature of the exhaust gas and the air temperature can reach hundreds of degrees. Not every material can withstand such an impact.
Types of stove building mixtures
The solution consists of some kind of binder, filler and solvent.
- The first component performs the main task - when hardened, it forms a strong connection that holds the masonry elements. The filler is necessary to reduce shrinkage, since during the transition from a viscous to a solid state, the volume of the substance decreases. The filler retains the primary volume and prevents the resulting compound from crumbling.
- The solvent in the vast majority of cases is water. It evaporates when solidified without forming any additional compounds.
In the simplest case, the mixture consists of one binder and one type of filler. In mixed versions, the composition is much more complex.
According to their purpose, mixtures are divided into 3 groups:
- masonry - that is, used in laying the stove itself, foundation, chimney, and so on;
- finishing - used when lining the stove with bricks or tiles;
To construct brick pipes, masonry mortars are used. They are divided according to the nature of the binder component:
- limestone - slaked lime serves as a binder. This styling mixture requires the use of tools;
- cement - the base is cement or Portland cement;
- gypsum - not used for the construction of a chimney;
- mixed - that is, including several binder components: lime-cement, lime-slag, and so on.
To construct part of the pipe under the roof, you can use solutions based on clay, cement or a mixture of clay and sand. For the part above the roof - lime, cement or cement-lime, since here one of the main requirements is greater water resistance, and the clay composition is washed away.
Choosing a mixture for installing stoves and fireplaces
Installation of stoves and chimneys is not an easy process. The construction of such a complex and fire-hazardous structure requires the participation of professional, qualified stove installers. However, there will always be brave and persistent stove lovers, folk craftsmen who rely only on their own strengths and skills. We will tell you how to choose a baking mixture or prepare it yourself.
In any case, you should know that the use of a high-quality mixture for masonry and lining of stoves is of great importance. The masonry mortars used directly affect the reliability and service life of the stove or fireplace. Therefore, it is imperative to use a stove mixture that is of high quality and suitable for the specific type of heating structure.
Types of masonry stove mixtures
Mixtures for laying stoves are divided into the following types:
Heat-resistant solution.
This kiln masonry mixture has good resistance to high temperatures. Once cooled, it retains its chemical properties and structure. In this case, irreversible deformation does not occur. The described mixture does not lose its load-bearing capacity even when heated.
Heat-resistant solution.
When exposed to high temperatures, this mixture does not expand and does not change its properties. When heated, the mixture retains all its characteristic mechanical properties. The solution is more resistant to thermal deformation compared to a heat-resistant mixture. Excellent resistance to both static and dynamic loads.
Fireproof mortar
. It can be heat-resistant or heat-resistant. The fire-resistant furnace mixture can withstand not only high temperatures, but also the influence of chemically aggressive substances found in the exhaust gases.
How to prepare clay mixtures for stove masonry
The mixture is used for construction inside the building. It cannot be used for chimneys on the roof. The optimal proportions are considered to be: the ratio of the shares of clay and sand as 1:1 or 1:2, and the volume of water as 1:4. In practice, everything is determined by the fat content of the clay.
One of the tests is used to check raw materials. For example: a kind of dough is kneaded from 500 g of clay and balls with a radius of 20–25 mm are rolled. The ball is placed between two dies and squeezed until cracks appear on the lump of clay. A ball of thin clay falls apart even with slight pressure. From poor - when the volume is reduced by ¼ or 1/5. Normal cracks appear when reduced to 1/3 of the diameter, and oily – when reduced to ½.
The best is normal clay. When using it there is no need to add sand. If it is oily, then carefully sifted river sand is added in a proportion of 0.5 to 5 volume fractions. The result will be checked using the test described above. If it’s poor, they wash it out: fill it with water and wash out the excess sand.
To obtain the solution with your own hands, take the following steps.
- The clay is laid on a flooring made of boards measuring 1.5 * 1.5 m. It must be applied in layers and moistened with water.
- If you need to add sand, it is laid in a layer on top of the moistened clay.
- As soon as the clay gets wet, it is mixed and raked into a ridge about 30 cm high. Then the ridge is chopped with the edge of a shovel into plates, the edges and lumps are crushed. Then they are collected again into a ridge.
- Stirring is repeated 3–5 times until there are no clots left in the resulting mixture. The finished solution slides off the iron shovel, but does not spread. A sample can be seen in the presented photo.
How to prepare a lime mixture for a chimney
Lime mortar is required for roof structures. Its components are sand, water and lime paste. The latter is prepared by slaking lime.
- The preparation method depends on the quality of the lime. If quick-quenching lime is used, then pour water into a special container - a slaking box - 1/2 the height, and then add lime. When steam forms, stir vigorously, and after quenching is completed, strain through a sieve with mesh sizes of 5 * 5 mm.
- The medium-extinguishing one is poured into the box at 1/4 height and filled halfway with water, and stirred when steam appears. Water is added in small doses until the mixture is completely extinguished.
- Slow-extinguishing is poured into the box at 1/4 height and moistened with water. After cracks appear, mixing begins with the gradual addition of water in small portions until the consistency of the mixture reaches the state of lime milk.
- The substance is poured into creative pits, where it is stored under a 50 cm layer of earth. It is recommended to keep the substance for about a month before use.
- The resulting lime dough is filtered with your own hands through a sieve with smaller cells - 3 * 3 mm, and mixed with sand. If necessary, dilute with water.
The finished composition should be held on a wooden paddle with a layer of 2–3 mm.
The video examines in detail the process of making mixtures for chimneys on the roof.
Checking the clay before preparing the solution
If the solution has normal fat content, the trowel is removed from the batch clean or almost clean.
To properly prepare a clay solution, you need to test the clay: add a little water to half a kilogram and knead it well with your hands until it completely absorbs the water and begins to stick to your hands. Having made a stiff dough, they form a ball with a diameter of 40-50 mm, and from another similar ball they flatten a cake with a diameter of 100 mm and dry both products for 2-3 days. If during this time cracks form on the cake or on the ball, it means that the clay is too greasy and you need to add sand to it. And if there are no cracks on the ball and cake after drying and they can withstand a fall from a height of 1 m, it means that the clay can be used in preparing a solution. Skinny clays do not crack, but they are not strong, so they need to be mixed with fatter clays. Clay or sand is added in several stages until the solution is ready.
To prepare the solution, use different clays, mixing them dry and then mixing them with water. Add 0.5-5 parts volume of sand to the fatty clay. It must be sifted through a fine sieve with 1.5×1.5 mm holes. Very thin clay is washed out - excess sand is removed from it by washing with water.
Instructions for stove mortars (for laying chimneys): what are they and how to prepare them?
Arranging the heating system of a private house involves certain difficulties with laying the chimney. The problem arises when using red ceramic bricks, which should only be laid using a special fireplace/stove mortar.
There are several types of compositions for laying a stove, and in each individual situation it is advisable to use only a specific type. The very use of the composition (its preparation) is quite possible with your own hands.
Why is it so important to choose the right mortar for laying a chimney?
The problem with fireplaces and stoves is that each segment of such a system is exposed to different negative effects (or with different intensity). The brick pipe inside the room “gets” the most – it is affected by smoke, condensate (moisture) and various acids formed during fuel combustion.
The process of laying cement-based kiln mortar
As a result, over time, large quantities of soot and soot begin to settle on the walls of the chimney pipe, which ultimately results in even more condensation and a decrease in draft. In this case, the outer part of the chimney does not suffer at all - it is not affected by any aggressive factors.
The chimney segment above the roof suffers from several other problems. The whole problem there is precipitation, specifically wind, rain and snow. But an even bigger problem is the difference between the temperature of the exhaust gases and the temperature of the air masses.
That’s why you need to choose the right solution for laying the chimney in order to protect it from the listed negative factors (it is simply impossible to completely avoid their impact ).
Chimney cleaning
A layer of soot settling inside the chimney not only reduces its cross-section, but also increases the likelihood of a fire, since it can ignite. Sometimes it is even specially burned, but this method of cleaning is very dangerous. It is more correct to remove soot using a combination of two methods:
- Mechanical involves the use of brushes and scrapers on long, extendable holders, as well as weights on a strong cord, which are passed into the chimney from above.
- Chemical: a special product is burned in the firebox along with regular fuel, for example, “Log-chimney sweeper” (sold in hardware stores). It contains many substances - coal wax, ammonium sulfate, zinc chloride, etc. The gas released when this product burns forms a coating on the walls of the chimney that does not allow soot to subsequently stick to them.
The second method is used as a preventive measure.
"Log-chimney sweep" will clean the chimney in two weeks
Types of solutions
All types of chimney mortars consist of binders, filler and solvent. The first two components work in “close interaction”:
- The binder, after hardening, creates a strong connection, which ultimately holds all the elements of the masonry. And the filler, in turn, is intended to reduce shrinkage, because during the transition from a viscous to a solid state, the volume of the substance always decreases significantly. It is the reduction in the volume of the substance that the filler prevents.
- Typically, water is used as a solvent, which after hardening does not form any auxiliary compounds.
Mortar for brick chimney, proportions
Brick chimney mortar
Nowadays, thanks to the Internet, you can find almost any information. Lots of videos on various topics.
As a result, more and more people prefer to do things with their own hands. For example, if earlier stove-makers had to be hired to lay a stove, now many people lay out the stove themselves.
Fortunately, you can view the entire process step by step on the Internet. And special “smart” programs will make accurate calculations of the brick and build a 3D model of the stove.
However, it is one thing to understand the order of laying bricks, and quite another to know the exact proportions of the mortar for laying a particular section of the furnace.
After all, you want an object created with your own hands to be functional, strong, and durable.
Brick chimney mortar
When building stoves and fireplaces, bricks are held together with a special mortar. There are special requirements for solutions.
After all, it must not only firmly connect the bricks to each other, but also withstand high temperatures.
In addition, the solution must be sealed. It is not allowed to crack. As a result of this, smoke and carbon monoxide can enter the room.
Which can cause irreparable harm to health or lead to death.
Requirements for solutions
If you look at the rules established for the construction of stoves and fireplaces, in the section of brick smoke ducts, at this address - files.stroyinf.ru/Data2/1/4293786/4293786504.htm#i1203891, you can see the requirements for solutions.
These rules specify the requirements for the location of objects, materials, and so on. Among other things, the requirements for solutions are indicated.
For example, it says that when constructing brick chimneys for stoves and fireplaces, the following solutions are used:
- lime or lime-cement - for erecting a chimney in the wall of a building;
- lime-cement - for masonry above the attic floor;
- cement - for masonry above the roof.
That is, the higher the chimney, and the less it is exposed to high temperatures, the more cement should be used in the solution.
Proportions of lime-cement mortar
Finding out the name of the solution is only half the battle. All that remains is to determine its exact proportions.
The proportions of the solution depend on many factors and the desired result.
Under moderate conditions and low strength requirements, less cement is added.
In harsh conditions and increased strength requirements, more cement is added.
For example, moderate-condition lime-cement mortar contains:
- Cement - one part;
- Lime - one part;
- Sand - six parts.
The same solution, but for more severe conditions and with increased strength, contains:
- Cement - one part;
- Lime - 0.5 parts;
- Sand - four parts.
If there is an excess amount of lime, the lime-cement mortar turns out to be too greasy. Then it becomes very deformed after drying. And if there is not enough lime, the result is an inelastic solution that is difficult to work with.
The indicated solutions may require different amounts of water. It all depends on the quality of cement, sand, humidity, and so on.
Therefore, it is recommended to take approximately one part of water to start kneading. And then, during the kneading process, gradually add water to the desired consistency.
Important Construction Aspects
After completing all the previous steps, you should start laying out the cutting neck. For a standard chimney, a laying of just five bricks will be sufficient.
So, how to build correctly?
- The beginning of the cutting itself. The parameters of the outer surface will be approximately 600x500 mm. You need to insert halves and quarters of a whole brick. You should first purchase special building plates that will be inserted inside. This will help to lay a smooth channel for removing smoke.
- Construction of the third row. Dimensions will be approximately 650x550 mm. It is worth choosing denser plates of approximately 80 mm here. At this stage, the fluff will gradually begin to take on its final shape.
- Layout of the fourth and fifth rows. A whole brick is used. The sixth row is laid out with obligatory dressing and nothing else.
Attic work
For attic work, you should start by arranging the main riser. You need to make a hole in the roof surface and pass equipment through it. This is all the work done in the attic. Next, the part through which the chimney is led to the roof is arranged.
Roof
As before, the primary stage of work is laying out the riser. We should not forget about the brickwork connections. The pipe is installed approximately three rows above the roof level, then you can begin to lay the otter.
Otter
This stage is required to be laid out in nine or more rows. Each subsequent one is larger than the previous one by a quarter of the whole brick. must be strictly adhered to - it should neither expand nor narrow. The protrusion will face forward. The edges of the chimney remain in place. By pushing the bricks forward, the otter will expand in width approximately in the third setting. In the fourth row, the protrusions on the sides should become longer. The fifth row should close the gap between the roof and the built-up chimney masonry.
The sixth row will close the resulting side open zones. The formation of the main protrusions will be completed on the seventh laying. All that remains is the design of the rear part.
The last, fourth protrusion should form in row number eight. To form the correct chimney, you must carefully follow the established dressings and not disturb the order of the plates. The ninth clutch is identical to the eighth. At this stage, you can begin laying out the so-called neck of the chimney.
This is also done in several rows. To be more precise, in three or more rows. The size should be selected based on the original dimensions and height of the smoke channel. In no case should you violate the rules for arranging a chimney above the roof of a building, since the future performance and even safety of the device depends on this. The established dimensions are saved regardless of the selected device model.
Final stage
The construction of the chimney with your own hands is almost complete. Now you need to build the head. You can start laying it on the formed neck. The stage is performed exactly the same as fluffing, so it shouldn’t be too difficult. When the work is finished, you should take a little time to select a weather vane or a cap for the chimney.
Mortar for laying a brick chimney
When building a furnace, the difficulty often arises as to what mortar to use for laying the pipe. After all, red ceramic brick does not interact with all compounds. The same mortar that was used in the construction of brick walls is not suitable for laying a chimney. However, its use is not recommended, as it will not withstand high temperatures. There are special heat-resistant compounds for heating systems.
Components of mixtures and their types
Depending on the type and method of use of the structure, a binding solution is selected. During operation of the furnace, smoke, evaporation and chemical acids act inside the pipe. Therefore, it is important to properly prepare the solution for the chimney. Typically, it consists of a solvent (i.e. water), binders and aggregate. When hardened, the volume decreases, and the filler does not allow it to crumble and retains its original size. The binder component performs an important function - when it transforms into a solid state, it forms a strong bond between the masonry material.
The mixtures differ in some characteristics:
- By dry density: light;
- heavy.
- lime;
When facing stove structures with bricks, the appropriate type of mortar is used.
Mortars are also divided into masonry (laying foundations, bricks, stones, chimneys), finishing (lining furnace structures with bricks) and special ones. A simple mixture consists of only a filler and one viscous component, a mixed and complex mixture consists of several binder components and fillers. In a complex composition, the name is determined by the main component with a strong astringent effect.
If you choose the right thickness of the mixture, it will turn out homogeneous, without unnecessary compounds and will be easily squeezed onto the brick with light pressure.
Lime mixture
The preparation method depends on the properties of the lime:
- When quenching slowly, pour the component into a quarter of the volume and add water. After cracks form, carefully stir, adding water little by little in small doses until a liquid state is obtained (milk of lime).
- For medium slaking, add ¼ of the lime and fill half with water. After steam has formed, stir thoroughly and add water until it is completely extinguished.
- For quickly slaking lime, pour ½ water and add lime. After steam appears, mix thoroughly until the quenching process is complete and rub through a sieve. If the solution turns out thick, add more water until smooth.
Return to contents
Clay mortar
To obtain the mixture correctly, clay is placed on the prepared boards. Place in layers, wetting each layer with water until softened. A layer of sand is placed on top. Its proportion with clay is 1:1 or 1:2, and the amount of water is a quarter of the volume of clay. After this, the solution is mixed and divided into layers with a shovel, collected into lumps, removing unnecessary particles, and mixed again until a homogeneous mass without clots is obtained. The finished solution should not be liquid or spread.
Cement mixture
This composition is the most durable. There are two ways to receive:
- A dry mixture of sand and cement is mixed, at the same time lime is prepared to the state of sour cream, then the compositions are combined and thoroughly mixed. To obtain the required thickness, add liquid and stir to the desired consistency.
- Mix cement with water and add to the prepared solution of lime and sand. This mixture is more plastic, sets quickly, but is less durable than with the first preparation method. The ratio of materials ranges from 1:1 to 1:6.
Return to contents
Lime-gypsum composition
To plaster a brick oven, use this mixture. It is inexpensive, and with the addition of cement and lime it can be used for laying a brick chimney. This composition is easy to work with and hardens quickly. The main thing is to correctly calculate the proportions and obtain the required homogeneous consistency.
Methods for slaking different types of lime
To prepare quick-quenching lime, pour water into the slaking box up to half of its walls. Then lime is added in several additions, distributing it evenly. When steam occurs, the lime is intensively mixed, breaking up large pieces and pouring water until the steam stops being released. Add water to the slaked lime to obtain a homogeneous milk of lime, and leave for a while to slak out the remaining pieces. Then the whole mass is mixed and passed through a sieve.
Water is added in small portions - this is necessary to prevent burnout and drying out of the lime.
To extinguish medium-slaking lime, you need to put boiling lime in the extinguishing box to a quarter of its height and pour water to half the layer. When steam appears, the lime is stirred and the pieces are broken. Add water in small portions - this is necessary to prevent burnout and drying out of the lime. When the steam emission ends, you need to add water, mix everything and after a while pour the milk of lime through a sieve into a creative pit or container.
Slow-slaking lime is poured into the slaking box up to a quarter of the height of its walls, moistened with a small amount of water and kept until signs of slaking appear (cracks, etc.). After this, small portions of water are carefully added to the lime so that the lime that has begun to slak does not cool. After slaking, the lime is diluted with water to obtain lime milk, kept for a short time and drained through a sieve for storage. In the cold season, to speed up slaking, slowly slaking lime is poured with hot water.
The use of mortars for laying brick chimneys
Lime composition is used for laying the furnace pipe. A mixture of water and lime with the addition of sand is prepared. The mortar prepared according to the rules can withstand high temperatures, is resistant to moisture and ensures the reliability and durability of the oven, connecting the bricks with high quality. To create a more durable mixture, cement is added, and gypsum is added to speed up hardening during putty work.
The clay composition is not suitable for laying a chimney, as it does not withstand moisture, which leads to the formation of cracks. But at the same time it is resistant to temperature increases, therefore it is used as a mixture for the main part of the furnace structure. However, such a solution should not differ from the composition of the brick, be durable and not emit fumes. To increase strength, add 100-200 grams of salt an hour before mixing. The masonry is made on the basis of fire-resistant clay and fireclay bricks. The cement mixture is used to build pipes. It sets quickly, so it is necessary to work with it within an hour after mixing, otherwise the solution will begin to lose strength. After laying, the solution is covered with shavings and moistened with water for 4-5 days.
Additives to the solution
The standard solution does not require the addition of admixtures. If it is necessary to use a complex type of mixture, salt and cement additives are used. 150 g of salt + 1 kg of cement M 400 + 2 buckets of clay + 2 buckets of sand. This volume will be required to lay 100 bricks.
To obtain the mixture, you need to pour clay into a container. It should be soaked in water, which will be 1 part to 4 parts clay, for 6 hours.
Don’t forget to stir the solution from time to time; you can do this with your feet in rubber boots.
Once the process is complete, add sand. The resulting mixture should be thick, but slide off the shovel. This will be an indicator of its quality.