Lags - what is it?
Installing a wooden floor on joists in a private house is an old technology. Some changes have been made to it today, but the basic principles remain the same. This floor design is characterized by such advantages as simplicity and reliability. Hence, in principle, its popularity.
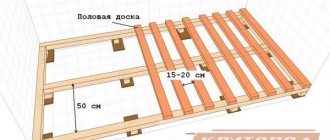
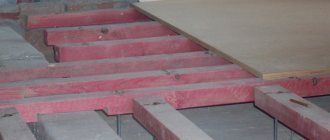
So, what are lags? Essentially, these are beams laid across the room. They become the basis for laying wooden boards on them. Typically, lumber is used for this, although we must pay tribute that in the construction of private houses it is allowed to use reinforced concrete products, metal profiles, and today even polymer materials.
The design of wooden logs can also be different. Of course, the best option is an even beam adjusted to certain dimensions. Because it’s easier to work with this material: adjusting, setting and assembling. You can use boards laid on edge with a thickness of at least 50 mm. If the distance between the supports for the logs is large, then the boards are knocked together in twos or threes.
Sometimes they even use logs or round timber, which is hewn on one side to a flat surface, on which a counter-lattice is then laid under the floorboards.
Round timber floor joists Source artc-alisa.ru
Note that in some respects wood is inferior to a concrete base. But it also has its great advantages:
- low specific gravity, which creates virtually no load on the foundation and additional supports;
- the floor base formed on logs is ventilated, which significantly increases the service life of the entire structure and the finishing coating as well;
- Communication networks can be easily placed between the joists, and getting to them in the event of an accident will not be difficult;
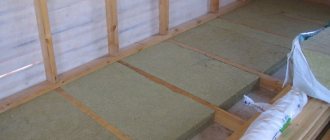
- Insulation is usually laid between the lags, which makes this design comply with regulations and standards;
- using logs, you can also level the floor structure, and this is much easier and cheaper if such a problem arises with concrete floors;
- the strength of the log structure is not inferior to any other;
- this design evenly distributes loads over the entire surface of the foundation;
- The floor itself, laid along joists, is easier to repair.
More recently, wooden floors in a private house with joists were criticized for being difficult to combine with heating systems: water and resistive. Today, the problem has been solved by new construction technologies that have emerged. That is, making a warm floor based on wood today is not a problem.
Warm water floor in a wooden floor structure Source i.ytimg.com
Floor installation without screed
Water heated floors without screed are used quite often today. A concrete base is certainly reliable, but it cannot be installed in every room. It is in these cases that an alternative heated floor system is used. Installation of such structures is easier than designing a screed, and in operation they are in no way inferior to it.
Underfloor heating system without screed
If the house is built of timber and the rooms have low ceilings, making a concrete screed can additionally “capture” an already small space. In addition, laying a concrete base is a labor-intensive and dirty job. In this case, the ideal solution for you would be a water heated floor in a wooden house with your own hands.
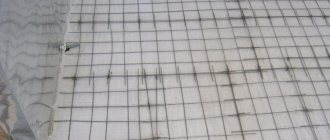
A water floor without a concrete base is installed on a wooden or polystyrene covering. Pipes are laid in special recesses. For better distribution of warm air, special metal plates are installed. The laid pipe system is covered with waterproofing material on top, and a finishing coating is applied to them.
Pipe system for wooden heated floors
Material for wooden joists
As mentioned above, the best option is timber. For logs, it is better to use inexpensive types of wood - pine, spruce and others. There are larch elements on the market, but they are more expensive. In addition, for a lag structure it is not necessary to choose high grade wood. Second grade timber is suitable, which already makes it possible to save money.
But it is better not to use third-grade products. Of course, appearance does not matter in this case, but the strength characteristics must be at their best. Still, wooden logs must withstand decent loads. Therefore, you should not purchase timber with a large number of cracks, with rotten rot or with blue areas. A lag structure made from such material simply will not last long.
You should also not purchase timber if its geometric shape has incorrect parameters. For example, a twisted beam, bent or deformed. It will be difficult to match such material to the level.
Beam for lag structure Source solovevgas.ru
Therefore, the advice is to buy timber that has been dried in special installations; its humidity should not exceed 12%. And if you purchase lumber in advance, you will have to create conditions for its storage. Be aware that material with a moisture content of more than 15% will deform during operation under the influence of changing temperatures.
Attention! As for the cross-section of the beam, its height should be 1.5-2 times the width.
But here another question arises, and it concerns the section itself. That is, what section is needed in a particular case. However, this is not where we should start. And from two other parameters:
- location of the logs relative to the room;
- the distance between them.
The first one is simple. Typically, boards, as a finishing coating, are laid perpendicular to the wall on which the window is located. The thing is that there are gaps between the elements of the plank floor. And if you lay lumber across the room, then all the cracks will be visible in the rays of daylight coming from the window. Therefore, the logs are laid across, that is, parallel to the wall with the window. If sheet materials are used as the basis for the finishing coating, for example, plywood, chipboard or OSB, then there is no difference in how the logs are laid.
Location of the log relative to the window Source piorit.ru
As for the distance between the logs, it is necessary to take into account the thickness of the boards that are used as flooring. There are special tabular data, they are standard. The ratio here is:
- board thickness 20 mm, lag laying pitch 300 mm;
- thickness 24, pitch 400 mm;
- 30 – 500;
- 35 – 600;
- 40 – 700;
- 45 – 800;
- 50 – 1000 mm.
It is necessary to pay attention to the fact that when the step of laying joists is calculated, a round number is not always obtained. Therefore, it must be rounded, only downwards. Craftsmen often install elements near walls with smaller spacing. And it is right. The entire floor structure will benefit from this. Distance between lags in the table:
Source m-strana.ru
So, if two parameters are known, you can find out the dimensions of the timber for the floor joists. But even here it is necessary to understand that the calculated value depends on the length of the lag. Because the longer the element, the more sagging it has. This means that the cross section will need to be increased to avoid this problem. That is, the cross-section of the beam directly depends on its length. And in this case, you can use the table:
- if the length of the span on which the timber is laid is 2 m, then lumber with a cross-section of 60x110 mm is used for this;
- 3 – 80x150;
- 4 – 100x180;
- 5 – 150x200;
- 6 – 180x220 mm.
As you can see, the cross-section of the material can be impressive. And this, first of all, makes it heavier, and, accordingly, increases the mass of the entire structure. Of course, the cost of the lag also increases, and the budget increases accordingly. The solution to this problem is simple. It is necessary to assemble, at certain distances, supports for the logs on which they will rest. Thus, small cross-section lumber can be used.
For example, if you assemble support columns every meter, you can lay logs with a cross section of 50x80 mm. If the step is increased to 1.2 m, then the dimensions will be 50x90 mm.
The smaller the distance between the columns, the smaller the cross-section of the log Source artdevice29.ru
See also: Catalog of companies that specialize in foundation repair
Please note that all values indicated are minimum values. That is, they can be changed, but only upward. Often today, thermal insulation material is placed in the space between the joists. And the thicker it is, the better. Therefore, craftsmen often lay logs with a large height, and leave the width as a table.
And one moment. The distance between the elements of the joist structure also directly affects its cross-section. The smaller the step, the thinner the boards can be laid on the floor. Accordingly, the cross-section of the beam is reduced.
And the last thing in the section on choosing material for lags. Wood is a natural material that can decompose over time. That is, logs can shrink, rot, crumble, and so on. In addition, colonies of harmful microorganisms may appear on its surface. To prevent this from happening, the wood must be treated with special protective compounds before use, of which there are many on the modern market.
Today, wooden products are additionally treated with fire retardants. These are compounds that protect the material from fire.
Attention! It is useless to treat damp wood with protective compounds. The maximum permissible humidity in this case is 25%.
Treatment of logs with protective compounds Source www.ivd.ru
Features and nuances
To make a floor in the premises of a wooden house, you can use various technologies for laying it and choose different materials, including for insulation, sound and waterproofing.
In particular, as insulation, in addition to mineral and glass wool, you can use expanded clay poured into the recesses between the beams, sawdust or slag. Styrofoam sheets will also work. However, materials such as expanded clay, slag or sawdust are better suited for the installation of floors on the first floor, especially under bathrooms.
At the same time, when laying the floor of the second or more floors, it is better to use mineral wool for better sound insulation. It is also better suited for attic floors.
Log installation process
We need to start with the fact that the installation of joists under wooden floors in private houses is carried out either on the ground, or on the foundation, or on the floor slab. Let's look at all the options separately.
On the ground
We must immediately make a reservation that the beams are not laid on the ground itself. To do this, columns are assembled from piece materials, or they are poured from concrete. But before forming columns under the floor joists, the soil itself is prepared. What they do:
- cut off the fertile layer inside the foundation structure;
- level it and compact it;
- they fill it with crushed stone or sand, someone makes a concrete screed or rolls up asphalt.
The main task is to do everything so that there is no dampness under the floor base and no vegetation grows.
Next, the supports are raised or poured into the prepared and installed formwork. The distance between the columns is selected from the table. It is important to waterproof the supports both from below and from the sides, as well as treat or cover the top plane, thus cutting off the logs from possible contact with moisture.
If the columns are assembled from piece building materials: brick, concrete blocks or stone, then a foundation of a small thickness is poured under each support. This can be several foundation structures for each support post or one solid one in the form of a tape for everything at the same time.
When all the support posts are ready, proceed to laying the joists. The main task here is to set them as accurately as possible both horizontally and vertically.
Floor frame
First, let's study the main constituent elements and main rules:
- The underground space from the pads to the floorboard must be at least 1 cm (and no more than 25 cm for floors on the ground). This is necessary for good ventilation inside the frame.
- Logs
are transverse bars that serve as the basis for further cladding with boards. They can rest on beams, a concrete slab, posts, and even on the ground (when using pads).
- The width of the logs when laid on a slab should be in the range of 80-100 mm and 100-120 mm when laid on posts or beams. The thickness when laid on a slab should be 25-40 mm, and when laid on posts - 40-50 mm.
- Beams
are horizontally laid structural elements that perform load-bearing functions. They are supported at least at two points on load-bearing walls. - Columns
(linings) are used to level the base. For logs with a thickness of 40-50 mm, linings are installed every 80-110 cm. - The pitch of laying the logs depends on the thickness of the sheathing. For example, if you use the thinnest floorboard 21 mm, then the step of laying the logs should not exceed 30 cm.
- It is best to use a thicker floorboard 35 mm, and make a standard laying step of 60 cm, especially if you are going to insulate the base. This way you won't have to cut the insulation to width.
Further floor arrangement
Further installation of the floor along the joists involves two more stages of work.
The first stage is laying the finished floor
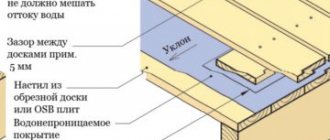
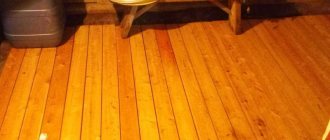
After installing the logs, thermal insulation, waterproofing and sound insulation, the finished floor is laid. They begin to lay it from the corner of the room. The first row of boards is placed tongue-and-groove against the wall, with a gap of 10 mm between the wall and the boards. This will compensate for the deformation of wood that appears from temperature changes and changes in humidity levels.
The next row is placed offset to the previous one by approximately 2 lags. To lay the boards tightly, apply a piece of wood to the ends of the board being attached and hit it with a hammer.
The boards are fastened to the joists with screws, the heads of which are driven into the boards.
After laying the boards, the expansion joints are covered with plinths.
Expert advice:
- lay the floor on a concrete base after leveling all the joists along the horizontal plane;
- boards must be attached to all beams;
- their size is chosen so that the joints between them are in the middle of the lag.
- To prevent them from cracking, it is necessary to make small-diameter holes in them for self-tapping screws. For the screw head it is necessary to make a countersunk hole, for drilling which you need to use a drill of a larger diameter.
- Instead of a plinth, you can install profiled strips - fillets.
- holes for pipes need to be made 8-10 mm larger.
To increase the accuracy of installation, experts advise that before fastening the boards, tighten them together with the staples of a construction stapler.
The second stage is the final finishing of the floor
This is the most critical stage of work on arranging a floor on a concrete base on joists. The appearance of the floor and room depends on the choice of finishing material. Listed below are the main types of final floor finishing.
Parquet
Parquet consists of solid wooden planks from which the floor covering is laid. It makes the floor very attractive. This flooring has a long service life - more than 30 years. In addition, part of the parquet can be replaced at any time.
Laying parquet requires a lot of experience, so it is difficult for an ordinary person to lay it falsely, since the technology for laying parquet is complex and labor-intensive. In addition, this coating is expensive. During operation, parquet requires careful handling, as it is scratched and afraid of moisture. To keep this floor always beautiful, it must be regularly polished and varnished.
Linoleum
This floor finish is very popular today. This is due to the low cost, practicality and ease of installation of this flooring material. You can lay linoleum indoors yourself, because this does not require special knowledge and skills. A floor covered with linoleum is resistant to moisture and aggressive liquids, while it looks beautiful.
Linoleum is easy to clean and sweep. Thanks to the wide variety of textures and colors, it can be matched to almost any color of furniture and wallpaper.
Linoleum can be laid on top of boards, plywood or concrete. Thick linoleum with a base of more than 3 mm can hide small unevenness in the floor and seams of sheet materials.
The disadvantage of linoleum is its low maintainability. If a hole appears on it, then it will not be possible to seal it and make this place invisible.
Laminate
This flooring is quite expensive. In appearance and performance characteristics, this material is similar to parquet. It is easy to install and does not require special care. The choice of laminate on the finishing materials market is quite extensive, so everyone can choose the option that suits them.
Fiberboard
Fiberboard is rarely used today for finishing floors. This material is mainly used to level the floor for the installation of other floor coverings. The sheets are secured to the floor with small nails or self-tapping screws. After fixing, the fiberboard is painted in 2–3 layers. This material is also afraid of moisture, because it swells under its influence.
Carpet
This floor covering looks beautiful and additionally insulates the floor. At the same time, carpet quickly loses its attractiveness (the pile wears out and gets worn out), which is why it is used only in bedrooms and children's rooms, where people rarely walk.
It is difficult to clean and quickly absorbs moisture. Drying the carpet without dismantling it is extremely difficult. In terms of installation, the material is convenient; it is simply rolled out on the floor and trimmed where needed.
Online calculators
To simplify calculations, you can use an online calculator. However, to enter data into it, you must first determine the cross-section of the timber, the thickness of the flooring and what pitch of the floor joist is accepted.
Attention: in this calculator there is a distinction between the concepts of “subfloor” and “floorboard”. This refers to a two-layer plank flooring, in which subfloor boards are first laid at intervals of 2 cm (to compensate for temperature and humidity deformation), and then a flooring is created from floorboards and they undergo finishing treatment (varnishing, painting).
Constructions
Due to some elasticity of the board as a floor covering, the design of the flooring requires the construction of a kind of supporting skeleton, reminiscent of a pie. In addition, the location of its installation - be it the floor of the first or second floor, an attic or terrace in a private urban housing construction, or a balcony (loggia), a bathroom in an apartment - dictates a number of requirements for the structure of the supporting structure before laying the finishing coating.
Regardless of the type of room in which the renovation is being carried out, the design includes some required elements:
Vapor barrier. Concrete or wooden floors, and in a village house, possibly open ground, must be isolated from the supporting skeleton of the log. Wood of any species is a fairly hygroscopic material, and even thorough antiseptic and antifungal treatment does not always eliminate the possibility of rotting or mold. Eliminating the source of dampness means extending the life of the floor many times over. A polyethylene film with a thickness of at least 150 microns (micrometers, “microns”) is suitable for these purposes. The strips are laid with a slight overlap of 5–10 cm, the joints are secured with wide adhesive tape along the entire length of the joint. The tolerance around the perimeter of the wall is about 20 cm.
Depending on the purpose of the room, one of two options for making a wooden floor is used - cold or insulated.
Cold
This design is suitable for balconies, terraces, attics, hallways and other rooms where residents are rarely and for a short time. In this case, a passive heat-insulating layer - polystyrene foam or mineral wool, discussed above - is sufficient. If the room is dry and the floor is not exposed to moisture from the underside of the base, you can do without thermal insulation.
Insulated
If a heated floor is planned (whether water or electric heating), then the heating elements are laid on top of the film covering the heat-insulating layer. This method is completely safe, since the melting point of polyethylene is significantly higher than the maximum temperature of the heating source.
In addition, the heat from the heating elements, thanks to the heat insulator, is not spent on the concrete or wooden sub-base, but goes to warm up the top finishing coating and is transferred to the room.
Fixation to concrete pillars
This method involves fixing beams to concrete pillars, using similar fasteners, but designed specifically for pillars.
- The pillars must be covered in advance with a waterproofing layer (bitumen or mastic is used). Their upper part can be protected from moisture with roofing felt. You need to pre-drill holes in the posts and beams.
- Next, you need to drive dowels or anchor spacers into them.
- Then the beam is attached to the post with self-tapping screws 2-3 times longer than the width of the spacer.
- The timber is attached to the posts using iron plates with screws. They are fixed to the posts with dowels-nails, and to the beams with screws.
Thanks to the study of all these fastening methods, the question of how to install joists on a concrete floor disappears by itself.
Calculation methods
To calculate the size of the timber and the number of elements required for installing a wooden floor on joists with rough coverings made of boards or chipboards, you can:
- Contact a design organization that will professionally calculate how many elements should be under the board or chipboard covering, and what size of timber should be used during construction;
- Use special average tables yourself, choosing which value is closer to the required one, leaning towards the larger side if there is no exact match between the real and tabulated sizes;
- Use computer programs and online calculators into which a fairly large number of parameters are entered, and the program will accurately determine the required dimensions of the timber and the distance through which it must be installed.
By correctly calculating and efficiently installing joists or floor beams, you can be completely confident in the strength and durability of the building, which will delight its owners with its impeccable appearance for a long time.
What does the step depend on?
The distance between the joists for the floor boards depends on the load on the assembled floor, the dead weight of all the wood material and the dimensions of the room, as well as the cross-section of both the board and the timber. A step that is too small, although it will add strength, will result in excess weight of the structure or building; a recalculation of the plan starting from the foundation will be required before construction begins. Too large a step - the boards will bend under the weight of people, furniture and equipment; in the worst case, the floor may crack and fall either onto the floor below, or come into contact with the subfloor (foundation) of the building, thereby disrupting the thermal vapor barrier of the latter. In any case, if the boards are damaged or people and objects fall through in the room, repairs will be required, including strengthening the “lag” component.
The laying of additional joists with the possible replacement of existing, damaged ones is inevitable. Likewise, the boards themselves will be replaced - those that have become deformed.
