When constructing any facility for economic purposes, there are features inherent only to this type of structure. The bathhouse is no exception. High levels of humidity, huge temperature changes of up to hundreds of degrees - all this requires its own approach, fortunately, the capabilities of modern building and insulating materials have now been added to the accumulated experience of generations of carpenters.
Special mention must be made about the ceilings of bathhouses: it is on them that the extreme thermal load falls when the washable ones “steam.” According to all the laws of physics, the hot air, which at this moment escapes from the heater, all tends to the ceiling. And if it is made without taking into account such periodic exposure to heat and moisture, the ceiling itself, the space above it, and the roof will soon become unusable. Therefore, special attention should be paid to the ceiling of the bathhouse, and in our material we will consider three main ways of arranging it.
Why is this necessary?
At first glance, this is not a serious issue - the ceiling is insulated to protect against thermal energy loss. However, this is far from the main goal of the procedure.
The main task is to organize a reliable cutoff of the ceiling plane and eliminate the formation of condensation. The settling of moisture on cold surfaces makes using the bathhouse uncomfortable and also contributes to premature failure of the floor materials.
As a rule, the ceiling in a bathhouse is lined with boards. If it is colder than other surfaces or objects, condensation will begin to actively settle on the entire surface. It is unpleasant to be in such a room - moisture drips from above and makes the washing process less comfortable.
In addition, the wood is saturated with moisture. This process causes undesirable consequences - mold and mildew appear between the ceiling boards, and the material begins to rot.
Impregnations and antiseptic compounds cannot be used in these conditions - at high temperatures a large amount of harmful substances are released, which can cause poisoning in confined spaces.
If the ceiling plane had the same temperature as other areas, the amount of moisture on it would be minimal or zero. Therefore, ceiling insulation should be considered a priority task.
When the bathhouse ceiling needs insulation
The laws of physics state that warm air is lighter than cold air, which means it tends to rise. The ceiling restricts this movement, causing it to accumulate in the upper part of the room. Then a lot depends on the thermal conductivity of the ceiling itself. If it is not insulated with anything, it causes a loss of 20% of heat. It is quite possible that for a summer bathhouse with a full firewood rack this is not a problem. In all other cases, you should take care of reducing heat loss and insulate the ceiling yourself.
To allow air to move without heat loss through the ceiling, it needs to be insulated
Insulation is also useful for those who do not want to spend the whole day on the firebox, because it is easier to fill the ladle if it does not leak. It's the same with heat.
Materials
There are a large number of heat insulators that can be used to insulate the ceiling in a bathhouse:
mineral wool
penoplex
Styrofoam
foamed polyethylene (isolon, tepofol, energyflex, etc.)
liquid polyurethane foam
folk remedies (felt, sawdust with clay, ordinary soil, etc.)
The choice of the appropriate option depends on the technical and financial capabilities of the bathhouse owner. However, it is necessary to carefully study the features of these materials in order to have an idea of their properties and parameters.
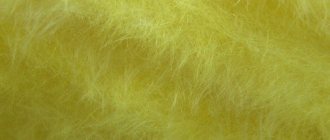
Mineral wool
There are many varieties of mineral wool - glass wool, slag wool, stone wool, etc. However, most of these materials are practically not used today due to difficulties in working with them (glass wool or slag wool can injure the skin and pose a danger to the eyes and respiratory organs).
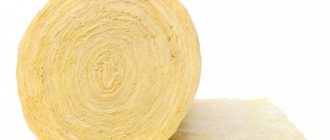
Therefore, when they talk about this material, they usually mean basalt or stone mineral wool. It is safe, retains thermal energy well, and is available in rolls or in the form of rigid slabs. The price of the material is low and accessible to the mass buyer.
The disadvantage of mineral wool is its hygroscopicity. When wet, the material loses all its useful qualities - it becomes heavy and does not retain thermal energy. Therefore, when choosing mineral wool, you need to take into account the operating conditions and methods of protecting the material from moisture.
Penoplex and foam plastic
These two heat insulators are closest relatives. Chemically, it is one material - polystyrene foam. The difference between them lies in the manufacturing technology.
Polystyrene foam is granulated polystyrene foam, and penoplex is extruded. In all respects, foam plastic is somewhat inferior to penoplex, but their general qualities are the same. Both insulators retain thermal energy well, are resistant to moisture, and are lightweight.
The question of the flammability of the material constantly arises. There are a lot of videos online where people unsuccessfully try to set fire to a foam briquette.
Based on these attempts, the conclusion is drawn that the foam does not burn.
However, these videos do not accurately reflect reality. The fact is that the pores or internal cavities of the granules are filled with carbon dioxide, which does not support combustion. If you melt Styrofoam into a dense puddle, it will burn.
The cost of materials (especially polystyrene foam) is quite inexpensive, installation is not difficult and is completed quite quickly.
Thermal insulation based on foamed polyethylene
Materials made from polyethylene foam appeared later than other types of thermal insulation.
They have many advantages:
- absolute impermeability to water or water vapor;
- some of them are equipped with a foil layer that reflects infrared (heat) rays;
- Available in roll or slab form;
- They are light in weight and thin.
- The only serious drawback of such materials is their ability to burn well.
This puts forward special requirements for protection against possible fire. The cost of such materials is relatively low. There are about 90 items in total, although in terms of physical and technical qualities they differ little from each other. Popular names - isolon, penofol, energyflex, tepofol, porilex, etc.
Liquid polyurethane foam
This is a special type of thermal insulation, which is a liquid that foams and swells in air. Liquid polyurethane foam is applied by spraying, which requires special equipment. A special feature of this insulator is that it can be applied to any surface - no preparation is required.
You can spray the material even on wet (but not icy) surfaces. In addition, the thickness of the insulation layer is regulated by the user himself - they spray as much as the operating conditions and surface features require.
Liquid polyurethane foam forms a sealed and completely water-impermeable insulation layer. All technical indicators of the material are high, but it is not popular. This is due to two reasons - high cost and the need to use special equipment that is not available to everyone.
Folk remedies
Today there is a wide selection of heat insulators on sale that can successfully solve the tasks and are easy to use.
However, in the old days there was no such abundance. At the same time, the ceilings in the baths were quite well insulated. For this, different materials were used - from felt or a mixture of clay and sawdust, to filling with ordinary earth from the outside of the ceiling.
Today it would not occur to anyone to use all these materials, although the effect from their use can be quite satisfactory.
How to vent a chimney through a mounted suspended ceiling
How to vent a chimney through a mounted suspended ceiling
Step 1. Find out where the stove maker plans to install the chimney. You must set a condition for the master - the distance between the walls of the chimney and the ceiling beams must be at least 20 centimeters. Let him think about how to mark out the stove and its components in order to meet fire safety requirements.
Step 2. Draw a square on the ceiling to match the dimensions of the chimney; the parameters of the square must exceed the parameters of the chimney by at least 20 cm around the entire perimeter.
Step 3. Cut a hole on the side of the bathhouse. This is much easier to do with an electric jigsaw. In the corner of the square, drill a hole for the jigsaw knife, insert it into this hole and cut the sheathing boards along the line.
If you don’t have an electric jigsaw, it’s quite convenient to work with a cylindrical grinder (grinder), just instead of a stone, insert a disk with pobedite teeth. Use a small, lightweight grinder; the disc diameter should be no more than 250 mm. The rest of the work needs to be done from the attic side. Bring your tools and materials up there.
We are preparing a place for the chimney passage through the ceiling. This is what the opening will look like
Step 4. It is necessary to transfer the dimensions and location of the hole for the chimney to the attic flooring. This is done simply. Using a drill, drill four holes in the flooring at the corners of the opening. Drilling should be done from the inside; try to keep the tool in a vertical position. Before starting work, you need to carefully cut off and remove the mineral wool around the perimeter of the opening. From the attic side, using the existing corner holes, draw the size of the opening and cut out the boards.
Prepared hole
Step 5. Now you need to secure the ends of the cut boards, otherwise they will always sag. You should especially carefully fix the cut ends of the boards in the attic, because that’s where you plan to make a room for use. To do this, you will have to make a supporting frame from 50x150 mm boards around the perimeter of the opening.
Beam installation diagram
Chimney passage dimensions
Step 6. Remove the distances between the ceiling beams adjacent to the opening, cut two pieces of 50x150 mm boards to these dimensions.
Step 7: Attach the pieces to the beams. You will have to work a little, because the frame has to be made with the existing finishing coating. To fix it, use long self-tapping screws and put an extension on the head under the sprocket. This will make it possible to fasten under the covering boards. To make the screws easier to tighten, prepare holes for them in the wooden elements. The diameter of the holes should be a millimeter smaller than the diameter of the screw. When fixing, firmly hold the parts in the desired position, make sure that the sections of the boards do not fall below the level of the floor beams during fastening. Attach two short ones to the installed long jumpers on the other sides of the opening for the chimney.
Step 8. After the stove maker finishes the stove chimney, from the rest room side, place mineral wool in place along the entire perimeter of the chimney. Cover the opening with sheet iron, preferably galvanized steel. On the attic side, the holes are also covered with sheet metal.
Installing ceiling trim
We fasten the cutting with self-tapping screws
Pipe passage, view from the attic
Methods
There are two methods of insulation:
Internal
External
They differ from each other in the choice of location for installing thermal insulation - external insulation is installed on the outside, and internal insulation on the inside of the ceiling.
To achieve maximum effect, it is recommended to use both methods simultaneously.
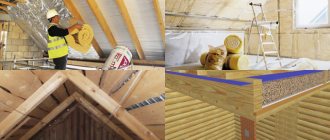
External
External insulation of the ceiling in the bathhouse is carried out according to the general technique used for attic floors.
As a rule, bulk types of thermal insulation are used:
expanded clay
sawdust
foam chips or granules
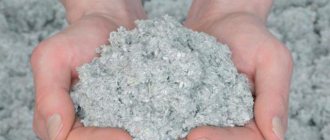
ecowool
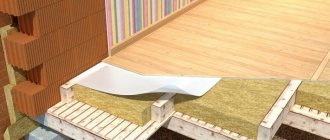
It must be taken into account that the backfill layer (regardless of the chosen material) is capable of accumulating moisture; therefore, it is necessary to ensure the tightness of the roof and cover the insulator with an impermeable sheet (the easiest way is to use polyethylene film).
The insulation method is simple - an even layer of heat insulation is poured onto the ceiling. Its thickness should be at least 25-30 cm. For ease of walking and leveling, the entire area of the attic is divided into sections separated from each other by wooden sides.
You can install walkways on them, or lay plank flooring for free movement around the attic.
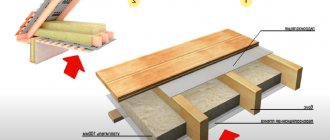
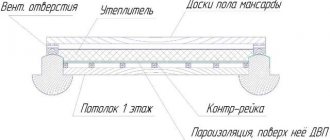
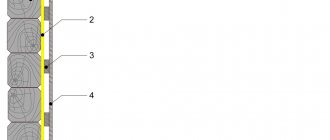
Internal
Internal insulation is a more complex procedure. In addition to installing a heat insulator, it is necessary to install lathing for filing the wooden ceiling (finish). In addition, it is necessary to secure the electrical wiring, install air ducts and other communications (if they are located in the flow area).
It is recommended to use impermeable materials as a heat insulator. The best option is foamed polyethylene with a foil layer. It is thin but provides effective heat retention. In addition, the foil reflects infrared rays, returning thermal energy to the room.
The choice of rolled thermal insulation made of foamed polyethylene is very extensive. You can use isolon, penofol and other types - they differ little in their working qualities. Installation of the insulation sheet can be carried out without prior installation of vapor and waterproofing.
Expert opinion
Lovkachev Boris Petrovich
Bath master who knows everything about steaming
The only requirement will be to seal the joints between the insulation strips, for which aluminum tape is used (used when installing ventilation).
As a rule, insulation is installed as a continuous sheet with sealed joints. After the procedure is completed, the sheathing strips are attached and the finished ceiling is hemmed. An air gap appears between the insulation and the finished ceiling, allowing water vapor to escape from under the sheathing.
The process of installing ceiling beams
After the walls are built and before the rafters are built, the ceiling beams are installed. The two crowns that are on top will act as the basis for installation. There are two ways to install ceiling beams:
- Through holes in the crowns. This method involves the ends of all beams facing the street, which makes the wall open;
- Blind holes in the crowns. In this case, the opposite is true, since the ends of all the beams are inside the logs, which makes the wall blank.
The second method is more popular than the first, because in the first case, beams located on the street are exposed to precipitation, which significantly reduces their reliability.
What tools will you need?
For external insulation, you will need the usual set of hand carpentry tools - an ax, a hacksaw, a hammer with nails and edged boards 25-30 mm thick. They will be needed to assemble the compartments.
The insulation is backfilled using a shovel and a homemade device for leveling the surface (a type of wide scraper on a long handle, two transversely connected strips).
For internal insulation you will need a more extensive list of materials and tools:
heat insulator (it is recommended to use isolon, penofol and other types of polyethylene foam)
aluminum tape for connecting joints
stationery knife
stapler and staples
measuring instruments
fasteners (screws and nails)
lathing strips (20-25 mm thick)
lining or prepared thin boards for lining the finished ceiling
The work is not difficult, except for some nuances - the installation is carried out on the ceiling, which forces you to work in an awkward position. However, even with minimal skills you can quickly and efficiently insulate the ceiling in a bathhouse.
Installation of a pitched roof
How to make a rafter system for a bathhouse roof? Before starting work, it is worth considering several nuances. To ensure that water is quickly removed from the roof surface during heavy rains, a certain slope angle must be maintained. This will also help during snow accumulation in winter. The minimum roof angle is 20 degrees. If the bathhouse is being built in a region with a lot of precipitation in winter, it is necessary to increase it to 45.
To create a certain angle, you will need to install supports of the required height. The work can be done in several ways:
- if one wall is higher than the other, the rafter legs simply rest on them;
- When constructing walls of the same height, it is necessary to place a supporting structure on one of them.
The rafters completely cover the span between the long walls of the bathhouse. Rafters are installed without supports only if the distance between the walls is 4.5 m. For the reliability of the roof, it is better that the rafters are installed every meter. If the distance between the supporting walls increases by more than 4.5 m, the rafter system should be supplemented with struts.
For more reliable installation of the rafter legs on the support beams, cutouts are made in them. Such structures are attached to nails and metal plates. When installing a pitched roof, the legs of the rafter system are moved beyond the frame of the building by half a meter. This will protect the walls of the bathhouse from precipitation.
Frequently asked questions
Let's look at a few questions that most users have and can be addressed right away:
Is it possible to use mineral wool to insulate the ceiling?
It is possible, but impractical. It will have to be placed in a cocoon of vapor barrier, purchased materials and a lot of additional work. This is difficult and increases the duration of the procedure.
What is the thickness of the polyethylene foam insulation layer?
The thickness limits of the ceiling insulation are 14-40 mm. Most often, roll insulation with a thickness of 20 mm is used. You can install two layers 10 mm thick, with different joints for greater tightness.
Is it possible to use sheathing strips as fasteners for thermal insulation?
Yes, this is what most users do. The material is applied to the ceiling and the strip is attached, punching it with nails along with the insulator. It is recommended to use rough nails.
If the bathhouse has a flat roof without an attic, is it necessary to insulate it from the outside?
Not necessary. However, it is necessary to install a thicker layer of insulation to ensure that the cold floor slab is cut off and to prevent the formation of cold bridges.
Is it possible to combine ceiling insulation with wall insulation?
It is possible and necessary. This connection will help to effectively cut off all cold surfaces and create a warm inner cocoon in the bathhouse.
Construction of a bathhouse roof - stages of construction
The roof structure is divided into the load-bearing part and the roof itself. The load-bearing part includes the ceiling, rafters, purlins and other elements. The roofing part includes lathing, steam, hydro, thermal insulation and materials for roof covering (ondulin, slate, metal tiles).
The structure of the bathhouse roof truss system can be assembled immediately at the top. Assembly can also be done on the ground, after which all rafter elements are raised to the top. Either option requires several stages of construction of the roof structure system.
Required thickness for each type of insulation
Insulation works if the thickness of each layer is taken into account. The first layer can be in the range from 3 to 6 mm. Next comes the vapor barrier, and the expert claims a thickness of 4-6 mm.
The outer side may be thickened, but much depends on the material. The steam room includes waterproofing and it is worth making the right choice. The optimal thickness for it is 6-8 mm. Thus, the features of insulation for a bathhouse. Common methods and tools are reviewed. The advantages and disadvantages of individual materials are taken into account.
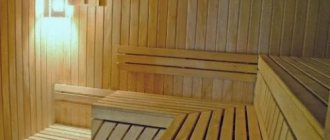
Features of dressing room finishing
- The dimensions of this room in the bathhouse should not exceed 150 x 250 centimeters. This should be a fairly comfortable place in temperature, without drafts.
- A small window is used for natural lighting. Artificial lighting must also be provided.
You should provide a place for clothes, benches for rest, and, if possible, a small table at which it is convenient to organize communication and drink traditional drinks that replenish fluid lost by the body.
In the dressing room, wall decoration is also important, but the requirements for materials here are not as strict as for the interior decoration of the steam room. Cladding with clapboard made of coniferous trees is allowed (and even encouraged).
The dressing room is also necessarily insulated with foam plastic or mineral wool. Mineral wool is attached to the walls and ceiling using wooden slats, and foam plastic is attached to special fasteners.
Installation of the sheathing precedes the fastening of wooden panels. The panels are attached using ordinary nails or self-tapping screws.
Following the recommendations of professional specialists will make visiting the bathhouse truly useful and give a person true pleasure.
Find out more about the secrets of finishing a bath from the video below:
https://youtube.com/watch?v=h4vAQZkujAs
SAWDUST and cement or clay what to choose
Sawdust in the attic will be useful to retain heat. The ceiling pie can be covered with clay or cement, and it is important to choose something . , the ceiling insulation scheme looks effective .
It has the best viscosity and is superior in ease of application. However, lovers of traditional methods know the best way to insulate the ceiling. Naturally, we are talking about clay, although its superiority over cement at least in some respects has not been proven.
The characteristics of clay minerals that can be used as insulation materials are often discussed. For builders, the chemical composition and structural features of various types of artificial and natural clays are described.
Chemical structures are often considered complex because of their unfamiliar names, which are sometimes taken from the regions where they originate, although structurally only minor differences actually exist. Now in many countries the adsorption and aggregation properties of typical dyes in clays are compared.
The quality depends on the type and amount of metallic elements present in the clay, the amount of water adsorbed, and the structure of the organic matter. All of these factors are discussed in relation to insulation.
Briefly about the main thing
The choice of the type of insulation organization and the materials used should be based on the following main points:
- the established budget;
- bath area;
- structural features of the structure;
- planned frequency of use of the bathhouse.
By adhering to all the above recommendations, you can organize a functional and high-quality ceiling, which will reduce the cost of fuel for heating the room. And it will last for many years.
Ratings 0
How heat flows out of the steam room
There are three main options for heat loss for enclosed spaces:
- heat escapes with air that escapes from the space through possible cracks;
- heat loss through solid structures (including the ceiling) through transition from more heated (internal) layers to less heated (external) layers and further dissipation outward;
- penetration of heat waves through a barrier.
High-quality insulation of a bathhouse assumes that the rates of all of the listed types of leaks are reduced to a minimum.
Reliable insulation closes the path to leakage Source sdelaipotolok.com