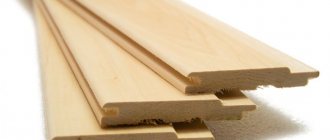
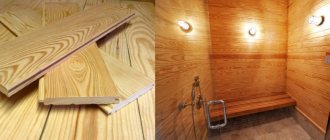
Lining differs from ordinary edged boards in the presence of longitudinal grooves. They provide a tight connection between the elements. The surface after finishing is smooth, without gaps and neat in appearance.
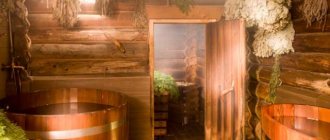
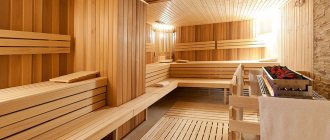
This is why lining a bathhouse with clapboard is becoming so popular. Wood material allows you to create a microclimate favorable for relaxation in the room. The installation process is simple and easy to learn on your own.
Users often search for:
- Bath shelves
- DIY bath floor
What to hammer in: nails, screws or staples?
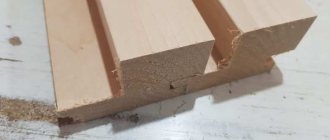
The lining itself is a board with a certain profile, which must have a tongue-and-groove locking connection. It is attached to the wall or ceiling using nails, screws or staples. The tools and material required to hammer in the lining in the bathhouse are as follows:
- nails, screws, staples;
- hammer, screwdriver, hardware gun;
- a mallet or a piece of clapboard for knocking a tenon into a groove;
- building level.
What nails should I take for the lining in the bathhouse? It is desirable that these are finishing nails 30-40 mm long, with an anti-corrosion coating . It’s worth taking coated screws (their length is the same, by the way). Regarding the length, you should proceed from the thickness of the board (if in a groove, then only the walls of the groove), plus you need to punch through the block to which the board is attached at least to the middle.
The staples should be the same size, although there are comrades who nail 14-mm staples with a construction stapler through a clamp, but this is rather an exception. To properly line a bathhouse with clapboard, it is better to use long staples and shoot them at an angle of 45 degrees (approximately).
Of course, it is tempting to wonder which of these methods is better . There cannot be a definite answer to this, because everything depends on the experience of a particular person. And if it is not there, then the easiest thing to do is to shoot the staples using a pneumatic gun. True, it is not cheap, and few people would agree to buy it for a one-time job. Other methods are a little more difficult to implement.
Material selection
Work begins after installation and testing of the functionality of all engineering systems. Before covering it is necessary:
- Determine the type and volume of materials;
- Make a list of necessary tools;
- Perform heat and vapor barrier;
- Install the sheathing.
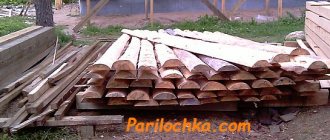
Previously, edged boards from various types of wood were used for interior cladding. The lack of necessary equipment and technology sharply reduced the range and quality of manufactured products. New production technologies have made it possible to increase the range and quality of modern lumber.
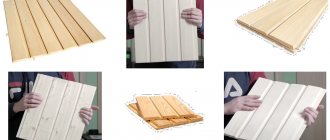
The main material for covering modern bathhouses is lining. The lining is a thin edged board with a special profile.
This is interesting. The name of the paneling comes from the thin wooden strips that were used to cover railroad cars.
The difference between lining and edged boards is the presence of recesses (grooves) and protrusions (tenks) along the long side. These elements ensure a tight connection of the panels during installation.
The widespread introduction of lining as a finishing material is facilitated by:
- Increased thermal insulation;
- Durability of the material;
- High installation speed;
- Ease of maintenance and repair;
- Beautiful exterior design.
How to mount: with or without clamps?
In another article, we even held a vote to find out how many fans the claimers will have and how many opponents there will be. Here we will simply list the reasons why those same clamps were invented.
The fact is that dry wood (and it is best to use dry wood in construction and finishing) easily splits if a point force is applied to it. Which is exactly what happens when you drive nails or screw screws through a groove in a board. Quite often the bar breaks.
This can be completely avoided if you do not punch through the plank at all, but use a clamp - a metal “claw” that fixes the plank to the sheathing bar. Hidden installation is greatly simplified when you only need to nail the clamp with a nail, screw or staple through convenient holes.
There are practically no disadvantages to clamps if they themselves are made of high-quality metal and have a coating that protects them from rusting.
ATTENTION! The clamps are selected according to the thickness of the groove and it is advisable to take ones that you cannot crumple in your fingers, like a sheet of tin - the harder the metal, the better.
How to line a bathhouse with clapboard using clamps is shown in the following video:
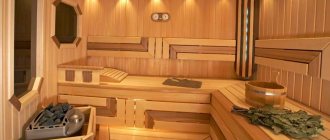
Why Eurolining?
Of all modern lumber, eurolining is best suited for interior cladding of saunas. Its distinctive features and advantages include:
- High grade of wood;
- Increased thickness and width;
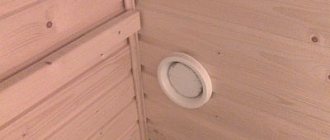
- Ventilation grooves on the back side help remove excess moisture.
- The dimensions of the tongue-and-groove locks are increased to prevent the board from drying out.
In order to save money and ease of installation, it is recommended to use boards up to 1.5 m to cover a bathhouse with eurolining yourself. Its cost is significantly lower than that of lamellas 2 m and higher; finishing with lining of such a height is inconvenient and difficult.
How to lay: horizontally or vertically?
Unfortunately, when choosing a method for cladding the inside of a bathhouse, we cannot be guided only by aesthetics. More precisely, not so: aesthetics can be the basis of choice only in a dry room , for example, in a rest room or dressing room.
If you decide to use it to decorate wet rooms (steam rooms and washing rooms), then it is better to focus on a method that minimizes future losses . By “losses” we mean possible damage to the planks from moisture, which will require their replacement.
So, what happens when the installation of lining in a bathhouse is carried out vertically? In a humid room, humidity is distributed unevenly - after all, gravity drives it towards the floor. As a result, each (!) plank also gets wet unevenly.
When it dries, this can lead to cracking, but more often, over a long period of time, problems accumulate at the bottom - somewhere there is not very good ventilation, for example, and in this place the water stagnates. Therefore, the planks begin to rot. And since we have them located vertically, the rotting area affects all the planks.
This is what’s inconvenient - in order to dismantle and replace damaged areas, you will have to cut (not replace the whole thing!), and then replace each piece. The cost of time and effort is especially clearly visible if we compare the situation with the horizontal upholstery of a bathhouse with clapboard - in this case , several strips are replaced entirely, which does not cause any special problems in dismantling and installation.
The only disadvantage of horizontal cladding of a bathhouse from the inside with clapboard can be considered a visual reduction in the height of the sheathed room, and in the bathhouse, as you know, the ceilings are already low. Therefore, as an option, you can combine both methods using the horizontal one at the bottom.
Installation
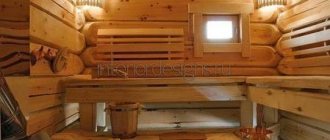
The casing of a sauna or bathhouse involves installing the lining using two fastening methods: vertically or horizontally. Horizontal fastening is carried out by laying lamellas, which are located parallel to the floor, and vertically - perpendicular. The horizontal method is more often used in practice, when installation is carried out with a tenon located at the top, and the groove of the next rail is put on the tenon of the previous one. This method is advantageous in that in case of persistent contamination, replacing panels is much easier than with vertical installation. As a rule, the horizontal method is used in Russian baths, where the steam is wet. The vertical method is suitable for Finnish saunas with dry steam.
Fastening is carried out:
- through connection with self-tapping screws or nails;
- hidden on screws or nails;
- on clamps (hidden).
The hidden fastening option is preferable, as it eliminates burns when touched during the steam room.
How to sheathe a steam room correctly
If the argument regarding horizontal laying is accepted, then this is one of the main points on how to properly line a steam room in a bathhouse with clapboard.
Because the rest concerns only the issues of preventing such expansion of wood , which will lead to a violation of the geometry of the wall.
The easiest way would be to avoid swelling of the planks by using boards made of linden wood. Linden is a material that exhibits low expansion when moistened. That is why it is used for the manufacture of bath doors (as well as furniture) - the most sensitive to changes in dimensions.
It would also be worth leaving compensation gaps along the edges of the wall, covering them with decorative strips. These gaps could also serve as ventilation gaps if some distance is left between them and the covering strips.
In general, it’s surprising - in some cases the lining holds up perfectly even in the absence of any tricks for this, but in others it doesn’t just swell, but manages to pull out nails or screws and generally crumble. We believe that its behavior is influenced by the extent to which the tree was dried at the harvesting stage , and the type of wood , of course, too.
Covering saunas and baths - is there a difference?
Since we have repeatedly mentioned on this site that the Finnish and Russian baths differ from each other in temperature and humidity, and also require specific conditions that create their inherent combination of temperature and humidity, it is logical to extend this to the clapboard cladding of saunas and baths.
But the answer will still be negative. The only difference is that followers of the Russian tradition can use coniferous species in the steam room with less caution, because the Russian bath does not like high temperatures. Well, at least you won’t get burned by the resin if it decides to leak